Table of Contents
Advertisement
adlonco@hotmail.com
W1608-32
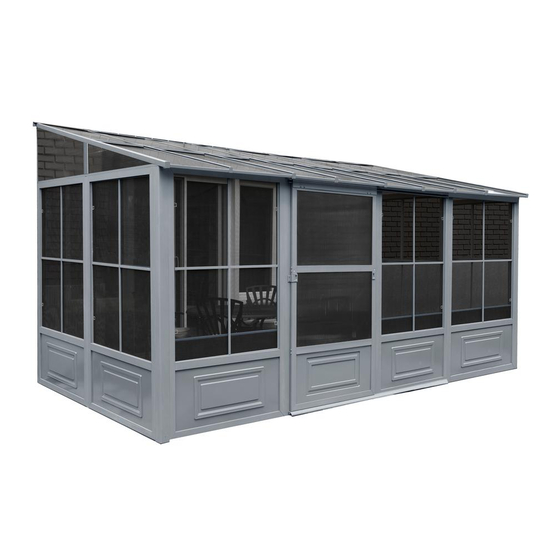
8 X 16 SOLARIUM
Assembly INSTRUCTIONS
Two or more adults required for assembly
Requires 96" clearance at the wall
Base Dimensions 190''x 94 1/2'', Largest Dimensions 190''x98 1/2'' (see pg.14)
ZZZ-188.W1608-32.1127-15.GP.EN.HER.doc
HER-HP
1
Advertisement
Table of Contents

Related Manuals for Gazebo penguin W1608-32


Summary of Contents for Gazebo penguin W1608-32
- Page 1 W1608-32 8 X 16 SOLARIUM ASSEMBLY INSTRUCTIONS Two or more adults required for assembly Requires 96” clearance at the wall Base Dimensions 190’’x 94 1/2’’, Largest Dimensions 190’’x98 1/2’’ (see pg.14) ZZZ-188.W1608-32.1127-15.GP.EN.HER.doc HER-HP...
- Page 2 Next, slide three (3) Yy-3 and one (1) Zz-3 from left side to right on top of the frame. The groove should be towards the interior of the unit. Repeat from right side and space evenly. ZZZ-188.W1608-32.1127-15.GP.EN.HER.doc HER-HP...
- Page 3 P-3 joint and one (1) Ss-3 panel, then do the right side with one (1) Tt-3 panel, one (1) Q-3 joint and one (1) Uu-3 panel over the J-3 horizontal panel. Secure P-3 and Q-3 to I-3 and J-3 respectively with self-tapping screws (PQ-3). ZZZ-188.W1608-32.1127-15.GP.EN.HER.doc HER-HP...
- Page 4 Set U-3 rafters over the middle of each panel with Bb-3 screws at the top and two (2) Z-3 screws over the brackets on frame manually. Set U-3 rafter on each joint screws manually. Do not use power drill. ZZZ-188.W1608-32.1127-15.GP.EN.HER.doc HER-HP...
- Page 5 Make sure the panels are inside the aluminum middle roof joint groove. Insert a V-3 at either end, then insert all W-3 and then the remaining V-3. Tap gently with rubber mallet if needed. ZZZ-188.W1608-32.1127-15.GP.EN.HER.doc HER-HP...
- Page 6 STEP #10 Starting at either end, add X-3 edging and one (1) R-3 bracket and screw with Bb-3 manually, do not use power drill. Add Y-3 edging and repeat until you reach the end, then add the X-3 edging. ZZZ-188.W1608-32.1127-15.GP.EN.HER.doc HER-HP...
- Page 7 Use bolt Bb-3 to affix the plastic stopper H-3 on each end of top door rail F-3. Use Oo-3 screws to affix upper door rail and cap Nn-3, at each end of top rail door. ZZZ-188.W1608-32.1127-15.GP.EN.HER.doc HER-HP...
- Page 8 (Ww) and washers (Gg-3) on the inside and female bolts (Cc-3-2) on the outside for the top assembly. See diagram below. Attach lower track with bolts (Cc-3) and washers (Gg-3). Set up door latch on the side required for your door to lock, adjust latch as required. ZZZ-188.W1608-32.1127-15.GP.EN.HER.doc HER-HP...
- Page 9 Use only mild or warm soapy water, no strong or abrasive cleaning products. Be sure to remove heavy snow and/or ice. WARNING: 1) Do not use BBQ or any other flammable product inside the solarium. 2) Remove snow from the roof. ZZZ-188.W1608-32.1127-15.GP.EN.HER.doc HER-HP...
- Page 10 BOTTOM DOOR PLASTIC RAIL STOPPER 10-500-32 10-501-32 LEFT SIDE RIGHT SIDE RECEIVER RECEIVER 10-502-32 10-532-32 CORNER TRACK CONNECTOR ML-3 10-533-32 10-505-32 TRACK TRACK JOINT MR-3 10-506-32 10-507-32 RAFTER LEFT GABLE BRACKET JOINT 10-508-32 10-509-32 RIGHT GABLE ROOF RAFTER JOINT ZZZ-188.W1608-32.1127-15.GP.EN.HER.doc HER-HP...
- Page 11 08-161-32 BOLT BOLT Bb-3 Cc-3 08-165-32 12-037-32 RIGHT DOOR FEMALE BOLT LATCH Cc-3-2 Dd-R-3 08-169-32 08-167-32 LEFT DOOR SCREW LATCH Ee-3 Dd-L-3 08-168-32 08-187 BOLT WASHER Ff-3 Gg-3 10-517-32 08-193 END ROOF PLASTIC PLUG CROSS BAR Ii-3 Jj-3 ZZZ-188.W1608-32.1127-15.GP.EN.HER.doc HER-HP...
- Page 12 RIGHT FRONT LEFT WALL GABLE PANEL GUIDE Uu-3 Vv-3 10-528-32 10-529 RIGHT WALL SCREW FOR GUIDE FIXING TO Ww-3 WALL Xx-3 10-530-32 10-531-32 REGULAR TOP END TOP FILLER FILLER Yy-3 Zz-3 13-045 12-047-32 SELF-TAPPING BOLT SCREW (M5*15mm) PQ-3 ZZZ-188.W1608-32.1127-15.GP.EN.HER.doc HER-HP...
- Page 13 PANEL (for doors) WINDOW 15-123-32 15-097-32 PIN FOR PVC DOOR WHEEL WINDOW ASSEMBLY 10-458 13-055 REPLACEMENT PC WINDOW (for WEATHERSTRIP sliding door) 124” 12-174-32 15-126-32 MOSQUITO MOUNTING SCREEN (in BRACKET FOR frame) RAFTER (U-3) 85-014 REPLACEMENT SCREENING (no frame) ZZZ-188.W1608-32.1127-15.GP.EN.HER.doc HER-HP...
- Page 14 ZZZ-188.W1608-32.1127-15.GP.EN.HER.doc HER-HP...
- Page 15 Warranty set forth below, it is warranted to be free of material and manufacturing defects for a period of one year from the date of purchase. Should the product become damaged, or the warranty period has expired, please contact Gazebo Penguin Customer Service Department for a complete schedule of replacement parts and prices.
Need help?
Do you have a question about the W1608-32 and is the answer not in the manual?
Questions and answers