Advertisement
Quick Links
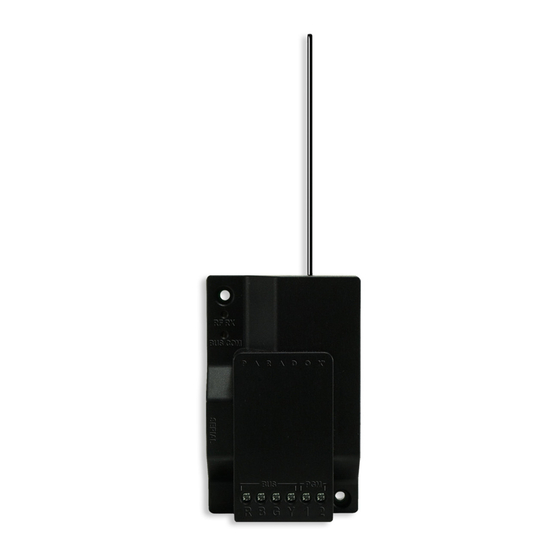
RX1: Wireless Receiver
V1.0
Description
The RX1 Wireless Receiver
adds wireless receiving
capability to the E55 and SP
Series panels (V5.0 and
higher). Adding the RX1 to an
installation allows for the use
of REM1/RAC1 remotes as
well as wireless one-way zone
transmitters (SP Series only)
with the system.
1
2
3
4
5
Specifications
Power input voltage:
12Vdc
Frequency:
433MHz or 868MHz
Sensitivity:
-110dBm (433MHz) or -106dBm (868MHz)
Current consumption:
25mA
Dimensions (no antenna):
5.1cm x 8.3cm x 2cm (2in x 3.25in x 0.78in)
Operating temperature:
0ºC to 50ºC (32ºF to 122ºF)
PGM outputs:
PGM1 and PGM2 - via PGM 13 and 14 of panel
Compatibility:
• E55 / SP Series control panels V5.0 and higher
• REM1 / RAC1 remote controls
• DCT10 / DCTXP2 / DCT2 door contacts (SP Series only)
• PMD1P / PMD75 / PMD85 motion detectors (SP Series only)
• SD738 smoke detector (SP Series only)
Antenna:
Monopole antenna; Error correction algorithm
Features
• Up to 32 remote controls
• Up to 32 wireless zones (SP Series only)
• 2 PGM outputs follow buttons 1 and 2 on
REM1/RAC1 (also programmable
through control panel)
• 4-wire bus connection
• Feedback LEDs (Bus / RX)
• In-field firmware upgradable
• Compact design
• RF jamming supervision
• Low battery, tamper and check-in
supervision
• Transmitter signal strength display
6
Overview
1. Mounting holes
2. RF RX LED
3. Bus communication LED
4. Serial connection
5. Bus connection
6. Antenna
7. PGM connection
1
7
Location
The location of the RX1 affects its performance. In order to ensure the best
possible signal reception, the following list of location criteria should be
respected:
• Select an installation site that is free of obstacles that reflect and absorb radio
frequency (RF) signals, as well as interference that may distort signals. Avoid
installation near or in the path of strong RF fields (e.g., neon lights,
computers), on or near metal objects, circuit breaker boxes, air conditioners,
or heating ducts since they may cause interference and reduce the module's
sensitivity.
• Mount the RX1 as high as possible.
• Avoid mounting the RX1 in the basement as the range of the module is
reduced when mounted below ground level. If it is absolutely necessary to
mount the module in the basement, mount the module as high and as close
to the underside of the first floor as possible.
Installation
Only one RX1 module can be connected to
an E55 or SP Series panel (V5.0 and higher).
To connect the RX1 to the control panel:
1. Straighten the RX1 antenna for maximum
reception.
2. Create a 4-wire bus connection to the
control panel, as shown.
3. If the current draw exceeds 150mA on
PGM1 or PGM2, use a relay.
To add a relay, connect the RX1's "R"
terminal to the relay's "RED" terminal.
Connect the PGM terminal (PGM1 or
PGM2) to the relay's BLK terminal.
LED Feedback
Legend
= On
G = Green
= Off
LED State
Condition
RF RX
G
Receiving RF signal
RF RX
G
RF jamming
BUS COM
G
Communicating on bus
BUS COM
No power / bus trouble*
*Possible causes: GRN/YEL short, GRN/YEL reverse, communication failure, too many modules, bus power too low
Bus
Control
panel
= Flashing
Advertisement

Related Manuals for Paradox RX1


Summary of Contents for Paradox RX1
-
Page 1: Specifications
• Mount the RX1 as high as possible. • Feedback LEDs (Bus / RX) well as wireless one-way zone • Avoid mounting the RX1 in the basement as the range of the module is • In-field firmware upgradable transmitters (SP Series only) reduced when mounted below ground level. - Page 2 Check-in supervision time 24 hours 80 minutes NOTE: Record the serial number of wireless modules to be used with the RX1. Onboard PGMs The RX1 includes two on-board PGMs which follow buttons 1 and 2 on REM1/ RAC1 remote controls. PGMs are also programmable and appear as PGMs 13 Warranty and 14 in the SP Series or E55 panel (V5.0 and higher).
Need help?
Do you have a question about the RX1 and is the answer not in the manual?
Questions and answers