Table of Contents
Advertisement
Advertisement
Table of Contents

Related Manuals for Hytera BD302


Summary of Contents for Hytera BD302
- Page 1 DIGITAL PORTABLE RADIO 数字手持终端 OWNER’S MANUAL 使用说明书...
- Page 2 Preface Thanks for your favor in our product. This manual provides guidance for you to use the product. To avoid body injury or property loss caused by misoperation, please carefully read the Safety Information Booklet before using the product. This manual is applicable to the following product: BD30X Digital Portable Radio (X may represent 2, 5, 6 or 8)
-
Page 3: Fcc Statement
If you have any suggestions or would like to learn more details, please visit our website at: http://www.hytera.com. Hytera is the trademark or registered trademark of Hytera Communications FCC Statement Corporation Limited (the Company) in PRC and/or other countries or areas. -
Page 4: Compliance With Rf Exposure Standards
Electronic Engineers (IEEE) C95. 1:2005; Canada RSS102 Issue from the antenna. Antenna should be kept away from eyes. 5 March 2015. When worn on the body, always place the radio in a Hytera’s approved ● Institute of Electrical and Electronic Engineers (IEEE) C95.1:2005 ●... - Page 5 obtain Canadian information on RF exposure and compliance Après examen de ce matériel aux conformité aux limites DAS et/ou aux limites d’intensité de champ RF, les utilisateurs peuvent sur l’exposition aux radiofréquences et la conformité and compliance d’acquérir les informations correspondantes This device complies with Industry Canada license-exempt RSS standard(s).
-
Page 6: Table Of Contents
Contents Items in the Package ----------------------------------------1 Care and Cleaning -------------------------------------------8 Product Overview --------------------------------------------2 Optional Accessories ---------------------------------------8 Product Controls ---------------------------------------------------2 LED Indication ------------------------------------------------------3 Before Use ------------------------------------------------------3 Attaching the Antenna --------------------------------------------3 Attaching the Battery ----------------------------------------------3 Attaching the Belt Clip --------------------------------------------4 Attaching the Audio Accessories -------------------------------4 Charging the Battery ----------------------------------------------4 Checking the Battery Power ------------------------------------4 Basic Operations ---------------------------------------------5... -
Page 7: Items In The Package
Items in the Package Please unpack carefully and check if all items listed below are received. If any item is missing or damaged, please contact your dealer. Quantity Quantity Item Item (PCS) (PCS) Radio Belt Clip Battery Strap Documentation Power Adapter Antenna The frequency band is marked on the label of antenna;... -
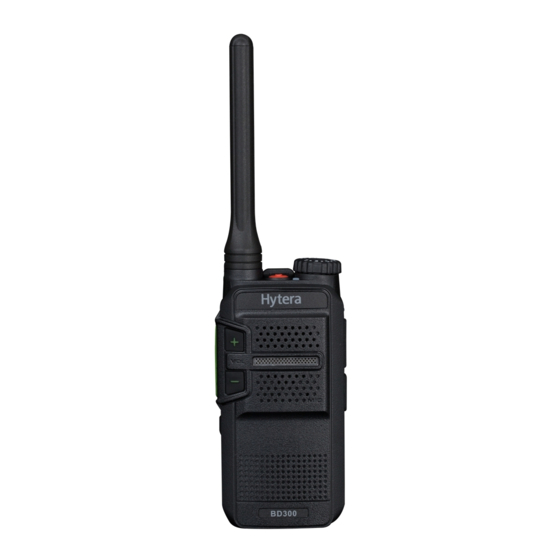
Page 8: Product Overview
Product Overview Product Controls Antenna LED Indicator Channel Selector Knob On-Off Key Charging Indicator Accessory Connector Push-to-Talk (PTT) Key Speaker Belt Clip Volume Up/Down Key Microphone Side Key (SK) Battery+Battery Cover Custom Marking Area Battery Latch For your convenience, you may request your dealer to program the SK as the shortcut to a radio feature. -
Page 9: Led Indication
Product Overview Before Use LED Indication Attaching the Antenna 1. Place the antenna in its receptacle. LED Indicator Radio Status 2. Rotate the antenna clockwise. Flashes green Being turned on. Glows green Receiving. Do not hold the radio by its antenna; otherwise, the Glows red Transmitting. -
Page 10: Attaching The Belt Clip
Before Use Attaching the Belt Clip Checking the Battery Power 1. Unfasten the two screws on the back of the radio. You can check the current battery power by holding down the Battery 2. Align the screw holes on the belt clip with those on the back of the Power Indicator key programmed by your dealer, and release the key to radio. -
Page 11: Basic Operations
Basic Operations Call Services Call on Digital Channel If you want to… Do this… On the digital channel, you can initiate or respond to a group call or Turn on/off the radio Press the On-Off key. private call. A group call is a call from an individual user to a group of Increase the volume Press the Volume Up key. -
Page 12: Optional Features
Optional Features The following features need to be programmed by your dealer. Please One Touch Allows you to press one key to call the Call predefined private or group contact. contact your dealer for detailed operations. Allows you to initiate a call to all users Type Feature Description... -
Page 13: Troubleshooting
Troubleshooting Phenomena Analysis Solution The battery may be installed improperly. Remove and reattach the battery. The battery power may run out. Recharge or replace the battery. The radio cannot be The battery may suffer from poor contact caused by dirtied or turned on. -
Page 14: Care And Cleaning
Care and Cleaning Optional Accessories To guarantee optimal performance as well as a long service life of the Contact your local dealer for the optional accessories of the product. product, please follow the tips below. Use the accessories specified by the Company only; Product Care otherwise, the Company shall not be liable for any Do not pierce or scrape the product. - Page 15 Hytera Communications Corporation Limited. 2016 Hytera Communications Corporation Limited. All Rights Reserved. Address: Hytera Tower, Hi-Tech Industrial Park North, 9108# Beihuan Road, Nanshan District, Shenzhen, People's Republic of China Postcode: 518057 http:// www.hytera.com 是海能达通信股份有限公司的注册商标或商标...
Need help?
Do you have a question about the BD302 and is the answer not in the manual?
Questions and answers