Table of Contents
Advertisement
Advertisement
Table of Contents

Related Manuals for HP Chromebox


Summary of Contents for HP Chromebox
- Page 1 User Guide...
- Page 2 HP products and services are be bound by the terms of the HP End User set forth in the express warranty statements License Agreement (EULA). If you do not accompanying such products and services.
- Page 3 Safety warning notice WARNING! To reduce the possibility of heat-related injuries or of overheating the computer, do not place the computer directly on your lap or obstruct the computer air vents. Use the computer only on a hard, flat surface. Do not allow another hard surface, such as an adjoining optional printer, or a soft surface, such as pillows or rugs or clothing, to block airflow.
- Page 4 Safety warning notice...
-
Page 5: Table Of Contents
Table of contents 1 Getting to know your Chromebox ........................1 Left side ..............................1 Front ..............................2 Rear ..............................2 Bottom ..............................4 Labels ..............................5 2 Using an optional keyboard and mouse ......................6 Using the action keys ........................... 6 3 Using your Chromebox ............................. -
Page 7: Getting To Know Your Chromebox
Using this button in conjunction with the Power button will result in all account information and data stored on your Chromebox, such as photos, downloaded files, and saved networks, being deleted. Saving files to a external hard drive, USB stick, or cloud storage is recommended for this reason. -
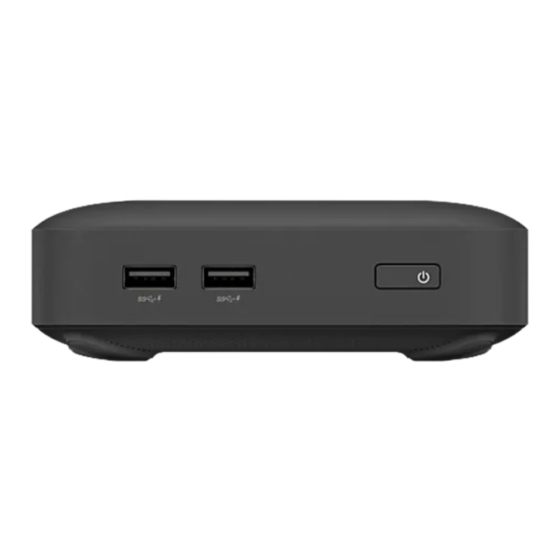
Page 8: Front
MP3 players, even when the device is off. Power button/Power light When the Chromebox is off, press the button to turn ● on the device. A white light indicates that the unit is on. The light will be off, if the unit is off, or in standby mode. - Page 9 Your device will attempt to preserve your work in the event of a power event. If you experience a power outage, or accidentally unplug your device, your Chromebox will automatically restart when power is restored. RJ-45 (network) jack Connects a network cable.
-
Page 10: Bottom
Enable airflow to cool internal components. NOTE: The device fan starts up automatically to cool internal components and prevent overheating. It is normal for the internal fan to cycle on and off during routine operation. Chapter 1 Getting to know your Chromebox... -
Page 11: Labels
All labels described in this section will be affixed to the bottom of the device. For help finding these locations, refer to Getting to know your Chromebox on page 1 Service label—The label affixed to the bottom of your device provides important information to ●... -
Page 12: Using An Optional Keyboard And Mouse
The keyboard also allows you to use action keys and hot keys to perform specific functions. TIP: HP recommends using a Chrome-compatible keyboard with your device. Keyboards not compatible with Chrome may not offer the same action key functionality. To find a Chrome- compatible keyboard, go to www.hp.com. - Page 13 Increases speaker volume incrementally as long as you hold down the key, and restores sound from mute. Power When the device is off, press the button to turn on the Chromebox. A white light ● button indicates that the unit is on. The light will be off, if the unit is off, or in standby mode.
-
Page 14: Using Your Chromebox
To get the most out of your Chromebox, use one of the video ports on the device to connect an external monitor, projector, or TV. Your device has both a high-definition multimedia interface (HDMI) port, which allows you to connect a high-definition monitor or TV, and a DisplayPort interface, for connecting to a DisplayPort compatible device. -
Page 15: Connecting A Digital Display Device
The DisplayPort delivers higher performance than a VGA external monitor port and improves digital connectivity. Connect one end of the DisplayPort cable to the DisplayPort on the Chromebox. Connect the other end of the cable to the digital display device. -
Page 16: Connecting To Your Wireless Network
WOL will be reset to its default setting (WOL-enabled) after a system reboot. Managing apps You can expand the productivity and entertainment capabilities of your Chromebox with free or purchased apps that can be downloaded directly to your device. Chapter 3 Using your Chromebox... - Page 17 To find and install apps, visit the Chrome webstore at https://chrome.google.com/webstore/user/ purchases#user/purchases. Using the store requires a Google account, but the store will maintain a list of every app you have ever installed, even if you’ve uninstalled them. This way, you’ll never lose an app due to reformatting the operating system.
-
Page 18: Securing Your Chromebox And Information
Google Drive as your file save location. Recovering your Chromebox If you wish to give your Chromebox to someone else, reset owner permissions, or are having problems with your account profile, you can clear all local user data by resetting your device. -
Page 19: Using An Optional Security Cable Lock
The security cable slot on your Chromebox may look slightly different from the illustration in this section. For the location of the security cable slot on your device, see... -
Page 20: More Hp Resources
More HP resources Setup Instructions You have already used to turn on the Chromebox and locate this guide. To locate product details, how-to information, and more, use this table. Resource Contents Setup Poster Overview of device setup and features. ●... -
Page 21: Electrostatic Discharge
Electrostatic Discharge Electrostatic discharge is the release of static electricity when two objects come into contact—for example, the shock you receive when you walk across the carpet and touch a metal door knob. A discharge of static electricity from fingers or other electrostatic conductors may damage electronic components. -
Page 22: Index
Index speakers, connecting 8 action keys 6, 7 jack apps audio-in (microphone) 3 traveling with the device 5 managing apps 10 audio-out (headphone) 3 audio-in (microphone) jack 3 audio-out (headphone) jack 3 USB 3.0 ports, charging, labels 5 identifying 2 regulatory 5 USB 3.0 ports, identifying 3 Back 6...
Need help?
Do you have a question about the Chromebox and is the answer not in the manual?
Questions and answers