Table of Contents
Advertisement
TJ UV Printer User Manual Confidential
Thanks for purchase our TEC TJ UV printers, this user manual will guide your the installation, using and maintain of TJ
digital flatbed printer , Please make sure you had read and full understand this manual before your installation and using. Please
keep this manual well for your reference in emergency, Thanks for your cooperation again.
TJ USER MANUAL
DIGITAL FLATBED PRINTER
DIGITAL UV PRINTER
Advertisement
Table of Contents

Related Manuals for TEC tecjet 6090uv-xp600


Summary of Contents for TEC tecjet 6090uv-xp600
- Page 1 TJ UV Printer User Manual Confidential Thanks for purchase our TEC TJ UV printers, this user manual will guide your the installation, using and maintain of TJ digital flatbed printer , Please make sure you had read and full understand this manual before your installation and using. Please keep this manual well for your reference in emergency, Thanks for your cooperation again.
-
Page 2: Chapter 1 Introduction
TJ UV Printer User Manual Index Chapter 1 Introduction 1.1 Customer Care ......... 3 1.2 Safe Information . -
Page 3: Customer Care
All rights reserved. Reproduction, adaptation, or translation of this manual is prohibited without prior written permission of TEC , except as allowed under the copyright laws. No part of this document may be photocopied, reproduced, or translated to another language without the prior written consent of TEC 1 .... - Page 4 TJ UV Printer User Manual Choosing a Right Place to Put Printer Precluding place printer in somewhere temperature and humidity are changeable. Likewise, the sun penetrating directly, strong light or heat. Strong light may influence the sensor of printer’s normally work.
- Page 5 TJ UV Printer User Manual Chapter 2 Before Installing the Printer 2. 1 Accessories Details and the Use Accessories Details Serial Model Name Amount Description Power Cord Connect printer and outlet USB Cable Connect printer and computer CD Driver Driver of this machine User’s Guideline of using this Guide...
-
Page 6: Front View
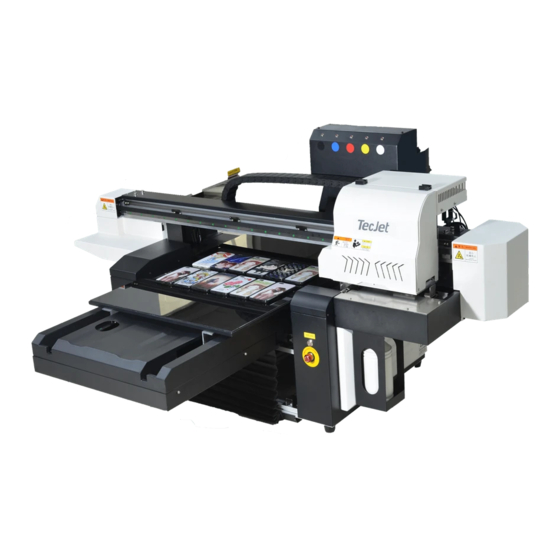
TJ UV Printer User Manual 2.2. Front view: Ink tank Carriage Right limit Carriage belt detect metal Ink level detect light Flatbed UV controller Flatbed ball screw General power switch White ink level detect light 2.3. Right side Rotary device Emergency button connection port USB Cable... - Page 7 TJ UV Printer User Manual 2.4. Flatbed Flatbed linear rail Flatbed ball Flatbed motor belt screw TJ designed with 2 flatbed. The top flatbed and bottom flatbed for printing with different thickness media, it can print on 40cm thickness media. So put the both flatbed if the media thickness is small than 15cm, and take out the top flatbed if media thickness is over 35cm.
- Page 8 TJ UV Printer User Manual 2.6. Home station: Wiper Flash waste ink dish Cleaning cap Waste ink tube Wiper switch Print head Cleaning pump 2.7. Carriage: White ink print head UV lamp power Ink color label cable UV lamp water Color ink print Circulation tube head cable...
-
Page 9: Ink Tank
TJ UV Printer User Manual 2.8. Ink tank Lack ink alarm light, the light will on when the ink tank don’t have enough ink Ink tank color label Ink refill hole Ink level sensor cable Ink pre-dust cover with sensor inside tank Ink color mark... - Page 10 TJ UV Printer User Manual 2.9. Sensors: X axis encoder fim sensor ( The encoder film must at the middle senor without scratch the both side if the sensor!) Transparent encoder film Right motion limit sensor Right motion limit sensor detector Backward limit sensor Forward limit sensor...
- Page 11 TJ UV Printer User Manual 2.10. Electronic system: Mainboard: Rotary device Flatbed motor /Rotary Carriage motor signal Combo function port motor driver device motor signal cable cable 24V, 42V power port Working status digit Receiver optical code cable from Carriage printing board with TX cable...
- Page 12 TJ UV Printer User Manual SAF: White ink circulation pump signal cable Y: Wiper motion signal cable K: UV light on/off signal cable LY: Head cleaning pump 1 signal cable LM: Head cleaning pump 2 signal cable GND: DC24V- cable Power port: 42V+ 24V+...
-
Page 13: Carriage Board
TJ UV Printer User Manual Carriage board: DC42V power port Encoder sensor port Home limit sensor 42V+ TX Sender optical port 42V+ cable from mainboard with RX Working status digit code RX Receiver optical cable from mainboard with White ink Print head Color ink Print head cable port cable port J6 Port connect with Print... -
Page 14: Power Supply System
TJ UV Printer User Manual Power supply system: power power supply box supply box 2.11. Motor Carriage motor Flatbed backward/ Forward motor Flatbed up/down motor... - Page 15 TJ UV Printer User Manual Rotary device motor driver Rotary device motor Rotary device / flatbed Rotary device transit relay switch 2.12. UV system: AC220V cable OUT cooling water tube port IN cooling UV lamp water tube port power cable UV on/off switch Cooling fan sensor...
- Page 16 TJ UV Printer User Manual UV controller power switch UV controller working temperature curing power adjust knob UV lamp power cable Water cooling circulation tube UV curing lamp (Carriage)
- Page 17 Make sure the ground wire is well connected to avoid the leakage of electricity. Please ask TEC support team to be sure your printer is 110V or 220V, it will damage printer if load wrong voltage! ( Fig.1 )...
- Page 18 TJ UV Printer User Manual 3.2. Install the print head to the machine. 1. Power off the machine, be sure the flatbed is free without anything leave on the flatbed. 2. Connect the print head cable to the left two port of the carriage as show as the following picture. Please pay attention to the correct connection side! 3.
- Page 19 TJ UV Printer User Manual 5. Then check if the Digit code of the carriage show Carriage board working correct status digit light 6. Power off the machine! Must power off!, or it will short the print head! 7. After power off the machine, then Connect the print head cable to the print head. Please pay attention to the DOWN, UP mark on the carriage board, the DOWN cable must connect with the down side of the print head.
- Page 20 TJ UV Printer User Manual 8., Install the two print head transit cable as following:, DX7 print head need this transit cable, if install with DX5 will no need this transit board, please pay attention to the mark on the transit board with UP/DOWN, conect at same port mark on carriage board with UP/DOWN mark.
- Page 21 TJ UV Printer User Manual Color ink print head White ink print head 8. Then put the print head to the carriage bottom plate, locat the print head by the 3 screws as following:...
- Page 22 TJ UV Printer User Manual 3.3. Install the ink damper to the print head. 1. Hold the ink damper with correct way, must take the ink damper by the front and back side, do not take the ink damper by the left and right side.
- Page 23 TJ UV Printer User Manual 4 white ink damper KCMY color ink damper...
- Page 24 TJ UV Printer User Manual 3.4. Adjust the cap station The cap station must conect well with the print head bottom surface to suck the ink out from the ink damper and print head during load ink and print head cleaning at the next chapter. 1.
- Page 25 TJ UV Printer User Manual 3.5. Install the UV system: 1. Fill 2/3 of the water to the UV controller water tank for supply the water circulation cooling system, then close the cover: 2. Connect the two water tube to the UV controller which named IN/OUT: 3.
-
Page 26: Install The Rip Software
TJ UV Printer User Manual Chapter 4. Install the software (Must install under computer system as WIN7/VISTA/XP!) 1. Install the compat driver Open the compat runtime folder and install the compat driver named VCX86Runtime.exe Then click FINISH to finish the installation. 2. - Page 27 TJ UV Printer User Manual 1. Install the RIP software driver first: 2. Click finish to finish the RIP driver installation 3.Install the RIP software Find out the folder named “UltraPrint” then unzip the folder and runing the file named “UltraPrint.exe” for using.
- Page 28 TJ UV Printer User Manual 4. Install the control system software. 1. Insert the USB key of the control system to your computer 2. Unzip the “TJ control sys” then running the “WellPrintExp.exe” for using...
- Page 29 TJ UV Printer User Manual Chapter 5. Power on machine As TJ support print by flatbed and rotary two motion method, so different printing method use different power on way, if print by flatbed way, then the rotary device will not working, and if print by rotary device, then the flatbed will not working. 5.1 Power on for print by flatbed motion way 1.
- Page 30 TJ UV Printer User Manual 5. Carriage start move to the right end to get detect by the right limit sensor, then stop. 6. Open the control system, choose the CFG file 1EPSON-8H4C- SINGLE-HEAD.CFG vthat matched with your printer, Then click OK to open the software.
- Page 31 TJ UV Printer User Manual 9. Printer carriage will move 1-2cm far away from the cap station then stop: 10. Printer power on succeed.
- Page 32 TJ UV Printer User Manual 5.2. Power on for print by rotary device way 1. Power on the machine by flatbed way as chapter 5.1. then go to the Control software/Maintainance/Platform control/Control/Press down button to make the flatbed move down to get enough space for put the rotary device on the flatbed. 2.
- Page 33 TJ UV Printer User Manual Adjust Y axis: Adjust the top point with the same line of the middle of the print head. Then adjust the Y axis keep the same edge of the flatbed, Adjust Z axis: Press the flatbed up button to adjust the gap between the media and print head between 3-5mm Middle of print head TOP of...
- Page 34 TJ UV Printer User Manual 5. Power on the General power switch 6. Press up the rotary device button to transit the motor motion signal to rotary device. (If the rotary device start moving, then no need press) 7. Press the emergency button up to release the rotary motion power. (If the rotary device start moving, then no need press)
- Page 35 TJ UV Printer User Manual 8. Carriage start move to the right end to get detect by the right limit sensor, then stop. 9. Connect the USB key to the computer. 10. Open the control system, choose the CFG file that name“3EPSON_8H4C-ROTARY”, Then click OK to open the software. 11.
- Page 36 TJ UV Printer User Manual 13. Printer carriage will move 1-2cm far away from the cap station then stop: 14. Printer power on succeed.
- Page 37 TJ UV Printer User Manual Chapter 6. Fill ink. 6.1 Fill ink to the ink tank 1. Open the ink tank cover, Fill the ink to the ink tank according to the ink mark at the ink tank by the funnel, different ink fill with one new funnel.
- Page 38 TJ UV Printer User Manual 6.2 Load ink to the ink damper Hold the both rear side of the ink damper , then connect the ink damper with the injection, pull out 5ml ink per each ink damper, then connect back to to the print head. Please holder the ink damper with correct way: ×...
- Page 39 TJ UV Printer User Manual 6.3 Load ink to the print head. Open the control software, choose the CFG file that you want, 1EPSON-8H4C-SINGLE-HEAD.CFG: Used for print with only one print head and print with color ink and white ink both 2EPSON-KCMY+W-TWO-HEAD.CFG: Used for print with two print head, one print head for white ink and another head for color ink.
- Page 40 TJ UV Printer User Manual 3. Install the waster ink bottle to the machine under the cap station and fasten it, then connect the waste ink tube to the waste ink bottle. 4. Power on the machine, then the printer will start self-testing 5.
- Page 41 TJ UV Printer User Manual 5. Then open Parameters/functions/heads/load ink, Then the ink will fill to the print head by the clean pump from all ink damper. 6. Put a white paper on the flatbed to do a nozzle check of the print head. Go to the software/TEST/head status, and if you put white ink to printer, just do the nozzle check again at the black flatbed table directly(click on white ink print), if the...
- Page 42 TJ UV Printer User Manual Bad color ink nozzle check Bad white ink nozzle check Good nozzle for printing 7. Be sure you can get a good nozzle check for white ink and color ink printing, if can not, just load the ink again and do the strong cleaning from software.
- Page 43 TJ UV Printer User Manual Chapter 7. Printer calibration adjustment 7.1 Calibrate the X motor gear ratio: 1. Power on the machine, be sure the machine is powered by flatbed way, please refer to chapter 5.1 2. Open the control software, choose by 1EPSON-8H4C-FLATBED.CFG to running the software (rotary cfg no need adjust), to wait for the software show as ready and printer connect HIGH:...
- Page 44 TJ UV Printer User Manual 3. Go to Maintainance/Motion setting/X-motor configuration/Move/200mm ( the number can not bigger than 500mm, as the TJ max. X printing width is 600mm. ) 4., Then carriage will start move from home position to left for a certain distance then stop, press the REPOSITION button when carriage stop move.
- Page 45 TJ UV Printer User Manual 7.2 Calibrate the Y motor gear ratio: 1. Press feed button to move the flatbed to the front and wait it automatic stop: 2. Then we measure the size between the flatbed edge and machine front body cover edge, for example now is86.4cm 86.4cm 86.4cm 3.
- Page 46 TJ UV Printer User Manual 4. Then the top printer will move from front to a certain distance then stop. 5. Then measure the size between the flatbed edge and printer front cover again as following: 56.1cm...
- Page 47 TJ UV Printer User Manual 56.1cm 6.. So the distance that when we put 303 at the software and the flatbed moved is 864-561=303mm, then the 1mm=? pulse flatbed motion gear ratio will changed autmatically, then we put the minus number to the software and press APPLY to save the setting. Flatbed gear ratio 7.3.
- Page 48 TJ UV Printer User Manual (Good vertical test printing) (bad vertical test printing) 2..Then we need to adjust the print head by manual, the left white ink print head no need adjust, we take the left white ink print head as standard to adjust the right color ink print head, first, must loosen the screws of the print head panel that lock the print head, no need remove out, just loosen it is ok.
- Page 49 TJ UV Printer User Manual 4.. After adjust, then print the vertical check printing again, be sure the print head is vertical , if not, just do as above step again. 5.After we get a good vertical test printing result, then we fasten back all print head screws and print head palet screws.
- Page 50 TJ UV Printer User Manual 7.4. Calibrate the Bi-direction calibration: 1. Put a new white paper on the flatbed, Go to control software/maintainance/Bias calibration/180dpi/slow/, then click Print. 2.Check the printing result, be sure the 0 is best squares, if 0 is not squares, just find out the number that with squares, the number left yard 0 is plus, right yard 0 is minus: -24 is best squares...
- Page 51 TJ UV Printer User Manual 4..Then click Print again to check if 0 is most squares, if 0 still not most squres, then need to do the step as following again. 5.. Do the calibration for 180dpi middle/fast speed as the same way. 6..
- Page 52 TJ UV Printer User Manual + (+8) 4. Then click print again to check the revised result. Be sure the 0 number is most accrossed, if not, just do as above again. 0 is most across 5. Do the calibration for other pass model by the same way as above.
- Page 53 TJ UV Printer User Manual Chapter 8.. Printing 7.1. Process the normal printing job from Photoshop: 1.. remove the background base if no need print white ink at the background, keep it as transparent base and adjust the color model by CMYK, then save as .tiff format. 7.2.
- Page 54 TJ UV Printer User Manual 2..Choose Filter/Stylize/Find edges 2. Click Chanel,(Beside the layer option)
- Page 55 TJ UV Printer User Manual 3. Select the color chanel that you want to make the embosed result : Press Ctrl at the computer, and one color of CMYK that you want do the embossed result. For example take Cyan for make the embossed result, just press Ctrl and click Cyan layer. 4..Click the create new chanel button to create a new color chanel: 4.
- Page 56 TJ UV Printer User Manual 5.. Then Press Ctrl+Delete for more than 10times to filling with black color to the alpha1layer: 6.. Right click the Alpha1 layer, choose Spot color, density 100%...
- Page 57 TJ UV Printer User Manual 7.. Click on all chanel switch: 8..Go back to the Layer, switch off the copy layer: 9..Save the file to local with named embossed file.png 10.File processed for embossed texture printing finished. Then printer will detect the spot color to print with white for get a thicker layer to catch the embossed result.
- Page 58 TJ UV Printer User Manual 7.3. Process the job from UltraRIP: 1.. Open the UltraPrint RIP software/file/printer setup/HSR800/make default/check the default setting as following: 2.. Go to UltraRIP/Setup/Option/Advanced/ Choose General CMS Mode. 3.. RIP a file for print only with color ink. A: Go to UltraRIP/FILE/NEW to set up a new template.
- Page 59 TJ UV Printer User Manual B: Click Load image symbel to load a image that processed from photoshop as above with tiff format, be sure the image is inside the square, do not make the image over the outside square line. If out of the sqaure line, it will can not be riped. √...
- Page 60 TJ UV Printer User Manual E: Click Print icon, then choose the print resolution and icc profile that matched this resolution. Then click print:...
- Page 61 TJ UV Printer User Manual F: Choose the folder to save the riped file and then start RIP: G: The file rip finished for printing: 4.. RIP a file for print with white ink and color ink/embossed texture result both(For print on dark media with white ink underbase) A: Go to UltraRIP/FILE/NEW to set up a new template.
- Page 62 TJ UV Printer User Manual √ × C: Right click the image, to choose the output size/Width/Height, Be sure that the width is small than 40cm, and Height is small than 80cm, as the TJ max. printing size is 40*80cm, the machine will get faulty if print over this size. D: Go to setup/option/White ink(SPOT)/Advaned/density curve(Choose the resolution that you want print), other just keep default.
- Page 63 TJ UV Printer User Manual E: Click Print icon, then choose the print resolution and icc profile that matched this resolution. Then click print: F: Choose the folder to save the riped file and then start RIP:...
- Page 64 TJ UV Printer User Manual G: The file rip finished for printing: 7.4. Load media to printer 1.. Power on the machine as Chapter 5 2. Press Back to move the flatbed to the end, make it automatic stop: 2. Press the emergency button down to be sure the flatbed and carriage motor is not locked:...
- Page 65 TJ UV Printer User Manual Keep the gap between the flatbed media 3~5mm 3. then Press up the emgency button to power on the flatbed and carraige motor motion 4. Press Home to make the carriage move back to home position...
- Page 66 TJ UV Printer User Manual 8.6. Printing 1.. Open the control software, be sure the printer is power on and connect with software by status connection: HIGH and READY 2.. Open the RIP that you want print from control software, set the PASS model you want to print, the more pass the more high printing resolution.
- Page 67 TJ UV Printer User Manual 8. . Click on/off the White ink print, if the rip file is rip as 4 color ink without white, just click off white ink print, if the rip file is 5 color with CMYK+White ink, so need to click on the white ink print 4..Setup the magin as the media at the flatbed, if the X.Ymargin is 0, then it will start print from the top 0 left 0 edge.
- Page 68 TJ UV Printer User Manual 11. Start printing:...
- Page 69 TJ UV Printer User Manual Chapter 9. Maintenance 9.1. Daily job after printing 1..Move the carriage out of home position about 15cm by press TO left 2. Fill in some head cleaning solution to the both cap station, then use the injection to connect with the waste ink tube to flush out the waste ink at the cap station.
- Page 70 TJ UV Printer User Manual 5. Block the waste ink tube by tape or fasten tile to prevent the air go inside the cap station: 6. Fill in some new clean solution full of cap station without leak out. 7. Power off the machine by press the general power...
- Page 71 TJ UV Printer User Manual 8. Move the carriage back to the home position without move, to make the print head keep wet with the cleaning solution at the cap station. Make sure the print head is suround by the cap station without leak air.
- Page 72 TJ UV Printer User Manual Be sure print head is suround by the Be sure print head is suround by the cap station with cleaning solution for cap station with cleaning solution for keep wet without leak air keep wet without leak air 9.
-
Page 73: Thank You
TJ UV Printer User Manual Please feel free to watch the installation video or contact with TEC support team when you need further support. Do not operation without full understanding. TEC INDUSTRY AND TRADE CO.,LTD Add: Buliding 13, Lane 21 Dasheng Road, Ningbo...
Need help?
Do you have a question about the tecjet 6090uv-xp600 and is the answer not in the manual?
Questions and answers