Advertisement
Quick Links
The following instructions will help you
install and use your SwitchView DVI
KVM switch.
Should you require further assistance, please
contact Avocent Technical Support.
NOTE: The default setting of the SwitchView
DVI switch is appropriate for most systems.
You do not need to confi gure the switch
before installation. You should power off your
computers before beginning installation.
1
Connecting power
Connect the external power supply to the
SwitchView DVI switch.
NOTE: If you do not use a USB device on
any of the USB 2.0 hub ports or hub ports
connected on a USB keyboard, the switch will
function via the USB self-power. The switch
receives power from the USB interface and
is instantly powered up when you connect
the switch to a PC. If using a USB device
other than a keyboard or mouse, plug in the
external power adaptor.
2
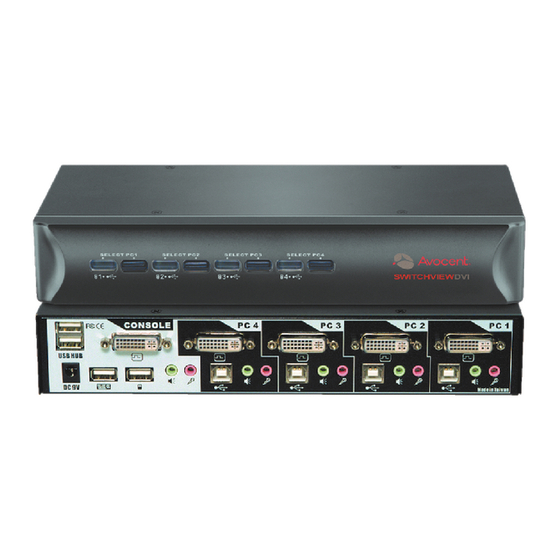
Connecting your peripherals
Connect your keyboard, monitor and mouse
into the console connectors on the rear of your
SwitchView DVI switch.
3
Connecting your computers
Connect each of your computers to the
SwitchView DVI switch using the DVI-I video
cable, USB cable (Type A to Type B) and audio
and mic cables provided.
To Contact Avocent Technical Support
Avocent, the Avocent logo, The Power of Being There and LongView are registered trademarks of Avocent Corporation or its affi liates. ©2005 Avocent Corporation. All rights reserved.
Quick Installation Guide
SwitchView
2 or 4-Port DVI USB KVM Switch
To install the switch
USB 2.0
hub
1
Connect external
power supply.
4
Powering up your system
Power up the the connected computers, ensuring
that the keyboard and mouse are enabled. The
green LED indicates PC port status (solid green =
active port, fl ashing green = PC not connected).
The red LED indicates the hub port control status.
When lit it indicates which PC port has control of
all of the hub ports and their connected devices (if
USB LED 1 is red, PC port 1 has control).
Call (888) 793-8763
VISIT www.avocent.com/support
The Power of Being There
®
DVI
2
Connect your
peripherals to the
computers using the
SwitchView DVI.
cables provided.
Operating the SwitchView DVI Switch
5
There are two ways to control the SwitchView DVI
switch for PC and USB hub port control, as well as
audio/mic channel selection: front panel push-but-
tons or a hotkey sequence.
Front panel buttons
The front panel buttons provide direct control over
KVM channel switching by pressing the PC button
for PC port switching. If binding is enabled between
PC/USB hub port control and audio/mic switching,
they will jointly be selected simultaneously.
®
4
Power up the
connected
computers.
3
Connect your
DOWNLOAD www.avocent.com
590-491-501A
Advertisement

Related Manuals for Avocent SwitchView DVI


Summary of Contents for Avocent SwitchView DVI
- Page 1 To Contact Avocent Technical Support Call (888) 793-8763 VISIT www.avocent.com/support DOWNLOAD www.avocent.com Avocent, the Avocent logo, The Power of Being There and LongView are registered trademarks of Avocent Corporation or its affi liates. ©2005 Avocent Corporation. All rights reserved. 590-491-501A...
- Page 2 To Contact Avocent Technical Support Call (888) 793-8763 VISIT www.avocent.com/support DOWNLOAD www.avocent.com Avocent, the Avocent logo, The Power of Being There and LongView are registered trademarks of Avocent Corporation or its affi liates. ©2005 Avocent Corporation. All rights reserved. 590-491-501A...
Need help?
Do you have a question about the SwitchView DVI and is the answer not in the manual?
Questions and answers