Advertisement
Quick Links
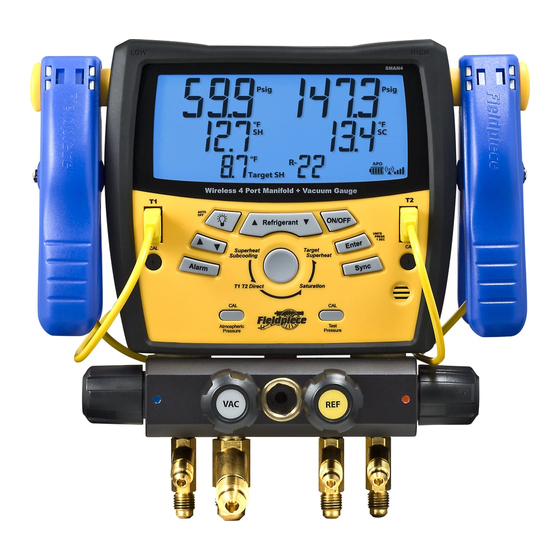
Fieldpiece
4-Port Wireless
Manifold & Vacuum
Gauge
OPERATOR'S MANUAL
Model SMAN4
01
Controls
5
1
1
7
6
8
9
10
11
12
2
2
3
4
13
1 Insert K-type thermocouple plugs here.
2 Temperature calibration pots.
3 Press to zero atmospheric pressure.
14
4 Press to calibrate to refrigerant tank.
(See Advanced Pressure Calibration section.)
5 Press to turn on backlight. Hold when
powering on to toggle Auto Power Off.
15
6 Press/hold to cycle through refrigerants.
7 Hold 1 second to toggle power on/off.
8 Press up or down arrow to adjust values.
9 Press to confirm selection.
16
Hold 1 second to adjust units.
10 Press to turn on/off the Hi/Lo vacuum
alarms and hold to change alarm settings.
11 Press to toggle through temperature tests.
12 Hold 1 second to Sync to a wireless enabled partner device.
13 Turn clockwise to close High side port.
14 Turn clockwise to close Low side port.
15 Turn clockwise to close 3/8" Vacuum port.
16 Turn clockwise to close Refrigerant port.
06
Quick Start
1 Power on your SMAN4 by holding the ON/
OFF button for 1 second.
2 Select desired units (English or Metric or a
combination) by holding ENTER for 1 second.
3 Calibrate temperature and/or pressure as
needed. See calibration sections for more
details.
4 Connect to the system.
5 Press the circular button to select between
Actual Superheat and Subcooling, Target
Superheat, Direct Temperature Display (T1 T2
Direct) or Saturation Temperature Display.
Certifications
FCC ID: VEARF915
C-Tick (N22675)
CE
RoHS Compliant
02
Functions
Superheat and Subcooling
1 Press circular button to cycle through temperature modes until
SH and SC are shown. The SMAN4 can calculate and display both
superheat and subcooling simultaneously.
2 Select the appropriate refrigerant using the REFRIGERANT button.
3 Connect EPA approved refrigerant hoses to low and high side on
SMAN4. Plug K-type thermocouple pipe clamps into T1 and T2.
4 Connect your SMAN4 to the system:
Superheat: Hand tighten low side hose to suction line service
port. Place the T1 pipe clamp thermocouple on the suction line
between the evaporator and compressor, no closer than 6 inches
to compressor.
Subcooling: Hand tighten high side hose to liquid line service
port. Attach the T2 pipe clamp thermocouple on the liquid line
between the condenser and expansion valve (TXV), as close to the
service port as possible.
5 After turning the system on or making any adjustments to
the system wait 15 minutes before charging by superheat or
subcooling to ensure that the system is running normally.
6 To add or remove refrigerant connect a refrigerant or recovery
tank to the REF port on SMAN4. Follow charging or recovery
practices from manufacturer. Use the low side, high side, and REF
valves on SMAN4 to charge or recover refrigerant as needed. Let
system stabilize again for 15 minutes.
T1 T2 Direct
1 Press circular button until T1 and T2 are shown.
2 Plug in any K-type thermocouple into T1 and/or T2.
3 Read the temperature directly from the display.
4 T1-T2 is displayed in the lower left corner of the display.
07
Description
Your SMAN4 is the first true wireless-
enabled digital refrigerant 4-port manifold and
vacuum gauge for HVACR service. Use optional
wireless transmitters to receive temperature
measurements over-the-air for real-time
target superheat calculations. Your SMAN4 can
wirelessly send data to the HG3 HVAC Guide
for more extensive analysis, data logging, or
printing reports for your customers.
Your SMAN4 combines high precision,
absolute pressure manifold gauges, a superheat/
subcooling calculator, true micron gauge for
vacuum, and dual temperature measurements
into one easy-to-use instrument. Your SMAN4
calculates and simultaneously displays target
superheat and actual superheat to ensure
proper charging of a unit. Your SMAN4's 4-port
manifold has a large 3/8" vacuum port and 3/8"
bore throughout the block for quicker recovery
and evacuations.
Your SMAN4 is designed to meet the demands
of the HVACR technician with a ruggedized
rubber boot for durability, a strong metal
hanger for easy storage and a form fitting, water
resistant, padded nylon pouch.
03
Saturation
Shows vapor (VSAT) and liquid (LSAT) saturation temperatures
calculated from the pressures measured and the refrigerant selected.
Target Superheat
Target Superheat is only used for charging fixed orifice
air conditioning systems. Your SMAN4 allows you to receive
real-time indoor wet bulb (IDWB) and outdoor dry bulb
(ODDB) temperatures wirelessly to calculate target superheat.
These values can also be entered manually or input directly by
connecting the included wet and dry bulb thermocouples to T1
and T2 respectively.
Receive IDWB and ODDB temperatures wirelessly
1 Press circular button until you've entered Target SH mode.
2 Press UP or DOWN ARROW. IDWB icon will begin blinking.
3 Hold SYNC on SMAN4 until a beep is heard (>1 sec).
4 Attach an accessory head (like ARH5, ARH4, or AAT3) capable of
measuring indoor wet bulb temperature to a Fieldpiece wireless
transmitter (sold seperately). Ready accessory head to measure
indoor wet bulb temperature and place at the return of the
evaporator between the filter and the coil.
5 Select transmit mode on Fieldpiece wireless transmitter and hold
SYNC until wireless partner searching begins. Once SMAN4 is
connected with transmitter, the real-time wet bulb temperature
measurement will display on SMAN4. The ODDB icon will begin
blinking.
Note: The SMAN4 and Fieldpiece wireless transmitter must be within
10 feet (3m) for initial sync to occur. Once synced, the wireless
range is 100 feet (30m).
6 Repeat steps 3 -5 for outdoor dry bulb measurements (ODDB). For
outdoor dry bulb measurement, place the accessory head onto
08
Pressure (bar)
Pressure (pounds/in
2
)
Pressure (kilopascals or Megapascals)
Negative Pressure (inches of mercury)
Negative Pressure (cm of mercury)
Superheat
T1 Direct
Vapor Saturation Temperature
Indoor Wet Bulb
Micron Reading Has Stabilized
Set Mode
Alarm Mode
High Alarm
Low Alarm
Vacuum (Microns of Mercury)
T1 thermocouple - T2 thermocouple
Target Superheat
04
the side of the condenser. For accurate results, keep it shaded
from direct sunlight.
7 Real-time target superheat is calculated and displayed in lower
left corner of display when SMAN4 is receiving real-time indoor
wet bulb and outdoor dry bulb measurements from the wireless
devices.
Note: If the indoor wet bulb or outdoor dry bulb measurements are
out of calculating range, "OL" or "-OL" will display in the lower
left corner.
Note: Retrieval of IDWB and ODDB wireless measurements will be
temporarily disabled for 30 seconds (nSG will display) if SMAN4
loses communication with the HG3. The wireless tower ( ) will
blink and "NoSignal" will be displayed on SMAN4 display until
HG3 re-connects or 30 seconds has elapsed. At this time, IDWB
and ODDB measurements will be enabled again.
Input temperatures with K-type thermocouples
1 Press circular button until Target SH is shown on the bottom,
center of display.
2 Plug ATWB1 Wet bulb K-type thermocouple into T1 and ATA1 Dry
bulb K-type thermocouple into T2. Both are included with your
SMAN4.
3 Press UP or DOWN ARROW to toggle between IDWB or ODDB
input. The icons will begin blinking. Press ENTER to select which
temperature you want to input first, either IDWB or ODDB. The
real-time temperature from the thermocouple will be displayed.
4 For IDWB input, wet the sock of the ATWB1. Clip it to the return
of the evaporator between the filter and coil. When the wet bulb
temperature reaches its lowest point and stabilizes, press ENTER
to lock the reading. If the inputted temperature is above or below
the wet bulb range, "OL" or "-OL" will blink and a beep will be
heard. Retake the measurement if this occurs.
5 For ODDB input, clip the ATA1 thermocouple to the side of the
condenser. Once reading is stable, press ENTER. If the inputted
09
Pressure (bar)
Pressure (pounds/in
2
)
Pressure (kilopascals or Megapascals)
Negative Pressure (inches of mercury)
Negative Pressure (cm of mercury)
Subcooling
T2 Direct
Liquid Saturation Temperature
Outdoor Dry Bulb
Vacuum Stopwatch
Hours:Minutes or Minutes:Seconds
Battery Life
Connection Strength
Auto Power Off Enabled
Wireless Signal Lost
Selected Refrigerant of System
05
temperature is above or below the dry bulb range, "OL" or "-OL"
will blink and a beep will be heard. Retake the measurement if
this occurs. For accurate results, keep the ATA1 shaded from direct
sunlight.
6 Once both IDWB and ODDB are locked in, the Target Superheat
will show in the lower left corner of the display. If the Target
Superheat calculated from the IDWB and ODDB temperatures is
outside the range in which air conditioning is recommended then
"OL" is displayed. Usually, raising the indoor temperature will
bring the conditions within manufacturer's recommendations. If
your target superheat is out of the recommended range, re-take
your measurements.
7 To re-take either IDWB or ODDB, press UP or DOWN ARROW until
the icon (IDWB or ODDB) you wish to re-take is blinking. Press
ENTER. Re-do the measurement and press ENTER to lock it in. The
newly calculated target superheat will be displayed.
Input temperatures manually
1 Press circular button until Target SH is shown at the bottom,
center of display. Unplug thermocouples from T1 and/or T2.
2 Press UP or DOWN ARROW to toggle between IDWB or ODDB
input. The icons will begin blinking. Press ENTER to select which
temperature you want to input first, either IDWB or ODDB. The far
left digit of IDWB or ODDB will begin blinking indicating manual
input mode is ready.
3 Press the UP or DOWN ARROW to change values and press ENTER
to lock in each digit. Once the last digit for ODDB or IDWB is
locked in, the calculated target superheat will show in the lower
left corner of the display.
Note: When pressing ENTER to lock in the last digit for IDWB or
ODDB, if the inputted temperature is below or above the wet bulb
or dry bulb range, "OL" or "-OL" will flash once and a beep will be
heard. In both instances you must re-input the measurement.
10
Advertisement

Related Manuals for Fieldpiece SMAN4


Summary of Contents for Fieldpiece SMAN4
- Page 1 6 Once both IDWB and ODDB are locked in, the Target Superheat SH and SC are shown. The SMAN4 can calculate and display both devices. will show in the lower left corner of the display. If the Target Target Superheat is only used for charging fixed orifice superheat and subcooling simultaneously.
-
Page 2: Specifications
6 With HG3 test, highlight a test line that corresponds to one of the 74 cmHgV to 0 cmHgV: ±1 cmHgV 4 Cap VAC port and gently shake your SMAN4 upside down to clean R401A(MP39), R401B, R402A, R402B, R404A, R406A, R407A, R407C, 1 Hold ALARM for one second to enter Alarm Set mode.
Need help?
Do you have a question about the SMAN4 and is the answer not in the manual?
Questions and answers