
Related Manuals for DAEWOO ELECTRONICS FR-630NT


Summary of Contents for DAEWOO ELECTRONICS FR-630NT
- Page 1 S/M No. : FR630NT010 Service Manual Refrigerator Model: FR-630NT/NB FR-662NT/NB FR-700NT/NB DAEWOO ELECTRONICS CO., LTD. Nov. 1999 http : //svc.dwe.co.kr...
-
Page 2: Table Of Contents
SAFETY AND PRECAUTIONS 1) For starters, be sure to check any chances of the leakage of electricity. 2) You could handle a part in the vicinity of electricity after unplugging. 3) You should put on rubber gloves to prevent an electric shock on operation test. 4) Make sure the rated current, voltage, capacity before using an instrument. -
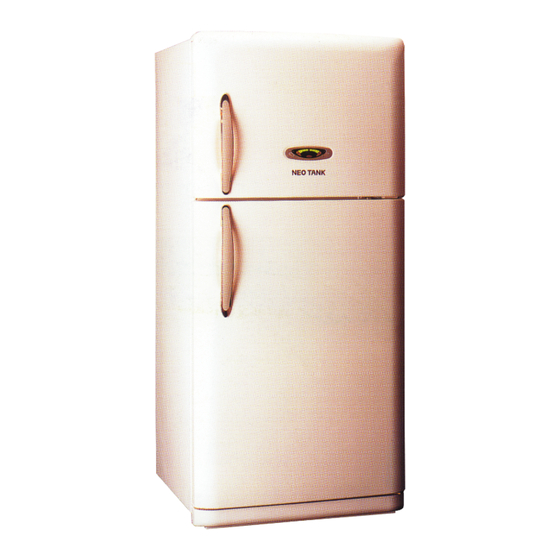
Page 3: External Views
EXTERNAL VIEWS 1. EXTERNAL SIZE FR-630NT/NB FR-662NT/NB FR-700NT/NB 2. NAME OF PARTS Freezer Compartment Lamp Shelf Ffreezer Case Icing Guide Icing Ice Box Refrigerator Compartment Lamp Cover Cubic Duct Fresh Case Shelf Refrigerator Deodorant Cover Vegetable Case Vegetable(B) Case Vegetable(A) -
Page 4: Specifications
SPECIFICATIONS 1. OUTLINE DIVISION CONTENTS MODEL NAME FR-630NT/NB FR-662NT/NB FR-700NT/NB USABLE CAPACITY FREEZER REFRIGERATOR TOTAL EXTERIOR DIMENSION WIDTH 818 mm 818 mm 818 mm DEPTH 752 mm 782 mm 812 mm HEIGHT 1818 mm 1818 mm 1818 mm QUANTITY OF REFRIGERANT... - Page 5 SPECIFICATIONS 2) RELAY REFRIGERANT VOLTAGE ( V/HZ) 100 /50,60 110 / 60 115,120/60 127/60 220/50 220 / 60 230 / 60 240 / 50 ASSY TYPE NAME 276THBYY-52 181SHBYY-52 276THBYY-52 PART CODE 3018119940 3018116610 3018119940 RESIS-TANCE S220 S330 S220 PART CODE OVER LOAD PART CODE 276THB...
- Page 6 SPECIFICATIONS 4)RUNNING CAPACITOR REFRIGERANT VOLTAGE ( V/HZ) 100 /50,60 110 / 60 115,120/60 127/60 220/50 220 / 60 230 / 60 240 / 50 PART CODE 400EL15110 RATED VOLTAGE 350V RATED CAPACITANCE REFRIGERANT R134a VOLTAGE ( V/HZ) 100 /50,60 110 / 60 115,120/60 127/60 220/50...
- Page 7 SPECIFICATIONS 8) DEFROST HEATER REFRIGERANT R12,R134a VOLTAGE ( V/HZ) 100 /50,60 110 / 60 115,120/60 127/60 220/50 220 / 60 230 / 60 240 / 50 SPEC (W) 180W 180W 180W 180W 180W 180W 180W PART CODE 3012803210 3012803210 3012803210 3012803200 3012803200 3012803200...
- Page 8 SPECIFICATIONS 13) FUSE (PCB) REFRIGERANT R12,R134a VOLTAGE ( V/HZ) 100 /50,60 110 / 60 115,120/60 127/60 220/50 220 / 60 230 / 60 240 / 50 RATED CURRENT 250V/1.6A PART CODE 5F3GB1682R 14) THERMO FUSE REFRIGERANT R12,R134a VOLTAGE ( V/HZ) 100 /50,60 110 / 60 115,120/60...
-
Page 9: Power Cord
SPECIFICATIONS 3. POWER CORD SHAPE OF POWER CORD PART CODE DESCRIPTION REMARK 3011315000 CP-2PIN For european country 401RA17200 CP-2PIN For other country 4006D17101 KP-30 For America & El Salvador 401PD17101 KP-211 For Japan & Taiwan 3011300801 BP-3PIN 3011303010 # 267 For Chile 3011315310 For Israel... -
Page 10: Door Color
SPECIFICATIONS 4. DOOR COLOR 1) ASSEMBLY URETHAN FREEZER DOOR Refrigerant R134a High-glossy High-glossy High-glossy High-glossy COLORTYPE Dull laminasheet Normal PCM Dull laminasheet Normal PCM Laminasheet Bright PCM Laminasheet Bright PCM PARTCODE 3010081960 3010077430 2) ASSEMBLY URETHAN REFRIGERATOR DOOR Refrigerant R134a High-glossy High-glossy High-glossy... -
Page 11: Operation And Fuctiolns
OPERATION AND FUCTIOLNS CONTROL FUNCTION CONTROL OBJECTS CONTENTS REMARK DISPLAY CUSTOM LED 1. Normal state 1) SILENT Icon (Amber) is off. 2) Initial State : Both compartment’ s icons indicate Middle-mode (“ 1” , and “ 2” are lit..) 2. FRZ.SET Button 1) Temperature Regulation of Freezer Compartment 2) Middle-left Icons are lit by pressing the button. - Page 12 OPERATION AND FUCTIOLNS CONTROL FUNCTION CONTROL OBJECTS CONTENTS REMARK Temperature Regulation 1. COMP 1. Temperature regulation by FRZ.SET Button. Reference of Freezer Compartment 2. F-FAN ON/OFF Diff : Fixed by Micom STEP Diff : Fixed by Micom Comp&C- Fan 2. COMP and F-Fan are controlled by On/Off point of each mode. are Coworking 3.
- Page 13 OPERATION AND FUCTIOLNS CONTROL FUNCTION CONTROL OBJECTS CONTENTS REMARK Temperature Regulation of 1. COMP In case Q.R starts during 1(refrigeration) mode Refrigerator (Freshfood 2. R-FAN Temp. Compartment) Over refrigeration off point Time Q.R(40min. 1) R-Fan and COMP continue to be On until the R-Sensor reaches to Off-point(-7 ) of over-refrigeration.
- Page 14 OPERATION AND FUCTIOLNS CONTROL FUNCTION CONTROL OBJECTS CONTENTS REMARK Defrosting Period 1. Defrosting Mode 1. What to be considered in determining Defrosting Period 1) Total Run-time of COMP : 6, 8, 10, 12, 14 hours 2) Running-rate of COMP (each 2hours running-rate) : more than 80% 3) Total time of Door openings : 10minutes 4) Total Time (COMP-On + COMP-Off) : 60hours 5) Ambient Temperature : more than 35...
- Page 15 OPERATION AND FUCTIOLNS CONTROL FUNCTION CONTROL OBJECTS CONTENTS REMARK Error Display (displayed on 1. Custom-LED 1. How to start ; open and close refrigerator door 3 times while pressing Limit-time : 4min. C-LED of F-PCB) REF.SET Button and it starts after 3 seconds. 2.
- Page 16 OPERATION AND FUCTIOLNS CONTROL FUNCTION CONTROL OBJECTS CONTENTS REMARK 4) d1 Error Occurrence : D-Sensor disconnection/short-circuit Control : by limit time(40min.) of Defrosting-return Dissolution : if D-Sensor is in normal state, it is finished by itself. 5) door Error Occurrence : when door-opening is sensed for more than 1 hour Control : deletion of Door SW sensing function Dissolution : if Door SW open-close is sensed, it ends by itself.
- Page 17 OPERATION AND FUCTIOLNS CONTROL FUNCTION CONTROL OBJECTS CONTENTS REMARK Explanation after Delivery Electric Devices 1. Start : press both buttons for 3 seconds after initial power supply (plug-in). 2. Electric devices turn Off for 3 hours. 3. Display works in normal way. Prevention of COMP Restart COMP 1.
-
Page 18: Diagram
DIAGRAM 3. CIRCUIT DIAGRAM... -
Page 19: Circuit Diagram
DIAGRAM 2. AIR FLOW DIAGRAM Freezer Pleas don’ t put bottles such as beer, beverage etc. It might be broken because of freezing. Freezer pocket Please don’ t put long term storing items such as ice cream etc. It might be melted because of opening the door freguently. -
Page 20: Refrigerant Cycle Diagram
DIAGRAM 3. REFRIGE RANT CYCLE DIAGRAM... -
Page 21: Disassembly And Assembly
DISASSEMBLY AND ASSEMBLY 1. Freezer & Refrigerator Doors 1. Insert flat type (-) screw driver between Hinge Cover and Cabinet surface to remove the Cover. (Be careful not to break the hooks of Cover and not to damage the Cabinet surface.) 2. - Page 22 DISASSEMBLY AND ASSEMBLY 2. Door Handles 1. Insert rectangular bent tool whose diameter is less than 4mm into the hole of Handle to remove the Handle Decorator. 2. Pull out Handle Decorator from up to down. Be careful not to damage the surface of Handle. and door Once it is peeled or damaged, corrosion may occur from metal parts beneath the handle.
- Page 23 DISASSEMBLY AND ASSEMBLY 3. F Light bulb 2. Remove the Light bulb by turning it counterclockwise. (Lamp : 15W) 3. Pull Light-bulb Base down forward with snap, if necessary In assembling, push it upward with snap. Be careful not to damage the Liner surface. 4-1.
- Page 24 DISASSEMBLY AND ASSEMBLY 3. Insert screw driver in the rectangular hole to pull out. 4. Push fingers into the 2 holes to pull out. 5. Pull the top of louver forward slowly while lifting the bottom. Be careful not to damage the insulator behind louver. 4-2.
- Page 25 DISASSEMBLY AND ASSEMBLY 2. Loosen wire tie on the left and pull louver forward slowly. Be careful not to damage sealing on the louver for they affect cold air circulation. 5. F Sensor 1. Cut down sensor wires and insert 2 pieces of heat shrinkage tube to each wire.
- Page 26 DISASSEMBLY AND ASSEMBLY 4. Pull out fan and remove screws. 5. Remove motor cover by turning it slowly. 6. Remove wire fastening tape and pull out the Motor. F and R Fan Motor are distinguished by their wire colors, so be careful not to change the motors. - Blue Wire for R Fan Motor - Red Wire for F Fan Motor See to it that wire out direction is correct.
- Page 27 DISASSEMBLY AND ASSEMBLY 7-2. D Sensor Exchange 4. Cut down sensor wires and insert 2 pieces of heat shrinkage tube to each wire. 5. Connect new sensor wires and old ones, and put soldering on the connecting part. D-SENSOR 1. Move shrinkage tubes to hide the connecting part and give mild heat around them to shrink.
- Page 28 DISASSEMBLY AND ASSEMBLY 9. Exchange of evaporator 1. Place any sheet on freezer compartment floor to protect it. 2. Remove 2 screws left right of evaporator. 3. Cut black gum out. 4. Pull pipes about 50mm forward. 5. Disconnect pipes by unsoldering them. 10.
- Page 29 DISASSEMBLY AND ASSEMBLY 10. Exchange of Defrost Heater 2. Remove connector of white wire on the top right. 2. Remove defrosting sensor on the top right of evaporator. 3. Pull evaporator forward slowly until defrosting heater appears. Be careful not to damage suction pipe and capillary pipe. 4.
- Page 30 DISASSEMBLY AND ASSEMBLY 5. Straighten with screw driver left 2 hooks of aluminum plate, then right hooks are open of itself. 6. Remove left rubber cap first, then right one. White wire is for the left rubber while gray wire is for the right one.
- Page 31 DISASSEMBLY AND ASSEMBLY 12. Top Panel of Refrigerator 1. Remove screws. 13. Return Duct Cover 1. Hold light bulb cover to pull it down. 2. Turn light bulb counterclockwise to pull it out. Be careful not to break hooks while removing the cover. 3.
- Page 32 DISASSEMBLY AND ASSEMBLY 14. Cubic Duct 1. Insert screw driver into the gap to pull out Be careful not to break hook. 15. Side Louver 1. Remove all the parts of fresh food dompartment excet for cubic-duct and return-cap. 2. Pull out sensor connector of left louver. 3.
- Page 33 DISASSEMBLY AND ASSEMBLY 1. Pull louver forward slowly. 2. Be careful not to damage sealing sponge stripes. 16. Check Valve 1. Insert screw driver into the gap to pull out. 2. Pull it out. 17. R Sensor 1. Cut out only sealing sponge on the insulator in straight way along the insulator.
- Page 34 DISASSEMBLY AND ASSEMBLY 3. Separate louver and insulator. 4. Be careful not to breake insulator 5. Remove sensor. 18. Front Control Panel 1. Place any sheet right of panel to protect surface of it. 2. nsert small screw driver into the gap to lift panel window up. 3.
- Page 35 DISASSEMBLY AND ASSEMBLY 7. Remove connector. 8. Remove screws on the back of panel. 19. Compressor 1. Remove Machine-room Cover screws. 2. Pull the cover up to remove. 3. Remove P-Relay Band by pressing it up toward the Compressor. 4. Remove Relay Assembly from Compressor. 5.
- Page 36 DISASSEMBLY AND ASSEMBLY 20. Wire-Condensor & C-Fan 1. Remove the 2 case screws using cross type screw driver. 2. Remove Wire-condenser pipes using soldering torch. 3. Cut out Dryer fixing cable. 4. Turn the Drain Hose by 90degrees to remove. 5.
- Page 37 DISASSEMBLY AND ASSEMBLY 8. Remove the Bell-mouth fixing screw. 9. Remove Bell-mouth by pulling them aside. 10. Press the Motor Band down to remove it. 11. Lift the Motor up to remove. 21. Return Duct Cover 1. Insert screw driver into the gap to pull out. Be careful not to break hooks.
-
Page 38: Exploded View And Parts List
EXPLODED VIEW AND PARTS LIST 1. EXPLODED VIEW - FR-630NT/NB, FR-662NT/NB, FR-700NT/NB... -
Page 39: Total Parts List
EXPLODED VIEW AND PARTS LIST 2. TOTAL PARTS LIST is a recommendable part for essential stock. PART CODE PART NAME PART DESCRIPTION QT’ Y REMARK 3010058720 ASSY CAB URT FR-630NT/NB 3010058730 FR-630NT/NB HCFC 3010058820 ASSY CAB URT FR-662NT/NB 3010058830 FR-662NT/NB HCFC... - Page 40 EXPLODED VIEW AND PARTS LIST PART CODE PART NAME PART DESCRIPTION QT’ Y REMARK 3014426920 PLATE CONN AS 3010102100 ABSORBER C MOTR 3012004400 FIXTURE C MOTOR MOTOR C REFER TO #5 3011800400 3011200500 CLAMP FAN 3011444800 COVER C FAN DRYER AS REFER TO #6 3011119200 CASE VAPORI...
- Page 41 EXPLODED VIEW AND PARTS LIST PART CODE PART NAME PART DESCRIPTION QT’ Y REMARK 3017900840 SOCKET F LAMP AS LAMP AS REFER TO #6 3015502600 WINDOW F SWITCH DR REFER TO #7 3012505600 GUIDE V/CASE *M 3015304100 SUPPORTER ROLL B 3014700400 ROLLER B 3011110400...
- Page 42 EXPLODED VIEW AND PARTS LIST PART CODE PART NAME PART DESCRIPTION QT ’Y REMARK 3018904300 LOUVER R *S *L 3013324301 INSULATOR R *S *L F-PS 7112401611 SCREW TAPPING TRS 4 X 16 MFZN 3018904400 LOUVER R *S *R 3013324401 INSULATOR R *S *R F-PS 3010916800 CAP RETUN DUCT...
-
Page 43: Machine Room Exploded View And Parts List
EXPLODED VIEW AND PARTS LIST 3. MACHINE ROOM EXPLODED VIEW AND PARTS LIST PART NAME PART NAME BASE CAB *B PIPE HOT SCREW TAPPING PIPE CONN A CORD POWER AS PIPE SUC CONN SCREW MACHINE PIPE SUCTION AS ABSORBER COMP BAND RELAY COMPRESSOR SWITCH P-RELAY AS... - Page 44 DAEWOO ELECTRONICS CO., LTD 686, AHYEON-DONG MAPO-GU SEOUL, KOREA C.P.O. BOX 8003 SEOUL, KOREA TELEX : DWELEC K28177-8 CABLE : “ DAEWOOELEC” E-mail : G7F00E@web.dwe.co.kr FAX : 032) 510-7630 TEL : 032) 510-7622 PRINTED DATE : SEP. 1999...
Need help?
Do you have a question about the FR-630NT and is the answer not in the manual?
Questions and answers