Rifton TRAM K310 Product Manual
Hide thumbs
Also See for TRAM K310:
- Product manual (28 pages) ,
- Product manual (32 pages) ,
- Product manual (24 pages)
Table of Contents
Advertisement
Quick Links
Download this manual
See also:
Product Manual
Advertisement
Table of Contents

Related Manuals for Rifton TRAM K310


Summary of Contents for Rifton TRAM K310
- Page 1 K310 Product Manual ®...
-
Page 2: Table Of Contents
For professionals who order and set up Rifton products. Home Users For caregivers who use Rifton products on a regular basis. Maintenance Personnel For anyone who is responsible for service or reordering of Rifton products and parts. © 2013 Rifton Equipment... -
Page 3: Warnings And Important Information
WARNINGS • Read and understand the information in this manual before attempting to use this product. If these procedures and instructions are not followed, serious injury or death could occur. • The TRAM may not be appropriate for all clients. The client’s therapist or physician should assess the appropriateness and safety of the TRAM for each user. - Page 4 • Using straps, trays, or supports to restrict a client's movement is considered behavioral restraint. Rifton products are not intended for this use. • This product is intended for indoor use only and must not be used in or around water other than for bathing and shower transfers in accordance with instructions provided.
-
Page 5: Recommended Use
Recommended use The TRAM is a Class 1 medical device. It is a transfer and mobility device. For transfers it enables a qualifi ed caregiver to lift a client in the seated posture and transfer the client between wheelchairs, chairs, toilets, beds or therapy tables. As a mobility device it helps a caregiver raise a client to a standing position, and then provides support for standing or ambulation. -
Page 6: Check Your Order
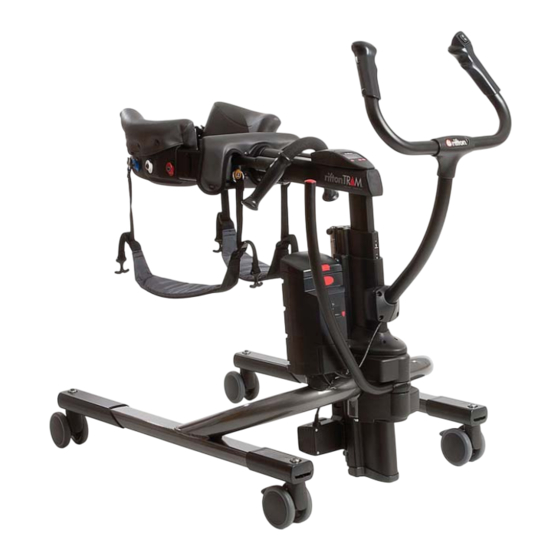
Check your order Every TRAM comes with a caregiver push handle, two thigh straps, one battery, one battery charger and a scale if ordered. All other accessories are retrofi ttable and can be added later if desired. Please check that your TRAM has been outfi tted as you ordered it. The TRAM requires minor assembly before use. -
Page 7: Initial Assembly And Directions For Use
Initial assembly instructions The caregiver push handle is removed for shipping and must be attached to the TRAM frame with four bolts: 1. With the Allen wrench found in the Figure 7a accessory carton remove the four bolts (see Figure 7a). 2. -
Page 8: Battery Box
Battery Box The battery box houses the micro- processor and rechargeable battery which power and control the TRAM’s electric actuator (see Figure 8a). To insert the battery, push the red, elliptical battery eject/emergency stop button (see Figure 9a) and lift the lid, slide the battery down into the box and close the lid until the latch engages. - Page 9 Battery level indicator (cont.) CAUTION To prevent damage to the battery, charge it Charge or change the battery when the light turns yellow. The indicator immediately if the battery level light light will extinguish 10 minutes after the turns red; do not attempt further lifts last activation of the up/down switch.
-
Page 10: Scale
TRAM. With the client’s full if used correctly. weight displayed on the scale, press the 4. Rifton recommends that the scale be zero button. Next, re-position the client calibrated by a qualifi ed technician for ambulation. The weight displayed will at three- to fi... -
Page 11: Caster Direction Lock
Caster direction lock The direction lock enables the caregiver to prevent one or more of the TRAM’s casters from swiveling. Locking a front caster makes the TRAM easier for a caregiver to maneuver during transfers. Locking a rear caster can stabilize the TRAM when used for ambulation. -
Page 12: Body Support System
Body support system The TRAM’s body support system includes the body support pads, patient hand grips, ring clips, and the safety belt and buckle. Figure 12a The back belt has a dual action safety buckle to prevent accidental release. Press the two release tabs simultaneously to release (see Figure 12b). - Page 13 Forearm supports Forearm supports give extra lifting support for clients who have low tone and provide positioning support during ambulation. Forearm supports adjust in many directions and angles to accommodate different positioning requirements (see Figure 13a). Figure 13a Notice: If forearm supports were purchased initially with the TRAM wing knob they will be attached and ready for...
- Page 14 Forearm Supports (cont.) Adjustments (see Figure 14a) Height adjustment: Press button (A) and slide post to desired position. Loosen knob (B) to: • Slide arm pad toward or away from the user. • Rotate up or down. Figure 14a • Rotate in or out. •...
-
Page 15: Operation And Transfers
Operation and transfers Before every transfer • Thoroughly inspect the TRAM body support system for tears, rips and worn areas, giving special attention to the straps and buckles. Remove the product from service if any condition develops that might make use unsafe. •... - Page 16 Using thigh straps for a seated transfer: 1. Clip one end of each thigh strap onto the yellow clips at the front of the TRAM's body support system. 2. With the client sitting up and arms Figure 16a raised slightly, position the TRAM’s body support system pads around the client’s rib cage a few inches below the armpits (see Figure 16a).
- Page 17 Using walking saddle for sit-to-stand or walking: 1. Position walking saddle under client, either by lifting client using the fi rst four steps on page 16 (see Figure 17a), or by folding saddle, shifting the client to one side and positioning saddle under client Figure 17a one half at a time.
- Page 18 Toileting and the TRAM While caregivers will always fi nd their own best methods for toileting a client, here is one suggested method for clients with some ability to bear weight. 1. Position the client in the TRAM over the toilet seat, leaving enough room to adjust clothing (see Figure 18a).
-
Page 19: Battery Charger
Battery charger Installation 1. Remove the battery from the charger to access the mounting bracket. 2. Attach the charger to the wall near an outlet, using two screws (A) (see Figure 19a). Two screws are provided with the charger, however, they may not be suitable for every situation. -
Page 20: Troubleshooting
2. Make sure the electrical cables are secure. 3. Check that the light on the battery box is green. 4. Contact Rifton. Lift beeps when down button is pushed: For safety, the TRAM’s actuator control system continuously monitors the force exerted by the actuator as the body support is lowered, and stops it if an excessive rise in force is detected, such as if the body support pushes down on the client's hips or thighs. -
Page 21: Technical Data
• Motor duty cycle: Two minutes (Replacement batteries available continuous use followed by 18 minutes idle. from Rifton) • Turning diameter: 50" (127 cm) • Battery charger: Wall-mounted • Mass of TRAM: 70 lbs (32 kg) charger, 100 - 240 V AC, max 650 mA •... -
Page 22: Maintenance, Cleaning And Warranty
As needed, clean with disinfectant wipes or a solution of up to 10% bleach. Do not use excessive amounts of water. Warranty Statement If a Rifton product breaks or fails in service during the fi rst year, we will replace it free of charge. -
Page 23: Materials And User Modifi Cations
All materials are free of latex, lead and phthalates. User modifi cations CAUTION: Rifton Equipment cannot accept responsibility for any modifi cations or alterations made to our components or products after they leave our premises. Customers modifying or altering our components or products, or using them in conjunction with products from other manufacturers, do so at their own risk since we are unable to validate the safety and effi... - Page 24 Use only replacement parts supplied by Rifton Equipment. We are glad to supply replacement parts. Although Rifton makes every effort to supply correct parts and instructions for repairing or refurbishing your equipment, you are responsible to make sure that the repairs or modifi...
Need help?
Do you have a question about the TRAM K310 and is the answer not in the manual?
Questions and answers