Table of Contents
Advertisement
Quick Links
Advertisement
Table of Contents

Related Manuals for Pelton & Crane CF36


Summary of Contents for Pelton & Crane CF36
- Page 1 Classic Twelve O’clock Cabinet Installation Instructions CF36 CF42...
-
Page 2: Table Of Contents
THIS MANUAL IS FOR AUTHORIZED AND QUALIFIED INSTALLATION PERSONEL ONLY! Table of Contents General Information ........................3 CF36 Cabinet Overview........................4 CF36 Cabinet Dimensions ......................5 CF42 Cabinet Overview........................6 CF42 Cabinet Dimensions ......................7 Optional Computer Storage Overview..................8 Optional Computer Cabinet Dimensions ..................8 Preparing the Site ........................9 &... -
Page 3: General Information
General Information Equipment Disposal Definitions of Symbols The following symbols may be used throughout the product manual: Contact your local authorized dealer for proper disposal of the device to ensure compliance with your local environmental regulations. CAUTION: Failure to carefully follow the Interference with Electromedical Devices described procedure may result in damage to To guarantee the operational safety of electromedical devices, it is... -
Page 4: Cf36 Cabinet Overview
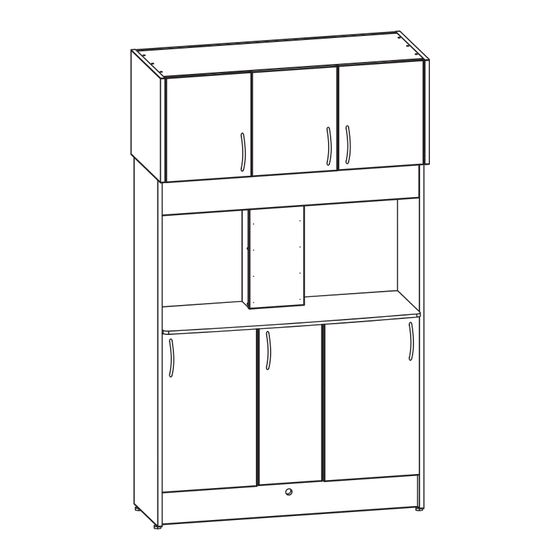
CF36 Overview A-C, upper module, storage B, counter workspace D, accessory panel E, central column, power chase K & M, lower module, storage L, unit mount area... -
Page 5: Cf36 Cabinet Dimensions
The CF cabinet provides a work surface, storage, and can be installed with or without a Pelton & Crane delivery system. The CF36 cabinet also provides a work surface and outlets. It is designed with the Dentist and staff in mind to provide a robust working enviroment for the daily activities of performing dentistry. -
Page 6: Cf42 Cabinet Overview
CF42 Overview A-C, upper module, storage B, CPU storage D, accessory panel E, central column, power chase F, counter workspace K & M, lower module, storage L, unit mount area... -
Page 7: Cf42 Cabinet Dimensions
CF42 Overview The CF cabinet provides a work surface, storage, and can be installed with or without a Pelton & Crane delivery system. The CF42 cabinet also provides a work surface and outlets. It is designed with the Dentist and staff in mind to provide a robust working enviroment for the daily activities of performing dentistry. -
Page 8: Optional Computer Storage Overview
Optional Computer Storage Overview A computer can be stored in the center storage area of the upper cabinet. Insert the computer’s cables through the access holes in the bottom of the cabinet and route to the utility box. Place the CPU so the front is facing the cabinet door. -
Page 9: Preparing The Site
Preparing the Site WARNING: Always lift cabinets by bottom edge, being careful to lift with your legs and not your back. CAUTION: Make all required, air water and drain attachments from the utilities to the incoming stub up connections before the delivery system installation occurs. Doing so prevents damage to the utility lines from heat associated with some plumbing connection methods. -
Page 10: Preparing The Site
Preparing the Site (Cont’d) NOTE: The template illustration depicts the mounting points. 1. Lay installation template over plumbing stub-ups and check the distance from the cabinet to the walls according to operatory layout. (Floor template is depicted in illustration. Stub-up information in the tem- plate illustration applies to all models.) 2. -
Page 11: Cabinet Installation
Cabinet Installation Remove the box and shrink wrap from around the cabinet. Unclip the doors and/or drawers and place in a safe area. - Page 12 Cabinet Installation cont’d. Remove the shelves from the upper and lower cabinets . Remove the (4) bolts, washers and nuts holding the cabinet section to the pallet. Center brackets used on 2800 only Washer Bolt...
- Page 13 Cabinet Installation cont’d. Using the floor template provided, drill for concrete (4) 3/8” x 3” deep holes, for wood drill (4) 1/4” x 2-3/4” deep holes. For con- crete insert (4) 3/8” x 2-3/4” anchor bolt, washer, lock washer and nut, for wood in- sert (4) 3/8 x 3-1/2”...
- Page 14 Cabinet Installation cont’d. Connect utilities in accordance with local codes. Re-install shelves and/or drawers and doors removed previously, taking care to place them in their original positions.
-
Page 15: Door & Drawer Adjustment
Door & Drawer Adjustment Note: Upper & lower plates Cam wing mounting plate must be moved together for each door Range (5/32") Note: One piece wing plate Upper & lower plates must be moved together for each door Range (5/32") WARNING over-adjusting hinges can cause damage Rotate spiral -tech cam Rotate front screw to increase or... -
Page 16: Clock Instructions
Clock Instructions To Set Calendar/Clock The CLOCK button is used to alternate between 12 hour (AM / PM) and 24 hour (International / Military time) clock modes. When you insert the battery, the clock will automatically be in the 12 hour clock mode. If you would like the clock to be in the 24 hour clock mode press CLOCK before setting the clock. -
Page 17: Electrical Diagram
Electrical Diagram WIRE NUT) INPUT POWER CABLE... -
Page 18: Installation And Servicing Checklist
Installation and Servicing Checklist Verify the following after installation or servicing of the cabinet: All manuals are present. All labels are present and legible. No mechanical damage on new installations. The cabinet is connected to the correct power source. There are no water or air leaks. All the cabinet adjustments have been made according to the users manual. - Page 19 NOTES...
- Page 20 We reserve the right to make any alterations which may be due to any technical improvements. © 2011, Pelton & Crane Order No. 059351 Pelton & Crane Rev. 0, 4/11 11727 Fruehauf Drive Printed in USA Charlotte, NC 28273...
Need help?
Do you have a question about the CF36 and is the answer not in the manual?
Questions and answers