Table of Contents
Advertisement
Advertisement
Table of Contents

Related Manuals for Carestream CS 9300C


Summary of Contents for Carestream CS 9300C
- Page 1 CS 9300C User Guide...
- Page 2 ENT (Ear, Nose and Throat) areas to be used at the direction of healthcare professionals as diagnostic support for pediatric and adult patients. In addition, the CS 9300C is a system that is also intended to produce cephalometric images. This includes imaging the hand and wrist to obtain the carpus image for growth and maturity assessment.
-
Page 3: Table Of Contents
Preparing the Unit and Setting the Acquisition Parameters for the Adult Patient ......5–8 CS 9300C User Guide (SM750)_Ed 01... - Page 4 Cleaning the CS 9300C unit ........
-
Page 5: 1-About This Guide
CAUTION Alerts you to a condition that might cause serious damage. IMPORTANT Alerts you to a condition that might cause problems. NOTE Emphasizes important information. Provides extra information and hints. CS 9300C User Guide (SM750)_Ed 01 1–1... - Page 6 Conventions in this Guide 1–2 About This Guide...
-
Page 7: 2-Cs 9300C Overview
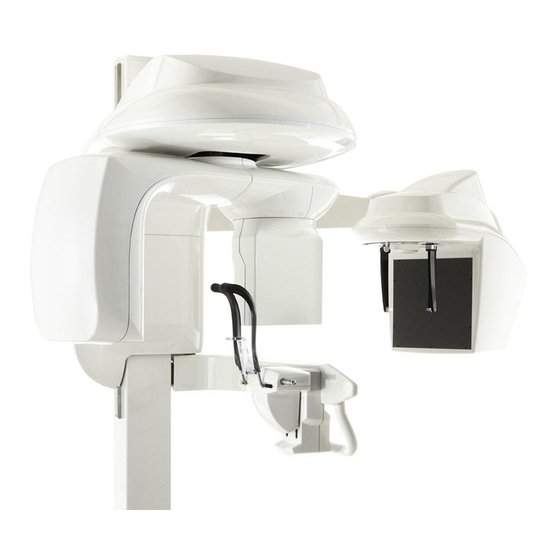
The cephalostat head The head clamps and ear cones The nasion support The acquisition software (see “Imaging Software Overview”) The following figures illustrate the general overview of the CS 9300C system. 2–1 CS 9300C User Guide (SM750)_Ed 01... -
Page 8: Mobile Components
General Overview Mobile Components Figure 2-1 illustrates the up and down movement of the CS 9300C mobile component and the 360° rotation of the rotative arm. Figure 2–1 CS 9300C Mobile Components 2–2 CS 9300C OVERVIEW... -
Page 9: General Functional Components
General Overview General Functional Components Figure 2-2 illustrates the general functional components of the CS 9300C. Figure 2–2 CS 9300C Functional Components ON/OFF button Sensor Unit fixed arm X-ray source assembly Control panel Unit rotative arm Hand Grips X-Ray remote control... -
Page 10: Digital Sensor Locations
Figure 2-3 illustrates the locations of the following digital sensors: *Panoramic and 3D digital sensor Cephalometric digital sensor panoramic, 3D and cephalometric digital sensors of the CS 9300C. Figure 2–3 CS 9300C System Digital Sensor Locations 2–4 CS 9300C OVERVIEW... -
Page 11: Laser Locations
General Overview Laser Locations Figure 2-4 illustrates the location of the lasers of the CS 9300C. Figure 2–4 CS 9300C System Laser Positions 3D central positioning laser beam Mid-sagittal positioning laser beam Horizontal positioning laser beam 3D Field of View (FoV) positioning laser beam... -
Page 12: Control Panel Overview
Display Screen: Displays the current acquisition parameters and the error messages. Ready Indicator LED: Green, indicates the unit is ready for acquisition. X-ray X-Ray Emission LED: Yellow, indicates the s are being emitted. System Status LED: Red, indicates the error alerts. 2–6 CS 9300C OVERVIEW... -
Page 13: X-Ray Remote Control Overview
X-ray room. You must press and hold the exposure button until the end of acquisition. WARNING Premature release of the exposure button will interrupt the acquisition. Figure 2–6 X-Ray Remote Control Exposure button: launches image acquisition. CS 9300C User Guide (SM750)_Ed 01 2–7... -
Page 14: Positioning Accessories And Replacement Parts
Panoramic Positioning Accessories and Replacement Parts Accessory Description Panoramic chin rest TMJ x2 Sinus TMJ x4 nose rest Panoramic standard bite block Bite block for edentulous patients Single use sheaths for bite blocks (500 pcs box) 2–8 CS 9300C OVERVIEW... -
Page 15: 3D Positioning Accessories
Table 2-2 lists the 3D positioning accessories. Table 2–2 3D Positioning Accessories and Replacement Parts Accessory Description 3D bite block 3D bite block support 3D head rest Single use hygienic sleeves for 3D bite block (100 pcs box) CS 9300C User Guide (SM750)_Ed 01 2–9... - Page 16 Positioning Accessories and Replacement Parts 2–10 CS 9300C OVERVIEW...
-
Page 17: 3-Imaging Software Overview
IMAGING SOFTWARE OVERVIEW Computer System Requirements For information on the minimum computer system requirements and the configuration for Imaging Software, see the CS 9300 and CS 9300C Safety, Regulatory and Technical Specifications User Guide. IMPORTANT It is MANDATORY to check that the computer system configuration is compatible with the computer system requirements for the CS 9300C software. -
Page 18: Cephalometric Acquisition Interface
Cephalometric Acquisition Interface Cephalometric Acquisition Interface Cephalometric Acquisition Interface Overview The Cephalometric Acquisition interface is the main cephalometric interface with the CS 9300C system that provides you with imaging acquisition functions. Cephalometric Acquisition Interface Figure 3–1 Information button: About: Identifies the Software and the Firmware versions. - Page 19 Exit button: Closes the Acquisition interface. Selector Button: Selects different acquisition setting options. Click Program to select examination type options. Click Patient to select patient type parameters. Click Parameters to select exposure parameter options. CS 9300C User Guide (SM750)_Ed 01 3–3...
-
Page 20: Cephalometric Program Pane
Cephalometric Acquisition Interface Cephalometric Program Pane The cephalometric Program pane enables you to choose different radiological exams as well as different acquisition formats. Figure 3–2 Cephalometric Program Pane Radiological exam options: Click for a lateral exam. Click for a submento-vertex exam. Click for a Click... -
Page 21: Cephalometric Patient Pane
Figure 3–3 Cephalometric Patient Pane Patient type parameters: Click if the patient is a child. Click if the patient is small. Click if the patient is medium. Click if the patient is large. CS 9300C User Guide (SM750)_Ed 01 3–5... -
Page 22: Cephalometric Parameter Pane
Cephalometric Acquisition Interface Cephalometric Parameter Pane The cephalometric Parameter pane enables you to choose exposure parameters for the radiological image acquisition. If the default parameter setting is not adapted to your patient type, you can manually adapt the parameter settings to the patient type and save this setting as the default setting. -
Page 23: 4-Getting Started
To increase the operating life of the X-ray tube, if the unit has not been used for a month, you must follow the following procedures before use. 1. In the Panoramic Acquisition interface, select the Parameter pane. 4–1 CS 9300C User Guide (SM750)_Ed 01... -
Page 24: Starting The Imaging Software
Starting the Imaging Software 2. Select the following series of parameter settings: 70 kV - 6.3 mA 80 kV - 10 mA 85 kV - 10 mA 3. Leave the X-ray room and close the door. For each parameter setting, from the X-ray remote control, press and hold the button to launch the X-ray. -
Page 25: Accessing The Cephalometric Acquisition Interface
Accessing the Cephalometric Acquisition Interface To access the Acquisition interface, follow these steps: 1. In the Imaging window, from the toolbar, click to access the Cephalometric Acquisition interface. 2. Prepare the acquisition parameters and launch an acquisition. CS 9300C User Guide (SM750)_Ed 01 4–3... -
Page 26: Starting The Cs Imaging Software
Starting the Imaging Software Starting the CS Imaging Software To start the CS Imaging Software, follow these steps: On your desktop, double-click . The Patient Browser tab is displayed. You must now create a patient card. Creating a Patient Card To create a patient card, follow these steps: Click in the Patient Browser tab. -
Page 27: Accessing The Acquisition Interface
Select and double-click the patient card in the patient list. The Image Viewer tab is displayed. to access the Cephalometric Acquisition In the Image Viewer tab, click interface. The acquisition interface is displayed. See the chapter “Acquiring an Image” to launch an acquisition. CS 9300C User Guide (SM750)_Ed 01 4–5... - Page 28 Starting the Imaging Software 4–6 GETTING STARTED...
-
Page 29: 5-Acquiring Cephalometric Images
4. If the default parameter setting is not adapted to your adult patient type, click the Parameter button and select the appropriate parameters. To save the new parameter settings as the default settings, click and select Memorize settings. CS 9300C User Guide (SM750)_Ed 01 5–1... -
Page 30: Preparing The Unit And Setting The Acquisition Parameters For The Pediatric Patient
Acquiring a Lateral Image Preparing the Unit and Setting the Acquisition Parameters for the Pediatric Patient To set the acquisition parameters, follow these steps: 1. Position the head clamps manually for the lateral exam. IMPORTANT You must position the head clamps manually because they are not positioned automatically from the Program pane exam type selection. -
Page 31: Preparing And Positioning The Adult Patient
Insert gently the second cone in the auditory canal of the patient. 6. On the control panel, click to turn ON the Frankfort laser positioning beam. Align the patient with the Frankfort laser beam. CS 9300C User Guide (SM750)_Ed 01 5–3... - Page 32 Acquiring a Lateral Image 7. Lower the nasion support to a vertical position. 5–4 ACQUIRING CEPHALOMETRIC IMAGES...
-
Page 33: Preparing And Positioning The Pediatric Patient
Insert gently the second cone in the auditory canal of the pediatric patient. 6. On the control panel, click to turn ON the Frankfort laser positioning beam. Align the pediatric patient with the Frankfort laser beam. CS 9300C User Guide (SM750)_Ed 01 5–5... - Page 34 Acquiring a Lateral Image 7. Lower the nasion support to a vertical position. 5–6 ACQUIRING CEPHALOMETRIC IMAGES...
- Page 35 Cephalometric Acquisition interface disappears and the acquired image is transferred automatically to the Imaging window. 3. Check the image quality, if satisfactory, remove the ear cones and the nasion support and release the patient. CS 9300C User Guide (SM750)_Ed 01 5–7...
-
Page 36: Acquiring A Frontal Ap Or Pa Image
Acquiring a Frontal AP or PA Image Acquiring a Frontal AP or PA Image Before acquiring a frontal AP or PA image, check that you have: Reset the unit rotative arm to the start position for patient to enter the unit. ... -
Page 37: Preparing The Unit And Setting The Acquisition Parameters For The Pediatric Patient
4. If the default parameter setting is not adapted to your pediatric patient type, click the Parameter button and select the appropriate parameters. To save the new parameter settings as the default settings, click and select Memorize settings. CS 9300C User Guide (SM750)_Ed 01 5–9... -
Page 38: Preparing And Positioning The Adult Patient
Acquiring a Frontal AP or PA Image Preparing and Positioning the Adult Patient To prepare and position the patient, follow these steps: 1. Ask the patient to remove all metal objects. 2. Ask the patient to wear a lead apron with a thyroid collar. Ensure that the apron lays flat across the patient’s shoulders. - Page 39 Acquiring a Frontal AP or PA Image Figure 5–3 Frontal AP Figure 5–4 Frontal PA CS 9300C User Guide (SM750)_Ed 01 5–11...
-
Page 40: Preparing And Positioning The Pediatric Patient
Acquiring a Frontal AP or PA Image Preparing and Positioning the Pediatric Patient To prepare and position the pediatric patient, follow these steps: 1. Ask the pediatric patient to remove all metal objects. 2. Ask the pediatric patient to wear a lead apron with a thyroid collar. Ensure that the apron lays flat across the pediatric patient’s shoulders. - Page 41 1. Leave the X-ray room and close the door. You must keep visual contact with the patient during acquisition. IMPORTANT To stop the acquisition, if any problem, release the exposure button of the remote control or press the red emergency stop button. CS 9300C User Guide (SM750)_Ed 01 5–13...
- Page 42 Acquiring a Frontal AP or PA Image Figure 5–9 Frontal AP Figure 5–10 Frontal PA 2. Launch the X-ray with the remote control. Press and hold the exposure button until the end of acquisition. The turns yellow indicating X-ray emission. The image appears on the Preview Screen of the Cephalometric Acquisition interface.
-
Page 43: Acquiring An Oblique Image
4. If the default parameter setting is not adapted to your adult patient type, click the Parameter button and select the appropriate parameters. To save the new parameter settings as the default settings, click and select Memorize settings. CS 9300C User Guide (SM750)_Ed 01 5–15... -
Page 44: Preparing The Unit And Setting The Acquisition Parameters For The Pediatric Patient
Acquiring an Oblique Image Preparing the Unit and Setting the Acquisition Parameters for the Pediatric Patient To acquire an oblique image, follow these steps: 1. Position the head clamps manually for the oblique exam with the desired angle. IMPORTANT You must position the head clamps manually because they are not positioned automatically from the Program pane exam type selection. -
Page 45: Preparing And Positioning The Adult Patient
5. Insert gently one cone in the auditory canal of the patient. Turn gently the button to close the arms. Insert gently the second cone in the auditory canal of the patient. 6. Lower the nasion support to a vertical position. CS 9300C User Guide (SM750)_Ed 01 5–17... -
Page 46: Preparing And Positioning The Pediatric Patient
Acquiring an Oblique Image Preparing and Positioning the Pediatric Patient To prepare and position the pediatric patient, follow these steps: 1. Ask the pediatric patient to remove all metal objects. 2. Ask the pediatric patient to wear a lead apron with a thyroid collar. Ensure that the apron lays flat across the pediatric patient’s shoulders. - Page 47 Cephalometric Acquisition interface disappears and the acquired image is automatically transferred to the Imaging window. 3. Check the image quality. If satisfactory, remove the ear cones and the nasion support. Release the patient. CS 9300C User Guide (SM750)_Ed 01 5–19...
-
Page 48: Acquiring A Submento-Vertex Image
Acquiring a Submento-Vertex Image Acquiring a Submento-Vertex Image Before acquiring a submento-vertex image, check that you have: Reset the unit rotative arm to the start position for patient to enter the unit. Selected the patient record. Accessed the Imaging window. ... -
Page 49: Preparing The Unit And Setting The Acquisition Parameters For The Pediatric Patient
3. If the default parameter setting is not adapted to your pediatric patient type, click the Parameter button and select the appropriate parameters. To save the new parameter settings as the default settings, click and select Memorize settings. CS 9300C User Guide (SM750)_Ed 01 5–21... -
Page 50: Preparing And Positioning The Adult Patient
Acquiring a Submento-Vertex Image Preparing and Positioning the Adult Patient To prepare and position the patient, follow these steps: 1. Ask the patient to remove all metal objects. 2. Ask the patient to wear a lead apron with a thyroid collar. Ensure that the apron lays flat across the patient’s shoulders. -
Page 51: Preparing And Positioning The Pediatric Patient
4. On the control panel, press and hold to level the ear cones to the pediatric patient’s auditory canals. CS 9300C User Guide (SM750)_Ed 01 5–23... - Page 52 Acquiring a Submento-Vertex Image 5. Insert gently one cone in the auditory canal of the pediatric patient. Turn gently the button to close the arms. Insert gently the second cone in the auditory canal of the pediatric patient. Launching the X-ray To launch the X-ray, follow these steps: 1.
- Page 53 Acquiring a Submento-Vertex Image CS 9300C User Guide (SM750)_Ed 01 5–25...
- Page 54 Acquiring a Submento-Vertex Image 2. Launch the X-ray with the remote control. Press and hold the exposure button until the end of acquisition. The turns yellow indicating X-ray emission. The image appears on the Preview Screen of the Cephalometric Acquisition interface. When the acquisition ends, the Cephalometric Acquisition interface disappears and the acquired image is automatically transferred to the Imaging window.
-
Page 55: Acquiring A Carpus Image
4. If the default parameter setting is not adapted to your pediatric patient type, click the Parameter button and select the appropriate parameters. To save the new parameter settings as the default settings, click and select Memorize settings. CS 9300C User Guide (SM750)_Ed 01 5–27... -
Page 56: Preparing And Positioning The Pediatric Patient
Acquiring a Carpus Image Preparing and Positioning the Pediatric Patient To prepare and position the pediatric patient, follow these steps: 1. Ask the pediatric patient to remove all metal objects. 2. Ask the pediatric patient to wear a lead apron with a thyroid collar. Ensure that the lead apron covers the patient’s thyroid area and lays flat across the patient’s shoulders. - Page 57 If you have a problem and need to stop the acquisition, release the exposure button of the remote control or press the red emergency stop button. 3. Check the image quality, if satisfactory, then release the patient. CS 9300C User Guide (SM750)_Ed 01 5–29...
-
Page 58: X-Ray Dose Emission Information
X-Ray Dose Emission Information X-Ray Dose Emission Information EURATOM 97/43 Directive Compliance with You can right-click on each image to display the estimated emitted dose received by the patient. You can use this information to calculate the effective dose received by the patient for the image. -
Page 59: Daily
Chapter 6 MAINTENANCE Perform the following maintenance activities on your CS 9300C unit. Daily Cleaning the CS 9300C unit 1. Switch off the unit. 2. Clean all accessible parts of the unit using low-level disinfectants that are U.S. Environmental Protection Agency (EPA)-registered or low-level disinfectants that are recognized by your Local Authority. -
Page 60: Cleaning And Disinfecting The Ear Cones
Daily 2. Rinse with water to remove chemical or detergent residue. 3. Sterilize by steaming under pressure (autoclaving) for 18 mn at 134 °C, or use a high-level disinfectant (for example, Glutaraldehyde, glutaraldehyde with phenol, hydrogen peroxide, hydrogen peroxide with peracetic acid, ortho-phthalaldehyde). WARNING To sterilize with heat, you must use a medical sterilization equipment cleared by the FDA in the USA. -
Page 61: Monthly
Monthly Wipe the outer covers of the unit with a soft, dry cloth. Annually We recommend a general inspection of the unit carried out by an authorized service technician. CS 9300C User Guide (SM750)_Ed 01 6–3... - Page 62 Annually 6–4 MAINTENANCE...
-
Page 63: Quick Troubleshooting
I 17 Sensor in movement The sensor is in the positioning Wait for the end of the positioning process. process for either panoramic, 3D or Ceph mode. CS 9300C User Guide (SM750)_Ed 01 7–1... - Page 64 Quick Troubleshooting 7–2 TROUBLESHOOTING...
Need help?
Do you have a question about the CS 9300C and is the answer not in the manual?
Questions and answers