Cactus V6 IIs User Manual
Wireless
flash
transceiver
Hide thumbs
Also See for V6 IIs:
- User manual (40 pages) ,
- Quick start manual (2 pages) ,
- User manual (94 pages)
Table of Contents
Advertisement
Advertisement
Table of Contents

Related Manuals for Cactus V6 IIs


Summary of Contents for Cactus V6 IIs
- Page 1 User Manual Wireless Flash Transceiver V6 IIs...
-
Page 2: Table Of Contents
Table of Contents Getting to Know the Cactus V6 IIs Cautions and Warnings Major Specif ications Package Contents Nomenclature LCD Panel Compatibility TTL Pass-through Getting Started 10. Flash Setup 11. Flash Triggering 12. Remote Manual Power and Zoom Control... - Page 3 13. High Speed Synchronization 14. Camera Shutter Release 15. Advanced Operations 16. Personalizing the V6 IIs 17. Working with Cactus Gear 18. LED Signal Guide 19. USB Connection 20. Optional Accessories 21. Troubleshooting 22. Notices 23. Warranty...
-
Page 4: Getting To Know The Cactus V6 Iis
V6 IIs Thank you for purchasing the Cactus Wireless Flash Transceiver V6 IIs. The Cactus V6 IIs is specially designed for Sony cameras and flashes with the MI (Multi- Interface) hot shoe. Yet when working with the Cactus V6 II, it allows you to command different brands’... - Page 5 V6 IIs build up a common language between cameras Core and flashes. When working with the V6 II, the V6 IIs transceiver is a gateway to sync your Sony cameras to almost any digital flashes in the world. Ready to go? Let’s get started and see what...
-
Page 6: Cautions And Warnings
5. Do not operate the device in the presence of flammable gases or fumes. 6. Do not disassemble. 7 . Do not crush the V6 IIs and do not expose it to any shock or force such as hammering, dropping, or stepping on it. -
Page 7: Major Specifications
3. Major Specifications • Working radio frequency: 2.4 GHz • Number of channels: 16 • Number of groups: 4 • Support sync speed up to 1/8,000 second • AF-Assist LED: 1W • Maximum effective distance: 100 meters • Operating temperature: -20°C to +50°C •... -
Page 8: Package Contents
4. Package Contents V6 IIs Transceiver Flash Stand FS-2 Album, Sticker & Quick Start Guide... -
Page 9: Nomenclature
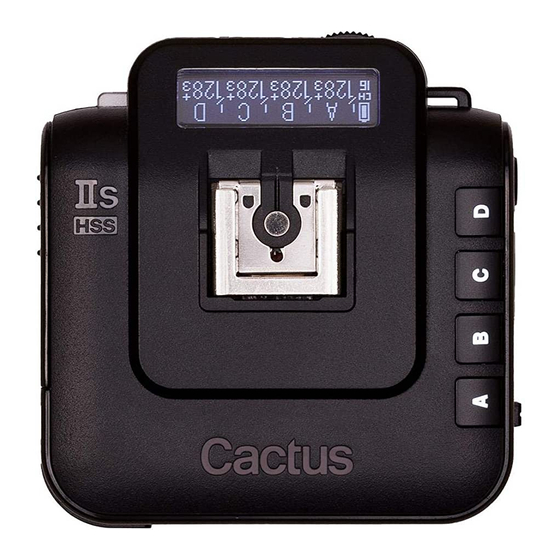
5. Nomenclature HOT SHOE (FEMALE) TEST BUTTON/ LCD DISPLAY SHUTTER RELEASE BUTTON LANYARD LOOP AF-ASSIST LIGHT X-SYNC PORT MINI USB PORT GROUP BUTTONS MODE SWITCH... - Page 10 HOT SHOE (MALE) HOT SHOE TRIPOD MOUNT LOCK LEVER SELECTION DIAL BATTERY DOOR OK BUTTON MENU BUTTON LED STATUS INDICATOR...
-
Page 11: Lcd Panel
6. LCD Panel BATTERY INDICATOR GROUP TX mode CHANNEL POWER LEVEL POWER LEVEL INCREMENT MAIN SCREEN POWER LEVEL/ FLASH ZOOM FLASH PROFILE SYSTEM DELAY CAMERA SYNC MODE RELAY MODE TIMER SYSTEM INDICATOR INDICATOR StAtuS SCREEN (The status screen is accessible by pressing and holding the Menu button while turning the dial to either the left or right at the same time. - Page 12 POWER LEVEL FLASH BATTERY POWER FLASH INCREMENT RX mode INDICATOR PROFILE LEVEL SYSTEM CHANNEL RELAY MODE DELAY WIRELESS INDICATOR TIMER SENSITIVITY Camera Sony Others and Flash Indicators...
-
Page 13: Compatibility
7. Compatibility The Cactus V6 IIs is both a wireless flash trigger and wireless remote control. While it triggers both portable flashes and studio strobe lights, it also supports remote control features with selected flash models. 7.1.1 Cactus RF60X / RF60 Flash &... - Page 14 This includes high trigger voltage portable flash models, and all strobe models with a trigger voltage of 300V or less. The Cactus V6 IIs does not provide remote power control of these flashes and strobes. For studio flashes to work with high-speed sync, they have to maintain a flash duration of 1/100 second or longer.
- Page 15 (2) the legacy Sony/Minolta iISO hot shoe with an appropriate hot shoe adapter (e.g. , Sony ADP-AMA) . To use the V6 IIs as a wireless shutter release, specif ic cables are required. For the list of optional accessories, see Section 20.
-
Page 16: Ttl Pass-Through
8. TTL Pass-through The V6 IIs transceiver comes with a pair of hot shoes that supports TTL pass-through with Sony cameras and Sony system flashes. While the V6 IIs does not wirelessly command off-camera flashes to f ire according to TTL... - Page 17 To enable the TTL pass-through in the V6 IIs press and hold for 2 seconds. The LCD will show the TTL pass-through indicator at the left bottom corner where the channel indicator used to be. In TTL pass-through mode, the V6 IIs TX cannot control the power level of the flash attached.
-
Page 18: Getting Started
Attaching to and Detaching from the Camera UNLOCK LOCK To mount the V6 IIs on a camera’s hot shoe mount: 1. Turn the lock lever of the V6 IIs to the left to unlock the multi-system shoe (male) . - Page 19 2. Slide the V6 IIs into the camera’s hot shoe. 3. Turn the lock lever of the V6 IIs to the right to lock the multi-system shoe (male) . 4. When detaching the V6 IIs from the camera’s hot shoe, turn the lock lever to the left to unlock the hot shoe (male) .
- Page 20 Group Control (see Section 9.6) Function Mode Select a group Main screen, Hold* (e.g. , group A) when the for adjusting group is not parameters (power selected level/zoom) Deselect a group Main screen, (e.g. , group A) when the group is selected Turn on/off a Main screen,...
- Page 21 Adjusting Power Level and Zoom (see Sections 12.1 and 12. 5) Function Mode Adjust power Main screen level/zoom of all groups Adjust power Main screen level/zoom of a single group (e.g. , Hold group A) then Adjust power Main screen level/zoom of the on-camera flash** Toggle between the...
- Page 22 Navigating the Menu (see Section 9. 7) Function Mode Enter the menu Main screen Browse through Menu menu items and options Choose a menu item Menu or option Leave the menu Menu Dial Lock (see Section 17 .2) Function Mode Lock the dial Main screen, Hold...
- Page 23 The Cactus V6 IIs transceivers communicate with one another via radio frequency. There Setting are 16 channels available. Always make sure that all of your V6 IIs transceivers are set Channel to the same channel: Radio ID 1. To set both the TX and RX to the same channel, press .
- Page 24 To protect your setup from interference from other Cactus devices, assign all your V6 IIs to a specif ic radio ID. Press turn the selection dial to <RADIO SETUP>. Press and turn the selection dial to <RADIO ID>.
- Page 25 5. Pressing the group button(s) of activated groups again on the V6 IIs TX will turn off the group(s) . The V6 IIs RX units that have been set to the off group(s) will not f ire.
- Page 26 The conf igurable menu items of the V6 IIs are grouped under categories shown in the Navigating following sequences: the Menu FLASH POWER RADIO FUNCTIONS PREFERENCES SETUP SETUP SETUP FUNCTIONS FLASH RADIO PREFERENCES SETUP SETUP To change a menu option: 1.
- Page 27 The conf iguration of the menu item will change immediately. 5. Press to leave and go back to the main screen, or dial right or left to the next menu item in the sequence. Check the list of menu items in each category below: FuNCtIoNS - SYNC MODE...
- Page 28 pREFERENCES - AF-ASSIST (TX/RX) √ √ - BACKLIGHT POWER √ √ - BACKLIGHT TIME √ √ - DAYLIGHT MODE √ √ - SWAP CONTROL √ - DIAL DIRECTION √ √ - TEMPORARY UNLOCK √ - SLEEP √ √ - FACTORY RESET √...
-
Page 29: Flash Setup
Prof ile Editor on a PC or Mac (see Section 10. 3) . 10.1 The Auto Flash Prof ile in the V6 IIs is the default prof ile that works with all Sony Applying system flashes. To apply the auto prof ile, no an Auto setup is required. - Page 30 V6 IIs Choosing RX assigned to a flash. a Flash Profile 1. Switch on the V6 IIs in RX mode. 2. Press , and then turn the selection dial to <FLASH SETUP>. Press 3. Turn the selection dial to <FLASH PROFILE>.
- Page 31 Cactus Prof ile Editor available for a PC and Mac. 1. Download the Cactus Prof ile Editor from the Cactus website. 2. Follow the f irmware update procedures to connect the V6 IIs with your computer...
- Page 32 6 digits in letters or numbers. 6. Press STORE PROFILE button. The custom prof ile will be loaded to the connected V6 IIs. The LCD display on the V6 IIs will return to the main screen. To choose the saved flash prof ile from the prof ile list, see Section 10.2.
- Page 33 Note: The Prof ile Editor supports prof ile sharing by codes. When customizing a flash prof ile, the editor will generate a code representing the changed parameters. You can share this code with others, or simply enter the code received from other users in the SHARE CODE column to generate a new customized prof ile in a second.
-
Page 34: Flash Triggering
3. Assign RX unit(s) to A, B, C, or D group and activate the group(s) on the TX (see Section 9.6) . 4. Connect the V6 IIs RX to portable flashes or studio strobes. completely. The 5. On the TX, press status LED of both the TX and RX should blink in green simultaneously. - Page 35 8. Press the camera’s shutter release button. The flashes on the RXs will f ire wirelessly and in sync. Tips: The V6 IIs transceiver can trigger portable flashes with or without remote power control. If you wish to wirelessly trigger the off-camera flashes without controlling their power levels, choose the <OTHER>...
-
Page 36: Remote Manual Power And Zoom Control
On each RX, choose the appropriate flash prof ile for each flash to be connected. The V6 IIs TX will then be able to command the flash to f ire from 1/128 to 1/1 full power, and at a zoom angle between 16mm and 200mm. - Page 37 Power relative power mode (i.e. , 1/1 for full power, 1/2 for half power, etc. ) . Upon switching on the V6 IIs in TX mode, the LCD will show the relative power levels of all activated groups. Note that the small single digit indicates the increment between major power levels.
- Page 38 You may also adjust the power level of the on-camera flash that you have mounted on the V6 IIs in TX mode. 1. Make sure that the TTL pass-through mode has not been activated (see Section 8) . 2. Press...
- Page 39 <SWAP CONTROL>. Press , turn the selection dial to <QUICK POWER ADJ> and press to choose. 2. In the main screen of the V6 IIs in TX mode, press once to enter the quick power adjustment mode.
- Page 40 1/8 can be higher than that of another, weaker flash model at 1/4. For this reason, the V6 IIs offers an Absolute Power mode in which EV numbers can be used to specify an absolute...
- Page 41 5. 7 1. 5 When setting up the absolute power mode, the V6 IIs TX will collect the flash prof iles being selected by the RX units in the same channel and rescale them to the unif ied light intensity scale. The following example...
- Page 42 scales are translated into the absolute power scale. RELATIVE LIGHT INTENSITY SCALE OF 4 FLASHES WITH DIFFERENT FULL ABSOLUTE LIGHT POWER GUIDE NUMBERS INTENSITY SCALE IN EV FLASH FLASH FLASH FLASH GN58 GN41 GN29 GN21 1/16 1/32 1/16 1/16 1/64 1/32 1/32 1/128...
- Page 43 Choose the correct flash prof iles for each of the V6 IIs RX. 2. Switch on the V6 IIs that you would like to be the commander in TX mode. Make sure it is on the same channel as the RX units.
- Page 44 OFFSET>. Turn the selection dial left or right to adjust the power scale from -1EV to 1EV. Press to return to the main screen. Note: The absolute power set up will not be saved upon switching off the V6 IIs TX. The...
- Page 45 Please note that while the Sony system flashes do not support the f inest EV step of 1/10EV, such setting on the V6 IIs TX can still command other system flashes (connected with the V6 II RX) or the RF60 series wireless flash in the setup.
- Page 46 TX by one step may not affect their power output. For example, on the V6 IIs TX that is set to 1/10EV step, you need to adjust 3 or 4 steps of power level to cause a change in power output of a Sony system flash that sup- ports up to 1/3 EV step.
- Page 47 To enable Lo Power: 1. Switch on the V6 IIs in TX mode and press . Turn the selection dial to <POWER SETUP> and press . Turn the selection dial to <Lo POWER> and press . Turn the selection dial to <ON> and press 2.
- Page 48 For example, if the V6 IIs is conf igured to 80mm for a particular group of flashes, a flash equipped with 70mm – 85mm –...
- Page 49 button and turn the selection dial simultaneously. Once the adjustment is f inished, release the group button. 3. On-camera Flash: Press and hold turn the dial simultaneously. Once the adjustment is f inished, release...
-
Page 50: High Speed Synchronization
Cactus V6 IIs supports high-speed sync in two ways: 1. Normal HSS: It supports the HSS or FP sync capabilities of the system flashes. - Page 51 When the shutter speed of the camera exceeds its x-sync speed, the normal HSS setting of Normal the V6 IIs will command the flashes to f ire continuous and constant flash pulses for the full duration between the f irst curtain opening and second curtain closing of the shutter.
- Page 52 13.2 As an alternative to the Normal HSS, the Power Sync of the V6 IIs syncs with the full Power power flash of the remote flashes. Power Sync Sync yields a much higher exposure than the normal HSS flash.
- Page 53 . Turn the selection dial to <SYNC MODE> and press . Turn the selection dial to <POWER SYNC> and press . On the status screen, the Power Sync icon will be shown. 2. Switch the camera shutter beyond its x-sync speed and take a picture. 3.
- Page 54 Notes: 1. Since the Power Sync always command the remote flashes to f ire in full power, the power level cannot be adjusted. The power levels on the main screen will be executed when the shutter speed is within the x-sync. 2.
-
Page 55: Camera Shutter Release
This cable is NOT included in the V6 IIs transceiver package. 14.1 Basic Setup A minimum of two Cactus V6 IIs transceivers is required to operate Cactus V6 IIs as a wireless shutter release. - Page 56 1. Connect the V6 IIs RX to your camera using an appropriate shutter release cable. 2. Set both the V6 IIs TX and RX to the same channel. On the V6 IIs TX, activate the group assigned to the V6 IIs RX.
- Page 57 1. Make sure that all the V6 IIs units are set to the same channel. 2. Set the V6 IIs you would like to use as the handheld remote as TX, then all others as RX.
- Page 58 3. Mount one of the V6 IIs RXs onto the camera’s hot shoe, and also connect the V6 IIs RX to the camera’s shutter release port with an appropriate shutter release cable (optional) . Connect the other V6 IIs RXs to the flash units.
- Page 59 6. By pressing on the TX, both the camera and flash units will be triggered and sync with one another. In addition, you will also be able to control the power level of the flashes with your V6 IIs TX.
-
Page 60: Advanced Operations
Light mode to best suit your working environment. To conf igure the AF-assist LED: 1. Switch on the V6 IIs in TX or RX mode. Please note that the set up will be applied to that operating mode only. 2. Press and turn the selection dial to <PREFERENCES>. - Page 61 AF-assist signal via the hot shoe, the AF-assist LED will not be activated. 15.2 The V6 IIs supports up to 20 TXs working together in a lighting set up. Photographers Multi- can share the same set of remote flash units...
- Page 62 , set an appropriate delay time from 1 millisecond to 99 seconds. To set up the delay timer: 1. Switch on the V6 IIs in TX or RX mode and press . Turn the selection dial to <FUNCTIONS> and press .
- Page 63 4. The status screen of V6 IIs TX and main screen of the V6 IIs RX will show the status of the delay timer (see Section 6) .
- Page 64 The V6 IIs offers two group sequence modes for selection: A-B-C-D: The f irst trigger in a series will f ire group A, then group B, and so on. The f ifth trigger will f ire group A and start the cycle again.
- Page 65 AB when there is no triggering event in 2 seconds. To select a group sequence mode: 1. Switch on the V6 IIs in TX mode. Press . Turn the selection dial to <FUNCTIONS> and press .
- Page 66 The sports shutter in the V6 IIs is designed to maximize the frames per second (FPS) of the slave camera in this setup.
-
Page 67: Personalizing The V6 Iis
16.1 In <DIAL DIRECTION>, the selection dial of the V6 IIs can be conf igured to operate in a Dial <CLOCKWISE> or <ANTI-CLOCKWISE> direction. Direction To increase the power level in the main... - Page 68 (see Section 12.1.1) will be unaffected. 16.3 In the main screen of the V6 IIs TX, pressing or the push-in selection dial once will Swap change it to one of the following modes: Control •...
- Page 69 1EV step (see Section 12.1.3) The option can be conf igured in <SWAP CONTROL>. 16.4 The LCD display of the V6 IIs can be conf igured in the following ways: Options 1. LCD Backlight Auto Off: The LCD backlight of the V6 IIs will turn on whenever...
- Page 70 In <SLEEP>, choose from <OFF>, <15 MINS>, or <60 MINS>. To wake up the V6 IIs from sleep mode, press any button or turn the selection dial once. Local triggering via a hot shoe or x-sync port also awakens the V6 IIs.
- Page 71 16.7 To set the V6 IIs back to the original manufacturing setting, use Factory Reset. Factory In the <FACTORY RESET> menu, press Reset turn the dial to <YES>. The screen will show <CONFIRM?>. Press to conf irm.
-
Page 72: Working With Cactus Gear
17. Working with Cactus Gear The V6 IIs transceiver is compatible with the Cactus Wireless Flash RF60 series, Wireless Flash Trigger V6 II, V6, V5, and Laser Trigger LV5. RF60X/ CAMERA RF60 LV5 SENSOR LV5 EMITTER... - Page 73 Check the table below for the supporting features of all the possible pairing options: Cross-device Pairing Options Features Supported Flash V6 IIs, V6 II, V6 II, V6, V5; Triggering V6, LV5, V5; RF60X, RF60 within x-sync RF60X, RF60 shutter speed...
- Page 74 HSS and Power Sync flash. Note: The Cactus V6 IIs can specify up to 1/10 EV step and communicate it with any flash of the RF60; however, the flash will only display the nearest 1/3 EV step.
- Page 75 A, a Canon 580EX II (with a V6 II RX) to group B, and a Sony HVL-F60M (with a V6 IIs RX) to group C. The V6 IIs TX will be able to trigger them all, set their power levels in either relative or absolute power mode, and adjust their zoom angles.
- Page 76 17.2 The Cactus V6 IIs in TX mode can work in pairs with V6 II in RX mode to support high V6 Series speed sync capabilities, but not vice versa.
- Page 77 They all share the same 2.4GHz, 16-channel platform. Since the V5 and LV5 do not support groups and remote power control, the V6 IIs TX will trigger all V5s, independent of which group it considers active. Similarly, both V5 and...
-
Page 78: Led Signal Guide
18. LED Signal Guide STATUS INDICATOR ON TX INDICATOR ON RX Flash triggering Green Shutter triggering Green Half-press auto Orange focusing Power level Orange command received Bulb mode Green (for 2 seconds) activation Bulb mode Green deactivation Low battery Red (every 3 seconds) Firmware update Red (every 0. -
Page 79: Usb Connection
V6 IIs, Firmware press and hold , then switch on the V6 IIs in TX or RX mode at the same time. The LCD display will show the f irmware version installed in the unit. Release the buttons... - Page 80 MU-1 (optional) . 3. Press and hold , then switch on the V6 IIs in TX or RX mode at the same time. 4. The V6 IIs is now in f irmware update mode. The status LED blinks red rapidly.
-
Page 81: Optional Accessories
1. Wireless flash RF60X / RF60 2. Wireless flash trigger V6 II 3. Laser trigger LV5 4. Shutter release cables (Cactus Shutter Cables are available for most camera models by Canon, Fujifilm, Leica, Minolta, Nikon, Olympus, Panasonic, Pentax, Samsung, and Sony. -
Page 82: Troubleshooting
21. Troubleshooting Before reading this section, ensure that the Cactus V6 IIs transceiver has been set up correctly (following the instruction in Section 8-14 of this manual) . If the problem persists after conducting the troubleshooting steps, contact your seller... - Page 83 1. Wrong Flash Power Fired LCD DISPLAY POSSIBLE CAUSE SOLUTION RX displays More than one - Set Radio ID to wrong power TXs are prevent the RX levels controlling the from receiving flash power of unintended the RXs commands by other TXs - Set all transceivers to...
- Page 84 Poor hot shoe - Adjust tightness RX: No contact of hot shoe contact - Clean the hot shoe contacts of the V6 IIs with a clean cloth TX: No Background radio - Set both RX: Yes interference transceivers to (Green)
- Page 85 Replace batteries RX: No contact or on TX and retry insuff icient battery on TX 2. Poor hot shoe - Adjust tightness contact of hot shoe contact - Clean the hot shoe contact of the V6 IIs with a clean cloth...
- Page 86 LED BLINKS? POSSIBLE CAUSE SOLUTION TX: Yes 1. Poor battery Replace the (Green) contact or batteries in the RX: No battery out of RX and retry power on RX 2. Channel and Ensure both group mismatch transceivers are set to the same channel and the group assigned to the RX has been...
- Page 87 (Green) contact of hot shoe RX: Yes contact (Green) - Clean the hot shoe contacts of the V6 IIs with a clean cloth 2. Flash used is Check that the not compatible flash used is with the compatible with V6 IIs the V6 IIs (see Section 7 .1)
-
Page 88: Notices
22. Notices Notices for Customers in the U.S.A. Federal Communications Commission (FCC) Radio Frequency Interference Statements. This equipment has been tested and found to comply with the limits for a Class B digital device, pursuant to Part 15 of the FCC Rules. These limits are designed to provide reasonable protection against harmful interference in a residential installation. - Page 89 Mirror Factory (6th) Industrial Building, 7-9 Ho Tin Street, Tuen Mun, Hong Kong, declare under our own responsibility that the product: Cactus Wireless Flash Transceiver V6 IIs is in conformity with the essential requirements and other relevant requirements of the R&TTE Directive (1999/5/EC) .
- Page 90 The crossed-out wheeled bin means that within the European Union the product must be disposed separately at the end of the product cycle. Do not dispose this product with other municipal waste. NCC Warning Statement Article 12 Without permission, any company, f irm or user shall not alter the frequency, increase the power, or change the characteristics and functions of the original design of the certif ied...
-
Page 91: Warranty
23. Warranty The limited warranty set forth below is given by Harvest One Limited in the world with respect to the Cactus brand Wireless Flash Transceiver purchased with this limited warranty. Your Cactus Wireless Flash Transceiver or other contents, when delivered to you in new condition... - Page 92 AND EVEN IF HARVEST ONE LIMITED HAS BEEN ADVISED OF THE POSSIBILITY OF SUCH DAMAGES. IN NO EVENT SHALL RECOVERY OF ANY KIND AGAINST HARVEST ONE LIMITED GREATER IN AMOUNT THAN THE PURCHASE PRICE OF THE CACTUS WIRELESS FLASH TRANSCEIVER SOLD BY HARVEST ONE LIMITED OR ITS AUTHORIZED...
- Page 93 YOUR PROPERTY AND TO OTHERS AND THEIR PROPERTY ARISING OUT OF USE OR MISUSE OF , OR INABILITY TO USE, THE CACTUS WIRELESS FLASH TRANSCEIVER NOT CAUSED DIRECTLY BY THE NEGLIGENCE OF HARVEST ONE LIMITED. THIS LIMITED WARRANTY SHALL NOT EXTEND...
- Page 94 www.cactus-image.com...
Need help?
Do you have a question about the V6 IIs and is the answer not in the manual?
Questions and answers