
Related Manuals for Zanotti GM1


Summary of Contents for Zanotti GM1
- Page 1 MANUALE USO E MANUTENZIONE USE AND MAINTENANCE INSTRUCTIONS NOTICE DE MODE D’EMPLOI ET D’ENTRETIEN GEBRAUCHS- UND WARTUNGSHANDBUCH MANUAL DE USO Y MANUTENCIÓN...
-
Page 2: Table Of Contents
CONTENTS Safety recommendations Table of warning and attention plates Description of the unit Operation Handling Installation 6.1 Plates 6.2 Dimensions 6.3 Location 6.4 Free room 6.5 Installation 6.6 Fitting the remote panel 6.7 Safety devices 6.8 Cleaning Connecting the unit 7.1 Electric connection 7.2 Connection to water system Electric controls... -
Page 3: Safety Recommendations
Thank you for choosing Uniblock. Please read these instructions carefully. They provide details and advice on the correct method of installing, using and maintaining this unit, in order to obtain maximum reliability, efficiency and long life. 1 SAFETY RECOMMENDATIONS When installing and using the unit please follow the recommendations listed here below. •... -
Page 4: Table Of Warning And Attention Plates
2 Table of warning and attention plates Modello Model Year of manufacture ZANOTTI S.p.A. ZANOTTI unit code Via Martin L. King, nr. 30 Serial number 46020 PEGOGNAGA (Mantova) - Italy Voltage Modello Model Run Absorption Matricola Serial Number Max Absorption... -
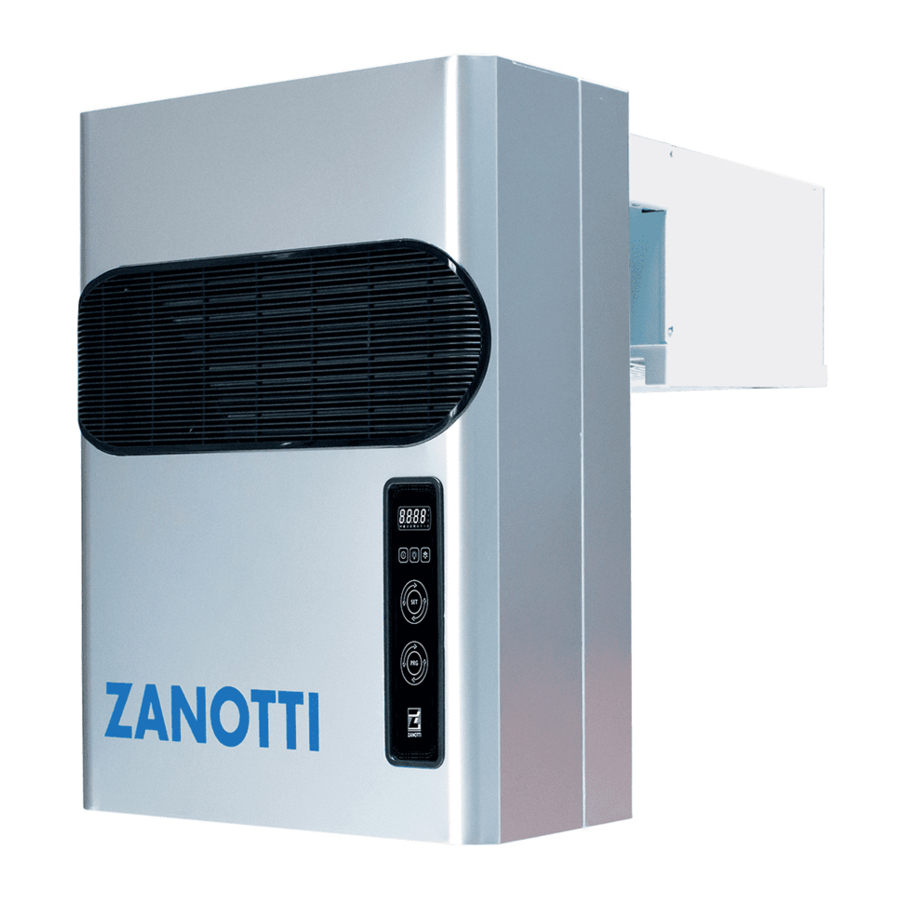
Page 5: Description Of The Unit
Description of the unit The GM series includes air-cooled or water-cooled (optional) condensing units built on the basis of the single-block principle. They consist of: 1. a condensing unit placed outside the cold room; 2. an insulating panel (optional) for wall-thru instead of straddle installation;... -
Page 6: Installation
6 Installation 6.1 Plates The unit is supplied with warning and attention plates as listed in the relevant table. 6.2 Dimensions 6.3 Location To obtain optimal operation of the unit act as follows: A) Place the unit in a well ventilated room, far from heat sources. B) Limit the number of door openings. -
Page 7: Installation
6.5 Installation Straddle version: before mounting the unit prepare the cuts and holes in the cold room wall shown in the picture. Fix the unit in place with the appropriate screws. Position the unit on the cold room, connect the evaporator drain tray spigot and the hole prepared in the cold room wall using the supplied fitting with pre-inserted heater (for low temperature units only). -
Page 8: Fitting The Remote Panel
Mod. 6.6 Fitting the remote panel (optional): Fix the back plate to the wall using the pre-drilled holes; be careful the panel is kept in a vertical position. Fit the connecting cable between panel and unit making sure not to bundle it with other cables. -
Page 9: Safety Devices
Safety devices mechanical safety devices The following are supplied: Fixed upper and side protections for evaporator and condensing unit, secured by locking screws. External fan protections placed on the evaporating and condensing units, secured with screws. electrical safety devices The following are supplied: Protection of fans (belonging to motors) against high power absorption;... -
Page 10: Connection To Water System
Connect the unit paying attention to the colours of the supply cable wires: a) 230V/1/50-60Hz Yellow/Green = Ground Brown = Phase b) 230V/3/50-60Hz 4 wires Blue = Phase Yellow/Green = Ground Brown = Phase Black = Phase c) 400/3/50 Hz 5 wires Blue = Neutral Yellow/Green = Ground... -
Page 11: Electric Controls
8 Electric controls 8.1 Control panel Control LED (GREEN) ON : compressor is running, unit is refrigerating. Flashing : compressor is in start delay mode. OFF : compressor is off, room temperature is down to set value. Control LED (GREEN) ON : evaporator fan is running. -
Page 12: Checks, Regulations And Adjustments
"ON/OFF" key: when pressed for 3 seconds it turns the unit on or off. "Enter" key: it gives access to programming menu and submenus. Access to the programming mode requires the installator’s assistance and should be effected only if necessary. Checks, regulations and adjustments Before turning the unit on, check that: - locking screws are tight... -
Page 13: Wiring
Wiring A wiring diagram, specific for the units of the GM series, is enclosed with these use and maintenance instructions. Maintenance and repairs Suitable maintenance is crucial for obtaining longer life, perfect working conditions and high efficiency of the unit as well as for ensuring the safety features provided by the manufacturer. -
Page 14: Alarms
Ice forms on the evaporator preventing air from flowing regularly. Possible causes are: - the door is opened too frequently; - faulty operation of evaporator fan; - faulty solenoid valve (in models with hot gas defrost); - faulty defrost heater (in models with electric defrost); - faulty defrost process. - Page 15 ALARM DISPLAY CAUSE REMEDY High temperature (HI) Excessive door openings Red led and alarm relay Excessive product load activated; Product too warm displayed in the alarm Malfunction of the unit menu as indicated above. Low temperature (LI) Malfunction Service intervention Red led, buzzer and alarm electronic controller relay are activated;...
-
Page 16: How To Order Spare Parts
Voltage monitor (E8) Wrong supply voltage The voltage monitor is an electronic device which checks the supply voltage of the unit. When voltage variations exceed +/- 12% the device activates the red led, the buzzer and the alarm led. Err and cold room temperature displayed alternately. - Page 17 Zanotti S.p.A. Via M.L. King, 30 - 46020 Pegognaga (MN) Italy Tel. 0376.5551 Fax 0376.536554 Info@zanotti.com - www.zanotti.com...
- Page 18 LEGENDA SCHEMA ELETTRICO - WIRING DIAGRAM LEGENDE SCHEMA ELECTRIQUE - SCHALTPLANLEGENDA LEYENDA ESQUEMA ELECTRICO - LEGENDA ESQUEMA ELECTRICO SONDA TEMPERATURA AMBIENTE RESISTENZA CARTER COMPRESSORE M1 ROOM SENSOR COMPRESSOR CRANKCASE HEATER SONDE CHAMBRE FROIDE RESISTANCE CARTER COMPRESSEUR RAUMSONDE KOMP.-ÖLSUMPFHEIZUNG SONDA CAMARA RESISTENCIA DEL CARTER DEL SONDA TEMPERATURA AMBIENTE COMPRESOR...
- Page 19 LAMPADA LUZ DA CAMARAU FUSIBILE COMPRESSORE COMPRESSOR FUSE FUSIBLE COMPRESSEUR ALLARME KOMPRESSORSICHERUNG ALARM FUSIBLE COMPRESOR ALARME FUSIVEIS COMPRESSOR ALARM ALARMA ALARME CENTRALINA ELETTRONICA ELECTRONIC CONTROL CAB PANNEAU DE CONTRôLE ELECTRONIQUE SUONERIA ALLARME TEMPERATURA ELEKTRONENKONTROLL- PANEEL ACUSTIC TEMPERATURE ALARM PANEL DE CONTROL ELECTRONICO SONNERIE ALARME TEMPERATURE TEMP.- ALARMWECKER ALARMA SONORA DE TEMPERATURA...
- Page 20 MOTEUR VENTILATEUR CONDENSEUR INTERRUPTOR GENERAL KOND.-VENTILATORMOTOR INTERRUPTOR GENERAL MOTOR VENTILADOR CONDENSADOR MOTOR VENTILADOR CONDENSADOR INTERRUTTORE ESCLUSIONE VAR. VELOCITA’ MOTORE VENTOLA EVAPORATORE COND. FAN SPEED REGULATOR “OFF” EVAPORATOR FAN MOTOR SWITCH MOTEUR VENTILATEUR EVAPORATEUR INTERR. EXCLUSION VARIATEUR VITESSE VERDMF.-VENTILATORMOTOR VENT. COND. MOTOR VENTILADOR EVAPORADOR KOND.-VENTILATORGESCHW.
- Page 21 Zanotti S.p.A. Via M.L. King, 30 - 46020 Pegognaga (MN) Italy Tel. 0376.5551 Fax 0376.536554 Info@zanotti.com - www.zanotti.com...
Need help?
Do you have a question about the GM1 and is the answer not in the manual?
Questions and answers