Table of Contents
Advertisement
Quick Links
Advertisement
Table of Contents

Related Manuals for Alecto DBX-76


Summary of Contents for Alecto DBX-76
- Page 1 USER MANUAL DBX-76...
-
Page 2: Eco Mode
1 ECO MODE Given the unique ECO MODE function on the DBX-76 baby monitor, the transmitter can be automatically and COMPLETALY deactivated when your baby is sleeping peacefully. The baby monitor will only be turned on when necessary, for example if your baby is crying. -
Page 3: General Functions
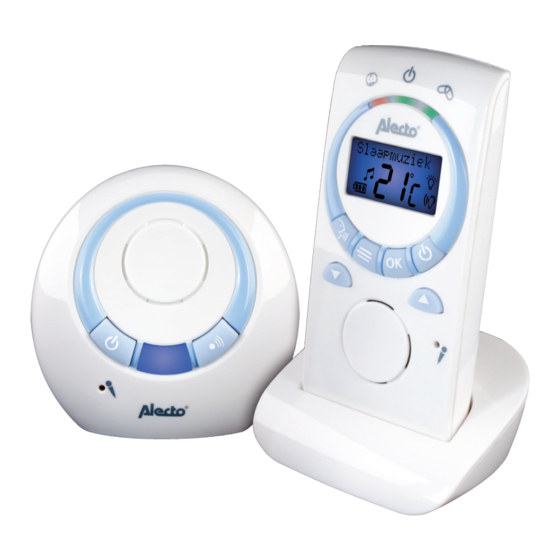
2 GENERAL FUNCTIONS OVERVIEW PARENT UNIT Light : Flashes when the parent unit is switched off and being charged on the charger (will stop flashing when the batteries are full). Lights up continuously when the parent unit is switched on. Flashes when the parent unit is off the charger and the batteries are running low. - Page 4 Key: To open the menu. Built in loud speaker. OK Button: to confirm the settings. Built in microphone. Key: Press the key repeatedly to increase the receiver volume or to scroll through the settings. Key: Press for more than 2 seconds to turn the parent unit on. Press again for more than 2 seconds to turn the parent unit off.
-
Page 5: Overview Display
Night light, the on /off indicator: Lights up when the baby unit is switched on, and goes off when the baby unit is switched off. Key: press for more than one second in order to call the pa- rent unit. Battery compartment. -
Page 6: Installations
3 INSTALLATIONS PARENT UNIT: The parent unit is powered by the two supplied rechargeable batteries. These batteries can be charged using the included holder/charger. ATTENTION: NEVER place normal batteries in the parent unit. Normal batteries are not rechargeable and may explode if charging causing irreparable damage to the parent unit. -
Page 7: Placement Tips
Open the battery compartment on the back of the baby unit by unscrewing the screw using a small screwdriver and turning counter clockwise to loosen. Place 4 batteries as indicated in the battery compartment taking note of the polarity (+ and -). Place the battery cover back onto the baby unit and turn the screw back on by turning it clockwise. -
Page 8: How To Use
4 HOW TO USE Please note that this baby monitor should only be used as an added assistance. The unit does not replace the physical presence and over- sight of a parent or guardian. ON / OFF AND CONNECTION CONTROL: Switch the parent unit on: Switch on Press the on/off button for more than 2 se-... -
Page 9: Listening
Switch baby unit off: switch off Press the on/off for more than 2 seconds to turn the baby unit off. Press 2 seconds LISTENING: If the baby unit detects sound, this sound is then sent to the parent unit. Receiving Volume: Press the keys on the parent unit in order to set the volume level (5 levels +... -
Page 10: Talk Back
TALK BACK: Press the button on the parent unit to talk back to the baby unit; let this button go again in order to listen. The talkback volume is fixed and cannot be changed. LULLABIES: The baby unit has 5 different programmed lullabies. You can start and stop the songs of your choice from the parent unit. -
Page 11: Setting The Playback Volume
Press the OK button. Use the keys to select the desired song (select [Play All] to play all the songs in sequence). Press the OK button to confirm your selec- tion. 4.5.3 Setting the playback volume: Press the key. Select the option [Lullaby] using the keys. -
Page 12: Language Display
LANGUAGE DISPLAY: The various instructions and messages on the display can be given in different languages. The language can be set as follows: Press the key. Select the [Language] option using the keys and . Press the OK button. Use the // and // keys to select the desired language. -
Page 13: Temperature Display And Alarm
Select the sensitivity level using the keys. Level indicates a low level of sensitivity. Level indicates a high level of sensitivity. Level indicates that the transmitter is now switched on continuously so you can also listen while the baby sleeping Press the OK button to confirm your selection. -
Page 14: Setting The Lower And Upper Temperature Limits
Press the OK button to confirm your selection. 4.8.2 Setting the lower and upper tempe- rature limits: Press the key. Select the [Temperature] option using the keys. Press 2 x on the OK button. Set the upper limit using the keys. -
Page 15: Warning-Tones When The Sound Is Off
Press 2x on the OK button (if the alarm was off, then it will now be turned on; if the alarm was activated, then it will be deactivated). Note that the temperature displayed is only an indication of the temperature. WARNING-TONES WHEN THE SOUND IS OFF: If the sound of the parent unit has been turned off, a warning beep tone will still go off should the parent unit detect a loud noise. -
Page 16: Other Functions
5 OTHER FUNCTIONS ECO MODE: When the ECO MODE is switched on, the transmitter connection will stop completely when the baby is asleep. The ECO MODE can be turned on and off by using the ON/OFF switch located at the bottom of the baby unit (you can change this switch using a poin- ted object). -
Page 17: Eco Mode On
5.2.2 ECO MODE on: If you have enabled the ECO MODE on the baby unit, as long as the baby is asleep and completely at rest; there will be no automatic con- nection control. The connection indicator will flash 1x every 5 seconds in order to show that the ECO MODE is switch on and you do not have an active continuous connection. - Page 18 • When the parent unit is on the cradle/charger, the battery icon will indicate that the batteries are charging. If the batteries are full, the battery icon display will show full; the light will also flash while the batteries are charging. •...
-
Page 19: General (Safety) Instructions And Tips General
The baby monitor should only be used as an assisting device and not as a substitute for an adult or baby-sitter. The DBX-76 should not be used for anything else than for de- tecting sounds from within your own private premises; anyone else within the listening perimeter of the baby monitor should be informed. -
Page 20: Using Mutiple Baby Monitors
USING MUTIPLE BABY MONITORS: The technology behind the DBX-76 makes it possible for more DBX-76 baby monitors (baby unit and parent unit) to be used next to each other in order to monitor multiple baby rooms simultaneously and still have an interference-free signal; each parent unit and baby unit is equipped with a unique code. -
Page 21: Battery Usage
BATTERY USAGE: 6.6.1 Parent Unit: Fully charged NiMH batteries, with a capacity of 750mAh, can supply the parent unit with power for between 12 to 15 hours without needing the power adapter. The time depends on the amount of usage (how often the baby cries switching the sound of the parent unit on, talking into the monitor, level of the volume, etc.). -
Page 22: Maintenance
Old or damaged batteries should be disposed of in an environ- mentally friendly manner according to your local regulations. Do no throw away used batteries together with your household waste. MAINTENANCE: Clean the baby monitor only with only a damp cloth; never use chemical cleaners. -
Page 23: Mulfunction Table
7 MULFUNCTION TABLE POSSIBLE CAUSE AND REMEDY: MALFUNCTION: LINK light fla- The connection link between the parent unit and shes baby unit has been dropped. - Check whether the parent unit and the baby unit Alert beep are both turned on. tones coming - Check the power supply (AC adapter or batteries). -
Page 24: Declaration Of Conformity
8 DECLARATION OF CONFORMITY The device complies with the essential requirements and provisions as defined in the European Directive 2014/53/EU. The declaration of conformity is available on: http://DOC.hesdo.com/DBX-76-DOC.pdf... -
Page 25: Guarantee
Postal code: receipt Place: The Alecto DBX-76 has a guarantee of 24 MONTHS after the date of purchase. We guarantee during this period the free repair of defects caused from the material and workmanship. Some things are kept for the assessment of the importer. -
Page 26: Table Of Contents
10 TABLE OF CONTENTS ECO MODE ................2 GENERAL FUNCTIONS OVERVIEW PARENT UNIT ..........3 OVERVIEW BABY UNIT ............3 OVERVIEW DISPLAY ............5 INSTALLATIONS PARENT UNIT ..............6 BABY UNIT ................6 PLACEMENT TIPS .............. 7 RBELT CLIP ................. 7 HOW TO USE ON / OFF AND CONNECTION CONTROL ...... - Page 27 OTHER FUNCTIONS ECO MOD ................16 CONNECTION CONTROL ..........16 5.2.1 ECO MODE off ............16 5.2.2 ECO MODE on ............17 BATTERY INDICATOR PARENT UNIT ......17 GENERAL (SAFETY) INSTRUCTIONS AND TIPS GENERAL ................19 TEMPERATURE DISPLAY..........19 USING MUTIPLE BABY MONITORS ........ 20 RANGE................
- Page 28 Service Help WWW.ALECTO.NL SERVICE@ALECTO.NL Hesdo, Australiëlaan 1 5232 BB, ‘s-Hertogenbosch The Netherlands Service WWW.ALECTO.NL SERVICE@ALECTO.NL Help Hesdo, Australiëlaan 1, 5232 BB, The Netherlands ‘s-Hertogenbosch, ver1.2...
Need help?
Do you have a question about the DBX-76 and is the answer not in the manual?
Questions and answers