Table of Contents
Advertisement
Advertisement
Table of Contents

Related Manuals for TRU-BOLT 0711016


Summary of Contents for TRU-BOLT 0711016
- Page 1 0711016 Page 1...
- Page 2 I N S T A L L A T I O N I N S T R U C T I O N S ELECTRONIC DEADBOLT WITH KEYPAD latch 2-3/8 Your latch is now set 2-3/8” (60mm) backset latch 2-3/4 2-3/4"...
- Page 3 I N S T A L L A T I O N I N S T R U C T I O N S DRILLING HOLE IN DOOR Please read and understand this entire manual before attempting to assemble, operate or install the product. 1.
- Page 4 INSTALLATION OVERVIEW I N S T A L L A T I O N I N S T R U C T I O N S GETTING STARTED For troubleshooting tips and “how to videos” visit www.truboltlocks.info 1. ADJUSTING THE DEADBOLT LATCH BACKSET (Deadbolt is shipped with the backset set at 2-3/8”) - Measure the backset (Backset is Distance between edge of the door and the center of Lock) To convert from 2-3/8”...
- Page 5 NOTE: Do not extend Cylindrical Cover past 2-3/4” Your latch is now set 2-3/4” (70mm) backset 2-3/4" (70mm) 2-3/8" 2-3/8" (60mm) (60mm) Cylindrical cover Extension plate fig. 1 2. TO CONVERT FROM 2-3/4” (70 MM) BACKSET TO 2-3/8” (60MM) BACKSET a.
- Page 6 3. INSTALLING THE DEADBOLT LATCH (need phillips head screwdriver) a. Insert Deadbolt Latch into door edge hole with the word UP and the arrow on the extension plate facing UP. Cross shaped spindle connector will be at the bottom of the Deadbolt Latch. b.
- Page 7 6. INSTALLING THE EXTERIOR ASSEMBLY Work with the Door Open for easy access a. Unpack the Exterior Assembly. Use care to not scratch the green circuit board during handling and installation. b. Check that the rubber gasket is properly seated on the Exterior Assembly. ( see figure 6 ) c.
- Page 8 8. OPTIONAL INSTALLATION a. Using a 1/16” drill bit, drill a pilot hole in your door using the Mounting Plate upper hole as a guide (see Figure 8a) b. Insert Screw A and tighten NOTE: LOCK AND UNLOCK USING THE KEY TO SEE IF THE DEADBOLT LATCH IS OPENING AND CLOSING EASILY.
- Page 9 10. SET THE INTERIOR KNOB POSITION FOR LEFT OR RIGHT HANDED DOORS a. The knob goes in the VERTICAL position for Right Handed Doors b. The knob goes in the HORIZONTAL position for Left Handed Doors Mounting screws Make sure deadbolt latch is retracted Right Handed Door Left Handed Door...
- Page 10 14. Insert 4 AA high quality Alkaline batteries into the Battery Compartment in the direction noted +/- on the Compartment. The Lock will beep 2 times, the Keypad will illuminate blue, and the Tru-Bolt button will flash green twice to signify that it has received power.
- Page 11 Trouble Shooting Issue Solution Latch Working Backwards - Lock Direction of entry switch is set to incorrect setting. unlocks when lock button is pushed Remove the interior assembly and move the entry switch to the or locks when unlock button or code opposite direction is pushed.
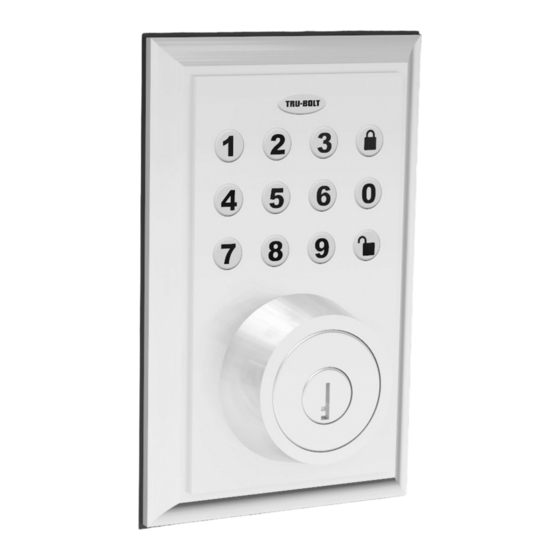
- Page 12 P R O G R A M M I N G A N D O P E R A T I N G I N S T R U C T I O N S Indicator light Used to “Unlock” door and for programming Batteries (not included) Electronic lock requires (4) High Quality AA...
-
Page 13: Basic Functions
Locking and Unlocking 1. TO UNLOCK THE LOCK Using Keypad: Enter a valid User Code (default code is 1234) and press and hear 1 beep and lights green. 2. TO LOCK THE LOCK Using Keypad: Press and then hear 2 beeps and lights red. Basic Functions 3. - Page 14 Advanced Functions 6. CHANGE CURRENT OR PRESET PROGRAMING CODE Factory default Programming Code = 123456, this is the master password for your lock. All programming functions require this code. Follow the below sequence to change the Programming Code to your custom 6 digit combination. Re-enter Hear 1 beep and Light Indicator illuminates green 7.
- Page 15 10. CREATE A TEMPORARY CODE Temporary access for house sitter, contractor, cleaning company, etc. Use one of the 50 available User Codes and give it out for temporary access and delete it when it is no longer required. See steps 3 and 4 on page 13. 11.
- Page 16 MENARDS® retail store. At its discretion, Tru-Bolt® agrees to have the product or any defective part[s] repaired or replaced with the same or similar Tru-Bolt® product or part[s] free of charge. This warranty is non transferable, and applies to the original purchaser only, as long as the original purchaser occupies the residential premises upon which the product[s] was originally installed.
- Page 17 Page 17...
Need help?
Do you have a question about the 0711016 and is the answer not in the manual?
Questions and answers
Can't program my new bolt
To program the TRU-BOLT 0711016 electronic deadbolt, follow the instructions in the installation manual. Specific programming steps are not detailed in the provided context. However, programming usually involves setting a user code through the keypad after installation. If a default code like "1234" still works after programming a new 6-digit code, it may indicate the default code was not deleted or the new code was not saved properly. To fix this, ensure you follow the full programming procedure, including deleting old codes and confirming the new one is active.
For exact programming steps, refer to the full manual or the lock's internal instructions.
This answer is automatically generated
I need to change my Tru Bolt pass code to lock/unlock the door
Can't separate the interior and exterior faceplate out of the box