Advertisement
Available languages
Available languages
Quick Links
CAN'T FIND THE INSTRUCTIONS IN YOUR LANGUAGE?
Please visit www.hmdxjam.com
UK HMDX Stream
Thank you for purchasing the HMDX Stream Wireless Stereo Speaker.
Please read these instructions and keep them for easy reference.
Getting started
Unpack the unit carefully. Remove all the accessories from the display carton.
Do not remove any labels or stickers on the rear of the unit and adaptor. Before
setting up the unit, verify that the following accessories are present:
• Instruction manual x 1
• Main unit x 1
• AC power adapter x 1
• 3.5mm aux-in cable x 1
Power Source
This unit is supplied with an AC adapter; take the following steps to connect the
adapter.
1. Connect the DC plug of the AC adapter to the DC socket on the rear of the unit.
2. Plug the AC adapter to the AC outlet (220v-240v). Connecting this system to
any other power source may cause damage to the system.
3. To switch the unit off completely, withdraw the AC adapter from the wall outlet
and remove batteries from product.
Battery operation
• Before installing batteries (not included), ensure that the unit is disconnected
from the main power supply.
• Remove the battery compartment cover on the back of the unit by carefully
pushing off the battery cover.
• Insert 4 AA size batteries(not included), referring to the polarity markings
inside the battery compartment. Never mix old and new batteries.
• Replace the cover.
• For battery operation, switch off the main supply and remove the cable from
the power socket, battery operation will be selected automatically.
Battery precautions
• Use only the size and type of batteries specified.
• When installing batteries, observe proper +/- polarities. Incorrect installation
of battery may cause damage to the unit.
• If the unit is not going to be used for a long period of time, remove batteries to
prevent damage due to possible battery leakage.
• Do not dispose of batteries in fire. Batteries may explode or leak.
• Remove used batteries promptly.
• Do not use alkaline, standard (carbon-zinc), or rechargeable (ni-cad, ni-MH,
etc.) batteries
• Clean the battery contacts and also those of the device prior to battery
installation.
This product contains small parts that may present a choking hazard for young
children.
Listening to your device wirelessly over bluetooth®
To listen to your music over Bluetooth® wireless connection, you need to pair your
device with HDMX Stream:
1. Make sure your device has Bluetooth® capability.
2. Press the POWER button to turn on the unit. The Bluetooth® light will flash
slowly after 5 seconds.
3. Once the Bluetooth® button beings to flash, press and HOLD the Bluetooth®
button for a few seconds until the Bluetooth® light begins to flash quickly.
4. Follow the instructions of your device to pair the unit.
5. Pair your device with the unit by selecting Stream from your Bluetooth®
listings on your device or selecting YES.
6. Press play on your device and use controls on the unit or remote to adjust to
desired volume.
7. The effective range of the Stream is approximately 30-feet from the
Bluetooth® device. Range can be affected by numerous factors including
the Bluetooth® device, wall materials, etc. If you experience audio drop outs
please move the Bluetooth® device closer to the Stream.
NOTE: Once you have successfully paired your device, you typically will not need
to repeat the above steps. Please ensure the AUX cable is unplugged, the unit
source is set to Bluetooth® and your device has Bluetooth® enabled.
NOTE: When pairing with a computer, please consult your computer manufacturer
for Bluetooth® pairing instructions and/or the latest Bluetooth® Drivers. A pairing
code is not required.
Listening to your device through the auxiliary aux audio jack
1. Connect the supplied audio cable to the headphone or line-out jack of an
audio device and plug the other end of the cable into the AUX In Audio jack on
the back of the unit.
2. Press the POWER button to turn on the unit.
3. Press PLAY on the device and use controls on the unit to adjust to desired
volume.
NOTE: PLAY/PAUSE controls on Stream will not work when using Line-In Audio Jack.
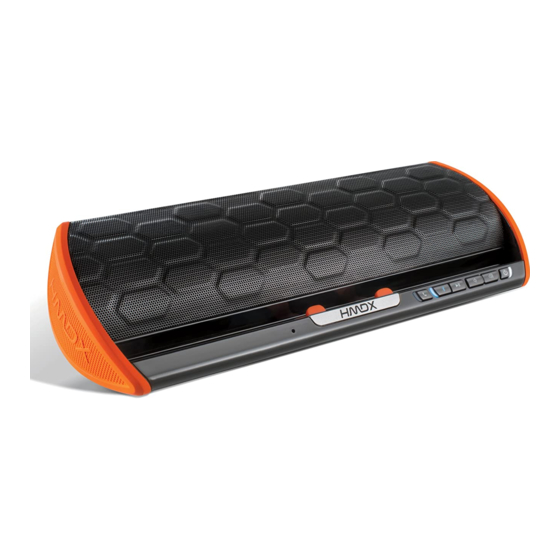
Stream Wireless Stereo Speaker
(Fig. 1)
1. Speaker Phone Button
4. Volume Controls
2. Bluetooth® Button
5. Power Button
3. Play/Pause Button
(Fig. 2)
1
2 3
Hands free speakerphone
The Stream can be used as a Hands-Free Speakerphone. When using the
speakerphone make sure to talk directly at the front of the product. The built-in
microphone will only work when it is connected to a Bluetooth® enabled device.
Answer/end a call
Press the PHONE button to answer and end a call.
Decline an incoming call
Hold the PHONE Button for 2 seconds.
Make a call
Use your phone to dial. Call will play over speakers (make sure phone is paired
to speaker).
USB charging port
• The USB port is for charging only. It cannot be used to play music through the
unit.
• In order to use the USB charging feature, you must have the proper cord to
connect to your device with a USB connector on the other end.
To charge your device using the USB charging port (located on the back of the unit):
1. Connect the USB type A end of the device's cable into the USB port on the rear
of the Stream.
2. Connect the other end of the USB cable to your device to begin charging.
Using the universal dock
Place tablet or smartphone in the dock.
Maintenance
To store
You may leave the speaker on display, or you can store it in its box in a cool, dry
place.
To clean
Only use a soft dry cloth to clean the enclosure of the unit.
NEVER use liquids or abrasive cleaner to clean.
READ ALL INSTRUCTIONS BEFORE USE AND SAVE THESE INSTRUCTIONS FOR
FUTURE REFERENCE. IMPORTANT SAFEGUARDS: WHEN USING ELECTRICAL
PRODUCTS, ESPECIALLY WHEN CHILDREN ARE PRESENT, BASIC SAFETY PRECAUTIONS
SHOULD ALWAYS BE FOLLOWED, INCLUDING THE FOLLOWING:
• WARNING: Do not place speakers too close to ears. May cause damage to ear
drums, especially in young children.
1
1 2 3
4
5
1. USB Port
4
2. DC IN
3. AUX IN
4. Battery Compartment
Advertisement

Related Manuals for HMDX HX-P420


Summary of Contents for HMDX HX-P420
- Page 1 UK HMDX Stream 2. Press the POWER button to turn on the unit. Thank you for purchasing the HMDX Stream Wireless Stereo Speaker. 3. Press PLAY on the device and use controls on the unit to adjust to desired Please read these instructions and keep them for easy reference.
- Page 2 HMDX AUDIO. Merci d’avoir acheté le haut-parleur stéréo sans fil HMDX Stream. • HMDX AUDIO is not liable for any damage caused to iPod/MP3 player or any Veuillez lire ces instructions et les conserver pour pouvoir s’y reporter other device.
- Page 3 Audio entrée. pas utiliser d’accessoires non recommandés par HMDX AUDIO. • HMDX AUDIO n’est pas responsable des dommages causés au lecteur iPod/MP3 Haut-parleur stereo sans fil stream ou à tout autre appareil.
- Page 4 I HMDX Stream 1. Collega il cavo audio fornito alle cuffie o al jack di uscita di un dispositivo Grazie per aver acquistato l’altoparlante stereo wireless HMDX Stream. audio e collega l’altra estremità del cavo al jack di ingresso audio AUX sul Leggere le presenti istruzioni e conservarle per una facile consultazione futura.
- Page 5 • Vekselstrømsadapter x 1 HMDX AUDIO. • 3,5 mm Aux-ind-kabel x 1 • HMDX AUDIO non sarà responsabile di eventuali danni causati a iPod/lettore MP3 o a qualsiasi altro dispositivo. Strømkilde • Non riporre né conservare l’apparecchio laddove potrebbe cadere o scivolare in Dette apparat leveres med en vekselstrømsadapter, tag følgende skridt for at...
- Page 6 • Anvend kun dette apparat, som det er hensigten iht. beskrivelsen i denne manual. Anvend ikke ekstraudstyr, som ikke anbefales af HMDX AUDIO. • HMDX AUDIO er ikke erstatningsansvarlig for eventuel skade, der måtte ske på iPod/MP3 afspiller eller eventuelle andre apparater.
- Page 7 D HMDX Stream genannten Schritte nicht noch einmal wiederholen. Bitte stellen Sie sicher dass Vielen Dank für den Kauf der kabellosen Stereo-Lautsprecher HMDX Stream. das AUX-Kabel nicht angeschlossen, das Quellgerät auf Bluetooth® eingestellt Bitte lesen Sie diese Anleitung und bewahren Sie sie für ein späteres und auf Ihrem Gerät Bluetooth®...
- Page 8 3. För att till fullo stänga av enheten, ta ur AC-adaptern från vägguttaget och ta • HMDX AUDIO haftet nicht für Schäden, die an Ihrem iPod/MP3 Player oder ur batterierna från produkten. einem anderen Gerät entstehen.
- Page 9 Använd inte tillbehör som inte är rekommenderade av HMDX AUDIO. • HMDX AUDIO ansvarar inte för någon skada orsakad av iPod/MP3-spelare eller någon annan enhet. • Placera eller förvara inte enheten där den kan falla eller dras ner i ett bad...
- Page 10 NL HMDX Stream 1. Sluit de bijgeleverde audiokabel aan op de hoofdtelefoon of op een Hartelijk dank voor uw aanschaf van de HMDX Stream draadloze stereoluidspreker. line-out-aansluiting van een audio-apparaat, en sluit het andere uiteinde Lees deze instructies door en bewaar ze om ze later te kunnen raadplegen.
- Page 11 Alleen door HMDX AUDIO aanbevolen hulpstukken • Käyttöopas 1 kpl gebruiken. • Pääyksikkö 1 kpl • HMDX AUDIO kan niet aansprakelijk worden gesteld voor schade aan iPod/ • AC-adapteri 1 kpl MP3-spelers of andere apparatuur. • 3,5 mm Aux-in -kaapeli 1 kpl •...
- Page 12 HUOMAUTUS: Stream-kaiuttimen TOISTO/TAUKO-painikkeet eivät toimi, jos käyttötarkoitukseen. Älä käytä lisälaitteita, jotka eivät ole HMDX AUDION Line-In-audioliitin on käytössä. suosittelemia. • HMDX AUDIO ei vastaa mistään iPod/MP3-soittimelle tai muulle laitteelle Langaton stream-stereokaiutin aiheutuvasta vauriosta. (Kuva 1) • Älä sijoita tai varastoi laitetta paikkaan, josta se voi pudota tai se voidaan vetää...
- Page 13 HMDX AUDIO tarafından önerilmemiş aparatlar kullanmayın. 1. Birlikte verilen ses kablosunu kulaklığa veya bir ses cihazının line out • HMDX AUDIO, iPod/MP3 oynatıcı veya başka herhangi bir cihazda meydana (hat-çıkış) jakına bağlayın ve kablonun diğer ucunu hoparlörün arkasındaki AUX In ses jakına takın.
- Page 14 Su veya başka bir sıvının içine koymayın veya ES HMDX Stream düşürmeyin. Gracias por comprar el altavoz estéreo inalámbrico HMDX Stream. Yanık, yangın, elektrik çarpması ve kişisel yaralanma riskini azaltmak için: Por favor, lea estas instrucciones y consérvelas para consultarlas fácilmente.
- Page 15 No utilice accesorios no recomendados por HMDX AUDIO. 2. Pulse el botón de ENCENDIDO para encender el aparato. • HMDX AUDIO no será responsable por ningún daño causado a un iPod/ 3. Pulse COMENZAR (PLAY) en el dispositivo y use los controles de la unidad para reproductor de MP3, ni a ningún otro dispositivo.
- Page 16 AUX-lydkoblingen brukerveiledningen. Ikke bruk tilbehør som ikke er anbefalt av HMDX AUDIO. på baksiden av enheten. • HMDX AUDIO er ikke ansvarlig for skade påført iPod/MP3-spiller eller noe 2. Trykk på STRØM-bryteren for å slå på enheten. annen enhet.
- Page 17 • Apparatet må ikke plasseres eller oppbevares på et sted hvor det kan falle RU HMDX Stream eller bli dratt ned i et badekar eller vask. Apparatet må ikke plasseres eller Благодарим за покупку беспроводного стереодинамика HMDX Stream. droppes i vann eller annen væske. Ознакомьтесь с приведенными в руководстве инструкциями и...
- Page 18 3. Нажмите кнопку воспроизведения на устройстве и используйте элементы этом руководстве. управления на динамике для регулировки громкости. • HMDX AUDIO не несет ответственности за возможные повреждения iPod/ ПРИМЕЧАНИЕ. При использовании разъема линейного аудиовхода элементы MP3-плеера или любого другого устройства. управления воспроизведением/паузой на динамике Stream недоступны.
- Page 20 HXP420...
Need help?
Do you have a question about the HX-P420 and is the answer not in the manual?
Questions and answers