Table of Contents
Advertisement
Quick Links
IMPORTANT SAFETY INSTRUCTIONS
INSTALLATION, OPERATING AND SERVICE MANUAL
READ AND FOLLOW ALL INSTRUCTIONS
The Speck
D
B
C
A
This is the
All parts are manufactured of corrosion-resistant material and combined in one single
housing (or two single housings for two jet systems) which can be installed in pools of
any size and shape.
Key to illustration:
A. Flush mounted Jet Housing.
B. Square, Anti-Entrapment Cover (8 1/4" x 8 1/4")
undetectable pump suction. (Optional Round)
C. Adjustable Water Flow Jet Nozzle.
D. Air Regulator adjusts amount of air bubbles in
water flow.
®
Counterstream Swimming Unit
U.S. Patent No. 3.977.027
OWNER'S MANUAL
®
G
®
II
II
E. Control Box with GFCI with pneumatic button
and tubing.
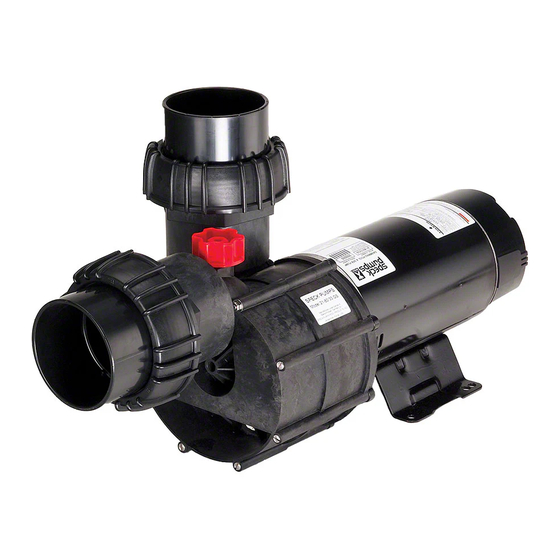
F. Speck 4 HP or 3.5 HP self-priming, plastic
pump, single phase with thermal overload (no
motor starter required). Optional three phase
motor and control available (Normal priming
pump available for installation below water level).
G. Optional Massage Hose with pulsator may be
attached to jet nozzle.
II
Complies with UL 1563
Swimming Pool Equipment
Listing #E212148
F
E
Advertisement
Table of Contents

Related Manuals for Speck pumps BADUSTREAM II


Summary of Contents for Speck pumps BADUSTREAM II
-
Page 1: Important Safety Instructions
IMPORTANT SAFETY INSTRUCTIONS INSTALLATION, OPERATING AND SERVICE MANUAL READ AND FOLLOW ALL INSTRUCTIONS ® Counterstream Swimming Unit U.S. Patent No. 3.977.027 OWNER'S MANUAL The Speck ® Complies with UL 1563 Swimming Pool Equipment Listing #E212148 This is the ® All parts are manufactured of corrosion-resistant material and combined in one single housing (or two single housings for two jet systems) which can be installed in pools of any size and shape. -
Page 2: Table Of Contents
TABLE OF CONTENTS Important Safety Instructions ....Page 3 2. Introduction and Planning ......Page 3 3. -
Page 3: Important Safety Instructions
1. Important Safety Instructions G. DO NOT store or use gasoline or other When installing and using this electrical equipment, flammable vapors or liquids in the vicinity of this basic safety precautions should always be equipment. DO NOT store pool chemicals near the followed, including the following: equipment. -
Page 4: Plumbing For Badu
4" Check Value (Optional) Horizontal (Below Water Level) Discharge Line Vertical Suction Line 4" BaduStream II Horizontal Suction Line max. 30 feet with 4 " pipe NOTE: Valves are recommended when pump is installed below water level. 4" Fig. 1... -
Page 5: Concrete Or Gunite Installation
4. Concrete or Gunite Installation A. Preplumb II Housings. 4. Recheck location of the jet housing when gunite is TREAM being applied. The force of the gunite may move the 1. Install plumbing manifold or approximately 12" of 4" jet location. SCH 40 pipe to both suction and discharge fittings on the jet(s) housing. -
Page 6: Liner And/Or Fiberglass Pool Installation
5. Liner and/or Fiberglass Pool Installation For Fiberglass pools only, the clamping ring (part # : Locate the air control hose connector CAUTION 3) can be used to mark and drill the holes as shown (part #6) at the top and center of the jet housing. in Fig. -
Page 7: 5A. Removal Of Liner
5a. Removal of Liner When replacing liner or removing liner for repairs; Remove one of the remaining two bolts and slide clamping ring (part #3) to the side. Replace all the remove 4 bolts (part #9/1) which hold square cover bolts before removing the last bolt. -
Page 8: Plumbing Suggestions
6. Plumbing Suggestions Fig. 7 II single housing installation ® TREAM NOTE: Increase pipe size to 6" when jets are more than 30 feet from pump. Use 6" x 4" bushings after 4" manifold tees. Fig. 8 II dual housing installation ®... -
Page 9: Installation Of The Pump And The Control Box
NOTE: Increase pipe size to 6" when jets are more than 30 feet from pump. Use 6" x 4" bushings after 4" manifold tees. NOTE: Check valves must be used on the discharge side of each pump. Minimum 4" pipe between pump and BaduStream plumbing manifold. -
Page 10: Operation Instructions
8. Operation Instructions Remove red filler plug or stainer tank lid on pump and II's adjustable flow nozzle enables TREAM fill pump with water. Replace red filler plug or lid. swimmer to regulate the volume of water released Push pneumatic button on. For the first start-up allow through the jet(s). -
Page 11: Parts List For Badu Stream
11. Parts list for TREAM ® 11/2 11/1 Part # Description Part # Description Face Ring - Nozzle Holder - Air Regulator Screw - Tapping 5.5 x 19 Bolt - 1/4-20 x 1-1/2" Nut - 1/4-20 Clamping Ring Washer - 1/4" Nozzle (adjustable flow) Gasket 60 x 11 x 2 Bushing... -
Page 12: Limited Warranty
TREAM II is warranted to be free 1. The TREAM to Speck Pumps or in shipping a repaired or replaced from defects in material and workmanship for a period II to a customer. TREAM of twelve (12) months from the date that the II is originally installed.
Need help?
Do you have a question about the BADUSTREAM II and is the answer not in the manual?
Questions and answers