Table of Contents
Advertisement
Advertisement
Table of Contents

Related Manuals for Speck pumps badu jet imperial


Summary of Contents for Speck pumps badu jet imperial
- Page 1 Installation Manual IMPERIAL ® Counter Swimming Unit Rev. 03/16...
- Page 2 Fax: 904-737-5261 Website: www.usa.speck-pumps.com Manufactured by Speck Pumps, Jacksonville Florida USA, © 2016 All Rights Reserved. This document is subject to change without notice. Safety CAUTION, WARNING, and Safety is emphasized throughout the user manual. These are safety alert symbols ( DANGER) .
-
Page 3: Table Of Contents
Table of Contents Important Safety Instructions SwimJet Combination Fitting Manufacturers Warnings. . 4 General Safety Instructions....5 General Description Installation Information Receiving Information ....7 Plumbing Installation . -
Page 4: Important Safety Instructions
Important Safety Instructions WARNING: Before Installing this product, read and follow all warning notices and instructions which are included. Failure to follow safety warnings and instructions can result in severe injury, death, or property damage. Call 1-800-223-8538 or visit www.usa.speck-pumps.com for additional copies of these instructions. Swim Jet Combination Fitting - Manufacturers Warnings MUST BE INSTALLED by an experienced and qualified pool industry professional ONLY. -
Page 5: General Safety Instructions
Swim Jet Combination Fitting - Manufacturers Warnings - continued As the manufacturer, Speck Pumps - Pool Products, Inc., hereby certifies that their Swim Jet Combination Fitting meets or exceed the requirements of the Virginia Graeme Baker Pool & Spa Safety Act, VGB 2008 and ANSI/APSP 16 standards and safety regulations as set forth by the Consumer Products Safety Commission. -
Page 6: General Description
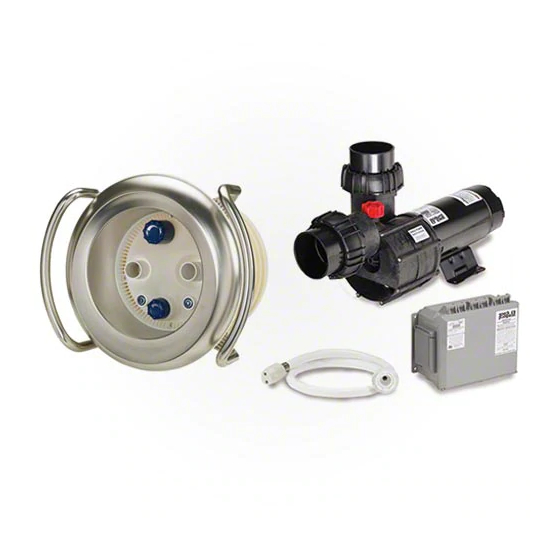
General Description The BaduJet Imperial from Speck Pumps has been designed to be installed during the construction of your pool to create a water treadmill for anyone wanting a therapeutic and effective exercise. The BaduJet Imperial can be installed in any type of pool, large or small, from gunite to vinyl liner. -
Page 7: Installation Information
Installation Information Receiving Information 1. Upon receipt of the swimjet system, check the cartons for damage. Open each carton and check the pump, jet housing, anti- entrapment cover, and control box for concealed damage, such as cracks, dents, or a bent base. If damage is found, contact the shipper or distributor where the swimjet was purchased. - Page 8 Plumbing Installation - Continued CAUTION: For trouble-free pump priming (up to 4 feet above the water line), first install a 6” long riser in the discharge connection on top of the pump. Then install an elbow and lead the discharge line downward to the discharge connection at the BaduJet Imperial jet housing.
-
Page 9: New Concrete Or Gunite Installation
Plumbing - continued Figure 3 Sample BaduJet Imperial Installation (Self-Priming) Valves (Optional) Discharge Line Control Service Disconnect NOTE: Valves are recommended when pump is installed below water level (flooded suction applications). 4” Pneumatic NOTE: To avoid stress on the housing, the jet housing and Hose 2 to 3 inches of plumbing/conduit stub out should be encased in gunite or concrete. - Page 10 Jet Housing Installation - New Concrete or Gunite Construction The following is a list of all parts that ARE NOT USED IN A CONCRETE OR GUNITE INSTALLATION WITHOUT VINYL LINER: Gasket with knobs (part #26) Clamping ring gasket (part #27) M8 x 30mm Countersunk Screw (part #98) 1.
- Page 11 Jet Housing Installation - New Concrete or Gunite Construction - continued Slide the inner wall formwork over the studs in the WATER LEVEL jet housing through the pre-drilled holes. Secure the formwork to the jet housing with four (4) M8 washers (part #32) and four (4) M8 nuts (part #33).
- Page 12 Jet Housing Installation - New Concrete or Gunite Construction - continued Concrete pool with vinyl liner: Use the provided mounting template (small scale version of template shown in Figure 5) to mark and drill the holes through the liner (twelve (12) M8 clamping ring screw holes and 13.3”...
-
Page 13: Existing Concrete Or Gunite Installation
Jet Housing Installation - Existing Concrete or Gunite Construction Materials: (NOT INCLUDED) One (1) piece of plywood 2’ x 3’ x 1/4” Eight (8) Lag screws 1/4” x 1-1/2” (minimum) Eight (8) Plastic lag shield anchors 1. Follow steps 1-4 under Jet Housing Installation - New Concrete or Gunite Construction on pages 9-10. 2. -
Page 14: Liner And/Or Fiberglass Pool Installation
Jet Housing Installation - Existing Concrete or Gunite Installation - continued 19" Beam Water Level 36" Figure 10 Layout for installing in existing gunite or concrete pools Jet Housing Installation - Liner and/or Fiberglass Pool Construction CAUTION: Locate discharge connector directly ABOVE the suction connection. Discharge and suction connectors must be exactly vertical or the stainless steel handles will not align properly. - Page 15 Jet Housing Installation - Liner and/or Fiberglass Pool Construction - continued 6. Align the stainless steel handles (part# 70) over the WATER LEVEL clamping ring gasket. 7. Align the clamping ring (part# 28) over the stainless steel handles (part# 70) as shown in Figure 7. 8.
-
Page 16: Bonding Instructions
Bonding Instructions 1. Glue the bonding adapter (part# 119) to the port on the lower right side of the jet housing (See Figure 15). 2. Insert the bare end of the 8 AWG wire through the bonding adapter and into the front of the jet housing (See Figure 16). 3. -
Page 17: Final Assembly
Final Assembly 1. Insert the o-ring (part# 62) in the jet housing as shown in Figure 20. 2. Start the ten (10) nozzle housing tapping screws (part# 61) into the pre-assembled nozzle housing (part# 102.1). Place the nozzle housing at the main jet housing. 3. -
Page 18: Electrical Installation
Final Assembly - continued 11. Mount the volume control knob (part #21.1) and air regulator knob (part #111) by means of a rubber mallet and a protective cloth. (See Figure 23) 21/1 38/1 38/2 Figure 23 Figure 22 Installation of Knobs Installation of Light Cover Electrical Installation WARNING: The wiring of the pool motor and control box should be done by a licensed electrician in accordance with all local,... - Page 19 Electrical Installation - continued GROUNDING: Permanently ground the pump motor and control box using a conductor of appropriate size. Pump Motor: Connect to the No. 10 green headed ground screw provided inside the motor terminal box. Control Box: Connect to the aluminum grounding terminal strip on the inside of the control box enclosure. CAUTION: DO NOT connect to electric power supply until the unit is permanently grounded.
- Page 20 Electrical Installation - continued BLK-2 BLK-2 RELAY RED-2 RED-2 BLK-4 120V ORG-0 T0RQUE DATA BLK-5 BLU-2 Wire Range Torque in.-lbs. 14-10 CU Coil 8 CU 120V CONTACTOR YEL-3 YEL-2 BLU-3 SWITCH (PUMP) LATCHING AIR SWITCH (LIGHT) GROUND NOTE: Use TO & FROM Control for remote SERVICE GROUND...
-
Page 21: Service And Maintenance
Service and Maintenance Stainless Steel Stainless Steel can provide an outstanding combination of aesthetic appeal, corrosion resistance, strength, durability, and cleanability, and they are commonly used for a wide range of indoor and outdoor pool applications, including ladders, handrails, diving platforms, and slide assemblies. These components are frequently still structurally sound and aesthetically pleasing after more than 25 years of service. -
Page 22: Winterizing
Nozzle Adjustments - continued Water Level ~12” Perspective View Side View Hose Adapter 1.5" Figure 25 PVC Coupling 1.5" PVC Pipe 1.5" x 4' BaduJet Nozzle Adjustment Winterizing In areas subject to freezing water temperatures, you should protect your equipment. We recommend you purchase a winter cover kit part #2326000010K. -
Page 23: Frequently Asked Questions
Frequently Asked Questions Frequently Asked Questions What size pool do I need? The BaduJet Imperial can be installed in any size pool. However, we recommend a minimum length of 14 ft and a minimum width of a 7 ft. swimming lane. What size plumbing is necessary? How far away from the BaduJet Imperial can the pump be installed? Use 4”... -
Page 24: Troubleshooting
Trouble Shooting PROBLEM POSSIBLE CAUSES SOLUTION 1. Pump will not prime. a. Suction air leak. Make sure the red filler plug and o-ring are clean and properly positioned. Tighten red filler plug. Tighten all pipes and fittings on suction side of the pump. Be sure water in the pool is high enough to flow through the jet housing. - Page 25 Trouble Shooting - continued PROBLEM POSSIBLE CAUSES SOLUTION 7. Motor overload a. Motor is not connected properly. Check wiring diagram on motor. protection “kicks out”. b. Low voltage due to under size Check with volt meter. Increase size of supply wire. wire or low incoming voltage.
-
Page 26: Product Specification
Product Specification... -
Page 27: Exploded View
Exploded View PART DRAWING DESCRIPTION NUMBER NUMBER REQUIRED 2326000002 JET HOUSING 2302001051 HOSE - AIR REGULATOR 8 x 2mm PVC CLEAR (PRICE PER FOOT) 3 FT 2326000408 HOSE (3X) WITH Y- HOSE BARB 2301001008 CLAMP - HOSE, AIR REGULATOR 14/9 SS A4 2326000031 STRAIN RELIEF - LIGHT CABLE, 3/4”... -
Page 28: Limited Warranty
Badu SwimJet System(s). 2. To the fullest extent permitted by law, the Limited Warranty will be void and of no force or effect and Speck Pumps-Pool Products, Inc. will have no liability, responsibilities or obligations to Buyer or with respect to the Badu SwimJet System(s) in... - Page 29 Buyer’s protection to the manufacturer at 8125 Bayberry Road, Jacksonville, Florida 32256 USA. Under no condition will products be accepted after the expiration of the Limited Warranty Period. Speck Pumps- Pool Products, Inc. shall not bear any costs or risks incurred by Buyer in shipping a defective Badu SwimJet System(s) to Speck...
Need help?
Do you have a question about the badu jet imperial and is the answer not in the manual?
Questions and answers