BEBE CONFORT Creatis.fix Instructions For Use Manual
Hide thumbs
Also See for Creatis.fix:
- Instructions for use manual (26 pages) ,
- Instructions for use manual (100 pages)
Advertisement
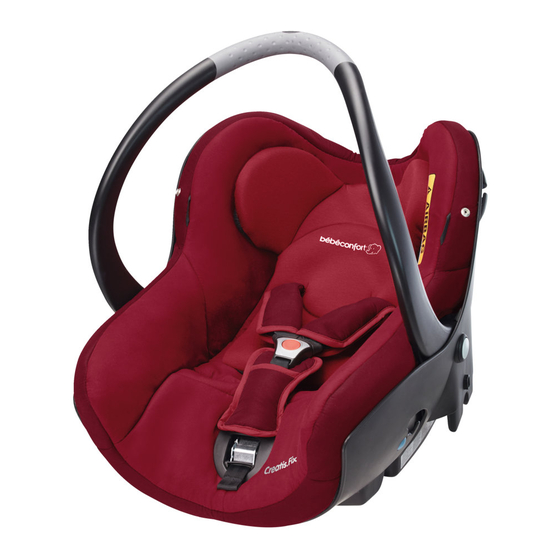
Use a Créatis.fix by bébéconfort
Made with Peoplbrain -
www.peoplbrain.com
Use a Créatis.fix by bébéconfort
Created by :
Bea
This how to guide is doable in : 10 to 20 min
and the level is : Easy
Instructions For Use of Créatis.fix by bébéconfort
1 / 28
Advertisement
Table of Contents

Related Manuals for BEBE CONFORT Creatis.fix


Summary of Contents for BEBE CONFORT Creatis.fix
- Page 1 Use a Créatis.fix by bébéconfort Made with Peoplbrain - www.peoplbrain.com Use a Créatis.fix by bébéconfort Created by : This how to guide is doable in : 10 to 20 min and the level is : Easy Instructions for use of Créatis.fix by bébéconfort 1 / 28...
- Page 2 Use a Créatis.fix by bébéconfort Made with Peoplbrain - www.peoplbrain.com Step : 1/54 Step : 2/54 Dear Customer, Thank you for the confidence you have shown in us by choosing one of our products. We hope it will meet all your expectations.
- Page 3 Made with Peoplbrain - www.peoplbrain.com Step : 3/54 INSTRUCTIONS FOR USE Créatis.fix bébéconfort GR O+ 0-13 Kg Step : 4/54 INSTRUCTIONS FOR USE OF CREATIS.FIX Direction : Rear-facing Position : Front and rear seats Group O+, 0 to 13 kg 3 / 28...
- Page 4 Use a Créatis.fix by bébéconfort Made with Peoplbrain - www.peoplbrain.com Step : 5/54 DO NOT install the child safety seat facing the rear on a front seat fitted with an airbag. DANGER OF DEATH OR SERIOUS INJURY. Step : 6/54 The seat can bu used in the front (if allowed by current legislation)...
- Page 5 Use a Créatis.fix by bébéconfort Made with Peoplbrain - www.peoplbrain.com Step : 7/54 Adjust the position of the vehicle’s seats so as not to interfere with the correct fitting and effectiveness of the child safety seat: Step : 8/54 Push the front passenger seat forward to install the child safety seat in the rear of the vehicle. 5 / 28...
- Page 6 Use a Créatis.fix by bébéconfort Made with Peoplbrain - www.peoplbrain.com Step : 9/54 Push the front passenger seat backwards when installing in the front of the vehicle to use the length of the front seat belt to maximum advantage Step : 10/54 Ensure that the base of the child safety seat is solidly placed on the seat of the vehicle.
- Page 7 Step : 11/54 CORRECT INSTALLATION OF CREATIS.FIX ONLY WARNING : if in any doubt about the correct installation or use of the system, the user is advised to contact the distributor or the manufacturer of the child restraining device system.
- Page 8 Use a Créatis.fix by bébéconfort Made with Peoplbrain - www.peoplbrain.com Step : 13/54 2 - Sunshade 3 - 2 press studs for fastening the sunshade 4 - 2 press studs for fastening the mosquito net 5 - Modulo Clip® System (For fastening on the Bé b é Confort frame) 6 - Cushion for the newborn (up to 3 months)...
- Page 9 Use a Créatis.fix by bébéconfort Made with Peoplbrain - www.peoplbrain.com Step : 15/54 13 - Headrest 14 - Fabric 15 - Storage pocket for instructions (between the shell and the polystyrene) 16 - Strap guide 17 - Base 18 - Installation label (approval no) 19 - Knob for unlocking handle 20 - Right-hand blue marker (Shows the position of the belt)...
- Page 10 Use a Créatis.fix by bébéconfort Made with Peoplbrain - www.peoplbrain.com Step : 17/54 CAUTION: before starting to fit the seat read through all the instructions provided. The carrying handle of the Creatis Fix must always be in the upward position when it is in use as a car seat. The blue marks on the Cré a tis.fix indicate the path of the safety belt.
- Page 11 Use a Créatis.fix by bébéconfort Made with Peoplbrain - www.peoplbrain.com Step : 19/54 2’’ - Thread the lap belt through the lower slot in the shell and fasten it as shown. CAUTION: when passing the lap belt through the slot in the shell, always ensure that it is not twisted. Step : 20/54 3 - When the lap belt has been threaded through the slots in the shell, slide it from left to right several times to check that it slides freely.
- Page 12 Use a Créatis.fix by bébéconfort Made with Peoplbrain - www.peoplbrain.com Step : 21/54 4 - Slide the diagonal belt behind the shell and then pull it firmly to tension the lap belt and to press the safety seat against the vehicle’s seat squab.
- Page 13 Step : 23/54 6 - Tighten the shoulder belt once it has been inserted into the belt guide (5) at the back of the Creatis.fix. Step : 24/54 7 - Thread the diagonal strap through the guide on the side of the seat and tighten it.
- Page 14 Use a Créatis.fix by bébéconfort Made with Peoplbrain - www.peoplbrain.com Step : 25/54 8 - NOTE you have now completed the installation of your Cré a tis.fix. Check it is positioned firmly. Check that the vehicle belt is correctly fastened (a), and that the belt has been correctly positioned at points b - c - d - e. Check that the vehicle's belt is not twisted Step : 26/54 9 - WARNING: use the reducing cushion from 0 to 3 months maximum ONLY with the headrest in its lowest position.
- Page 15 Use a Créatis.fix by bébéconfort Made with Peoplbrain - www.peoplbrain.com Step : 27/54 10 - Lengthen the shoulder straps of the harness by pressing on the adjustment latch and pulling on the shoulder straps. WARNING: do not pull on the shoulder pads but rather on the shoulder straps of the harness. Step : 28/54 11a - To make it easier to get your child into the seat, put the harness in the elastic retainers located on either side of the seat.
- Page 16 Use a Créatis.fix by bébéconfort Made with Peoplbrain - www.peoplbrain.com Step : 29/54 11b - Place the child in the seat, arrange the shoulder straps and then attach them to the harness buckle. A click will indicate that it is locked. Adjust the harness to suit the child by pulling on the adjustment strap. WARNING: Always fasten the child into the seat.
- Page 17 Use a Créatis.fix by bébéconfort Made with Peoplbrain - www.peoplbrain.com Step : 31/54 Adjusting the height of the shoulder straps of the harness 13 - Lengthen the shoulder straps of the harness by pressing on the adjustment latch and pulling on the shoulder straps (10).
- Page 18 Use a Créatis.fix by bébéconfort Made with Peoplbrain - www.peoplbrain.com Step : 33/54 WARNING: Never place your child in the carrycot on a raised surface, except on the stand approved and sold by the manufacturer. Never leave a child unsupervised. IMPORTANT: Before carrying the seat, check that the carrying handle is locked in place.
- Page 19 Use a Créatis.fix by bébéconfort Made with Peoplbrain - www.peoplbrain.com Step : 35/54 Move the handle from the upper carrying position to the lower at-rest position. 15 - Press on the right-hand locking knob until you hear a click. The button will then remain depressed. Step : 36/54 16 - Press on the left-hand locking knob and keeping it depressed, move the handle to the rear.
- Page 20 Use a Créatis.fix by bébéconfort Made with Peoplbrain - www.peoplbrain.com Step : 37/54 17 - Push the handle as far as it will go until it locks (Click!). Step : 38/54 Move the handle from the lower at-rest position to from the upper carrying position. 18 - Press on the right-hand locking knob until you hear a click, the button will then remain depressed.
- Page 21 Use a Créatis.fix by bébéconfort Made with Peoplbrain - www.peoplbrain.com Step : 39/54 19 - Press on the left-hand side locking knob and, keeping it depressed, fold the handle towards you. Step : 40/54 20 - When you hear a click from the right-hand knob and when it has returned to its initial position, the handle is in the locked position.
- Page 22 Use a Créatis.fix by bébéconfort Made with Peoplbrain - www.peoplbrain.com Step : 41/54 Sunshade 21 - Attach the sunshade to the fabric by means of the 4 press studs. Step : 42/54 Sunshade 2 - Insert the side flaps of the sun canopy inside the shell of the seat. The sunshade can be folded back to allow you to see the child better.
- Page 23 Use a Créatis.fix by bébéconfort Made with Peoplbrain - www.peoplbrain.com Step : 43/54 Mosquito net, Raincover and Footmuff (sold as an accessory) Step : 44/54 MODULO Clip System Compatibility : Cré a tis.fix can be used with the following Bé b é Confort frames: Loola Up Loola High Trek...
- Page 24 Use a Créatis.fix by bébéconfort Made with Peoplbrain - www.peoplbrain.com Step : 45/54 MODULO Clip System To Refit Step : 46/54 MODULO Clip System To Remove 24 / 28...
- Page 25 Use a Créatis.fix by bébéconfort Made with Peoplbrain - www.peoplbrain.com Step : 47/54 MODULO Clip System Keyo Step : 48/54 REMOVAL OF COVER WARNING: Before removal, ensure you have carefully noted the way which the various parts are attached to the seat so as to facilitate reassembly.
- Page 26 Use a Créatis.fix by bébéconfort Made with Peoplbrain - www.peoplbrain.com Step : 49/54 Headrest 25 - Remove the head rest cover starting from the top, unhook the elastic attachments. Step : 50/54 26 - Pass the shoulder straps of the harness through the slots in the cover. WARNING: never remove the protective foam fixed to the plastic head rest.
- Page 27 Use a Créatis.fix by bébéconfort Made with Peoplbrain - www.peoplbrain.com Step : 51/54 Cover 27 - Unhook the hook located at the front under the shell. Step : 52/54 28 - Remove the cover from the base of the seat and pass the buckle of the harness through the slot in the cover. 27 / 28...
- Page 28 Use a Créatis.fix by bébéconfort Made with Peoplbrain - www.peoplbrain.com Step : 53/54 29 - Remove the cover from the top of the seat and unhook the elastic attachments from behind the polystyrene. Step : 54/54 28 / 28...