Table of Contents
Advertisement
Quick Links
Advertisement
Table of Contents

Related Manuals for ATEN CV211


Summary of Contents for ATEN CV211
- Page 1 Laptop USB Console Adapter USER MANUAL CV211...
-
Page 2: Emc Information
EMC Information FEDERAL COMMUNICATIONS COMMISSION INTERFERENCE STATEMENT: This equipment has been tested and found to comply with the limits for a Class A digital device, pursuant to Part 15 of the FCC Rules. These limits are designed to provide reasonable protection against harmful interference when the equipment is operated in a commercial environment. -
Page 3: Online Registration
CV211 User Manual Online Registration You can register your product at our online support center: International http://eservice.aten.com Online Support International Email Support support@aten.com Online Technical Support http://eservice.aten.com Support Product Information http://www.aten.com Telephone Support 886-2-8692-6959 Telephone Support International 886-2-8692-6959 China 86-400-810-0-810... -
Page 4: Package Contents
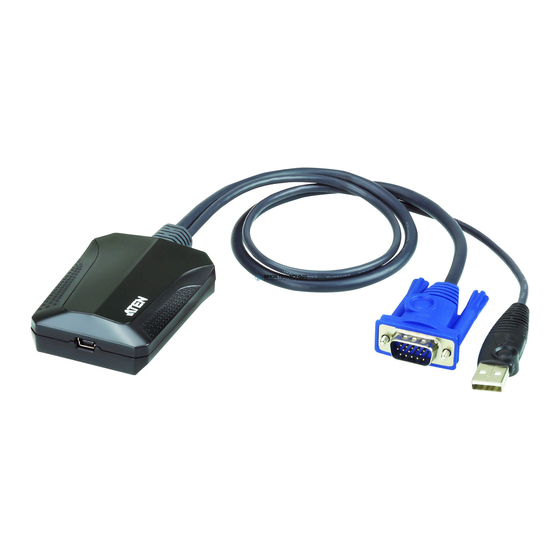
Copyright © 2017 ATEN® International Co., Ltd. Manual Date: 2017-05-16 ATEN and the ATEN logo are trademarks of ATEN International Co., Ltd. All rights reserved. All other trademarks are the property of their respective owners. - 4 -... - Page 5 The CV211 Laptop USB Console Adapter provides a direct Laptop-to-Computer connection with instant desktop access. Through its USB 2.0 and VGA cables, the CV211 gives a laptop direct access*, bi-directional file transfers, video recording and screenshots on the connected computer. Simply connect the cables between a laptop and computer for fast and easy remote desktop access with no software to install.
-
Page 6: System Requirements
A laptop with a USB Type A port. A computer with a USB Type A and VGA port. Note: 1. The CV211 only controls the target computer through a direct cable connection. It cannot be used to control two standalone PCs, as it only provides one computer with desktop access, as a one-to-one direct KVM console. - Page 7 Features USB Console Adapter provides direct Laptop-to-Computer desktop access Bi-directional file transfers between the laptop and connected computer Supports analogue video resolutions up to 1920 x 1200 @ 60 Virtual media enables file applications, OS patching, software installation and diagnostic testing Video recording and image capture of remote desktop Mouse DynaSync™...
- Page 8 Components Side View Component Description Mini USB Port This connects the CV211 to the USB port on the laptop. Connection LED Lights solid blue when the USB connection is established with the laptop and connected computer. Flashes blue when the laptop is accessing the connected computer through a remote client session.
- Page 9 Component Description Cable Clip Use this clip to secure the USB and VGA cables to avoid unnecessary tension. - 9 -...
-
Page 10: Installation
B Cable (included with this package) to the Mini USB port of the CV211. 3. Connect the CV211’s USB Type A connector to a USB port on the target computer. 4. Connect the CV211's VGA connector to a VGA port on the target computer. -
Page 11: Installation Diagram
Installation Diagram - 11 -... -
Page 12: Operation
3. Open an explorer window, click on the Removable Disk, and then double-click: WinClient.exe.* Note: 1. If the Removable Disk doesn’t install check the laptop’s USB connection to the CV211. 2. If the computer isn't running Windows, the Java AP Client provides remote access. To connect via the Java AP Client, double-click the JavaClient.jar file... -
Page 13: Desktop View
Desktop View The WinClient AP provides a Desktop View window with Control Panel to access the computer, as shown below: The WinClient Control Panel is hidden at the upper center of the screen, and becomes visible when you mouseover it. The panel consists of seven icons, as described on the next page. -
Page 14: Control Panel
Control Panel Icon Description Capture Click to take a snapshot (screen capture) of the target computer’s display (see page 38). Record Click to record a video of the target computer’s display. The video is saved on the laptop’s desktop. You can change the save to path in the Configure Panel (see page 38). -
Page 15: Control Panel Settings
Control Panel Settings When you click the last icon on the far right, it brings up a menu-style version of the Control Panel that allows you to select additional options, as shown below: - 15 -... -
Page 16: Winclient Control Panel Functions
WinClient Control Panel Functions The Control Panel functions are described in the table below. Icon Function Click to bring up the Hotkeys & Macros dialog box (see Hotkeys & Macros, page 17). Click to bring up the Video Options dialog box. (see Video Settings, page 25). -
Page 17: Hotkeys & Macros
Hotkeys & Macros The Macros icon provides access to two tabs found in the Hotkeys & Macros dialog box: Hotkeys and User Macros. Each function is described in the sections below. Hotkeys Various actions related to manipulating the connected computer can be accomplished with hotkeys. - Page 18 An explanation of the Hotkey actions is given in the table below: Action Explanation Exit Remote Breaks the connection to the CV211 and returns you to local client computer operation. This is equivalent to Location clicking the Exit icon on the Control Panel. The default keys are F2, F3, F4.
- Page 19 Substitute Alt Although all other keyboard input is captured and sent to the CV211, [Alt + Tab] and [Ctrl + Alt + Del] work on your laptop. In order to implement their effects on the connected computer, another key may be substituted for the Alt key.
- Page 20 3. Click Set Macro, and then Record 4. Press the keys for the macro. To pause macro recording, click Pause. To resume, click Resume. Click Stop to end recording the keys. When you click Minimize, the dialog box disappears, and a small panel appears at the top left of the screen: Clicking Cancel cancels all keystrokes.
- Page 21 When recording the macro the focus must be on the remote screen. It cannot be in the macro dialog box. Click Show Detail to return to the macro dialog box. Note: 1. Case is not considered – typing A or a has the same effect.
- Page 22 7. If you want to change any of the keystrokes, select the macro and click Set Macro. This brings up a dialog box that allows you to change the content of your keystrokes, change their order, etc. 8. Repeat the procedure for any other macros you wish to create.
- Page 23 After creating your macros, you can run them in two ways: 1. By using the hotkey (if one was assigned). 2. By opening the Macros dialog box and clicking Play. If you run the macro from this dialog box, you have the option of specifying how the macro runs.
- Page 24 Note: 1. Information about the Search function is given below. 2. User Macros are stored on the Local Client computer. Therefore, there is no limitation on the of number of macros, the size of the macro names, or makeup of the hotkey combinations that invoke them.
-
Page 25: Video Settings
Video Settings Clicking the Video Settings icon on the Control Panel Settings menu brings up the Video Settings dialog box. The options in the dialog box allow you to adjust the Screen Position, slide bar settings (Performance, Video Quality, Detect Tolerance) and Refresh settings, as shown below: Video Settings Options Usage... - Page 26 The larger the value, the clearer the picture and the more video data is transmitted. Enable Refresh The CV211 can redraw the screen every 1 to 99 seconds, eliminating unwanted artifacts from the screen. Select Enable Refresh and enter a number from 1 through 99.
- Page 27 Options Usage Detect This setting also relates to video quality. It governs Tolerance detecting or ignoring pixel changes. A high setting can result in a lower quality display due to less data transfer. A lower setting will result in better video quality, but setting the threshold too low may allow too much data to be transferred, negatively impacting performance.
- Page 28 Zoom The Zoom icon controls the zoom factor for the target computer’s console window. Settings are as follows: Setting Description Sizes and displays the remote view window at 25%. Sizes and displays the remote view window at 50%. Sizes and displays the remote view window at 75%. 100% Sizes and displays the remote view window at 100%.
-
Page 29: Virtual Media
Virtual Media The Virtual Media feature found on the Control Panel Settings menu allows a drive, ISO file, folder, removable disk, or smart card reader on a user’s system to appear and act as if it were installed on the target computer. Mounting Virtual Media To mount a virtual media device, do the following: 1. - Page 30 Depending on your selection, additional dialog boxes appear to enable you to select the Drive, ISO File, Folder, or Removable Disk you desire. 3. If your device only supports full speed USB, put a check in the Disable High Speed USB Operation Mode checkbox. 4.
- Page 31 Note: If a redirected device cannot be written to, it appears in gray. 6. To remove an entry from the list, select it and click 7. After you have made your media source selections, click Mount. The dialog box closes. The virtual media devices that you have selected are redirected to the target computer, where they show up as drives, files, folders, etc.
- Page 32 Once mounted, you can treat the virtual media as if they really existed on the target computer – drag and drop files to/ from them; open files on the target computer for editing and save them to the redirected media, etc. Files that you save to the redirected media will actually be saved on your laptops storage.
-
Page 33: On-Screen Keyboard
On-Screen Keyboard The CV211 supports an on-screen keyboard, available in multiple languages, with all the standard keys for each supported language. Click this icon to pop up the on- screen keyboard: One of the advantages of the on-screen keyboard is that if the keyboard languages of the target computer and laptop’s aren’t... - Page 34 2. Select the new language from the list. Selecting Platforms The On-screen Keyboard supports the Sun platform as well as the PC. To select the platform, do the following: 1. Click the down arrow next to the currently selected platform, to drop down the platform list.
-
Page 35: Mouse Pointer
Mouse Pointer The control panel offers a number of mouse pointer options when working in the target computer’s display. Click this icon to select from the available choices: Note: 1. The Dot pointer is not available with the Java Applet Viewer or the Java Client AP. -
Page 36: Mouse Sync Mode
Mouse Sync Mode Synchronization of the laptop and target computer mouse pointers is accomplished either automatically or manually. Automatic Mouse Synchronization Mouse DynaSync provides automatic locked-in synching of the target computer and laptop mouse pointers – eliminating the need to constantly resync the two movements. The icon on the Control Panel indicates the synchronization mode status as follows: Icon... - Page 37 Manual Mouse Synchronization If the laptop’s mouse pointer goes out of sync with the target computer's mouse pointer, there are a number of methods to bring them back into sync: 1. Perform a video and mouse auto sync by clicking the Video Sync icon on the Control Panel menu.
-
Page 38: Configure Panel
Item Description Screenshot These settings let the user configure the CV211’s screen capture parameters for when you use the Capture icon from the Control Panel: Path lets you select a directory that the captured screens and video files automatically get saved to. - Page 39 Item Description Keyboard Pass When this is enabled, the Alt-Tab key press is passed Through to the target computer and affects the target computer. If it is not enabled, Alt-Tab acts on your laptop. - 39 -...
- Page 40 As the upgrade proceeds, progress information is shown in the Progress bar. Once the upgrade completes successfully, the CV211 resets itself. 5. Reconnect to the CV211 and check the firmware version to ensure it is the new one. - 40 -...
-
Page 41: The Java Control Panel
The Java Control Panel The Java Client Viewer and Java Client AP Control Panel is similar to the one used by the WinClient: The major differences between them are: In the Macros dialog box, Toggle Mouse Display is not available. The Dot mouse pointer type is not available. -
Page 42: Vsr Viewer
VSR Viewer The CV211 can record a video of the target computer’s desktop display via the Video icon on the Control Panel. Clicking the Video icon starts and stops the recording. Videos are saved to the laptop’s desktop and can be opened with the VSR Viewer. - Page 43 Drag the round button left or right across the play-bar to bring the video to a specific time or frame. When the mouse is hovered over the play-bar, detailed time and date information is displayed. Use this icon to pause the video while its being played. Use this icon to play the video after its been paused.
- Page 44 Click the Settings Menu to configure the following options: Scale Mode: Keep Video Size – Keeps the video the same size regardless of how the window is adjusted. Parts of the desktop may not appear on the screen if the window is made too small.
- Page 45 Click this icon to save the video file to a new location and/or with a new name. Click this icon to open a new video file. The VLS Viewer can only open video files with the *.vls extension. Click this icon to open the Control Panel window. The Control Panel displays information about every key that was pressed on the keyboard as the video was recording.
-
Page 46: Specifications
Specifications Function CV211 Computer Connections Connectors Laptop USB Console 1 x Mini-USB Female (Black) (LUC) Port Computer Port 1 x USB Type A Male (Black) 1 x VGA Male (Blue) LEDs Online 1 (Blue) Max Video Resolution 1920 x 1200 @ 60 Hz Environment Operating Temp. -
Page 47: Limited Warranty
Limited Warranty IN NO EVENT SHALL THE DIRECT VENDOR'S LIABILITY EXCEED THE PRICE PAID FOR THE PRODUCT FROM THE DIRECT, INDIRECT, SPECIAL, INCIDENTAL OR CONSEQUENTIAL DAMAGES RESULTING FROM THE USE OF THE PRODUCT, DISK OR ITS DOCUMENTATION. The direct vendor makes no warranty or representation, expressed, implied, or statutory with respect to the contents or use of this documentation, and specially disclaims its quality, performance, merchantability, or fitness for any particular purpose.
Need help?
Do you have a question about the CV211 and is the answer not in the manual?
Questions and answers