Table of Contents
Advertisement
Advertisement
Table of Contents

Subscribe to Our Youtube Channel
Related Manuals for Hobbes Test-I


Summary of Contents for Hobbes Test-I
- Page 1 Model No. 258898 user manual...
-
Page 2: Table Of Contents
Content • Introduction • Product Description • Button definition • Features • Specification • Instructions for Operation - Getting Started - Test Cable - Fast Test - Save, Delete, Browse and Upload the Record • Driver Installation - Before Installation - Driver Installation - Hardware Connects - To Uninstall Driver... -
Page 3: Introduction
PC connector types and the most commonly used flat cables. The TEST-i not only tests each pins connection to identify opened circuits, shorted circuits, crossed wires, mis-wires and pin to pin connectivity, but can also record up to a 100 test results. -
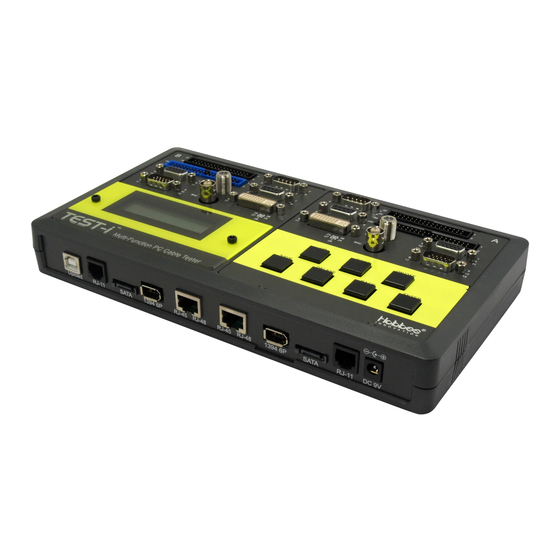
Page 4: Product Description
Product Description 1. Ferric Plate: A.Transmission, B. Receiving 2. LCD display with back light function 3. Control Switch: UP , DOWN, ON/OFF , SAVE, DELETE, BACK, ENTER 4. FRONT SIDE: with data upload 5. BACK SIDE 6. DC 9V 500mA power jack(adpter not included) - Page 5 USB-A USB-B HDMI 1394 4P 1394 4PRCA HDMI USB-B USB-A Upload RJ-11 SATA 1394 6P RJ-45 RJ-45 1394 6P SATA RJ-11 DC RJ-48 RJ-48...
-
Page 6: Button Definition
Button definition Button Description Press ON/OFF button to power ON/OFF (Back Light) on/off the tester and back light Press UP/DOWN button to select UP/DOWN the function Press SAVE button to save the SAVE test result Press DELETE button to delete DELETE the record Press BACK button to return to... -
Page 7: Features
Features • Identify opened wires, shorted wires, crossed- wires and mis-wires connectivity • Support 18 flat types of PC connectors • 100 Test results can be saved and transferred to PC via USB • Alphanumeric LCD display with back light function •... -
Page 8: Specification
Specification • Product: TEST-i Multi-Function PC Cable Tester • Model: 258898 • Hardware -Connectors: IDC40, IDC34, DVI29, HDB15M/F , DB9M/F , COAX, BNC, RJ11, RJ45, 1394-6P , 1394-4P , SATA, USB(A/B), HDMI, RCA -Control Switch: ON/OFF(POWER), UP , DOWN, SAVE, DELETE, BACK(CANCEL), ENTER... -
Page 9: Instructions For Operation
Instructions for Operation Getting Started 1. Push the ON/OFF button to power “on” the tester, a beep sound will indicate the tester is working. The LCD display the following message: Test Cable ← Browse → 2. In operating mode, you can press ON/OFF button to switch the LCD’s back light to “on”/”off”. - Page 10 3. In operating mode, you can hold the DOWN button 5 sec. to activate the “Alarm” function after the display shows “Alarm OFF(or ON)”, press ENTER to turn on/off the alarm and press DOWN button back to previous menu. Alarm OFF 4.
-
Page 11: Test Cable
Test Cable 1. Use UP or DOWN button to select the pin number for the cable you want to test, then press ENTER to start the testing. Press Enter To Select Pin Num. ← 04 06 07 → 09 15 2. -
Page 12: Fast Test
ENTER to select pin number, or press BACK to return to main menu. Fast Test TEST-i also provides quick test function to test a large number of cables in a short time. 1. Select Fast Test in main menu then press ENTER. - Page 13 2. Select Define Standard to create the standard pin to pin connectivity as the model, the standard will be compared to the other cable and determine whether the cable is good or bad. The standard rule is saved automatically. Test Cable ← Define Standard A01-B01 A02-B02 →...
- Page 14 If the cable’s pin to pin connectivity matches the standard, TEST-i will show OK and display the detailed pin to pin connectivity. If not, TEST-i will show Error and also display the cable’s detailed information. A01-B01 A02-B02 A03-B03 A04-B04 →...
-
Page 15: Save, Delete, Browse And
Save, Delete, Browse and Upload the Record 1. Press SAVE button to save the last test result (saving sequence is from 1 to 100). Saved No.003 OK 2.By pressing DELETE button, the tester will display two options in the menu: “Delete All” or “... - Page 16 3. If deleting a specific record, select “Delete One” and press UP or DOWN button to choose the record you want to delete, then press ENTER to delete the record(Note: by pressing ENTER again, it will delete the next record saved). Press BACK to return to the main menu.
- Page 17 ENTER to display data. Browse 002 Record → 5. To connect TEST-i to a computer(via USB) to upload the data, driver and software(included) must be installed on the computer. Please refer to next section for more detail process.
-
Page 18: Driver Installation
Driver Installation A) Before Installation: 1. Uninstall any previous TEST-I driver first prior to installation from control panel → Add or Remove program(refer to D) to uninstall driver). - Page 19 Please uninstall manually as follows steps in advance. (normally happens to Windows XP) 3. Please connect TEST-i device → goes to Device manger → Universal Serial bus controller → move to CP2101 USB Composite Device (either CP210x USB Composite Device or...
- Page 20 4. Right-click the mouse → Update Driver Software → select the destination folder manually. 5. Install from a list or specific location to TEST-i_ Driver\WinXP_2003_Vista_7 → Follow the on screen instructions.
- Page 22 TEST-i driver\Hobbes TEST-i\TEST-i_Driver...
- Page 23 6. When an unsigned driver installation warning is displayed, ignore and presses continue anyway → completing the Found New Hardware Wizard.
-
Page 24: Driver Installation
B) Driver Installation 1. Insert CD into the CD-ROM drive. Setup will start automatically. If it does not start after several seconds → double-click My Computer on your desktop(or click the Start button, and click My Computer) → right-click your CD drive, and then click AutoPlay. - Page 26 3. Select the destination folder: To install into the default folder, click “Next”. You can change the installation folder by inputting or selecting the browse button to choose a different folder.
- Page 27 4. To start Installation of the TEST-i device driver → Click “Install”...
- Page 28 5. Device driver is installing(allow the installer to process).
- Page 29 6. If an older version of the driver is detected, the program will ask you to remove the old driver before installing the new one → Click Yes(Y) to uninstall the old driver.
- Page 30 7. When an unsigned driver installation warning is displayed, ignore and press Continue(C)
- Page 31 8. After the new driver has been installed, the program will ask you to reboot the system in order to complete the whole installation process. Press Yes(Y) to continue.
- Page 32 Please Click “Close” to exit. After the driver has been successfully installed, a TEST-i icon will display on the Desktop as 10. If this is not the first time you had installed the device driver, please goes to A) Before Installation steps.
-
Page 33: Hardware Connects
Environment: Windows 2000, Windows XP , Windows 7, Vista 1. Connecting TEST-i via USB cable(included in the package: TEST-i, CD disk and USB cable) 2. Connect the USB Cable on the unit and your computers USB Port. The system will automatically detect and search the driver. - Page 34 3. When an unsigned driver installation warning is displayed, ignore and press Continue(C)
- Page 35 4. After the installation process has been completed. Click “Finish” to close the window.
- Page 36 5. Connect TEST-i into computer via USB cable and Click TEST-i icon on the Desktop. 6. TEST-i table will pop up. Toolbar includes Open, Save, Print, Upload, About and Exit. TEST results includes ID, Pin and Pin State.
- Page 37 1) Open: Open the file that has been saved. 2) Save: Saving test result. 3) Print: Print test result. 4) Upload: Upload the data that has been saved on TEST-i. 5) About: Indicate current version of Hobbes TEST-i installed. 6) Exit: Exit TEST-i.
- Page 38 8. TEST result: Includes ID number, Pin number of testing cable, pin to pin status. Found Problems: (X)(Y): shows the number of the referring pin A(X)-: The cable is broken(no connection); Broken circuit A(X)-B(X): Correct connection(Cable is good) A(X)-A(Y)-B(X) -B(Y): Crossed, shorted.(The connection is shorted;...
- Page 39 9. Uploading the data → Press the “Upload Data” button. 1) Refresh Dev: Click “Refresh Dev” to refresh the device once windows can’t detect it successfully (make sure device is connected properly and all connections are secure). 2) Upload Data: Click “Upload Data” to upload test result to PC.
- Page 40 10. Clicking “Upload data” → receive success → Ok.
- Page 41 11. The test results will display completely.
-
Page 42: To Uninstall Driver
D) To Uninstall Driver: 1. Go to control panel → Add or Remove Programs. 2. Remove TEST-i. - Page 43 3. Uninstall the TEST-i driver. 4. Restart the computer after uninstall process→ uninstalled completely.
-
Page 44: Remarks
Remarks: •If the driver was damaged or not installed correctly, please set up TEST-i driver again. •Also, the driver can be downloaded from Hobbes Webiste(www.hobbes-group.com), goes to service/download. Warning: 1. Please don’t connect the tested cable to the same side of the test interface. -
Page 45: Warranty
4. Do not attempt to open or disassemble the unit by yourself. You run the risk of voiding the limited warranty. If the product appears to be damaged or does not function properly, please send it to original dealer to obtain warranty service.
Need help?
Do you have a question about the Test-I and is the answer not in the manual?
Questions and answers