Airtraq A-390 Instructions For Use Manual
Hide thumbs
Also See for A-390:
- Getting started (32 pages) ,
- Instructions for use manual (21 pages) ,
- Manual (4 pages)

Related Manuals for Airtraq A-390


Summary of Contents for Airtraq A-390
- Page 1 A-390 WI-FI CAMERA Instructions For Use ENGLISH CHECK FOR LATEST SOFTWARE VERSION AVAILABLE BY CONNECTING TO AIRTRAQ CAM APPLICATION (WINDOWS & MAC)
-
Page 2: Table Of Contents
A-390 WI-FI CAMERA INDEX A-390 Basic information A-390 Components A-390 Switches, indicators and connectors A-390 Battery charge & charge status checking 4.1. Camera Docking Station 4.2. Airtraq Docking Station Mounting the A-390 onto the Airtraq Turn On/Off Touch Panel & Menus... -
Page 3: A-390 Basic Information
CMOS video camera with integrated touch screen and rechargeable Li-Po Battery. 2.2. USB - micro USB cable To be used to connect the A-390 to a PC for video downloading or for camera’s settings administration. 2.3. Silicon protective case Provides additional protection against shocks. -
Page 4: A-390 Switches, Indicators And Connectors
2.7. Storage case Accessory to store all above items. The A-390 can be charged when it is inside the storage case. Pass the battery charger cable to the inside of the storage case through the hole on its lateral side and connect the Micro USB directly to the A-390. -
Page 5: A-390 Battery Charge & Charge Status Checking
A. Automatic power button: This button is automatically pushed when the A-390 is inserted onto any Airtraq. It can also be pushed manually to turn on the A-390. To turn off the A-390 press the corresponding icon on the menu. -
Page 6: Camera Docking Station
Battery Charger needed to connect it to mains supply. USE DOCKING STATION ONLY WITH BATTERY CHARGER PROVIDED. In order to keep the Airtraq Avant Optics clean it shall be inserted into the Docking Station covered by the Optics Storage Case. - Page 7 Optics as well as its battery charge level. 2. Airtraq Avant Optics connector: Micro-USB male connector. 3. Airtraq Camera A-390 connector: Brass pin connector for the A-390 Camera. 4. Airtraq Wi-Fi Camera A-360 connector: Micro-USB male connector for A-360 Camera.
-
Page 8: Mounting The A-390 Onto The Airtraq
A-390. Turning on will take approximately 3 seconds. To turn off the A-390 press the “Power off” icon on the main menu. The unit will show a message to the user and a “cancel” icon will appear and it will automatically shut down in 5 seconds unless the user cancels the action. -
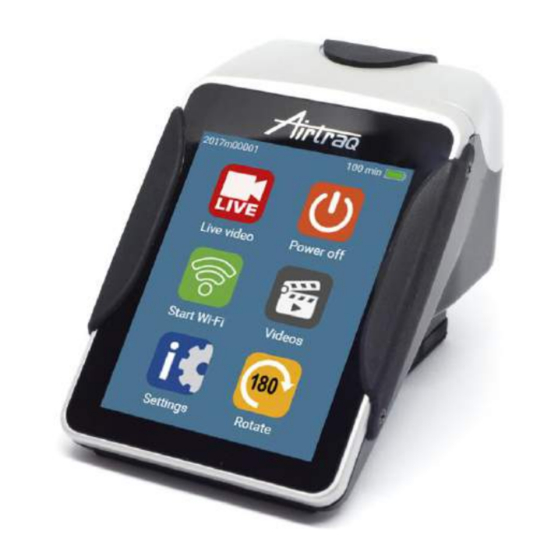
Page 9: Touch Panel & Menus
If so, a new period of 30 minutes will start. When A-390 is not assembled onto the Airtraq, and there is no action from the user for 5 minutes, A-390 will shut down automatically. Before turning off the screen will show a message to the user and show an icon to cancel the shutdown process. -
Page 10: Initial Set Up
• Set Auto Recording Mode: The auto-recording function will automatically start a new video recording every time the A-390 goes into Live Video. Set it on or off as desired. • Set Auto-recorded video maximum size: select the maximum video file size: (5 min [18 mb], 7 min [21 mb], 10 min [30 mb], 15 min [45 mb], 20 min [60 mb], 30 min [90 mb]). - Page 11 A-390 enters into Live Video. Video files are recorded in avi format and stored in A-390’s internal memory. A-390 is able to store 200 videos (more than 10 hours of video.
-
Page 12: Delete Videos
When the App is launched, a screen will show up with the A-390 connected to the PC. Only one A-390 at a time can be connected to the PC. Click on “Manage Videos on Cam” icon and the App will display the list of videos stored into the A-390. -
Page 13: Connecting Wi-Fi Live Video To A Pc
TABLET / PHONE A-390 can connect via Wi-Fi to tablets and smartphones on iOS. When Wi-Fi is enabled the A-390 cannot record on it is internal memory. If the user needs to record, it can be done on the connected device. -
Page 14: View System Information
A-390 to the PC through the USB cable provided. A screen will show up with the A-390 connected to the PC. Only one A-390 at a time can be connected to the Select “Cam Settings”. In “Cam Settings” screen select “Software Upgrade”. - Page 15 2. Cleaning: Use clean cotton gauze pads that are saturated with the cleaning solution to wipe down the exterior surfaces of the A-390. Use soft brushes with the cleaning solution to remove any residues from areas that cannot be reached with the gauze pads.
-
Page 16: Operating, Storage And Transport
20. OPERATING, STORAGE AND TRANSPORT The A-390 should not be used, stored or transported at temperatures below -5 °C/23°F or over 55° C/131°F. The relative humidity must not exceed 95%. The air pressure must not exceed 500 to 1060 hPa. - Page 17 Electromagnetic Compatibility. Detailed results of Emissions and Immunity Tests are available from the manufacturer. A-390 is a portable RF communications equipment and can affect Medical Electrical Equipment. This equipment is intended for use by healthcare professionals only.
- Page 18 is subject to the following two conditions: (1) This device may not cause harmful interference, and (2) this device must accept any interference received, including interference that may cause undesired operation. Statement according to FCC part 15.21. Changes or modifications not expressly approved by the party responsible for compliance could void the user’s authority to operate the equipment.
-
Page 19: Disposal Instructions
If you have any technical problems with the device, please call the Airtraq Distributor in your country or send a message through our web site (www.airtraq.com). Before making your call please have the serial number ready. The serial number... - Page 20 A-390 is located on a sticker near the lens of the camera and also on the original package. In case of a hardware defect confirming the warranty conditions, your device will be collected and you will receive another one within 20 working days after we receive your defective one.
-
Page 21: Important Safety Instructions
1. Keep, read and follow all of these instructions. 2. Heed all warnings in these instructions. 3. The A-390 does not work when it is being charged. It should be charged at least 1.8 m away from the patient. 4. Use only the A-390´s battery charger supplied by the manufacturer. - Page 22 Guangdong (Vizcaya). 519085 P.R. China SPAIN USA & Canada Representative: AIRTRAQ LLC 2414 Lawton Ln. Rowlet, TX 75089, USA For further advice on using the A-390 visit www.airtraq.com or contact: USA & Canada: +1877-624-7929 info.usa@airtraq.com EU & Other: +34944804690 info@airtraq.com Airtraq is a registered trademark.
Need help?
Do you have a question about the A-390 and is the answer not in the manual?
Questions and answers