Table of Contents
Advertisement
Available languages
Available languages
Quick Links
Advertisement
Table of Contents

Subscribe to Our Youtube Channel
Related Manuals for Axis AXIS MFD-R


Summary of Contents for Axis AXIS MFD-R
- Page 1 AXIS 209FD/FD-R/FD-R M12 AXIS 209MFD/MFD-R/MFD-R M12 Installation Guide...
-
Page 3: Installation Steps
AXIS 209FD/FD-R/FD-R M12/MFD/MFD-R/MFD-R M12 Installation Guide AXIS 209FD/FD-R/FD-R M12 AXIS 209MFD/MFD-R/MFD-R M12 Installation Guide This installation guide provides instructions for installing the AXIS 209FD, AXIS 209FD-R, AXIS 209FD-R M12, AXIS 209MFD, AXIS 209MFD-R and the AXIS 209MFD-R M12 on your network. For all other aspects of using the product, please see the User’s Manual, available on the CD included in this package, or from www.axis.com/techsup Installation steps 1. -
Page 4: Hardware Overview
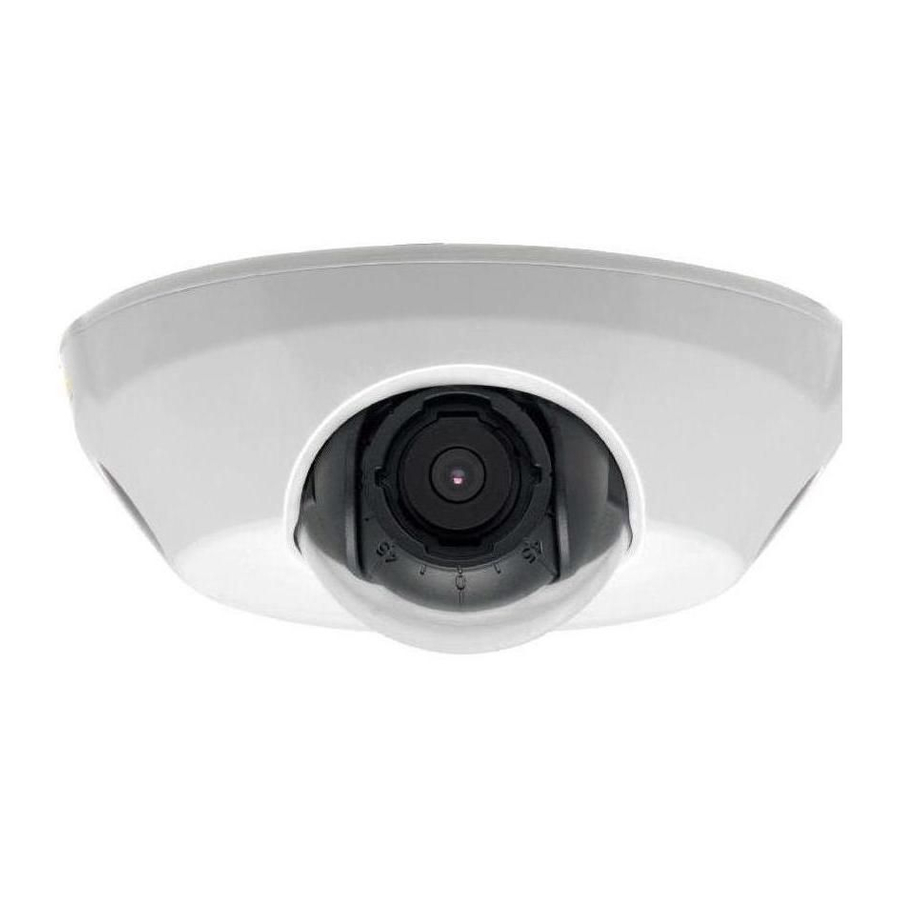
Page 4 AXIS 209FD/FD-R/FD-R M12/MFD/MFD-R/MFD-R M12 Installation Guide Hardware overview Front view Rear view Side view Base plate Screw holes Dimensions Diameter 1 = 102mm (4.02”), Diameter 2 = 100mm (3.94”) Height = 39mm (1.54”) Weight = 0.18 kg (0.40lb) ∅... -
Page 5: Install The Hardware
AXIS 209FD/FD-R/FD-R M12/MFD/MFD-R/MFD-R M12 Installation Guide Install the hardware IMPORTANT! - The casing of the AXIS 209FD/AXIS 209MFD is not approved for outdoor use and may only be installed in indoor environments. The AXIS 209FD-R/AXIS 209FD-R M12/AXIS 209MFD-R/AXIS 209MFD-R M12 is rugged and can be used in humid environments such as mass transit vehicles. - Page 6 Page 6 AXIS 209FD/FD-R/FD-R M12/MFD/MFD-R/MFD-R M12 Installation Guide 4. Connect the network cable. If PoE is not supported by the network switch, use the supplied PoE midspan/power injector to connect power to the AXIS 209FD, AXIS 209FD- R, AXIS 209MFD, AXIS 209MFD-R.
-
Page 7: Assign An Ip Address
AXIS 209FD/FD-R/FD-R M12/MFD/MFD-R/MFD-R M12 Installation Guide Assign an IP address To make it accessible on the network, the AXIS 209FD/FD-R/FD-R M12/MFD/MFD-R/MFD- R M12 must be assigned an IP address. Depending on the number of cameras you wish to install, the recommended method for assigning IP addresses in Windows is either AXIS IP Utility or AXIS Camera Management. -
Page 8: Axis Ip Utility - Single Camera/Small Installation
Page 8 AXIS 209FD/FD-R/FD-R M12/MFD/MFD-R/MFD-R M12 Installation Guide AXIS IP Utility - single camera/small installation AXIS IP Utility automatically discovers and displays Axis devices on your network. The application can also be used to manually assign a static IP address. Note that the computer running AXIS IP Utility must be on the same network segment (physical subnet) as the AXIS 209FD/FD-R/FD-R M12/MFD/MFD-R/MFD-R M12. -
Page 9: Axis Camera Management - Multiple Cameras/Large Installations
AXIS 209FD/FD-R/FD-R M12/MFD/MFD-R/MFD-R M12 Installation Guide AXIS Camera Management - multiple cameras/large installations AXIS Camera Management can automatically find and set IP addresses, show connection status, and manage firmware upgrades for multiple Axis video products. Set the IP address for a single device 1. -
Page 10: Set The Password
Page 10 AXIS 209FD/FD-R/FD-R M12/MFD/MFD-R/MFD-R M12 Installation Guide Set the password When accessing the AXIS 209FD/FD-R/FD-R M12/MFD/MFD-R/MFD-R M12 for the first time, the ‘Configure Root Password’ dialog will be displayed. 1. Enter a password and then re-enter it, to confirm the spelling. Click OK. 2. -
Page 11: Lens Adjustments
AXIS 209FD/FD-R/FD-R M12/MFD/MFD-R/MFD-R M12 Installation Guide Lens adjustments Position To adjust the position of the lens, follow these steps: 1. Open the Live View page in your web browser. 2. While checking the image in the Live View page, move the lens to the desired position. -
Page 12: Complete The Installation
Page 12 AXIS 209FD/FD-R/FD-R M12/MFD/MFD-R/MFD-R M12 Installation Guide Complete the installation 1. Clean the dome with a dry soft cloth to remove dust and fingerprints and use a blower to remove any dust from the lens. 2. To absorb any moisture in the AXIS 209FD-R/AXIS 209FD-R M12/AXIS 209MFD-R/AXIS 209MFD-R M12, remove the... -
Page 13: Other Methods Of Setting The Ip Address
AXIS 209FD/FD-R/FD-R M12/MFD/MFD-R/MFD-R M12 Installation Guide Other methods of setting the IP address The table below shows the other methods available for setting or discovering the IP address. All methods are enabled by default, and all can be disabled. Use in operating system Windows UPnP™... -
Page 14: Led Indicators
Page 14 AXIS 209FD/FD-R/FD-R M12/MFD/MFD-R/MFD-R M12 Installation Guide LED indicators Color Indication Network Green Steady for connection to a 100 Mbit/s network. Flashes for network activity. Amber Steady for connection to 10 Mbit/s network. Flashes for network activity. Unlit No network connection. Status Green Steady green for normal operation. -
Page 15: Resetting To The Factory Default Settings
AXIS 209FD/FD-R/FD-R M12/MFD/MFD-R/MFD-R M12 Installation Guide Resetting to the Factory Default Settings This will reset all parameters, including the IP address, to the Factory Default settings: 1. Disconnect the network cable from the camera. 2. Using the supplied allen/hex key, loosen the 4 screws holding the cover and remove it. 3. - Page 16 Page 16 AXIS 209FD/FD-R/FD-R M12/MFD/MFD-R/MFD-R M12 Installation Guide...
-
Page 17: Étapes De L'installation
Guide d'installation de l'AXIS 209FD/FD-R/FD-R M12/MFD/MFD-R/MFD-R M12 Guide d'installation de l'AXIS 209FD/FD-R/FD-R M12 AXIS 209MFD/MFD-R/MFD-R M12 Ce Guide d'installation vous explique comment installer les appareils AXIS 209FD, AXIS 209FD-R, AXIS 209FD-R M12, AXIS 209MFD, AXIS 209MFD-R et AXIS 209MFD-R M12 Fixed Dome Network Camera sur votre réseau. -
Page 18: Présentation Du Matériel
Page 18 Guide d'installation de l'AXIS 209FD/FD-R/FD-R M12/MFD/MFD-R/MFD-R M12 Présentation du matériel Vue avant Vue arrière Vue latérale Plaque de base Trous de vis Dimensions Diamètre 1 = 102 mm, diamètre 2 = 100 mm Hauteur = 39 mm Poids = 0,18 kg Position de la sortie arrière du câble (facultatif) -
Page 19: Installation Du Matériel
Guide d'installation de l'AXIS 209FD/FD-R/FD-R M12/MFD/MFD-R/MFD-R M12 Installation du matériel IMPORTANT ! - Le boîtier de l'AXIS 209FD/AXIS 209MFD n'est pas conçu pour une utilisation en extérieur et ne doit être installé qu'à l'intérieur. L'AXIS 209FD-R/AXIS 209FD-R M12/AXIS 209MFD-R/AXIS 209MFD-R M12 est consolidée et peut être utilisée dans des environnements humides. - Page 20 Page 20 Guide d'installation de l'AXIS 209FD/FD-R/FD-R M12/MFD/MFD-R/MFD-R M12 4. Connectez le câble réseau. Si l'alimentation PoE n'est pas prise en charge par le commutateur réseau, utilisez le midspan PoE fourni pour brancher l'AXIS 209FD/FD-R/ FD-R M12/MFD/MFD-R/MFD- R M12. 5. Vérifiez que les témoins DEL indiquent les conditions correctes.
-
Page 21: Attribution D'une Adresse Ip
Guide d'installation de l'AXIS 209FD/FD-R/FD-R M12/MFD/MFD-R/MFD-R M12 Attribution d'une adresse IP Pour que l'appareil AXIS 209FD/FD-R/FD-R M12/MFD/MFD-R/MFD-R M12 soit accessible sur le réseau, vous devez lui affecter une adresse IP. Selon le nombre de caméras à installer, pour attribuer des adresses IP sous Windows, il est recommandé... -
Page 22: Axis Ip Utility - Une Seule Caméra/Petite Installation
Page 22 Guide d'installation de l'AXIS 209FD/FD-R/FD-R M12/MFD/MFD-R/MFD-R M12 AXIS IP Utility - Une seule caméra/petite installation L'utilitaire AXIS IP Utility détecte et affiche automatiquement les périphériques Axis de votre réseau. Cette application sert également à attribuer manuellement une adresse IP statique. -
Page 23: Axis Camera Management - Plusieurs Caméras/Grandes Installations
Guide d'installation de l'AXIS 209FD/FD-R/FD-R M12/MFD/MFD-R/MFD-R M12 AXIS Camera Management - Plusieurs caméras/grandes installations AXIS Camera Management détecte et définit automatiquement les adresses IP, affiche les états de connexion et gère les mises à niveau de microprogrammes de nombreux produits vidéo Axis. -
Page 24: Définition Du Mot De Passe
Page 24 Guide d'installation de l'AXIS 209FD/FD-R/FD-R M12/MFD/MFD-R/MFD-R M12 Définition du mot de passe Si vous accédez à l'appareil AXIS 209FD/FD-R/ FD-R M12/MFD/MFD-R/MFD-R M12 pour la première fois, la boîte de dialogue Configurer le mot de passe root s'affiche. 1. Entrez un mot de passe et entrez-le une seconde fois pour en confirmer l'orthogra- phe. - Page 25 Guide d'installation de l'AXIS 209FD/FD-R/FD-R M12/MFD/MFD-R/MFD-R M12 Réglages de l'objectif Position Pour régler la position de l'objectif, procédez comme suit : 1. Ouvrez la page Vidéo en direct dans votre navigateur Web. 2. Tout en contrôlant l'image dans la page Vidéo en direct, déplacez l'objectif vers la position souhaitée.
-
Page 26: Fin De L'installation
Page 26 Guide d'installation de l'AXIS 209FD/FD-R/FD-R M12/MFD/MFD-R/MFD-R M12 Fin de l'installation 1. Nettoyez le dôme avec un chiffon doux et sec pour enlever la poussière et les traces de doigt. Dépoussiérez l'objectif avec un ventilateur. 2. Pour absorber l'humidité éventuellement présente dans l'AXIS 209FD-R/AXIS 209FD-R M12/AXIS 209MFD-R/AXIS... -
Page 27: Autres Méthodes De Définition De L'adresse Ip
Guide d'installation de l'AXIS 209FD/FD-R/FD-R M12/MFD/MFD-R/MFD-R M12 Autres méthodes de définition de l'adresse IP Le tableau ci-dessous indique les autres méthodes permettant de définir ou de déterminer l'adresse IP. Toutes les méthodes sont activées par défaut et désactivables. Utilisation sur le système d'exploitation Windows... -
Page 28: Témoins Del
Page 28 Guide d'installation de l'AXIS 209FD/FD-R/FD-R M12/MFD/MFD-R/MFD-R M12 • Pour utiliser la commande ARP sur Mac OS X, utilisez l'utilitaire Terminal dans Application > Utilitaires. Témoins DEL Témoin DEL Couleur Indication Réseau Vert Continu en cas de connexion à un réseau 100 Mbits/s. Clignote en cas d'activité réseau. -
Page 29: Rétablissement Des Paramètres D'usine Par Défaut
Guide d'installation de l'AXIS 209FD/FD-R/FD-R M12/MFD/MFD-R/MFD-R M12 Rétablissement des paramètres d'usine par défaut Pour revenir aux paramètres par défaut définis en usine et réinitialiser l'adresse IP, procédez comme suit : 1. Débranchez le câble Ethernet de la caméra. 2. Á l'aide de la clé hexagonale fournie, desserrez les 4 vis du couvercle et retirez ce dernier. - Page 31 AXIS 209FD/FD-R/FD-R M12/MFD/MFD-R/MFD-R M12 Installationsanleitung AXIS 209FD/FD-R/FD-R M12 AXIS 209MFD/MFD-R/MFD-R M12 Installationsanleitung In dieser Anleitung wird die Installation der AXIS 209FD, AXIS 209FD-R, AXIS 209FD-R M12, AXIS 209MFD, AXIS 209MFD-R und der AXIS 209MFD-R M12 Fixed Dome Network Camera im Netzwerk beschrieben. Alle weiteren Hinweise zur Verwendung des Produkts finden Sie im Benutzerhandbuch, das auf der mitgelieferten CD enthalten ist und auf unserer Webseite unter www.axis.com/techsup zur Verfügung steht.
- Page 32 Seite 32 AXIS 209FD/FD-R/FD-R M12/MFD/MFD-R/MFD-R M12 Installationsanleitung Komponente Gedruckte Dokumente Modelle/Varianten/Anmerkungen AXIS 209FD/FD-R/FD-R M12/MFD/MFD-R/MFD-R M12 Installationsanleitung (dieses Dokument) Axis-Garantieerklärung...
- Page 33 AXIS 209FD/FD-R/FD-R M12/MFD/MFD-R/MFD-R M12 Installationsanleitung Hardwareübersicht Vorderansicht Rückansicht Seitenansicht Bodenplatte Schraubenlöcher Abmessungen Durchmesser 1 = 102 mm, Durchmesser 2 = 100 mm Höhe = 39 mm Gewicht = 0,18 kg Position des Kabelausgangs auf der Rückseite (optional) ∅ 102 mm Netzwerkkabel mit modellspezifischem Anschluss...
-
Page 34: Hardware Installieren
Seite 34 AXIS 209FD/FD-R/FD-R M12/MFD/MFD-R/MFD-R M12 Installationsanleitung Hardware installieren WICHTIGER HINWEIS! Das Gehäuse der AXIS 209FD/AXIS 209MFD ist nicht für die Benutzung im Freien geeignet. Deshalb darf die Kamera nur in Innenräumen installiert werden. Die AXIS 209FD-R/AXIS 209FD-R M12/AXIS 209MFD-R/AXIS 209MFD-R M12 ist besonders widerstandsfähig und kann auch in feuchten Umgebungen verwendet werden. - Page 35 AXIS 209FD/FD-R/FD-R M12/MFD/MFD-R/MFD-R M12 Installationsanleitung 3. Um das Kabel durch eine Decke zu verlegen, schneiden oder bohren Sie ein Loch für das Kabel und den Kabelanschluss. Für die AXIS 209FD/AXIS 209MFD ist ein Loch mit einem Durchmesser von 17 mm erforderlich.
-
Page 36: Ip-Adresse Zuweisen
Seite 36 AXIS 209FD/FD-R/FD-R M12/MFD/MFD-R/MFD-R M12 Installationsanleitung IP-Adresse zuweisen Um die Kommunikation mit dem Netzwerk zu ermöglichen, muss der AXIS 209FD/FD-R/FD- R M12/MFD/MFD-R/MFD-R M12 eine IP-Adresse zugewiesen werden. Von der Anzahl der zu installierenden Kameras hängt ab, ob die IP-Adressen unter Windows mit Hilfe von AXIS IP Utility oder AXIS Camera Management zugewiesen werden sollten. -
Page 37: Axis Ip Utility - Einzelne Kamera/Kleine Installation
AXIS 209FD/FD-R/FD-R M12/MFD/MFD-R/MFD-R M12 Installationsanleitung AXIS IP Utility – Einzelne Kamera/kleine Installation AXIS IP Utility erkennt automatisch im Netzwerk vorhandene Axis-Geräte und zeigt diese an. Die Anwendung kann außerdem zur manuellen Zuweisung einer statischen IP-Adresse verwendet werden. Beachten Sie, dass sich die AXIS 209FD/FD-R/FD-R M12/MFD/MFD-R/MFD-R M12 und der Computer, auf dem AXIS IP Utility ausgeführt wird, im gleichen Netzwerksegment (d. -
Page 38: Axis Camera Management - Mehrere Kameras/Große Installation
Seite 38 AXIS 209FD/FD-R/FD-R M12/MFD/MFD-R/MFD-R M12 Installationsanleitung AXIS Camera Management - Mehrere Kameras/große Installation Mit AXIS Camera Management können automatisch IP-Adressen gesucht und eingerichtet, der Verbindungsstatus angezeigt und die Firmware-Aktualisierungen mehrerer Axis- Videoprodukte verwaltet werden. Automatische Erkennung 1. Stellen Sie sicher, dass die Kamera an das Netzwerk und die Stromversorgung ange- schlossen ist. -
Page 39: Kennwort Festlegen
AXIS 209FD/FD-R/FD-R M12/MFD/MFD-R/MFD-R M12 Installationsanleitung Kennwort festlegen Beim erstmaligen Zugriff auf die AXIS 209FD/ FD-R/FD-R M12/MFD/MFD-R/MFD-R M12 wird das Dialogfeld Configure Root Password (Root-Kennwort konfigurieren) angezeigt. 1. Geben Sie ein Kennwort ein, und wieder- holen Sie die Eingabe, um die korrekte Schreibweise zu bestätigen. - Page 40 Seite 40 AXIS 209FD/FD-R/FD-R M12/MFD/MFD-R/MFD-R M12 Installationsanleitung Objektiveinstellungen Position Um die Position des Objektivs einzustellen, führen Sie folgende Schritte aus: 1. Öffnen Sie die Seite „Direktübertra- gung“ in Ihrem Webbrowser. 2. Überprüfen Sie das Bild auf der Seite „Direktübertragung“, und bewegen Sie das Objektiv dabei in die gewünschte Position.
-
Page 41: Installation Abschließen
AXIS 209FD/FD-R/FD-R M12/MFD/MFD-R/MFD-R M12 Installationsanleitung Installation abschließen 1. Entfernen Sie mit einem trockenen, weichen Tuch Fingerabdrücke und Staub von der Glasoberfläche. Blasen Sie Staub ggf. mit Druckluft von der Linse. 2. Nehmen Sie zur Absorption von Feuchtigkeit in der AXIS 209FD/ FD-R/FD-R M12/MFD/MFD-R/ MFD-R M12 das mitgelieferte Silicagelkissen (Trockenbeutel) - Page 42 Seite 42 AXIS 209FD/FD-R/FD-R M12/MFD/MFD-R/MFD-R M12 Installationsanleitung Weitere Methoden zum Festlegen der IP-Adresse Diese Tabelle bietet einen Überblick zu weiteren Methoden, die IP-Adresse festzulegen bzw. zu ermitteln. Alle Methoden sind standardmäßig aktiviert und können deaktiviert werden. Verwendung im Betriebssystem Windows UPnP™...
-
Page 43: Led-Anzeigen
AXIS 209FD/FD-R/FD-R M12/MFD/MFD-R/MFD-R M12 Installationsanleitung 5. Schließen Sie die Eingabeaufforderung, sobald ‚Reply from 192.168.0.125: ...’ oder eine ähnliche Antwort angezeigt wird. 6. Starten Sie einen Browser, geben Sie im Adressfeld „http://<IP-Adresse>“ ein, und drücken Sie die Eingabetaste. Hinweise: • So öffnen Sie die Eingabeaufforderung unter Windows: Wählen Sie „Ausführen...“ im Startmenü, und geben Sie „cmd“... -
Page 44: Weitere Informationen
Seite 44 AXIS 209FD/FD-R/FD-R M12/MFD/MFD-R/MFD-R M12 Installationsanleitung Auf werkseitige Voreinstellungen zurücksetzen Gehen Sie folgendermaßen vor, um sämtliche Parameter einschließlich der IP-Adresse auf die werkseitigen Standardeinstellungen zurückzusetzen: 1. 1. Trennen Sie das Netzwerkkabel von der Kamera. 2. Lösen Sie mit Hilfe des mitgelieferten Inbusschlüssels/Sechskant-Stiftschlüssels die 4 Schrauben, mit denen das Gehäuse befestigt ist, und nehmen Sie das Gehäuse ab. -
Page 45: Procedura Di Installazione
Guida all'installazione di AXIS 209FD/FD-R/FD-R M12/MFD/MFD-R/MFD-R M12 Guida all'installazione di AXIS 209FD/FD-R/FD-R M12 AXIS 209MFD/MFD-R/MFD-R M12 Nel presente documento vengono fornite le istruzioni per installare la Fixed Dome Network Camera AXIS 209FD, AXIS 209FD-R, AXIS 209FD-R M12, AXIS 209MFD, AXIS 209MFD-R e AXIS 209MFD-R M12 in rete. -
Page 46: Panoramica Dell'hardware
Pagina 46 Guida all'installazione di AXIS 209FD/FD-R/FD-R M12/MFD/MFD-R/MFD-R M12 Panoramica dell’hardware Vista anteriore Vista posteriore Vista laterale Base Fori per le viti Dimensioni Diametro 1 = 102 mm, diametro 2 = 100 mm Altezza = 39 mm Peso = 180 grammi Posizione dell'uscita cavi posteriore (opzionale) ∅... -
Page 47: Installazione Dell'hardware
Guida all'installazione di AXIS 209FD/FD-R/FD-R M12/MFD/MFD-R/MFD-R M12 Installazione dell'hardware IMPORTANTE! La custodia del dispositivo AXIS 209FD/AXIS 209MFD non può essere utilizzata all'aperto e può essere installata solo in ambienti chiusi. Il dispositivo AXIS 209FD-R/AXIS 209FD-R M12/AXIS 209MFD-R/AXIS 209MFD-R M12 è particolarmente robusto e affidabile e può essere utilizzato in ambienti umidi. - Page 48 Pagina 48 Guida all'installazione di AXIS 209FD/FD-R/FD-R M12/MFD/MFD-R/MFD-R M12 4. Collegare il cavo di rete. Se l'alimentazione PoE non è supportata dallo switch, collegare l'alimentazione al dispositivo AXIS 209FD/FD-R/ FD-R M12/MFD/MFD-R/MFD- R M12 mediante il midspan PoE fornito. 5. Verificare che i LED indichino le condizioni di funzionamento corrette.
-
Page 49: Assegnazione Di Un Indirizzo Ip
Guida all'installazione di AXIS 209FD/FD-R/FD-R M12/MFD/MFD-R/MFD-R M12 Assegnazione di un indirizzo IP Per renderlo disponibile in rete, è necessario assegnare un indirizzo IP al dispositivo AXIS 209FD/FD-R/FD-R M12/MFD/MFD-R/MFD-R M12. In base al numero di videocamere che si desidera installare, si consiglia di utilizzare AXIS IP Utility o AXIS Camera Management per assegnare gli indirizzi IP in ambiente Windows. -
Page 50: Axis Ip Utility: Videocamera Singola/Piccole Installazioni
Pagina 50 Guida all'installazione di AXIS 209FD/FD-R/FD-R M12/MFD/MFD-R/MFD-R M12 AXIS IP Utility: videocamera singola/piccole installazioni AXIS IP Utility consente di rilevare e visualizzare automaticamente la presenza di dispositivi Axis in rete. L’applicazione inoltre può essere utilizzata per assegnare manualmente un indirizzo IP statico. -
Page 51: Axis Camera Management: Più Videocamere/Grandi Installazioni
Guida all'installazione di AXIS 209FD/FD-R/FD-R M12/MFD/MFD-R/MFD-R M12 AXIS Camera Management: più videocamere/grandi installazioni AXIS Camera Management è in grado di individuare e impostare automaticamente gli indirizzi IP, mostrare lo stato di connessione e gestire gli aggiornamenti del firmware di più prodotti video Axis. -
Page 52: Impostazione Della Password
Pagina 52 Guida all'installazione di AXIS 209FD/FD-R/FD-R M12/MFD/MFD-R/MFD-R M12 Impostazione della password Quando si accede al dispositivo AXIS 209FD/ FD-R/FD-R M12/MFD/MFD-R/MFD-R M12 per la prima volta, viene visualizzata la finestra di dialogo "Configure Root Password". 1. Immettere una password, quindi inserirla di nuovo per confermarne l'esattezza. -
Page 53: Regolazione Dell'obiettivo
Guida all'installazione di AXIS 209FD/FD-R/FD-R M12/MFD/MFD-R/MFD-R M12 Regolazione dell'obiettivo Posizione Per regolare la posizione dell'obiettivo, attenersi alla seguente procedura. 1. Aprire la pagina Live View nel browser Web. 2. Controllando l'immagine visualizzata nella pagina Live View spostare l'obiettivo nella posizione desiderata. -
Page 54: Completamento Dell'installazione
Pagina 54 Guida all'installazione di AXIS 209FD/FD-R/FD-R M12/MFD/MFD-R/MFD-R M12 Completamento dell'installazione 1. Pulire la cupola con un panno morbido e asciutto per rimuovere polvere e impronte digi- tali; utilizzare un soffietto per rimuovere la polvere dall'obiettivo. 2. Per assorbire l'umidità nel dispositivo AXIS 209FD-R/AXIS 209FD-R M12/AXIS 209MFD-R/ AXIS 209MFD-R M12, rimuovere... -
Page 55: Altri Metodi Di Impostazione Dell'indirizzo Ip
Guida all'installazione di AXIS 209FD/FD-R/FD-R M12/MFD/MFD-R/MFD-R M12 Altri metodi di impostazione dell’indirizzo IP Nella tabella riportata di seguito sono illustrati altri metodi disponibili per impostare o rilevare l'indirizzo IP. Tutti i metodi sono disponibili per impostazione predefinita e possono essere tutti disabilitati. Uso nel sistema operativo Windows... -
Page 56: Indicatori Led
Pagina 56 Guida all'installazione di AXIS 209FD/FD-R/FD-R M12/MFD/MFD-R/MFD-R M12 6. Nel browser immettere http://<indirizzo IP> nel campo del percorso/indirizzo e premere Invio. Note • Per aprire un prompt dei comandi in Windows: dal menu Start, selezionare Esegui... e digitare cmd. Fare clic su OK. -
Page 57: Ulteriori Informazioni
Guida all'installazione di AXIS 209FD/FD-R/FD-R M12/MFD/MFD-R/MFD-R M12 3. Tenere premuto il pulsante Control e ricollegare il cavo di rete. 4. Tenere premuto il pulsante fino a quando l'indicatore di Stato emette una luce gialla lampeggiante (l'operazione può richiedere fino a 15 secondi). 5. - Page 58 Pagina 58 Guida all'installazione di AXIS 209FD/FD-R/FD-R M12/MFD/MFD-R/MFD-R M12...
-
Page 59: Pasos De Instalación
Guía de instalación de AXIS 209FD/FD-R/FD-R M12/MFD/MFD-R/MFD-R M12 Guía de instalación de la AXIS 209FD/FD-R/FD-R M12 AXIS 209MFD/MFD-R/MFD-R M12 Esta guía de instalación incluye las instrucciones necesarias para instalar la Fixed Dome Network Camera AXIS 209FD, AXIS 209FD-R, AXIS 209FD-R M12, AXIS 209MFD, AXIS 209MFD-R y AXIS 209MFD-R M12. - Page 60 Página 60 Guía de instalación de AXIS 209FD/FD-R/FD-R M12/MFD/MFD-R/MFD-R M12 Artículo Material impreso Modelos/variantes/notas Guía de instalación de AXIS 209FD/FD-R/FD-R M12/MFD/MFD-R/MFD-R M12 (este documento) Documento de garantía de Axis...
-
Page 61: Presentación Del Hardware
Guía de instalación de AXIS 209FD/FD-R/FD-R M12/MFD/MFD-R/MFD-R M12 Presentación del hardware Vista frontal Vista posterior Vista lateral Placa base Orificios para tornillos Dimensiones Diámetro 1 = 102 mm, Diámetro 2 = 100 mm Altura = 39 mm Peso = 0,18 kg Salida posterior del cable (opcional) ∅... -
Page 62: Instalación Del Hardware
Página 62 Guía de instalación de AXIS 209FD/FD-R/FD-R M12/MFD/MFD-R/MFD-R M12 Instalación del hardware ¡IMPORTANTE! - La carcasa de la AXIS 209FD/AXIS 209MFD no está aprobada para su uso en exteriores y solo puede instalarse en entornos interiores. La AXIS 209FD-R/AXIS 209FD-R M12/AXIS 209MFD-R/AXIS 209MFD-R M12 está... - Page 63 Guía de instalación de AXIS 209FD/FD-R/FD-R M12/MFD/MFD-R/MFD-R M12 4. Conecte el cable de red. Se l'alimentazione PoE non è supportata dall'interruttore di rete, collegare l'alimentazione al dispositivo AXIS 209FD/FD- R/FD-R M12/MFD/MFD-R/ MFD-R M12 mediante il midspan PoE fornito. 5. Compruebe que los LED indican las condiciones adecuadas.
-
Page 64: Asignación De Una Dirección Ip
Página 64 Guía de instalación de AXIS 209FD/FD-R/FD-R M12/MFD/MFD-R/MFD-R M12 Asignación de una dirección IP Debe asignarse una dirección IP a la AXIS 209FD/FD-R/FD-R M12/MFD/MFD-R/MFD-R M12 para que sea accesible desde la red. Dependiendo del número de cámaras que desee instalar, el método recomendado de asignación de direcciones IP en Windows será... -
Page 65: Axis Ip Utility: Para Cámaras Individuales O Instalaciones Pequeñas
Guía de instalación de AXIS 209FD/FD-R/FD-R M12/MFD/MFD-R/MFD-R M12 AXIS IP Utility: para cámaras individuales o instalaciones pequeñas AXIS IP Utility encuentra y muestra automáticamente los dispositivos Axis que existen en la red. Además, puede utilizarse para fijar manualmente una dirección IP estática. Recuerde que el equipo que ejecute AXIS IP Utility debe instalarse en el mismo segmento de red (subred física) que la AXIS 209FD/FD-R/FD-R M12/MFD/MFD-R/MFD-R M12. -
Page 66: Axis Camera Management: Para Varias Cámaras E Instalaciones Grandes
Página 66 Guía de instalación de AXIS 209FD/FD-R/FD-R M12/MFD/MFD-R/MFD-R M12 AXIS Camera Management: para varias cámaras e instalaciones grandes AXIS Camera Management puede buscar y configurar automáticamente direcciones IP, mostrar el estado de la conexión y administrar las actualizaciones del firmware de varios productos de vídeo de Axis. -
Page 67: Configuración De La Contraseña
Guía de instalación de AXIS 209FD/FD-R/FD-R M12/MFD/MFD-R/MFD-R M12 Configuración de la contraseña Al acceder a la AXIS 209FD/FD-R/FD-R M12/ MFD/MFD-R/MFD-R M12 por primera vez, aparecerá el cuadro de diálogo Configure Root Password (Configurar contraseña de root). 1. A continuación, escriba una contraseña y vuelva a escribirla para confirmarla. - Page 68 Página 68 Guía de instalación de AXIS 209FD/FD-R/FD-R M12/MFD/MFD-R/MFD-R M12 Ajustes de la lente Posición Para ajustar la posición de la lente, siga estos pasos: 1. Abra la página Live View en su navegador de Web. 2. Mientras comprueba la imagen en la página Live View, mueva la lente a la posición deseada.
-
Page 69: Finalización De La Instalación
Guía de instalación de AXIS 209FD/FD-R/FD-R M12/MFD/MFD-R/MFD-R M12 Finalización de la instalación 1. Limpie la burbuja con un trapo suave y seco para eliminar el polvo y las huellas dactila- res y utilice una pera para quitar el polvo de la lente. 2. -
Page 70: Otros Métodos Para Configurar La Dirección Ip
Página 70 Guía de instalación de AXIS 209FD/FD-R/FD-R M12/MFD/MFD-R/MFD-R M12 Otros métodos para configurar la dirección IP Esta tabla presenta todos los métodos disponibles para configurar o detectar la dirección IP. Todos los métodos están habilitados de forma predeterminada y es posible deshabilitarlos. Sistema operativo Windows UPnP™... -
Page 71: Indicadores Led
Guía de instalación de AXIS 209FD/FD-R/FD-R M12/MFD/MFD-R/MFD-R M12 • Para utilizar el comando ARP en un sistema operativo Mac OS X, utilice la herramienta Terminal, que se encuentra en Aplicaciones > Utilidades. Indicadores LED Color Indicación Verde Fijo para indicar conexión a una red de 100 Mbit/s. Parpadeo para indicar actividad de red. -
Page 72: Restablecimiento De Los Valores Iniciales
Restablecimiento de los valores iniciales Esta operación reconfigurará todos los parámetros, incluida la dirección IP, a los valores iniciales: 1. Desconecte el cable de red de la cámara. 2. Utilice la llave allen incluida para aflojar los 4 tornillos que sujetan la cubierta y retírela. 3. - Page 73 Guía de instalación de AXIS 209FD/FD-R/FD-R M12/MFD/MFD-R/MFD-R M12 Página 73...
- Page 74 Página 74 Guía de instalación de AXIS 209FD/FD-R/FD-R M12/MFD/MFD-R/MFD-R M12...
- Page 75 AXIS 209FD/FD-R/FD-R M12/MFD/MFD-R/MFD-R M12 December 2008 Installation Guide v3.2 Copyright © Axis Communications AB, 2007 - 2008 Part No. 34066...
Need help?
Do you have a question about the AXIS MFD-R and is the answer not in the manual?
Questions and answers