Table of Contents
Advertisement
Quick Links
Download this manual
See also:
Basic Manual
Advertisement
Table of Contents

Subscribe to Our Youtube Channel
Related Manuals for AU pt003


Summary of Contents for AU pt003
- Page 1 PT003 read this manual to master the cellular phone...
- Page 2 Introduction Thank you for purchasing the PT003. Before using your PT003, be sure to read the PT003 Basic Manual (this PDF manual) to ensure correct usage. After you have finished reading this manual, store this PDF manual and the printed manuals in safe places so you can retrieve them whenever you need them.
-
Page 3: Illustrations And Screenshots In This Manual
The screenshots in this manual are simplified and may look different from the actual cell phone screens. • The display design themes of the PT003 vary by model color. The screenshots for the Navy Blue models are used in this manual. -
Page 4: Notes On Cell Phone Use
Notes on Cell Phone Use • Obtain the permission of other people before you take their photos with the cell phone's camera. • Do not record information with the cell phone's camera Cell Phone Etiquette in bookstores and other locations where taking photos The cell phone always emits weak radio waves when power is not permitted. -
Page 5: Disaster Message Board Service
• When a large scale disaster occurs, お客さまサポート (au Customer Support) ⇒ 調べ Registering from an au phone, you can register your る (Search ) ⇒ 災害用伝言板(デモ版) (Disaster safety safety information (i.e. your condition and comments) to the 災害用伝言板... -
Page 6: Table Of Contents
Returning a Call (Outgoing History/Incoming Contents History) …………………………………………………… 17 One-ring Calls …………………………………………… 17 Introduction Adjusting the Earpiece Volume during a Call …………… 18 Turning On Manner Mode ……………………………… 18 Illustrations and Screenshots in This Manual Changing the Incoming Ring Tone ……………………… 18 Notes on Cell Phone Use Adjusting the Incoming Ring Tone Volume ……………... - Page 7 Replying to Received E-mail Messages ………………… 28 Lock ……………………………………………………… 42 Rejecting Spam ………………………………………… 29 Remotely Activating the Remote Auto Lock on Your PT003 42 Using C-mail ……………………………………………… 29 Activating the Remote Auto Lock by the Security Lock Creating and Sending C-mail Messages ………………… 29 Service ……………………………………………………...
-
Page 8: Getting Ready
• Global Passport mobile rental service Owner's Guide (Japanese) • JIBUN BANK Launcher Operation Guide (Japanese) • au International Call Guide (Japanese) • An AC adapter and microSD memory card are not included. Purchase a specified AC adapter (sold separately) and a commercially available microSD memory card. -
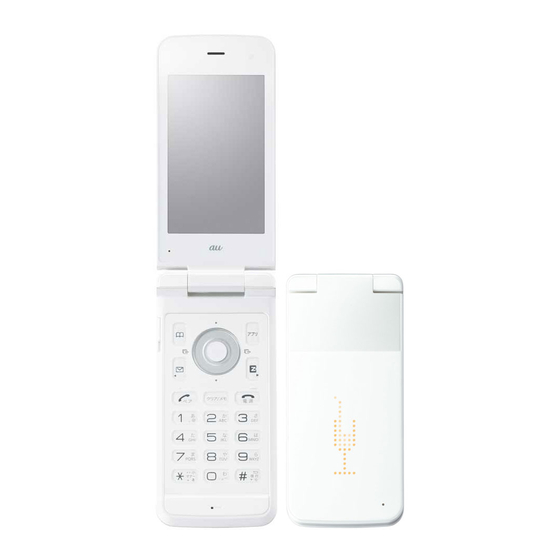
Page 9: Names Of Parts
Names of Parts ■ ■ ■ From the Front From the Back From the Sides... -
Page 10: Charging The Battery Pack
➡ Unfold the power plug of the AC adapter and Charging the Battery Pack plug it into a 100 V AC power outlet. The battery pack is not fully charged at the time of purchase. ➡ Confirm that the charging indicator lights. Be sure to charge the battery pack before using the cell • Charging: The charging indicator lights. -
Page 11: Learning The Basics
Learning the Basics ■ Key Assignments ■ Side Key Assignments • If you lose track of where you are or if you make a mistake, press C to return to the previous screen. Return to the standby screen by pressing... -
Page 12: Turning On Power
To use e-mail and EZweb, you need to apply for an EZweb subscription. If you did not apply for an EZweb subscription Turning On Power at the time of purchase, contact an au shop or the Customer Service Center. Also, before use, you need to configure initial settings. Your Hold down F for at least one second. -
Page 13: Display Indicators
Display Indicators Display indicators inform you of mail arrival, current settings, etc. ■ Display Indicator Description Indicator Description ① ⑪ Current date and time Signal strength ⑫ ② Easy voice memo set Battery level ⑬ Manner mode set microSD memory card ③... -
Page 14: Using Main Menu
■ Sub-Display Each Main menu pattern has a different set of items. Menu-Silver1/ Menu-Blue1/ Menu-List Menu-Pink1 Indicator Description ① Missed calls ② New or unread e-mail ③ New or unread C-mail • The date and time are set automatically. • Press ) to switch the sub-display screen. - Page 15 Menu-Silver2 Menu-Silver3 Menu-Blue2 Menu-Pink2 Kantan Menu Calculator Alarm EZnavi Calculator Call Alarm Calendar Data Data Camera Function Camera Kantan Mode Calculator IrDA microSD Security Navi Tools Tools Tools EZ Service Data Folder Camera Camera Camera Data Folder Calendar Settings Alarm/Calendar Alarm/Calendar Tools SD Card Menu...
-
Page 16: Changing Your E-Mail Address
➡ Use j to select the entry box, press c (Edit), Changing Your E-mail Address enter an e-mail address using single-byte You can change the account alphanumeric characters, and then press name of your e-mail address. c (OK). • For details on entering e-mail addresses, see page 22. ➡... -
Page 17: Security Code And Passwords
① S ubscribing or canceling subscriptions ① U sing the Answering Service (Voice to EZweb fee-based contents paid Mail) and Call Transfer remotely from a by まとめて au 支払い (au Collective fixed-line phone Usage ② M aking inquiries, applications, and... -
Page 18: Making And Answering Calls Making A Call
(Call). dial either of the following numbers: ➡ Press c (Select). From au cell phones (toll-free): 184 + Call: When you do not want to inform the other 157 (area code not required) • From fixed-line phones (toll-free): party of your phone number. -
Page 19: Answering A Call
Answering a Call Returning a Call (Outgoing History/ Incoming History) To answer a call, press N. • To end the call, press F. Example: Returning a call to a phone number in the incoming history ■ Display When a Call is Received When the standby screen is displayed, press l. -
Page 20: Adjusting The Earpiece Volume During A Call
Adjusting the Earpiece Volume Changing the Incoming Ring Tone during a Call When the standby screen is displayed, press c. ➡ Use a to select Settings and then press During a call, use j. • u: Increases the volume. c (Select). • d: Decreases the volume. -
Page 21: Adjusting The Incoming Ring Tone Volume
Adjusting the Incoming Ring Turning On the Easy Voice Memo Tone Volume When the standby screen is displayed, hold down C for at least one second. When the standby screen is displayed, press c. is displayed on the standby screen. ➡... - Page 22 ■ Deleting a Message When the standby screen is displayed, press C. ➡ Use j to select Easy Voice Memo and then press c (Select). ➡ Use j to select Easy Voice Memo List and then press c (Select). ➡ Use j to select the message you want to delete and then press % (Menu).
-
Page 23: Character Input
Character Input Number of Times to Press the Key 〜 Character Entry Modes . @ − _ / : When a character entry screen is displayed, you can select a character entry mode if you press & (Char). ■ Menu Items 漢字... -
Page 24: Entering E-Mail Addresses
■ Entering Two or More Characters Entering E-mail Addresses Assigned to the Same Key ■ E-mail Address Compatible Characters After you enter the first character, press r and then enter • Before you enter an e-mail address, switch to the single- the next character. -
Page 25: Entering Pictograms
➡ Press % (Menu). ➡ Use j to select Useful Sentence and then press c (Select). ➡ Use j to select .co.jp and then press c (Select). ".co.jp" is entered. Entering Pictograms When a character entry screen is displayed, press R. ➡... -
Page 26: Phone Book
Phone Book • The phone book can store up to 1,000 entries. • The cell phone automatically saves an entry to the lowest available memory number from 000 to 999. Saving a Phone Book Entry • You can save three phone numbers and three e-mail addresses for each phone book entry. -
Page 27: History
Saving a Phone Number from the Incoming or Outgoing History Example: Saving a phone number from the incoming history to the phone book When the standby screen is displayed, press l and use j to select the phone number you want to save. -
Page 28: Pair Function
Making a Call to a Pair Partner Pair Function When the standby screen is displayed, press N. You can register a maximum of five pair partners you ➡ Use s to select the person you want to call. contact often to easily call or send mail. ➡... -
Page 29: Mail
If you did not apply for an EZweb subscription at the time ➡ Use j to select Address and then press of purchase, contact an au shop or the Customer Service c (Edit) and then press c (Select). Center. Also, before use, you need to configure initial ➡... -
Page 30: Reading Received E-Mail Messages
➡ Use j to select the file name and then press Reading Received E-mail Messages c (Receive). When you receive an e-mail message, New E-mail ➡ Press c (Play). appears on the standby screen. ➡ Use s to select New E-mail and then press • Selecting the file name or pressing c (Receive) may be unnecessary for some files to be displayed,... -
Page 31: Rejecting Spam
Setting mail filters to reject spam is recommended. C-mail is a service that uses phone numbers as addresses The オススメ設定 (Recommended Settings) helps you to to exchange messages between au cell phones that set mail filters easily. support C-mail. A C-mail message can contain up to 50 double-byte (or 100 single-byte) characters. -
Page 32: Reading Received C-Mail Messages
➡ Use a to select a phone book entry and then press c (Select). ➡ Use a to select a phone number and then press c (Select). ➡ Use j to select and then press c (Edit). ➡ Enter text and then press c (OK). ➡... -
Page 33: Camera
■ Landscape Position Camera Your cell phone has a CMOS camera with 1.97 effective megapixels for shooting photos and movies. You can use the self-timer and autofocus. Shot images can be used for the standby screen, and attached to e-mail messages. Photo Taking Tips When taking photos, frame the subject within the display and hold the cell phone steady with both hands to avoid... -
Page 34: Taking A Photo
Taking a Photo When the standby screen is displayed, press ) for at least one second. The monitor screen appears. ➡ Frame the subject within the display and then press c (Shot). The shutter clicks, and the preview screen is displayed. ■... -
Page 35: Ezweb
To use EZweb, you need to apply for an EZweb subscription. If you did not apply for an EZweb subscription at the time of purchase, contact an au shop or the Customer Service Center. Also, before use, you need to configure initial settings. -
Page 36: Accessing Sites
■ Viewing the au one “OTONA” Style You can access EZweb from the au one “OTONA” Style. There is a lot of convenient information that the adult makes attractive in the au one “OTONA” Style. When the standby screen is displayed, press R, use j to select Top Menu/Search and then press c (Select). -
Page 37: Bookmarking Frequently Accessed
Press C to return to the previous screen. Hold down When the page you want to bookmark is C for at least one second to return to the au one Top. displayed, press % (Browser menu). ➡ Use j to select New bookmark and then press The following describes the basic operations that are c (Select). -
Page 38: Checking Charges
➡ Use j to select the site you want to access Checking Charges and then press c (Select). When the standby screen is displayed, press c. The download instructions appear. ➡ Use a to select Settings and then press • Fee-based information sites require entry of EZ password or Premium EZ password. -
Page 39: Ez News Flash
Setting EZ News Flash EZ News Flash EZweb Subscription Required The EZ News Flash is available free of charge. You have Use the EZ News Flash to display flash news on the only to make a few simple settings. After following the standby screen. - Page 40 ■ Canceling EZ News Flash When the standby screen is displayed, press u and select the ticker field and then press c (OK). ➡ Press % (メニュー[Menu]), use j to select サービス設定解除 (Service Cancellation) and then press c (選択[Select]). ➡ Follow the on-screen instructions. ■...
-
Page 41: Ez Navi
• The packet communication charges for using EZ Navi services apply to the amount of data sent and Using these functions, you can check the position of an au received. Some services may require a separate cell phone that supports Security Navi; and automatically information fee. -
Page 42: Ez Navi Walk For When You Go Out
EZ Navi Walk for When You Go Out View information on services that are オススメ便利 available on PCs, and use advanced メニュー Displays various useful menu items for when you are out. functions of EZ Navi Walk that you There are two menu modes: the Full Mode menu for those (Useful Menu) can enjoy. -
Page 43: Evacuate Navi To Guide You Home Or To Nearby
PT003 ( 避難所マップ [Evacuate Area Map] ). indicated in real time by . Other useful contents can be downloaded from the 災害時... -
Page 44: In Case Of Loss Of Your Pt003
Remote Auto Lock ➡ Use j to select Incoming Call Count and then You can activate the Remote Auto Lock by calling your PT003 a press c (Select). set number of times from a registered phone number within a ➡... -
Page 45: Service
Login to au Customer Support (https://cs.kddi.com/) and complete the application process by following the on-screen instructions. • The Remote Auto Lock cannot be activated when the PT003 is turned off or out of the service area, or Emission OFF is set to... -
Page 46: Troubleshooting
Troubleshooting Symptom Possible Cause Remedy Page ● Is the battery pack charged? Charge the battery pack. Cannot turn on ● Did you hold down F for at least one power. Hold down F for at least one second. second? ● Is power turned on? Hold down F for at least one second. - Page 47 • For more detailed information, visit the following au troubleshooting sites: - From an au cell phone: R ⇒ Top Menu/Search ⇒ auお客さまサポート (au Customer Support) ⇒ オンラインマニュアル (Online Manual) ⇒ 故障診断Q&A (Troubleshooting FAQ) - From a PC: http://www.kddi.com/customer/service/au/trouble/kosho/index.html...
-
Page 48: Index
Index Disaster Message Board Service ……………………………… 3 Display ………………………………………………………7,11 Domain ……………………………………………………… 14 Accessories ……………………………………………………… 6 Downloading Chaku-Uta® …………………………………… 36 Battery level ………………………………………………… 11 Earpiece volume … …………………………………………… 18 Battery pack ………………………………………………… 6,8 Easy voice memo …………………………………………… 19 Battery pack cover ……………………………………………… 7 Playback …………………………………………………… 19 Turning off …………………………………………………... - Page 49 E-mail ……………………………………………………… 27 EZweb ………………………………………………………… 33 Mail filters …………………………………………………… 29 Accessing sites ……………………………………………… 34 Recommended settings …………………………………… 29 au one Top ………………………………………………… 34 Basic operations …………………………………………… 35 Main menu …………………………………………………… 12 Initial settings ……………………………………………… 10 Manner mode ………………………………………………… 18 Names of parts ………………………………………………… 7 Incoming history ……………………………………………...
- Page 50 Spam ………………………………………………………… 29 Making ……………………………………………………… 16 Returning …………………………………………………… 17 Sub-display …………………………………………………… 12 Phone book ………………………………………………… 24 Dialing ……………………………………………………… 24 Editing ……………………………………………………… 24 Troubleshooting … …………………………………………… 44 Saving ……………………………………………………… 24 Turning on/off power … ……………………………………… 10 Saving a phone number from the incoming or outgoing history …… 25 Phone number ………………………………………………...
-
Page 51: Fcc Notice
FCC Notice This device complies with part 15 of the FCC Rules. Operation is subject In August 1996, the Federal Communications Commission (FCC) to the following two conditions: (1) This device may not cause harmful of the United States, with its action in Report and Order FCC 96- interference, and (2) this device must accept any interference received, 326, adopted an updated safety standard for human exposure including interference that may cause undesired operation. -
Page 52: Sar Information
(e.g., at the ear and worn on the body) as required by the FCC for SAR INFORMATION each model. The highest SAR value for this model phone when tested for use at the ear is 0.428 W/Kg and when worn on the THIS MODEL PHONE MEETS THE GOVERNMENT’S body , as described in this user guide, is 0.681 W/Kg . -
Page 53: Regulations For Wireless Devices
FCC Hearing-Aid Compatibility (HAC) Regulations for Wireless Devices On July 10, 2003, the U.S. Federal Communications Commission (FCC) Report and Order in WT Docket 01- 309 modified the exception of wireless phones under the Hearing Aid Compatibility Act of 1988 (HAC Act) to require digital wireless phones be compatible with hearing-aids. - Page 54 From fixed-line phones: From au cellphones: 0077-7-111 area code not required PRESSING ZERO WILL CONNECT YOU TO AN OPERATOR AFTER CALLING 157 ON YOUR au CELLPHONE For loss, theft or damage and operation information (toll free) From fixed-line phones: From au cellphones:...
Need help?
Do you have a question about the pt003 and is the answer not in the manual?
Questions and answers