Table of Contents
Advertisement
Quick Links
Advertisement
Table of Contents

Subscribe to Our Youtube Channel
Related Manuals for AU Infobar C01


Summary of Contents for AU Infobar C01
-
Page 2: Preface
Thank you for purchasing the INFOBAR C01. Manual (Accessory) (Japanese) or full Instruction Manual (Japanese) Before using your INFOBAR C01, be sure to read the Basic Manual in PDF format from the au homepage. (this PDF manual) to ensure correct usage. -
Page 3: Before Using An Au Phone
• The au phone is a digital cell phone and can maintain a high call quality until the signal weakness reaches its limit. Therefore, once the limit has been reached, the call may be disconnected suddenly. -
Page 4: Cell Phone Etiquette
● Notice Sheet (Japanese) • Move to areas where you will not inconvenience others on trains or in ● Setting Guide (Japanese) ● JIBUN BANK ・ au Insurance Service Guide (Japanese) hotel lobbies. • Refrain from talking in a loud voice. -
Page 5: Illustrations And Descriptions In This Manual
• Explanations of this manual are based on the case when the color of the INFOBAR C01 is “NISHIKIGOI” as an example. • Explanations of this manual are based on the case when the INFOBAR C01 is held vertically. If you hold it horizontally, menu items/icons/on-screen keys etc. -
Page 6: Security Code And Pin Code
PIN code will be locked. Use the PUK code to unlock the PIN code. ■ PIN Code You can set the INFOBAR C01 to require PIN code entry every time the power is turned on, to prevent unauthorized use of the au IC-Card... -
Page 7: Puk Code
• If the PUK code is incorrectly entered ten times consecutively, contact an au shop, PiPit or the Customer Service Center. • When the PIN code is locked, the INFOBAR C01 may be restarted for the security reasons. • PIN code cannot be reset even if you carry out the operation (on the iida... -
Page 8: Table Of Contents
Turning the Power Off ........... 20 Making an International Call (au International Call Restarting the INFOBAR C01 ....... 20 Service) ..............42 Contents Sleep Mode............20 Answering a Call ...........43 Switching the Display Language to English ..21 Answering an Incoming Call .........43 Initial Setup ............ - Page 9 TV antenna ............74 Initial Setup of 1Seg..........75 Watching 1Seg ............. 75 Applications Using au Disaster Countermeasure Application ... 77 Using Android Market ........... 79 Using au one Market..........79 Using GREE Market ..........79 Using au Customer Support ......... 79 au Customer Support ...........
-
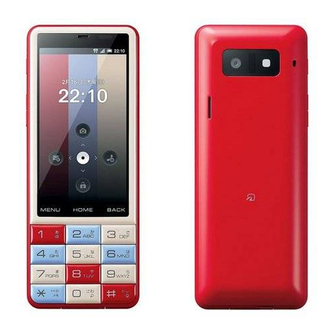
Page 10: Names And Functions Of Parts
D # Home key Names and Functions of Parts Use it to display the iida Home etc. E Number key ■ Front Use it to enter characters, make a call, etc. You can activate an application by holding down a number key if you use Quick Launch. For details on Quick Launch, refer to “Using the Menu of the iida Home”. - Page 11 ■ Bottom L External connection jack cover M External connection jack Use it to connect the INFOBAR C01 to the microUSB-3.5φ conversion cable, the common AC adapter 03 (sold separately), the microUSB cable 01 (sold separately), SHARP microUSB-18-pin (charger) conversion cable 01 (sold separately), the microUSB stereo earphone conversion adapter 01 (sold separately), etc.
- Page 12 Q Speaker ■ Back Emits ring tones, alarm tones, etc. R Battery pack cover S FeliCa mark ® Hold it over a reader/writer when using Osaifu-Keitai Sends and receives data via IC communication. T Strap eyelet String the hole with the cord of a hand strap. U Mobile light Flashes in red while activating Camera.
-
Page 13: Removing/Attaching The Battery Pack
When removing the battery pack, turn off the INFOBAR C01. • When removing the battery pack, always pull up the protruding edge of the battery pack. Doing otherwise may result in damage to the INFOBAR C01 or Remove the battery pack cover on the back of the the battery contacts. -
Page 14: Using A Hand Strap
Hand strap Battery pack cover Strap eyelet • Before attaching the battery pack, make sure that the au IC-Card is inserted Put the string of the hand strap on the strap hook of properly. • Failure to follow the correct procedure when attaching the battery pack may the INFOBAR C01 and pull the string lightly in the result in damage to the battery pack or the battery pack cover. -
Page 15: Removing A Hand Strap
INFOBAR C01 when attaching the battery pack cover. • Do not swing the INFOBAR C01 with the hand strap. It may result in an accident, such as injury, or malfunction or damage to the INFOBAR C01. -
Page 16: Using Au Ic-Card
You cannot use the INFOBAR C01 with a card other than an au IC-Card inserted. If an au IC-Card is not inserted or an au IC-Card other than yours is inserted and the INFOBAR C01 is turned on, the following operations are unavailable. -
Page 17: Removing Au Ic-Card
Turn off the power and remove the battery pack before inserting the au IC-Card. • Inserting the tray not deeply enough may prevent the INFOBAR C01 from Pull the tab of the tray in the direction of the arrow. functioning properly. -
Page 18: Using Microsd Memory Card
* Operation is confirmed for microSD memory cards that are sold as of November 2011. For the latest information on operation confirmation, visit the au homepage or contact the INFOBAR C01 even if they are moved/copied from the PC etc. to a microSD Customer Service Center. -
Page 19: Removing Microsd Memory Card
• Do not remove the microSD memory card forcefully. It may result in damage Inserting a microSD memory card forcefully into the slot could result in to the microSD memory card or the INFOBAR C01 or data loss. failure to remove the microSD memory card or damage to the microSD •... -
Page 20: Charging The Battery Pack
Approx. 370 min appears on it. In such case, the average usage times shorten. * These times are based on the case when the INFOBAR C01 is used in Japan. ■ Charging the Battery Pack with the Specified AC • The INFOBAR C01 and battery pack may become warm during charging Adapter (sold separately)/DC Adapter (sold but this is not a malfunction. - Page 21 Unplug the common AC adapter 03 (sold separately) power plug from the power outlet/Unplug the common DC adapter 03 (sold separately) plug from the cigarette lighter socket. • Although you can charge the INFOBAR C01 while the power is turned on, charging time lengthens.
-
Page 22: Turning The Power On/Off
Turning the Power Off • If you use the microUSB cable to charge the INFOBAR C01, it may take the Hold down f for at least two seconds. INFOBAR C01 longer to be fully charged than if you use the specified AC adapter (sold separately). -
Page 23: Switching The Display Language To English
Yes/No. If you have already acquired an au one-ID, set the au one-ID you have. If you tap No, the initial setup screen will not be displayed from the next If you have not acquired an au one-ID, register a new ID. -
Page 24: Operating The Touch Panel
Operating the Touch Panel Gently touch a screen and then trace it to the desired direction. The display of the INFOBAR C01 is a touch panel. You can operate • Scroll screen or switch pages. In addition, operate gauge and bar the INFOBAR C01 by directly touching the screen. -
Page 25: Iida Home And Widget Home
■ Pinch iida Home and widget Home Touch a screen with two of your fingers and then move them apart or Home consists of two screens which are the iida Home and widget closer together. Home. You can paste applications, shortcuts, etc. on the iida Home •... -
Page 26: Using The Iida Home
Absorption scrolling the iida Home. System Settings Performs the various settings for the INFOBAR C01. Quick Launch • Hold down the number key on the iida Home/widget Home to quickly activate the assigned application. • Long-touch an assigned application [OK to disable the setting for Quick Launch. -
Page 27: Adding/Editing Panels
Adding/Editing Panels • When the number of installed applications exceeds the maximum number of panels that can be pasted, the panels of the installed applications are On the iida Home, e [Add/Edit Panel. automatically set to be hidden. Moving Panels Applications Displays the application list. -
Page 28: Using The Widget Home
• Tap the panel whose size can be changed to switch the size of the System Settings Performs the various settings for the displayed panel. INFOBAR C01. • Tap a section bar to edit the section title. Wallpaper • While a live wallpaper is set, the battery level is reduced faster than usual. -
Page 29: Application List
Icon Name of icon Description people. Edy|au Pay monthly charge of Edy and au Task Cleaner This is an application for saving at the same time. battery consumption. You can cut © bitWallet,Inc. back on wasteful consumption of... - Page 30 Clock Use World Clock, Alarm, Timer and the internet shopping site. Stopwatch. Delete data in the INFOBAR C01 Compass Displays the compass and your and microSD memory card or lock current location on the Google its operations in case of loss of Maps.
- Page 31 Use Gmail. Pedometer Use pedometer. Google Search Search for information in the Phone Make a call and use outgoing INFOBAR C01 or on web sites. history/incoming history. GREE_MARKET This application allows you to Photo Display images in the microSD (GREE Market) browse games and other content card as a list and edit them.
-
Page 32: Using The Status Bar
• When you use functions of applications, call fees may apply depending on Dialing, Calling, During an incoming call the function. If you have not subscribed to IS NET, au.NET charges (525 yen including Putting a call on hold tax for the used month) and communication charges apply. - Page 33 ■ Examples of status indicator Indicator Description Answering memo Indicator Description ™ Skype |au status Time : Signed in : New event Alarm set Space available less than approx. 10 % Battery level ® Bluetooth file receiving request : Battery level display...
-
Page 34: Using Notification/Status Panel
B Notification area Using Notification/Status Panel You can check the status of the INFOBAR C01 and contents of notifications. You can tap to activate a corresponding In the notification/status panel, you can check the details on notification indicators and status indicators or activate an application application depending on the information. -
Page 35: Switching Orientation
• Even on the same screen, the number of items collected into More differs not be changed if the INFOBAR C01 is laid in parallel to the ground. depending on the setting and condition since the number of option menus •... -
Page 36: Character Input (Hardware Keyboard)
■ Context Menu Character Input (Hardware Keyboard) The context menu is displayed by long-touching an item or a display where the menu is available. Viewing the Character Entry Screen Example: In the character entry screen (Notepad) Context menu 《Character entry screen》 A Character entry area B Prediction candidates list/Relational prediction candidates list/ Normal conversion candidates list... -
Page 37: Switching Character Entry Modes
C Cursor key/Phrase reduction key/Phrase extension key • While the prediction candidates list/relational prediction candidates list/ normal conversion candidates list is not displayed, tap ^ to hide the : Moves the cursor to the left and right. Change the keyboard. range of the characters for character input and conversion. -
Page 38: Character Input (Software Keyboard)
B Emoji/Symbol/Facemark list Switching Software Keyboards Displays the emoji/symbol/facemark list screen for each Tap the character entry field while INFOBAR C01 is displayed category. horizontally to display the software keyboard and enter characters by • Long-touch a facemark to edit it. However, facemarks in tapping keys on the screen. -
Page 39: Viewing The Character Entry Screen
Viewing the Character Entry Screen Keep touching 《Character entry screen (QWERTY)》 Flick left 《Character entry screen (12 Key)》 A Character entry area B Prediction candidates list/Relational prediction candidates list/ Normal conversion candidates list If the word prediction function is enabled, the prediction candidates list is displayed when characters are entered. - Page 40 G Delete key • You can enlarge the candidates list area by tapping . Tap to return it to the original display. Deletes the selected character or the character on the left of the C Software keyboard cursor. When the cursor is at the beginning, the character on the You can enter a character assigned to each key.
-
Page 41: Switching Character Entry Modes
N Settings key/Space key/Normal conversion key Entering Emoji/Symbol/Facemark : Displays iWnn IME menu. On the character entry screen, : Enters a space. ・ Appears in alphabet and katakana entry. : Displays the normal conversion candidates list. O Space key/Uppercase/Lowercase characters switch key : Enters a space. -
Page 42: Switching Input Software
F Delete key Deletes the selected character or the character on the left of the cursor. When the cursor is at the beginning, the character on the right of the cursor is deleted. Select an emoji/a symbol/facemark. • There are some lists that cannot be displayed and some emojis/symbols/ facemarks that cannot be entered depending on the screen you operate. -
Page 43: Making A Call
• If you cover the screen while dialing/calling, it may be turned off depending 《Phone number entry screen》 on the orientation of the INFOBAR C01. A Phone number entry field • The call fees when calling with “1401” will be subtracted from the balance Enter numbers of up to 32-digit. -
Page 44: Making An International Call (Au International Call Service)
• The international call fee is charged together with other monthly fees from • The following NTT services are unavailable. • Collect call • If you do not wish to use the service, you can set not to use the au • Message service International Call Service. -
Page 45: Answering A Call
Answering a Call Returning a Call (Outgoing History/ Incoming History) Answering an Incoming Call On the iida Home, Phone Slide to the right during an incoming call. [Outgoing History/Incoming History. When you get an incoming call while the backlight illuminates (except for when the unlock screen is displayed), tap Answer. -
Page 46: Turning On Manner Mode
When you cannot answer calls, this function automatically plays a message and allows callers to record messages. • The INFOBAR C01 can store up to 100 entries in each of the outgoing and On the iida Home, Settings [Call settings incoming histories. -
Page 47: Playing A Message In Answering Memo
Speaker on/ The Answering memo can be heard on the Playing a Message in Answering Memo Speaker off speaker/earpiece. On the iida Home, Settings [Call settings [Call/Ans Memo [Answering Memo List. • When multiple Answering memos are recorded, tap while playing a message to play the previous/next Answering memo. -
Page 48: Adding An Address Book Entry
Ring Set Set the sound, the lamp and the vibration Adding an Address Book Entry when an incoming call is received. On the iida Home, Address Book [e Save [Yes. [Add new entry. • Tap to display the entry items which are not displayed. If you have set an account, select the destination to register a contact •... -
Page 49: Using An Address Book
E Action icons Using an Address Book Tap to retrieve the following functions. : Call to the selected phone number. Viewing the Address Book Details Screen : Create an SMS (C-mail) message using the selected On the iida Home, Address Book phone number as an address. -
Page 50: Using Phone Number
Using Phone Number Using Mail Address On the iida Home, Address Book On the iida Home, Address Book [Select a contact information. [Select a contact information. ■ When calling/sending to a phone number ■ When sending a mail message to a mail address Select the phone number. -
Page 51: Using E-Mail
• The packet communication charge for sending and receiving e-mail varies according to the amount of data sent and received. For using overseas, high charges can be incurred. For details, refer to the au comprehensive catalogue or au homepage. • Sending and receiving e-mails may take some time if attached data are 《Sending mail creation screen》... -
Page 52: Receiving E-Mail Messages
Receive Enter an e-mail address as the destination by • If you send pictograms of au version to cell phones of other carriers, those pictograms will be converted to other carriers’ version before they are history selecting one included in the list of entries from received by the other party. -
Page 53: Receiving Mail Message By Inquiring
Tap the status bar. Reading Received E-mail Messages E-mail. Received e-mail messages are saved in “Inbox”. Sent e-mail messages are saved in “Outbox”. If the received e-mail messages The e-mail top screen is displayed. and sent e-mail messages match a condition for sorting mail Tap Inbox or a folder [Select the received e-mail. - Page 54 D Unsent ■ Outbox When there are unsent e-mails, the number of the e-mails appears in blue (it changes to red when there are e-mails failed to be sent). E Template F Create new folder G Action bar Select a box/folder. ■...
- Page 55 ■ Folder : E-mail which has been replied/E-mail for replying : E-mail which has been forwarded/E-mail for forwarding : E-mail which has been replied and forwarded E Two line display/Message preview display switching key Appears only on the portrait display. Message preview display is always applied for the landscape display.
- Page 56 • E-mails which have not reached the other party because their destinations are not identified are saved in “Outbox”. display all e-mail addresses. • On the e-mail top screen, tap e [au one mail [au one mail Top to use : E-mail with its message not received au one mail.
-
Page 57: Setting Mail Filters
※ The function of the mail filters is to be expanded. The details of the expanded function and time for the function expansion are to be released on the au homepage. from cell phones, PHSs or PCs. - Page 58 指定受信リスト設定 Issue a one time password to set the mail 詳細設定 PC設定用ワンタ (Advanced (Allowed Address List Setting) filter on your PC. イムパスワード Settings) Prioritize reception of mail messages from 発行 certain e-mail addresses, domains or parts (Issue One Time of addresses to the left of “@” that are Password for PC contained in the specified address list.
-
Page 59: Using Sms (C-Mail)
ルター設定 (Mail Filter Settings From PC) (in Japanese only) inside the screen of 迷惑メールでお困りの方へ (For Customers Bothered By Unwanted Spam) (in Japanese only) on the au homepage and set the mail filter after entering a one time password for PC setting. -
Page 60: Receiving Sms (C-Mail) Messages
Address Enter a phone number in the address book as • When a call is ended: If an SMS (C-mail) failed to be sent immediately book the destination. after an SMS (C-mail) is stored, all the SMS (C-mail) stored in the SMS (C-mail) center will be sent after the user ends a call with the INFOBAR Send history Enter a phone number as the destination by... -
Page 61: Reading Received Sms (C-Mail) Messages
Select the phone number or the name. The received mail list screen is displayed. If there are multiple unopened SMSs (C-mails), New message (Xmessages) is displayed. Select the received SMS (C-mail). The received mail message screen is displayed. • Receiving SMS (C-mail) is free. •... - Page 62 Select an SMS (C-mail). mails. In that case, protected mails are the exception for the automatic deletion. If the internal memory of the INFOBAR C01 is insufficient, the automatic deletion will be performed even if the limit is not exceeded.
-
Page 63: Rejecting Spam Sms (C-Mail) Messages
Setting Account for PC-mail On the iida Home, SMS(C-mail) [Inbox/Outbox [e You can use PC-mail by setting an account of au one mail etc. • To use au one mail in PC-mail, acquiring au one mail account, [Settings [SMS filter. - Page 64 Set the interval to confirm to the frequency server whether a new PC-mail is When setting by POP3 server, the PC-mail saved in the INFOBAR C01 received. terminal may be deleted depending on the provider you use. When Send email from this Set to the priority account when using the mail server supporting IMAP (Gmail, au one mail, etc.), set...
-
Page 65: Sending Pc-Mail Messages
• On the iida Home, tap Settings [Accounts & sync to synchronize Tap the destination entry field Gmail saved in the server with one saved in the INFOBAR C01. [Enter the destination. • For using Gmail, refer to Google homepage. -
Page 66: Sending Gmail
On the iida Home, Gmail. Sending Gmail On the iida Home, Gmail [e [Compose. Tap the destination entry field [Enter the destination. Tap the subject entry field [Enter the subject. Tap the message entry field [Enter the message. Receiving Gmail 《Inbox tray screen》... -
Page 67: Viewing Sites With Browser
The browser screen is displayed. On the iida Home, Browser [ On the iida Home, tap au one for iida to display iida homepage for Android all the time. • When browsing a web page with a large amount of data, the application may be terminated automatically. -
Page 68: Bookmarking A Web Page
Bookmarking a Web Page Bookmark the displayed site. On the iida Home, Browser [ [Add. • On the iida Home, tap Browser [ [Long-touch a bookmark [Delete bookmark to delete the bookmark. Likewise, on the iida Home, tap Browser [Most visited/History [Long-touch a most visited site/history [Delete from bookmarks to delete the bookmark. -
Page 69: Using The Camera
• Be careful of camera shakes. Hold the INFOBAR C01 tight or use Using the Camera the self-timer function since such shakes may cause the images to INFOBAR C01 has a CMOS camera with approximately 8.04 effective blur. megapixels for shooting photos and recording movies. - Page 70 In such case, reactivate shot photos may become rough etc. • Note that if the self-timer shooting is set and the INFOBAR C01 is left the camera. • The following subjects may cause images to be out of focus.
-
Page 71: Taking Photos
• On the iida Home, tap Camera [ [Switch camera Taking Photos [Miniaturize Cam [Miniaturize Set to change the On the iida Home, Camera. pattern of the blurring. Also, you can change the setting each time you tap the miniature setting key. A confirmation screen asking whether to attach location informations to •... -
Page 72: Recording Movies
N Previously shot data Recording Movies Displays the thumbnail of previously shot data. Tap the On the iida Home, Video Camera. thumbnail to confirm the data. O Shoot On the iida Home, tap Camera [ [Save Settings [Auto Save [ON to automatically save the shot image. When the setting is set to OFF, the photo preview screen is displayed. -
Page 73: Using Photo
H Previously recorded data • If the mobile light is set to ON, the mobile light is turned on and it is Displays the thumbnail of previously recorded data. Tap the automatically turned off after approximately three minutes. • While activating Video Camera, press 5 to display the operation guide. thumbnail to confirm the data. -
Page 74: Using Contents Manager
Music: Displays voice data recorded by the built-in voice Using Contents Manager recorder, music and sounds. TV/SD-Video: Displays recorded data of 1Seg or recorded Displaying/Playing Data data such as data cooperated with recorders. You can categorize and list, display/play, check, and manage data on Doc.: Displays Office and text data. -
Page 75: Using Menu In The Contents Screen
Display the taken pictures by slideshow. microSD/ Display the space of the microSD memory phone space card and the INFOBAR C01. App setting Retrieval condition setting Set the search range under various search criteria and whether to save the search criteria. -
Page 76: Cautions For Using 1Seg
TV antenna ■ Cautions for Using 1Seg The TV antenna is not built in the INFOBAR C01. When you activate 1Seg and set the watching area or when you watch/record 1Seg, • No communication charges apply for using 1Seg. However, when connect the microUSB-3.5φ... -
Page 77: Initial Setup Of 1Seg
After watching, pull out the microUSB-3.5φ Watching 1Seg conversion cable from the INFOBAR C01 straight. On the iida Home, One Seg [One Seg TV. Close the external connection jack cover of the INFOBAR C01. • When an earphone is not connected, sounds come out from the speaker while the microUSB-3.5φ... - Page 78 F 1Seg operation panel/Data broadcast operation panel ■ Operations While Displaying Channel List : Starts/Stops recording. • Select the broadcast station name: Switches to the selected : Displays the channel list. broadcast station. : Displays the data broadcast operation panel. •...
-
Page 79: Applications
* From the spring of 2012, we will start providing “Disaster/evacuation information” as early warning mail. You will be notified on the au homepage for details. 《au disaster countermeasure menu》 At the time of purchase, receiving setting of early warning mail (earthquake early warnings and disaster/evacuation information) is set (Receive). - Page 80 音量 (Volume) charges. Set the volume of the receiving sound for • As for this service, au shall not be liable for any damage incurred on the earthquake early warnings. users resulted from failure or delay of information delivery due to バイブ...
-
Page 81: Using Android Market
You can download and install various applications such as useful • To use games searched from GREE Market, registering as an au one GREE tools or games from Android Market offered by Google. • Google account is required to use Android Market. For details on member may be required. -
Page 82: Using Anshin Security Pack
Before using location search of Anshin Security Pack ■ VirusBuster Mobile for au • Note that au shall not be liable for any loss of the users caused by provided • Countermeasure against improper applications: When you install GPS informations. -
Page 83: Using 3Lm Security
Alternatively, on the iida Home, tap (VirusBuster). for 3LM Security are displayed, so tap I Accept [Activate after When you activate VirusBuster Mobile for au for the first time, the confirming the contents. license agreement for VirusBuster Mobile for au is displayed, so tap 同意する... -
Page 84: Managing Applications
Managing Applications You can delete data, clear cache or stop installed applications forcefully. On the iida Home, Settings [Applications [Manage applications. The installed applications list is displayed. Select an application. The detailed application information is displayed. Select the operation to perform. Follow the on-screen instructions to perform it. -
Page 85: Checking Your Profile
OK to display the profile screen. However, information such as Own phone number or ICCID is not displayed. Also, some operations, such as attaching the profile to mail, may not be carried out. Insert your au IC-Card and turn on power again. -
Page 86: Initializing Microsd Memory Card
Initializing microSD Memory Card When initializing a microSD memory card, all data (including applications) saved on the microSD memory card are deleted. On the iida Home, Settings [microSD & phone storage [Unmount microSD [OK. Erase microSD [Erase microSD [Enter Lock No. [OK [Erase everything. -
Page 87: Using Global Passport Cdma/Gsm
Europe, America, Asia, Oceania and Africa. GSM does not support CDMA, PDC, etc. applied in • If you newly subscribe for the INFOBAR C01, you can use it overseas from Japan. -
Page 88: For Overseas Use Without Anxiety
On the iida Home, Settings [Wireless & networks • If the au IC-Card inserted into the INFOBAR C01 is stolen or lost, the [Mobile networks [Roaming settings [PRL settings card may be inserted into another mobile phone (including GSM [Update PRL version. -
Page 89: Making A Call At Your Travel Destination
• To enable the data roaming, set Area settings to other than Japan in advance. code “81” (Japan) regardless of his/her travel destination. • If you have not subscribed to IS NET, au.NET charges (525 yen including tax for the used month) and communication charges apply. -
Page 90: Receiving A Call At Your Travel Destination
Kong, Macau, Thailand, Taiwan, party’s phone Indonesia, Vietnam, Israel, India, number Example: To have a call made to your au phone in Japan Bermuda Islands, Bangladesh, Bahamas, “090-1234-XXXX” from the USA Venezuela Enter “011” as the international access code for the Mexico (Local call) Other party’s... -
Page 91: Troubleshooting
Battery usage time is (zP.86) • Make sure the battery does not approach the end of short. • Is the INFOBAR C01 within the service area or in a Cannot receive calls. its service life. location where the signal is strong? (zP.31) •... - Page 92 Insert the connector securely. microphone. • Does the INFOBAR C01 receive an adequate digital Cannot watch 1Seg, images or sounds are broadcasting signal? (zP.74) • Is the microUSB-3.5φconversion cable connected? interrupted or noise occurs.
-
Page 93: Index
Disaster Countermeasure..77 Character input (hardware Delete selected ......73 au IC-Card ........14 keyboard) ........34 Direct Dial........25 au international call service ..42 Character input (software Direct Message ......25 Absence Memo......43 au one Market .......79 keyboard) ........36 Directions &... - Page 94 Flick ..........22 Operating the touch panel ...22 Input method ........ 40 Address Book ......46 For overseas use without anxiety Inserting au IC-Card..... 15 Menu in the contents screen..73 Option menu........33 ............ 86 Inserting microSD Memory Card Menu key ......... 8 Organization........46...
- Page 95 Strap eyelet........10 Reboot........... 20 screen ........25 Security type .........62 Strap hook ........11 Receive history VirusBuster Mobile for au.... 81 Select language ......21 Support & Service......80 E-mail messages ......50 Volume up/down key...... 9 Send by Bluetooth......83 Switch grid/list ......
- Page 96 January 2012 Edition...
Need help?
Do you have a question about the Infobar C01 and is the answer not in the manual?
Questions and answers