Quantum DXi4700 Installation Manual
Hide thumbs
Also See for DXi4700:
- User manual (383 pages) ,
- Upgrade manual (50 pages) ,
- Upgrade manual (42 pages)
Advertisement
Table of Contents
- 1 Table of Contents
- 2 Dxi4700 Configuration
- 3 Choosing a Location
- 4 Preparing for the Installation
- 5 Dxi4700 Installation Overview
- 6 Unpacking the Dxi4700
- 7 Determining the Dxi4700 Model
- 8 Installing Components in the Dxi4700 Node
- 9 Installing the Dxi4700 System in the Rack
- 10 Initial Configuration
- 11 Dae/Veeam Memory Module Installation
- 12 Troubleshooting
- 13 Contacting Quantum
- Download this manual
See also:
User Manual
Quantum DXi4700 Installation Guide
This guide provides hardware installation and initial system
configuration instructions for the Quantum DXi4700 disk backup
system. For more information, see the Quantum DXi4700 User's
Guide.
Make sure to take the online training for the DXi4700 in order to make
the best use of your product. The online training is available at:
www.quantum.com/Documentation
The DXi4700 Installation & Configuration video is available at
https://youtu.be/cSy3ttkr_x8.
DXi4700 Expansion Module (JBOD)
January 2018
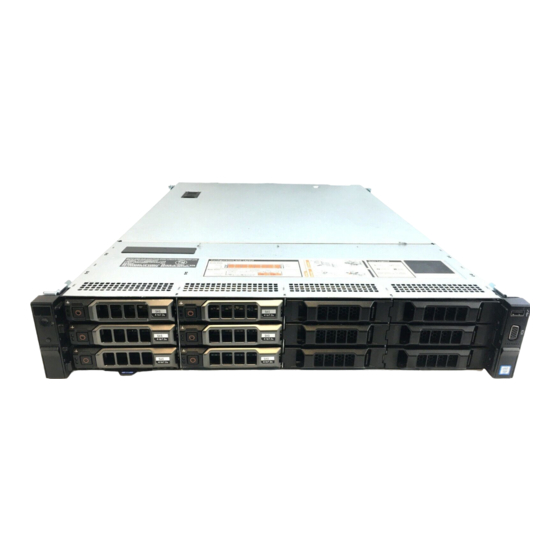
DXi4700 Node
Contents
6-68551-02
2
5
7
8
12
17
18
42
53
78
92
94
Advertisement
Table of Contents

Related Manuals for Quantum DXi4700


Summary of Contents for Quantum DXi4700
-
Page 1: Table Of Contents
Choosing a Location Guide. Preparing for the Installation Make sure to take the online training for the DXi4700 in order to make DXi4700 Installation Overview the best use of your product. The online training is available at: Unpacking the DXi4700 www.quantum.com/Documentation... -
Page 2: Dxi4700 Configuration
6TB, 8TB, and 18TB. Storage capacity upgrades are enabled simply by adding a license key. To purchase a storage capacity upgrade license, contact your Quantum sales representative. After you obtain the storage capacity license, refer to the section “Adding a License Key” in the DXi4700 User’s Guide for instructions on completing the capacity upgrade. - Page 3 6TB, 8TB, and 18TB. Storage capacity upgrades are enabled simply by adding a license key. To purchase a storage capacity upgrade license, contact your Quantum sales representative. After you obtain the storage capacity license, refer to the section “Adding a License Key” in the DXi4700 User’s Guide for instructions on completing the capacity upgrade.
- Page 4 6TB, 8TB, and 18TB.. Storage capacity upgrades are enabled simply by adding a license key. To purchase a storage capacity upgrade license, contact your Quantum sales representative. After you obtain the storage capacity license, refer to the section “Adding a License Key” in the DXi4700 User’s Guide for instructions on completing the capacity upgrade.
-
Page 5: Choosing A Location
Installation Requirements below Rack Space Requirements below Environmental Conditions on the next page Installation Requirements Review the DXi4700 Site Planning Guide to ensure that your site meets the installation requirements for the DXi4700. Rack Space Requirements Table 1 below contains the rack requirements for the DXi4700 G1 components. - Page 6 DXi4700 G2 - 10% to 80% (non-condensing) with a maximum humidity gradient of 10% per hour Temperature: DXi4700 G1 - 10° to 35°C (50° to 95°F) with a maximum temperature gradient of 10°C per hour DXi4700 G2 - 10° to 35°C (50° to 95°F) with a maximum temperature gradient of 20°C per hour Altitude: DXi47001 G1 –...
-
Page 7: Preparing For The Installation
Notebook computer and Ethernet cable (for initial system configuration) DXi Software Requirements To successfully complete the DXi4700 system installation, the latest version of DXi software is mandatory. If the DXi will not have Internet connectivity, manually download a copy of the latest DXi software upgrade file to your Notebook computer before you begin the installation process. -
Page 8: Dxi4700 Installation Overview
DXi4700 Installation Overview Depending on the configuration, the DXi4700 system components ship in one or more boxes. Each box includes a label that notes the number of the box and the total number of boxes in the shipment (for example, box 1 of 3). - Page 9 DXi4700 Installation Overview Table 1: DXi4700 Component Installation Overview DXi4700 Configurations Components to Install Procedures to Complete 5–11 TB 1 DXi4700 Node Unpacking the DXi4700 on page 12 (Optional) X520 10 GbE Card Determining the DXi4700 (Optional) X540 10 GBase-T Card...
- Page 10 DXi4700 Installation Overview DXi4700 Configurations Components to Install Procedures to Complete 19–27 TB 1 DXi4700 Node Unpacking the DXi4700 on page 12 4 TB hard drive x 6 Determining the DXi4700 (Optional) X520 10 GbE Card Model on page (Optional) X540 10 GBase-T Card...
- Page 11 4 TB hard drive x 6 Determining the DXi4700 4 GB Memory Module x 8 Model on page H810 Controller x 1 (DXi4700 G1) Installing the Node Hard Drives on page 18 H830 Controller x 1 (DXi4700 G2) Installing Components in the...
-
Page 12: Unpacking The Dxi4700
The packaging materials must be used if the system is relocated. WARNING: The DXi4700 G2 Node and Expansion module (JBOD) weigh 49.4 pounds (22.4 kg) and 59.2 pounds (26.8 kg) respectively. A minimum of two people are required to lift either chassis. - Page 13 Unpacking the DXi4700 Figure 1: Unpacking the DXi4700 Node Item Description Bezel (key taped to back) Accessory Kit Rack mount rails Quantum DXi4700 Installation Guide...
- Page 14 (Optional) X540 10 GBase-T Network Card Carefully unpack and remove the components from the packing materials (see Figure 2 below). Figure 2: Unpacking the Additional DXi4700 Node Components H810 RAID Controller (DXi4700 G1) H810 RAID Controller (DXi4700 G1) Quantum DXi4700 Installation Guide...
- Page 15 X520 10 GbE Card 4 TB Hard Drives X540 10 GBase-T Card Unpacking the DXi4700 Expansion Module The box containing the DXi4700 Expansion module (JBOD) contains the following items: Rack mount rails Cable management straps Accessory kit, which includes the following:...
- Page 16 Unpacking the DXi4700 Figure 3: Unpacking the DXi4700 Expansion Module Item Description Rack mount rails Foam Quantum DXi4700 Installation Guide...
-
Page 17: Determining The Dxi4700 Model
Accessory Kit Bezel Determining the DXi4700 Model You will need to determine if the DXi system is a DXi4700 G1 or DXi4700 G2. Model information is located on the pull-out information tag on the front of the Node (see Figure 4 below). -
Page 18: Installing Components In The Dxi4700 Node
Installing Components in the DXi4700 Node Installing Components in the DXi4700 Node If the DXi4700 shipped with additional Node components, you must install these additional components in the Node before installing the system in the rack and turning it on (see... - Page 19 Installing Components in the DXi4700 Node DXi4700 Configuration Node Hard Actions to Take Drives 19 TB Install 6 hard drives (4 TB each) in Node hard drive slots 6– 27 TB 45 TB 63 TB 81 TB 99 TB 117 TB...
- Page 20 Note: The additional hard drives are not keyed to a particular slot. You may install any hard drive in any slot, as long as it is installed in slot 6–11. Caution: Use only the Quantum-supplied hard drives in the DXi4700 Node. Do not use any other drive (not even one taken from another DXi).
- Page 21 Opening the Node Cover To open the DXi4700 Node cover: WARNING: The DXi4700 G1 Node and Expansion module (JBOD) weigh 61.0 pounds (27.7 kg) and 62.6 pounds (28.4 kg) respectively. A minimum of two people are required to lift either chassis.
- Page 22 Installing Components in the DXi4700 Node Figure 10: Node Power Button 1. Power Button 4. On the Node cover, rotate the latch release lock counterclockwise to the unlocked position (see Figure below). Figure 11: Removing the Node Cover Item Description...
- Page 23 Installing Components in the DXi4700 Node 5. Lift the latch on top of the Node and slide the cover back. 6. Grasp the cover on both sides, and carefully lift the cover away from the Node. a. Remove the cooling shroud by holding the touch points and lifting the shroud away from the Node...
- Page 24 Guide pin on the system board (2) Cooling-fan connector (6) Guide pin on the chassis (6) 9. Lift the cooling-fan assembly out of the Node. Figure 14 on the next page illustrates the interior of the DXi4700 Node with the cover removed. Quantum DXi4700 Installation Guide...
- Page 25 Installing Components in the DXi4700 Node Figure 14: Inside the DXi4700 Node Item Description Cooling shroud. Memory modules. Expansion card riser 1 Optional X520 network card (DXi4700 G1) Quantum DXi4700 Installation Guide...
- Page 26 WARNING: DAE and Veeam Memory Configurations For DXi4700 systems with a Dynamic Application Environment (DAE) or Veeam configuration, the installation of additional memory modules is required after the initial system installation is complete. DO NOT install the additional memory at this time.
- Page 27 Install 8 x 4 GB memory modules in slots A9–A12 and B9–B12 (green sockets). Figure 15: Node Memory Module Locations To install the memory modules in the DXi4700 Node: Caution: Use appropriate ESD precautions, including the use of a grounding strap, when performing this procedure.
- Page 28 Installing Components in the DXi4700 Node Caution: Handle the memory modules by the card edges and avoid touching the components on the memory module. 1. Remove the plastic memory blank from the socket by pressing down and out on the ejectors on each...
- Page 29 Installing Components in the DXi4700 Node a. Align the cooling-fan assembly slots with the guide pins on the chassis (see Figure 17 below). b. Slide the cooling-fan assembly into the chassis. c. Lock the cooling-fan assembly into the chassis. Figure 17: Replacing the Cooling-Fan Assembly 6.
- Page 30 Installing the H810/H830 RAID Controller The PERC H810 RAID controller (DXi4700 G1) or PERC H830 RAID controller (DXi4700 G2) allows you to connect up to three Expansion modules to the DXi4700 Node and is required for 45 TB and larger configurations (see Table 3 below).
- Page 31 Item Card Option(s) H830 RAID controller card To install the H810 or H830 RAID controller card in the DXi4700 Node: Caution: Use appropriate ESD precautions, including the use of a grounding strap, when performing this procedure. 1. Lift the blue expansion card latch out of the slot (see Figure 21 on the next page).
- Page 32 Installing Components in the DXi4700 Node Figure 21: Installing the H810/H830 Card in Riser 3 Item Description Expansion card latch (blue) H810/H830 card Metal slot cover Expansion card connector Expansion card riser 3 2. Remove the metal slot cover from slot 6 by sliding it out of the slot.
- Page 33 Figure 23 on the next page). A DXi4700 system can be configured with either the optional X520 10 GbE network card or X540 10 GBase-T network card. The system cannot be configured with both cards. Table 4: DXi4700 Optional 10 GbE Configurations...
- Page 34 Install X520 10 GbE network card in slot 4. DXi4700 G1: Installing the X520 Network Card To install the X520 10 GbE network card in the DXi4700 Node: Caution: Use appropriate ESD precautions, including the use of a grounding strap, when performing this procedure.
- Page 35 Installing Components in the DXi4700 Node Figure 24: Removing and Installing the Expansion Card Riser 1 Item Description Touch points Expansion card riser 1 Front riser guide Expansion card riser 1 connector Back riser 2. Press the tab to release the expansion card latch and rotate the latch away from the expansion card...
- Page 36 Installing Components in the DXi4700 Node Figure 25: Installing the X520 Card in Riser 1 Item Description Expansion card connector Expansion card latch tab X520 card 3. Remove the metal slot cover from slot 1 by sliding it out of the slot.
- Page 37 10 GbE network card.) DXi4700 G2: Installing the X520 Network Card To install the X520 10 GbE network card in the DXi4700 G2 Node: Caution: Use appropriate ESD precautions, including the use of a grounding strap, when performing this procedure.
- Page 38 5. (Optical 10 GbE option only) Insert an SFP+ unit into each 10 GbE port on the X520 card. (The SFP+ units are included with the optional 10 GbE network card.) Installing the X540 Network Card The X540 network card provides two 10 GBase-T Ethernet ports and is an available option for all DXi4700 configurations (see Table 5 below).
- Page 39 Item Card Option(s) Install X540 10 GBase-T network card in slot 4. To install the X540 10 GBase-T network card in the DXi4700 Node: Caution: Use appropriate ESD precautions, including the use of a grounding strap, when performing this procedure.
- Page 40 Installing Components in the DXi4700 Node Figure 28: Installing the X540 Card in Riser 2 Item Description Expansion card latch (blue) X540 card Metal slot cover Expansion card connector Expansion card riser 2 2. Remove the metal slot cover from slot 4 by sliding it out of the slot.
- Page 41 Installing Components in the DXi4700 Node 5. Push the expansion card latch down to lock the X540 card in place. Closing the Node Cover To close the DXi4700 Node cover: 1. Lift the latch on the cover (see Figure 29 below).
-
Page 42: Installing The Dxi4700 System In The Rack
Figure 30 below). Make sure to leave enough space below the lowest installed component for future system expansion. The DXi4700 can be expanded to a maximum configuration requiring 8U of rack space (see Table 1 on page Figure 30: Recommended Component Rack Order (Maximum Configuration) - Page 43 Locating the Mounting Position The DXi4700 system is designed to fit in a standard 19 inch (48.3 cm) wide rack. It is important for the chassis installation to locate the hole pattern in the rack rails. You must allow 2U (3.4 inches or 8.7 cm) of vertical space for the DXi4700 Node and an addition 2U for each Expansion module (JBOD) installed in the rack.
- Page 44 Rail back end. Installing the DXi4700 Expansion Module WARNING: The DXi4700 Expansion module (JBOD, including hard drives) weighs 62.6 pounds (28.4 kg). A minimum of two people are required to lift the chassis. To lift the chassis, use the slots in the packing foam to place your hands under the sides of the chassis.
- Page 45 Installing the DXi4700 System in the Rack Note: To remove the Expansion module, loosen the thumbscrews and slide the Expansion module out of the rack. 3. Install the end caps on either side of the module by inserting the top of the end cap first and then snapping the bottom into place.
- Page 46 Installing the DXi4700 System in the Rack Make sure to align the pins correctly with the holes, as inserting them in the wrong holes may bend them. The top of the rail front end should be flush with the desired line on the vertical rack flange.
- Page 47 Rail back end Installing the DXi4700 Node WARNING: The DXi4700 G1 Node and Expansion module (JBOD) weigh 61.0 pounds (27.7 kg) and 62.6 pounds (28.4 kg) respectively. A minimum of two people are required to lift either chassis. WARNING: The DXi4700 G2 Node and Expansion module (JBOD) weigh 49.4 pounds (22.4 kg) and 59.2 pounds (26.8 kg) respectively.
- Page 48 Installing the DXi4700 System in the Rack Figure 35: Node Installation Item Description Rear rail standoffs Rear rail J-slots Slide-release lock button Lock lever Inner slide rails Cabling the DXi4700 Follow these steps to cable the DXi4700: Quantum DXi4700 Installation Guide...
- Page 49 Installing the DXi4700 System in the Rack 1. Connect each Array module (RBOD) to the DXi4700 Node. For DXi4700 G1 models, (see Table 1 below Figure 36 on the next page). For DXi4700 G2 models, (see Table 2 below Figure 37 on page 51).
- Page 50 53). Use the attached straps to secure the power cords to the chassis. Note: Quantum recommends connecting each power cord to a separate AC circuit to ensure system availability in case of a power failure. Power supplies should be checked periodically for audible and LED warnings.
- Page 51 Installing the DXi4700 System in the Rack Figure 37: DXi4700 G2 SAS Cabling Quantum DXi4700 Installation Guide...
- Page 52 Installing the DXi4700 System in the Rack Figure 38: DXi4700 Fibre Channel Cabling (VTL/PTT Configurations Only) Quantum DXi4700 Installation Guide...
-
Page 53: Initial Configuration
Before the DXi4700 is operational, you must configure the system through the remote management console. You must also configure your backup software. Configuring the DXi4700 consists of five major steps. See the following subsections for detailed instructions for completing each step:... - Page 54 Note: You will need a notebook computer and an Ethernet cable to complete the initial configuration. Accessing the Remote Management Console To access the DXi4700 remote management console: 1. Turn on the DXi4700 system components in the following order: a. Turn on both power switches on the back of each Expansion module (see Figure 40 below).
- Page 55 Figure 41: Node Power Button 1 - Power Button 2. Using an Ethernet cable, connect the Ethernet port on the notebook computer to Ethernet port 1 on the back of the DXi4700 (see Figure 42 below). Figure 42: Connecting to Ethernet Port 1 3.
- Page 56 Click OK, and then click Close. f. Wait at least two minutes for the computer to set the IP addresses on the local computer. 4. On the computer, open a supported Web browser, type 10.1.1.1 in the Address box, and press Quantum DXi4700 Installation Guide...
- Page 57 Figure 44 below). Additional Information For Web browsers, the DXi4700 supports Firefox 26 or higher, Chrome 40 or higher, or Internet Explorer 11 or higher. If the Login window does not display, verify that you entered the correct IP address (10.1.1.1) and that the network settings on the computer are correct.
- Page 58 3. Select the I have read and accept this License Agreement check box, and then click Next to continue. Note: If you do not accept the license agreement, the DXi4700 will not function. The Access Control page displays (see Figure 48 on page 61).
- Page 59 (ServiceLogin) and iDRAC login to be disabled. b. Enter the new password again in Confirm New Password. 6. Click Next to continue. The Network page displays (see Figure 48 on page IMPORTANT - READ BEFORE CONTINUING Quantum DXi4700 Installation Guide...
- Page 60 DXi4700 into your company’s network. If you set up the DXi4700 using the example below, you can always change the network settings as needed at a later time. For more information, see the “Network” section in the Quantum DXi4700 User’s Guide.
- Page 61 7. Under General, enter the following network information as provided by your network administrator: a. Enter the Hostname used to identify the DXi4700 system. The Hostname cannot be blank and must contain only letters [ A–Z, a–z ], numbers [ 0–9 ], hyphens [ - ], underscores [ _ ], and dots [ .
- Page 62 Initial Configuration Specifying a default gateway is optional if all access is local to a particular subnet. For example, if the DXi4700 and all of its clients are on the same subnet, you do not need to specify a default gateway.
- Page 63 Netmask - The network mask of the DXi4700. Gateway - The gateway of the DXi4700. (This is usually not the same as the default gateway.) c. Select the Any check box to allow all traffic types (management, replication, and data) on the interface.
- Page 64 Note: You can also choose to synchronize the system time with an NTP time server. To select a timeserver pool, you must have specified at least one DNS IP address above. Otherwise, you must specify the IP address of the timeserver pool. For more information, see the Quantum DXi4700 User’s Guide.
- Page 65 17. Review the settings you selected to make sure they are correct. If necessary, click Previous to return to a previous step to make changes 18. After you have confirmed all settings, click Finish. A message appears stating that completing the setup will restart the system. 19. Click Yes to restart the system. Quantum DXi4700 Installation Guide...
- Page 66 Initial Configuration 20. Disconnect the computer from the DXi4700 service port. Reset the computer network settings back to the default values. 21. Wait for the system to fully restart. This can take up to 30 minutes. Continue with the next section to upload the new DXi software.
- Page 67 2. On the Login window, select Administrator, type the password you created in the Getting Started Wizard, and click Login. The Upload New DXI Software Upgrade File page displays (see Figure 52 below). Figure 52: Upload New DXi Software Upgrade File Quantum DXi4700 Installation Guide...
- Page 68 Figure 53: Upload New DXi Software Upgrade File - No Internet Connectivity To access the Software Upgrade Utility: 1. Click the Open the Software Utility link. The Software Upgrade Utility appears (see Figure 54 on the next page). Quantum DXi4700 Installation Guide...
- Page 69 Manually upload a software upgrade file This option allows you to upload and install a software upgrade file on the DXi4700. Use this upgrade method if the DXi cannot access the Internet. 1. Download the latest software upgrade file from the Quantum Service and Support Site: http://www.quantum.com/serviceandsupport/index.aspx...
- Page 70 7. Click Check Now to check for available software upgrades. 8. Click Install to begin the software installation. Wait for the system to fully restart. This can take up to 30 minutes. Clear Your Web Browser Cache Quantum DXi4700 Installation Guide...
- Page 71 Figure 59 on the next page). Note: A DXi4700 system can be configured with either the optional X520 10 GbE network card or X540 10 GBase-T network card. The system cannot be configured with both cards. Figure 57: DXi4700 G1 Optional 10 GbE Ethernet Cabling...
- Page 72 Initial Configuration Figure 58: DXi4700 G2 Optional 10 GbE Ethernet Cabling Figure 59: DXi4700 Optional 10 GBase-T Ethernet Cabling Installing the Front Bezel New DXi Bezel A new DXi bezel is available. Please contact your account sales manager to purchase additional new bezels.
- Page 73 Initial Configuration can recognize the Node bezel by the square DXi4700 badge). 3. Snap the left side of the bezel into place. Note: To remove the bezel, lift the latch on the left side of the bezel. Caution: The Expansion module bezel may interfere with door operation on some rack models. In this case, remove the Expansion module bezels, and make sure to keep the rack door closed and secured.
- Page 74 Note that the system serial number displays directly above the New Key box. For information about accessing the remote management console, see the DXi4700 User’s Guide. Figure 61: License Keys Page b. In the other browser, enter the address for the License Key Management Web site (see...
- Page 75 5. Click the Storage Capacity license link on the License Keys page. The maximum allowed storage capacity appears under License Details (see Figure 63 on the next page). Verify that the licensed capacity equals the expected total storage capacity of the system. Quantum DXi4700 Installation Guide...
- Page 76 Initial Configuration Figure 63: License Details Taking Next Steps Before the customer can begin using the DXi4700 for backups, they must configure the system. Here are next steps the customer can take: Configuring Email Reports below Using the Configuration Wizards on the next page...
- Page 77 Initial Configuration 1. Make sure a valid outgoing e-mail server is specified on the Configuration > Notifications > Email > Server page. Also make sure to select the Enable automatic emails to Quantum check box on this page. 2. (Optional) Specify any additional recipients to receive the reports on the Configuration >...
-
Page 78: Dae/Veeam Memory Module Installation
To enable data replication to another DXi™-Series system, refer to Chapter 6, “DXi4700 Replication” in the QuantumDXi4700 User’s Guide). Installing Additional DAE/Veeam Memory Modules For DXi4700 systems that will run a DAE or Veeam configuration, the installation of additional memory modules is required (see DAE/Veeam Memory Module Installation below). - Page 79 4. After the Node shuts down, turn off both power switches on the back of all installed Expansion modules (JBODs) (see Figure 65 below). Figure 65: Expansion Module Power Switches - DXi4700 1 - Power Switches Opening the Node Cover To open the DXi4700 Node cover: 1.
- Page 80 6. Grasp the cover on both sides, and carefully lift the cover away from the Node. a. Remove the cooling shroud by holding the touch points and lifting the shroud away from the Node (see Figure 68 on the next page). Quantum DXi4700 Installation Guide...
- Page 81 DAE/Veeam Memory Module Installation Figure 68: Removing the Cooling Shroud 1. Cooling shroud 8. Remove the cooling-fan assembly by lifting the release levers upwards (see Figure 69 on the next page). Quantum DXi4700 Installation Guide...
- Page 82 Guide pin on the system board (2) Cooling-fan connector (6) Guide pin on the chassis (6) 9. Lift the cooling-fan assembly out of the Node. Figure 70 on the next page illustrates the interior of the DXi4700 Node with the cover removed. Quantum DXi4700 Installation Guide...
- Page 83 DAE/Veeam Memory Module Installation Figure 70: Inside the DXi4700 Node Item Description Cooling shroud. Memory modules. Expansion card riser 1 Optional X520 network card (DXi4700 G1) Quantum DXi4700 Installation Guide...
- Page 84 DAE/Veeam Memory Module Installation Item Description Expansion card riser 2 Optional X520 network card (DXi4700 G2) Optional X540 network card Expansion card riser 3 H810 RAID Controller (DXi4700 G1) H830 RAID Controller (DXi4700 G2) Installing the DAE/Veeam Memory Modules Install the additional DAE/Veeam memory modules in the Node (see Table 1 below).
- Page 85 DAE/Veeam Memory Module Installation Figure 71: Node Memory Module Locations To install the memory modules in the DXi4700 Node: Caution: Use appropriate ESD precautions, including the use of a grounding strap, when performing this procedure. Caution: Handle the memory modules by the card edges and avoid touching the components on the memory module.
- Page 86 Align the cooling-fan assembly slots with the guide pins on the chassis (see Figure 73 on the next page). b. Slide the cooling-fan assembly into the chassis. c. Lock the cooling-fan assembly into the chassis. Quantum DXi4700 Installation Guide...
- Page 87 Lower the cooling shroud into the chassis until it is firmly seated. Note: For proper seating of the cooling shroud in the chassis, ensure that the cables inside the system are routed along the chassis Closing the Node Cover To close the DXi4700 Node cover: Quantum DXi4700 Installation Guide...
- Page 88 4. Rotate the latch release lock in a clockwise direction to secure the cover. 5. Pull the inner slide rails out of the rack until they lock into place (see Figure 76 on the next page). Quantum DXi4700 Installation Guide...
- Page 89 DAE/Veeam Memory Module Installation Figure 76: Installing the DXi4700 Node in the Rack Item Description Rear rail standoffs Rear rail J-slots Slide-release lock button Lock lever Inner slide rails 6. Locate the rear rail standoff on each side of the system and lower them into the rear J-slots on the slide assemblies.
- Page 90 Turning On the System To turn on the system: 1. Turn on the DXi4700 system components in the following order: a. Turn on both power switches on the back of each Expansion module (see Figure 77 below).
- Page 91 DAE/Veeam Memory Module Installation For complete DAE/Veeam installation and configuration instructions, please refer to the DAE Installation Guide and Veeam Installation Guide on the DXi4700 Documentation Center (www.quantum.com/DXi4700Docs). Quantum DXi4700 Installation Guide...
-
Page 92: Troubleshooting
Troubleshooting Troubleshooting If you encounter problems while installing or configuring the DXi4700, see Table 1 for troubleshooting steps. Table 1: DXi4700 Installation Troubleshooting Problem Corrective Action The system does not power on. Make sure all power cords are connected to a grounded electrical outlet and the power switches located on the back of the power supplies are on. - Page 93 H810/H830 RAID Controller on page 30). 7. Make sure all SAS and power cables are securely connected to the correct ports (see Cabling the DXi4700 on page 48). 8. Turn on the system (see Accessing the Remote Management Console on page 54).
-
Page 94: Contacting Quantum
Quantum DXi4700 Installation Guide © 2018 Quantum Corporation. All rights reserved. Your right to copy this manual is limited by copyright law. Making copies or adaptations without prior written authorization of Quantum Corporation is prohibited by law and constitutes a punishable violation of the law. Artico, Be...
Need help?
Do you have a question about the DXi4700 and is the answer not in the manual?
Questions and answers