Table of Contents
Advertisement
Owner's Manual &
Safety Instructions
17j
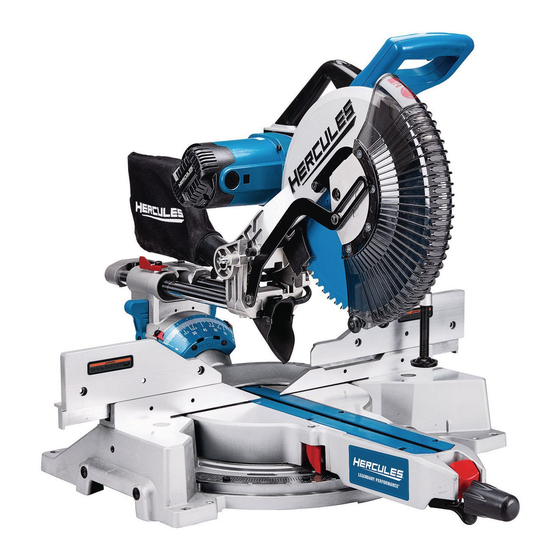
Model
HE74
12" Double-Bevel
Sliding Compound Miter Saw
WARNING:
To prevent serious injury,
User must read and
understand Owner's Manual. SAVE THIS MANUAL.
When unpacking, make sure that the product is intact and
undamaged. If any parts are missing or broken, please call
1-888-866-5797 as soon as possible. Reference 63978.
Advertisement
Table of Contents

Related Manuals for Hercules HE74


Summary of Contents for Hercules HE74
-
Page 1: Safety Instructions
Owner’s Manual & Safety Instructions Model HE74 12" Double-Bevel Sliding Compound Miter Saw WARNING: To prevent serious injury, User must read and understand Owner’s Manual. SAVE THIS MANUAL. When unpacking, make sure that the product is intact and undamaged. If any parts are missing or broken, please call... -
Page 2: Important Safety Information
IMPORTANT SAFETY INFORMATION GENERAL TOOL SAFETY WARNINGS 10. WEAR PROPER APPAREL. Do not wear loose clothing, gloves, neckties, rings, bracelets, or other jewelry which may get caught in moving Read all safety warnings and all instructions. parts. Nonslip footwear is recommended. Failure to follow the warnings and instructions may result Wear protective hair covering to contain long hair. -
Page 3: Grounding Instructions
12. Always use blades with correct size and shape Grounding Instructions (diamond versus round) of arbor holes. Blades that do not match the mounting hardware of the saw will run eccentrically, causing loss of control. 13. Never use damaged or incorrect blade washers TO PREVENT ELECTRIC SHOCK AND or bolt. -
Page 4: Vibration Safety
Vibration Safety Symbology This tool vibrates during use. Repeated or long-term Canadian Standards Association exposure to vibration may cause temporary or permanent physical injury, particularly to the hands, arms and shoulders. To reduce the risk of vibration-related injury: Underwriters Laboratories, Inc. 1. -
Page 5: Functional Description
Functional Description Dust Collection Lower Blade Slide Lock Guard Knob Slide Stop Head Lock-Down Blade Clamp Turntable Kerf Board Detent Latch Button Miter Miter Angle Lock Miter Indicator Miter Detent Knob Scale Lever Trigger Precision Blade Guide System On/Off Switch Dust Outlet Depth Stop Bevel... -
Page 6: Operation
OPERATION Lower Blade Guard Read the ENTIRE IMPORTANT SAFETY INFORMATION section at the beginning Guard of this manual including all text under Plate subheadings therein before set up or use of this product. TO PREVENT SERIOUS INJURY: DO NOT Guard OPERATE WITH ANY GUARD DISABLED, Plate DAMAGED, OR REMOVED. -
Page 7: Adjusting The Bevel Angle
3. The Miter Angle Indicator will indicate the 3. To use the pre-set detents (stops), push the selected angle. While the Miter Detent Lever Bevel Detent Lever back until the Saw Head is released, the Table will lock into place at Assembly can be moved and then release the often used miter angles, including 15º, 22.5º, Lever. -
Page 8: Workpiece And Work Area Set Up
Note: Hold the work material in place using the Clamp. Workpiece and Work Area Set Up Ensure that the work material is level and supported securely. Use saw horses or supports if necessary. 1. Designate a work area that is clean and well lit. The work area must not allow access by children 5. -
Page 9: Maintenance And Servicing
4. Pull up on the Miter Detent Lever to unlock the Table MAINTENANCE AND SERVICING and move the Table to the 0º miter position. Release the Miter Detent Lever to lock the Table Procedures not specifically explained in position. Do not tighten the Miter Lock Knob. in this manual must be performed 5. -
Page 10: Troubleshooting
Troubleshooting Problem Possible Causes Likely Solutions Tool will not start. 1. No power at outlet. 1. Check power at outlet. 2. Cord not connected. 2. Check that cord is plugged in. Tool operates 1. Low power supply or 1. Check power supply and power cords. sporadically or improper extension cords. - Page 11 Record Product’s Serial Number Here: Note: If product has no serial number, record month and year of purchase instead. Note: Some parts are listed and shown for illustration purposes only, and are not available individually as replacement parts. Parts may not be interchangeable. Specify item number when ordering. Item 63978 For technical questions, please call 1-888-866-5797.
-
Page 12: Please Read The Following Carefully
PLEASE READ THE FOLLOWING CAREFULLY THE MANUFACTURER AND/OR DISTRIBUTOR HAS PROVIDED THE PARTS LIST AND ASSEMBLY DIAGRAM IN THIS MANUAL AS A REFERENCE TOOL ONLY. NEITHER THE MANUFACTURER OR DISTRIBUTOR MAKES ANY REPRESENTATION OR WARRANTY OF ANY KIND TO THE BUYER THAT HE OR SHE IS QUALIFIED TO MAKE ANY REPAIRS TO THE PRODUCT, OR THAT HE OR SHE IS QUALIFIED TO REPLACE ANY PARTS OF THE PRODUCT. - Page 13 Part Description Part Description Washer Pulley M16 Nylon Nut 629 Bearing Stationery Fence M5 x 1 6 Screw M8 x 2 5 Screw Blade Guide Holder Assembly Left Sliding Fence Blade Guide Holder Right Sliding Fence Blade Guide Light Fence Knob Blade Guide Lens M6 ...
- Page 14 Parts List (continued) Part Description Part Description Bushing Cable Clamp Torsion Spring M5 x 1 6 Screw Shaft M5 x 1 0 Screw M8 x 1 5 Screw Cable Clamp M6 x 1 6 Screw Inner Flange Bottom Handle Blade M5 ...
-
Page 15: Assembly Diagram
Assembly Diagram Item 63978 For technical questions, please call 1-888-866-5797. Page 15... -
Page 16: Limited 90-Day Warranty
LIMITED 90 DAY WARRANTY Harbor Freight Tools Co. makes every effort to assure that its products meet high quality and durability standards, and warrants to the original purchaser that this product is free from defects in materials and workmanship for the period of 90 days from the date of purchase.
Need help?
Do you have a question about the HE74 and is the answer not in the manual?
Questions and answers
How do I get an additional wood clamp
The parts list includes a "Clamp Assembly" (item 245), a "Clamp Rod" (item 252), a "Clamp Arm" (item 253), and a "Clamp Lock Knob" (item 254), which are components of the wood clamp for the Hercules HE74. To obtain an additional wood clamp, you would need to request the "Clamp Assembly" or its individual parts by their item numbers.
This answer is automatically generated
what size hose works on the dust port
Where can I buy parts for my Hercules miter saw? The handle is broken and I need to buy a new one and replace it.
Where can I buy parts?