
Related Manuals for Areca ARC-1883 Series


Summary of Contents for Areca ARC-1883 Series
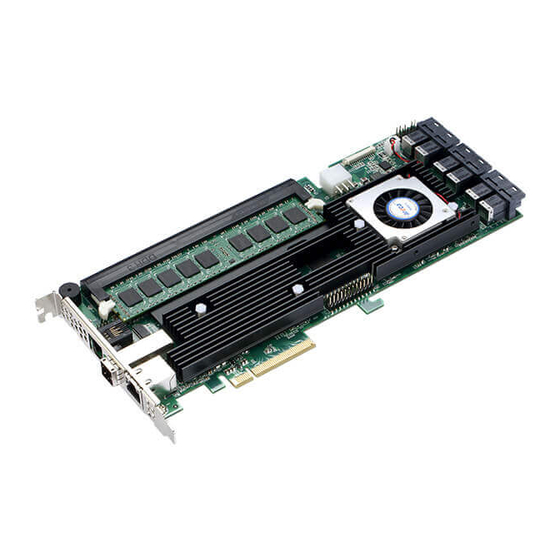
- Page 1 12Gb/s SAS RAID Cards ARC-1883 Series (PCIe 3.0 to 12Gb/s SAS RAID Controllers) User Manual Version: 1.4 Issue Date: July, 2016...
-
Page 2: Copyright And Trademarks
Copyright and Trademarks The information regarding products in this manual is subject to change without prior notice and does not represent a commitment on the part of the vendor, who assumes no liability or responsibility for any errors that may appear in this manual. All brands and trademarks are the properties of their respective owners. -
Page 3: Table Of Contents
Contents 1. Introduction .............. 10 1.1 Overview ............... 10 1.2 Features ................ 12 2. Hardware Installation ..........16 2.1 Before You First Installing..........16 2.2 Board Layout ..............16 2.3 Installation ..............22 2.4 SAS Cables ..............31 2.4.1 Mini SAS HD SFF-8643 to 4xSATA Cable ....... 31 2.4.2 Mini SAS HD SFF-8643 to 4xSFF-8482 Cable .... - Page 4 3.7.3.1 Create Volume Set (0/1/10/3/5/6) ......61 • Volume Name ..............63 • Capacity ............... 64 • Stripe Size ..............66 • SCSI ID ................ 67 • Cache Mode ..............68 • Write Protect ..............68 • Tag Queuing ..............69 3.7.3.2 Create Raid30/50/60 (Volume Set 30/50/60) .....
- Page 5 3.7.6.3 Hot Plugged Disk For Rebuilding ......91 3.7.7 HDD Power Management ..........92 3.7.7.1 Stagger Power On ..........92 3.7.7.2 Time to Hdd Low Power Idle ........93 3.7.7.3 Time To Low RPM Mode ......... 94 3.7.7.4 Time To Spin Down Idle Hdd ........94 3.7.8 Ethernet Configuration ..........
- Page 6 Start-up from Ethernet Port (Out-of-Band) • ....126 6.2 McRAID Storage Manager ..........127 6.3 Main Menu ..............128 6.4 Quick Function .............. 128 6.5.1 Create Raid Set ............129 6.5.2 Delete Raid Set ............130 6.5.3 Expand Raid Set ............130 6.5.4 Offline Raid Set ............
- Page 7 • JBOD/RAID Configuration ..........151 • SATA NCQ Support ............152 • HDD Read Ahead Cache ..........152 • Volume Data Read Ahead ..........152 • HDD Queue Depth ............152 • Empty HDD Slot LED ............ 152 • CPU Fan Detection ............153 •...
- Page 8 Appendix B ..............176 Flash-based Backup Module (ARC-1883-BAT/CAP) ....176 Appendix C ..............181 Battery Backup Module (ARC-6120BA-T121-12G) ....181 Appendix D ..............185 SNMP Operation & Installation ..........185 Appendix E ..............196 Event Notification Configurations ........196 A. Device Event .............. 196 B.
- Page 9 RAID 6 ................213 RAID x0 ................213 JBOD ................214 Single Disk (Pass-Through Disk) ......... 214...
-
Page 10: Introduction
INTRODUCTION 1. Introduction This section presents a brief overview of the 12Gb/s SAS RAID control- ler, ARC-1883 series. (PCIe 3.0 to 12Gb/s SAS RAID controllers) 1.1 Overview The 12Gb/s SAS interface supports both 12Gb/s SAS disk drives for data-intensive applications and 6Gb/s SATA drives for low-cost bulk storage of reference data. - Page 11 SAS or SATA devices Unsurpassed Data Availability Designed and leveraged with Areca’s existing high performance RAID solution, ARC-1883 provides superior levels performance and enterprise level data protection for the most demanding next- generation server and storage environments.
-
Page 12: Features
INTRODUCTION ARC-1880/1882 series controller field-proven compatibility with operating systems, motherboards, applications and device drivers. Easy RAID Management The controllers contain an embedded McBIOS RAID manager that can access via hot key at M/B BIOS boot-up screen. This pre-boot McBIOS RAID manager can use to simplify the setup and manage- ment of RAID controller. - Page 13 INTRODUCTION • Support flash-based or battery backup module (FBM/BBM) ready (optional) • RoHS compliant RAID Features • RAID level 0, 1, 10(1E), 3, 5, 6, 30, 50, 60, Single Disk or JBOD • Multiple RAID 0 and RAID 10(1E) support (RAID 00 and RAID100) •...
-
Page 14: Operating System
• Linux • FreeBSD • VMware (Driver 6.x support CLI in-band management utility) • Solaris 10/11 x86/x86_64 • Mac OS X 10.4.x or higher (For latest supported OS listing visit http://www.areca.com.tw) 12Gb/s SAS RAID Controllers Model Name ARC-1883i ARC-1883LP ARC-1883x... - Page 15 INTRODUCTION 12Gb/s SAS RAID Controllers Model Name ARC-1883ix-12 ARC-1883ix-16 ARC-1883ix-24 I/O Processor Dual Core RAID-on-Chip 1.2GHz Full Height: 98.4 x 254 mm Form Factor (H x L) Host Bus Type PCIe 3.0 x 8 Lanes Driver Connector 3xSFF-8643 4xSFF-8643 6xSFF-8643 1xSFF-8644 1xSFF-8644 1xSFF-8644...
-
Page 16: Hardware Installation
HARDWARE INSTALLATION 2. Hardware Installation This section describes the procedures for installing the 12Gb/s SAS RAID controllers. 2.1 Before You First Installing Thanks for purchasing the 12Gb/s SAS RAID controller as your RAID data storage subsystem. This user manual gives simple step-by-step instructions for installing and configuring the 12Gb/s SAS RAID controller. - Page 17 Mini SAS HD 1-8 Ports (Internal) SFF-8643 11. (SCN2) Mini SAS HD 9-16 Ports (Internal) SFF-8643 12. (SCN3) Mini SAS HD 17-24 Ports (Internal) SFF-8643 Table 2-1, ARC-1883ix-12/16/24 Connectors Note: You can download the ARC1882ix_1883ix Expander-CLI.PDF manual from “http://www.areca.com.tw/support/main.htm” to view and set expander configuration.
- Page 18 HARDWARE INSTALLATION Figure 2-2, ARC-1883i Top View Connector Type Description 1. (J1) Manufacture Purpose Port 12-pin header 2. (J2) Flash-based/Battery Backup Module Connector 14-pin box header 3. (J3) C/LCD Connector 7-pin header 4. (J4) Global Fault/Activity LED 4-pin header 5. (J5) Individual Activity (HDD) LED Header 4-pin header 6.
- Page 19 HARDWARE INSTALLATION Figure 2-3, ARC-1883LP Top View Connector Type Description 1. (J1) Manufacture Purpose Port 12-pin box header 2. (J2) Flash-based/Battery Backup Module Connector 14-pin header 3. (J3) Global Fault/Activity LED 4-pin header 4. (J4) Individual Fault/Activity LED Header 8-pin header 5.
- Page 20 HARDWARE INSTALLATION Figure 2-4, ARC-1883x Top View Connector Type Description 1. (J2) Flash-based/Battery Backup Module Connector 14-pin box header 2. (J3) C/LCD Connector 7-pin header 3. (J4) Ethernet Port RJ45 4. (SCN1) Mini SAS HD 5-8 Ports (External) SFF-8644 5. (SCN2) Mini SAS HD 1-4 Ports (External) SFF-8644 Table 2-4, ARC-1883x Connectors...
-
Page 21: Tools Required
The 12Gb/s SAS RAID controller can be installed in an universal PCIe slot and requires a motherboard that: ARC-1883 series 12Gb/s SAS RAID controller requires: • Comply with the PCIe 3.0 x8 lanes It can work on the PCIe 3.0 x1, x4, x8, and x16 signal with x8 or x16 mechanical slot M/B. -
Page 22: Installation
HARDWARE INSTALLATION caused by electrostatic discharge, observe the following precau- tions: • Do not remove the 12Gb/s SAS RAID controller from its anti- static packaging until you are ready to install it into a computer case. • Handle the 12Gb/s SAS RAID controller by its edges or by the metal mounting brackets at its each end. - Page 23 HARDWARE INSTALLATION physical memory configuration for ARC-1883ix series is one 240- pin DIMM socket for 2GB(default) up to 8GB DDR3-1866, 1Rx8, ECC module or 8GB, DDR3-1600, 2Rx8, ECC module. Step 4. Install the 12Gb/s SAS RAID Controllers To install the 12Gb/s SAS RAID controller, remove the mounting screw and existing bracket from the rear panel behind the selected PCIe 3.0 slot.
- Page 24 HARDWARE INSTALLATION installed. Be sure that the power is connected to either the cage backplane or the individual drives. In the backplane solution, SAS/SATA drives are directly connected to 12Gb/s SAS system backplane or through an expander board. The number of SAS/SATA drives is limited to the number of slots available on the backplane.
- Page 25 HARDWARE INSTALLATION Step 6. Install SAS Cable This section describes how to cable a controller to the drive or backplane. Figure 2-7, Connecting to HDD Figure 2-8, Connecting to Backplane...
- Page 26 HARDWARE INSTALLATION Step 7. Connect Power to the Controller (ARC-1883ix only) There is a 6-pin PCI-E connector on the ARC-1883ix labelled J4. You must plug in a PSU’s PCI-E cable at all times to supply enough stable power for the controller. Figure 2-9, Connect Direct from Power Supply If your power supply doesn’t have a 6 pin PCI-E power cable then you can use the adapter to convert two 4 pin peripheral power...
- Page 27 HARDWARE INSTALLATION Figure 2-10, Connect through HDD/CD Cable Step 8. Install the LED Cable (Optional) The preferred I/O connector for server backplanes is the Mini SAS HD SFF-8643 connector. This connector has eight signal pins to support four SAS/SATA drives and six pins for the SGPIO (Serial General Purpose Input/Output) side-band signals.
- Page 28 SFF-8448 specification. The SFF-8448 sideband signals cable is reserved for the backplane with header on it. The following signal defines the sideband connector which can work with Areca sideband cable on its Mini SAS HD SFF-8643 to 4xSATA cable.
- Page 29 HARDWARE INSTALLATION wrong LED which causes the user to hot swap the wrong drive. This could result in failure and loss of system data. Step 11. Power up the System Thoroughly check the installation, reinstall the computer cover, and reconnect the power cord cables. Turn on the power switch at the rear of the computer (if equipped) and then press the power button at the front of the host computer.
- Page 30 For Intel-based Mac system: Areca controller has supported the EFI BIOS on the PCIe 3.0 12Gb/s SAS RAID controller. You have other alternatively to add volumes on the Intel-based Mac bootable device listing. You can follow the following procedures to add 12Gb/s SAS RAID controller on the Mac bootable device listing.
-
Page 31: Sas Cables
HARDWARE INSTALLATION 2.4 SAS Cables You can connect the end devices to each other through direct cables or through the SAS expander/backplane connections. The 12Gb/s SAS RAID controller supports daisy-chain expansion up to 8 enclosures. The following is an example of some internal SAS/SATA cables and an external SAS cable. -
Page 32: Mini Sas Hd Sff-8643 To 4Xsff-8482 Cable
HARDWARE INSTALLATION 2.4.2 Mini SAS HD SFF-8643 to 4xSFF-8482 Cable These controllers can be installed in a server RAID enclosure with out a backplane. The kind of cable will attach directly to the SAS disk drives. The following diagram shows the picture of Mini SAS HD SFF-8643 to 4xSFF-8482 cables. -
Page 33: Mini Sas Hd Sff-8644 Cable
HARDWARE INSTALLATION 2.4.4 Mini SAS HD SFF-8644 Cable The Mini SAS HD SFF-8644 cables are used for connection be- tween the 12Gb/s SAS controller external connectors and con- nectors on the external drive boxes or drive expanders (JBOD). The 12Gb/s SAS controller has Mini SAS HD SFF-8644 external connector, each of them can support up to four SAS/SATA sig- nals. - Page 34 HARDWARE INSTALLATION 1. Individual Activity/Fault LED and Global Indicator Con- nector Most of the backplane has supported the HDD activity from the HDD. The 12Gb/s SAS RAID controller also provides the fault activity for fault LED. Connect the cables for the drive fault LEDs between the backplane of the cage and the respective connector on the 12Gb/s SAS RAID controller.
- Page 35 HARDWARE INSTALLATION Figure 2-16, ARC-1883i LED Indicator Connector Figure 2-17, ARC-1883LP LED Indicator Connector Figure 2-18, ARC-1883x LED Indicator Connector...
- Page 36 Areca LCD module for information, status indication, or menus or Card LED indicator for status message. This interface can also cascade to another Areca serial bus accessories for the additional status display. The following picture and table are the serial bus signal name description for LCD &...
-
Page 37: Hot-Plug Drive Replacement
HARDWARE INSTALLATION Figure 2-19, Connect to LCD Status Panel 2.6 Hot-plug Drive Replacement The RAID controller supports the ability of performing a hot-swap drive replacement without powering down the system. A disk can be disconnected, removed, or replaced with a different disk without taking the system off-line. -
Page 38: Summary Of The Installation
HARDWARE INSTALLATION Note: The capacity of the replacement drives must be at least as large as the capacity of the other drives in the raid set. Drives of insufficient capacity will be failed immediately by the RAID controller without starting the “Automatic Data Rebuild”. 2.7 Summary of the installation The flow chart below describes the installation procedures for 12Gb/s SAS RAID controllers. - Page 39 CLI (Command Line Interface) lets you set up and manage RAID controller through a command line interface. CLI performs many tasks at the command line. You can download CLI manual from Areca website or software CD <CDROM>\ DOCS directory. SNMP Manager Console Integration...
- Page 40 Since the 12 Gb/s SAS RAID controller is already installed in the host system, no extra connection is necessary. Just load the necessary in-band Areca SNMP extension agent for the controllers. Before launching the SNMP agent in...
-
Page 41: Mcbios Raid Manager
ARC-1883 PCIEx8/8G RAID Controller - DRAM: 2048(MB) / #Channels: 8 BIOS: V1.23A / Date: 2014-01-02 - F/W: V1.52 / Date: 2014-01-31 Bus/Dev/Fun= 4/0/0, I/0-Port=28000000h, IRQ=11, BIOS=C800 : 0h ID-LUN=00-0, Vol=”Areca ARC-1883-VOL#000R001”, Size=3.6 (TB) ID-LUN=00-1, Vol=”Areca ARC-1883-VOL#001R001”, Size=3.6 (TB) ID-LUN=00-2, Vol=”Areca ARC-1883-VOL#002R001”, Size=3.6 (TB) RAID controller BIOS not installed Press <Tab/F6>... -
Page 42: Mcbios Raid Manager
While the desired controller is highlighted, press the Enter key to enter the main menu of the McBIOS RAID manager. I/O Port Addr : 28000000h, F2(Tab): Select Controller, F10: Reboot System Note: Areca Technology Corporation RAID Controller Main Menu The manufacture Quick Volume/Raid Setup... -
Page 43: Configuring Raid Sets And Volume Sets
BIOS CONFIGURATION • Add physical drives, • Define volume sets, • Modify volume sets, • Modify RAID level/stripe size, • Define pass-through disk drives, • Modify system functions and • Designate drives as hot spares. 3.3 Configuring Raid Sets and Volume Sets You can configure RAID sets and volume sets with McBIOS RAID manager automatically. -
Page 44: Using Quick Volume /Raid Setup Configuration
BIOS CONFIGURATION 3.5 Using Quick Volume /Raid Setup Con- figuration “Quick Volume / Raid Setup configuration” collects all available drives and includes them in a RAID set. The RAID set you created is associated with exactly one volume set. You will only be able to modify the default RAID level, stripe size and capacity of the new volume set. -
Page 45: Using Raid Set/Volume Set Function Method
BIOS CONFIGURATION The capacity for the current volume set is entered after highlighting the desired RAID level and pressing the Enter key. The capacity for the current volume set is displayed. Use the UP and DOWN arrow keys to set the capacity of the volume set and press the Enter key to confirm. - Page 46 BIOS CONFIGURATION Step Action To setup the hot spare (option), choose “Raid Set Function” from the main menu. Select the “Create Hot Spare” and press the Enter key to define the hot spare. Choose “Raid Set Function” from the main menu. Select “Create Raid Set” and press the Enter key.
-
Page 47: Main Menu
The main menu shows all functions that are available for executing actions, which is accomplished by clicking on the appropriate link. I/O Port Addr : 28000000h, F2(Tab): Select Controller, F10: Reboot System Areca Technology Corporation RAID Controller Main Menu Quick Volume/Raid Setup... -
Page 48: Quick Volume/Raid Setup
BIOS CONFIGURATION Option Description Create a default configuration based on the number Quick Volume/Raid Setup of physical disk installed Raid Set Function Create a customized RAID set Volume Set Function Create a customized volume set Physical Drives View individual disk information Raid System Function Setup the RAID system configuration Hdd Power Management... - Page 49 Select “Quick Volume/Raid Setup” from the main menu; all possible RAID level will be displayed on the screen. I/O Port Addr : 28000000h, F2(Tab): Select Controller, F10: Reboot System Areca Technology Corporation RAID Controller Main Menu Quick Volume/Raid Setup...
- Page 50 “Create Volume Set” option in the main menu to define additional volume sets. I/O Port Addr : 28000000h, F2(Tab): Select Controller, F10: Reboot System Areca Technology Corporation RAID Controller Main Menu Available Capacity : 2400.0GB...
- Page 51 Roaming the stripe size 256K/512K/1024K Raid Set to firm- ware version older than 1.52 will cause data corruption. I/O Port Addr : 28000000h, F2(Tab): Select Controller, F10: Reboot System Areca Technology Corporation RAID Controller Main Menu Available Capacity : 2400.0GB...
-
Page 52: Raid Set Function
Available)” for initialization and “No Init (To Rescue Volume)” for recovering the missing RAID set configuration. I/O Port Addr : 28000000h, F2(Tab): Select Controller, F10: Reboot System Areca Technology Corporation RAID Controller Main Menu Available Capacity : 2400.0GB Quick Volume/Raid Setup Selected Capacity: 2400.0GB... -
Page 53: Create Raid Set
A “Create Raid Set Confirmation” screen will appear, select the Yes option to confirm it. I/O Port Addr : 28000000h, F2(Tab): Select Controller, F10: Reboot System Areca Technology Corporation RAID Controller Main Menu Quick Volume/Raid Setup Raid Set Function... -
Page 54: Delete Raid Set
RAID set. The max no. disk drives per volume set: 32 for RAID 0/1/10/3/5/6 and 128 for RAID 30/50/60. I/O Port Addr : 28000000h, F2(Tab): Select Controller, F10: Reboot System Areca Technology Corporation RAID Controller Main Menu Quick Volume/Raid Setup Raid Set Function... -
Page 55: Expand Raid Set
BIOS CONFIGURATION 3.7.2.3 Expand Raid Set I/O Port Addr : 28000000h, F2(Tab): Select Controller, F10: Reboot System Areca Technology Corporation RAID Controller Main Menu Quick Volume/Raid Setup Raid Set Function Raid Set Function Volume Set Function Raid Set Function Physical Drives... -
Page 56: Offline Raid Set
Unexpected accident may cause serious data cor- ruption. • Migrating I/O Port Addr : 28000000h, F2(Tab): Select Controller, F10: Reboot System Areca Technology Corporation RAID Controller Main Menu Quick Volume/Raid Setup Raid Set Function Raid Set Function... -
Page 57: Activate Raid Set
BIOS CONFIGURATION I/O Port Addr : 28000000h, F2(Tab): Select Controller, F10: Reboot System Areca Technology Corporation RAID Controller Main Menu Quick Volume/Raid Setup Raid Set Function Raid Set Function Raid Set Function Volume Set Function Physical Drives Create Raid Set... -
Page 58: Create Hot Spare
RAID set or enclosure with a dedicated hot spare is pre-set, data on the disk drive is rebuild automatically on the dedicated hot spare disk. I/O Port Addr : 28000000h, F2(Tab): Select Controller, F10: Reboot System Areca Technology Corporation RAID Controller Main Menu Quick Volume/Raid Setup Raid Set Function... -
Page 59: Rescue Raid Set
BIOS CONFIGURATION I/O Port Addr : 28000000h, F2(Tab): Select Controller, F10: Reboot System Areca Technology Corporation RAID Controller Main Menu Quick Volume/Raid Setup Raid Set Function Raid Set Function Raid Set Function Volume Set Function Raid Set Physical Drives Delete Raid Set... -
Page 60: Raid Set Information
RAID set number, then press the Enter key. The “Raid Set Information” will appear. You can only view information for the RAID set in this screen. I/O Port Addr : 28000000h, F2(Tab): Select Controller, F10: Reboot System Areca Technology Corporation RAID Controller Main Menu Quick Volume/Raid Setup Raid Set Function... -
Page 61: Create Volume Set (0/1/10/3/5/6)
BIOS CONFIGURATION I/O Port Addr : 28000000h, F2(Tab): Select Controller, F10: Reboot System Areca Technology Corporation RAID Controller Main Menu Quick Volume/Raid Setup Raid Set Function Volume Set Function Volume Set Function Physical Drives Raid System Function More System Functions... - Page 62 Volume Name, Raid level, Capacity, Strip Size, SCSI Channel/ SCSI ID/SCSI Lun, Cache Mode, Write protect and Tagged Command Queuing. I/O Port Addr : 28000000h, F2(Tab): Select Controller, F10: Reboot System Areca Technology Corporation RAID Controller Main Menu Quick Volume/Raid Setup Volume Creation...
-
Page 63: Volume Name
BIOS CONFIGURATION I/O Port Addr : 28000000h, F2(Tab): Select Controller, F10: Reboot System Areca Technology Corporation RAID Controller Main Menu Quick Volume/Raid Setup Volume Creation Raid Set Function Volume Set Functions Volume Set Function Volume Set Function Volume Name : Volume Set # 000... -
Page 64: Capacity
Select a RAID level and press the Enter key to confirm. I/O Port Addr : 28000000h, F2(Tab): Select Controller, F10: Reboot System Areca Technology Corporation RAID Controller Main Menu Quick Volume/Raid Setup Raid Set Function... - Page 65 If volume capacity will exceed 2TB, controller will show the "Greater Two TB Volume Support" sub-menu. I/O Port Addr : 28000000h, F2(Tab): Select Controller, F10: Reboot System Areca Technology Corporation RAID Controller Greater Two TB Volume Support Main Menu Quick Volume/Raid Setup...
-
Page 66: Stripe Size
Roaming the stripe size 256K/512K/1024K Raid Set to firmware version older than 1.52 will cause data corrup- tion. I/O Port Addr : 28000000h, F2(Tab): Select Controller, F10: Reboot System Areca Technology Corporation RAID Controller Main Menu Quick Volume/Raid Setup Volume Creation... -
Page 67: Scsi Id
It is necessary to assign a SCSI ID to each device from a list of available SCSI IDs. I/O Port Addr : 28000000h, F2(Tab): Select Controller, F10: Reboot System Areca Technology Corporation RAID Controller Main Menu Quick Volume/Raid Setup... -
Page 68: Cache Mode
• Cache Mode User can set the cache mode to either “Write Through” or “Write Back”. I/O Port Addr : 28000000h, F2(Tab): Select Controller, F10: Reboot System Areca Technology Corporation RAID Controller Main Menu Quick Volume/Raid Setup Volume Creation Raid Set Function... -
Page 69: Tag Queuing
This function should normally remain “Enabled”. “Dis- abled” this function only when using SAS drives that do not support command tag queuing. I/O Port Addr : 28000000h, F2(Tab): Select Controller, F10: Reboot System Areca Technology Corporation RAID Controller Main Menu Quick Volume/Raid Setup Volume Creation... -
Page 70: Delete Volume Set
BIOS CONFIGURATION I/O Port Addr : 28000000h, F2(Tab): Select Controller, F10: Reboot System Areca Technology Corporation RAID Controller Main Menu Quick Volume/Raid Setup Raid Set Function Volume Set Function Volume Set Function Volume Set Functions Physical Drives Create Raid 30/50/60... -
Page 71: Modify Volume Set
Choose this option to display the properties of the selected volume set. But user can only modify the last volume set capacity. I/O Port Addr : 28000000h, F2(Tab): Select Controller, F10: Reboot System Areca Technology Corporation RAID Controller Main Menu Volume Modification Quick Volume/Raid Setup... - Page 72 BIOS CONFIGURATION To expand an existing volume noticed: • Only the last volume can expand capacity. • When expand volume capacity, you can’t modify stripe size or modify RAID revel simultaneously. • You can expand volume capacity, but can’t reduce volume capacity size.
-
Page 73: Check Volume Set
After completed the selection, the confirma- tion screen appears, press Yes to start the check. I/O Port Addr : 28000000h, F2(Tab): Select Controller, F10: Reboot System Areca Technology Corporation RAID Controller Main Menu Quick Volume/Raid Setup... -
Page 74: Physical Drives
BIOS CONFIGURATION I/O Port Addr : 28000000h, F2(Tab): Select Controller, F10: Reboot System Areca Technology Corporation RAID Controller Main Menu The Volume Set Information Quick Volume/Raid Setup Volume Set Name : ARC-1883-VOL # 004 Raid Set Function Volume Set Functions... -
Page 75: View Drive Information
SAS RAID controller are listed. Move the cursor to the desired drive and press Enter key to view drive information. I/O Port Addr : 28000000h, F2(Tab): Select Controller, F10: Reboot System Areca Technology Corporation RAID Controller Main Menu Quick Volume/Raid Setup... -
Page 76: Modify Pass-Through Disk
Enter key. The “Delete Pass-Through confirma- tion” screen will appear; select Yes to delete it. I/O Port Addr : 28000000h, F2(Tab): Select Controller, F10: Reboot System Areca Technology Corporation RAID Controller Main Menu Quick Volume/Raid Setup Raid Set Function... -
Page 77: Identify Selected Drive
BIOS CONFIGURATION I/O Port Addr : 28000000h, F2(Tab): Select Controller, F10: Reboot System Areca Technology Corporation RAID Controller Main Menu Quick Volume/Raid Setup Raid Set Function Physical Drive Function Volume Set Function Physical Drives Physical Drives View Drive Information Raid System Function... -
Page 78: Identify Enclosure
ArrowKey Or AZ:Move Cursor, Enter: Select, ESC: Escape, L:Line Draw, X: Redraw 3.7.4.8 Identify Enclosure To prevent removing the wrong enclosure, the selected Areca expander enclosure all disks fault LED indicator will light for physically locating the selected enclosure when the “Identify Enclosure”... -
Page 79: Mute The Alert Beeper
BIOS CONFIGURATION I/O Port Addr : 28000000h, F2(Tab): Select Controller, F10: Reboot System Areca Technology Corporation RAID Controller Main Menu Quick Volume/Raid Setup Raid Set Function Volume Set Function Physical Drives Raid System Function Raid System Function More System Functions... -
Page 80: Change Password
BIOS CONFIGURATION I/O Port Addr : 28000000h, F2(Tab): Select Controller, F10: Reboot System Areca Technology Corporation RAID Controller Raid System Function Main Menu Mute The Alert Beeper Quick Volume/Raid Setup Alert Beeper Setting Alert Beeper Setting Raid Set Function Change Password... -
Page 81: Jbod/Raid Function
BIOS CONFIGURATION I/O Port Addr : 28000000h, F2(Tab): Select Controller, F10: Reboot System Areca Technology Corporation RAID Controller Raid System Function Main Menu Mute The Alert Beeper Quick Volume/Raid Setup Alert Beeper Setting Raid Set Function Change Password Change Password... -
Page 82: Background Task Priority
SAS RAID controller allows the user to choose the rebuild prior- ity (UltraLow, Low, Normal, High) to balance volume set access and rebuild tasks appropriately. I/O Port Addr : 28000000h, F2(Tab): Select Controller, F10: Reboot System Areca Technology Corporation RAID Controller Raid System Function Main Menu Mute The Alert Beeper... -
Page 83: Hdd Read Ahead Cache
BIOS CONFIGURATION I/O Port Addr : 28000000h, F2(Tab): Select Controller, F10: Reboot System Areca Technology Corporation RAID Controller Raid System Function Main Menu Mute The Alert Beeper Quick Volume/Raid Setup Alert Beeper Setting Raid Set Function Change Password Volume Set Function... -
Page 84: Volume Data Read Ahead
The "Aggressive" value is optimal for sequential access but it degrades random access. I/O Port Addr : 28000000h, F2(Tab): Select Controller, F10: Reboot System Areca Technology Corporation RAID Controller Raid System Function Main Menu Mute The Alert Beeper... -
Page 85: Empty Hdd Slot Led
BIOS CONFIGURATION I/O Port Addr : 28000000h, F2(Tab): Select Controller, F10: Reboot System Areca Technology Corporation RAID Controller Raid System Function Main Menu Mute The Alert Beeper Quick Volume/Raid Setup Alert Beeper Setting Raid Set Function Change Password Volume Set Function... -
Page 86: Controller Fan Detection
McBIOS RAID manager setting to disable the warning beeper function. I/O Port Addr : 28000000h, F2(Tab): Select Controller, F10: Reboot System Areca Technology Corporation RAID Controller Raid System Function Main Menu Mute The Alert Beeper... -
Page 87: Disk Write Cache Mode
BIOS CONFIGURATION I/O Port Addr : 28000000h, F2(Tab): Select Controller, F10: Reboot System Areca Technology Corporation RAID Controller Raid System Function Main Menu Mute The Alert Beeper Quick Volume/Raid Setup Alert Beeper Setting Raid Set Function Change Password Volume Set Function... -
Page 88: Capacity Truncation
ArrowKey Or AZ:Move Cursor, Enter: Select, ESC: Escape, L:Line Draw, X: Redraw 3.7.5.15 Capacity Truncation Areca RAID controllers use drive truncation so that drives from different vendors are more likely to be usable as spares for one another. Drive truncation slightly decreases the usable capac- ity of a drive that is used in redundant units. -
Page 89: More System Functions
Move the cursor bar to an item, then press Enter key to select the desired function. I/O Port Addr : 28000000h, F2(Tab): Select Controller, F10: Reboot System Areca Technology Corporation RAID Controller Main Menu Quick Volume/Raid Setup Raid Set Function... -
Page 90: Smart Polling Interval
BIOS CONFIGURATION “Alert Only” – it will trigger alert when there happens a SMART fail drive. I/O Port Addr : 28000000h, F2(Tab): Select Controller, F10: Reboot System Areca Technology Corporation RAID Controller Main Menu Quick Volume/Raid Setup Raid Set Function... -
Page 91: Hot Plugged Disk For Rebuilding
RAID set with duplicated RAIDset# and with all the rest of RAID members missing. I/O Port Addr : 28000000h, F2(Tab): Select Controller, F10: Reboot System Areca Technology Corporation RAID Controller Main Menu Quick Volume/Raid Setup... -
Page 92: Hdd Power Management
BIOS CONFIGURATION 3.7.7 HDD Power Management Areca has automated the ability to manage HDD power based on usage patterns. The “HDD Power Management” allows you to choose a “Stagger Power On Control”, “Low Power Idle”, “Low RPM” and completely “Spins Down Idle HDD”. It is designed to reduce power consumption and heat generation on idle drives. -
Page 93: Time To Hdd Low Power Idle
BIOS CONFIGURATION Areca RAID controller has included the option for customer to select the disk drives sequentially stagger power up value. The values can be selected from 0.4 to 6 seconds per step which powers up one group of drives. -
Page 94: Time To Low Rpm Mode
The values can be selected “Disabled” or within the range 10 to 60 minutes. I/O Port Addr : 28000000h, F2(Tab): Select Controller, F10: Reboot System Areca Technology Corporation RAID Controller Main Menu Low RPM Mode... -
Page 95: Ethernet Configuration
Move the cursor bar to an item, and then press Enter key to select the desired function. I/O Port Addr : 28000000h, F2(Tab): Select Controller, F10: Reboot System Areca Technology Corporation RAID Controller Main Menu Quick Volume/Raid Setup... -
Page 96: Local Ip Address
IP address that does not conflict with other devices on the network. I/O Port Addr : 28000000h, F2(Tab): Select Controller, F10: Reboot System Areca Technology Corporation RAID Controller Main Menu Quick Volume/Raid Setup Raid Set Function... -
Page 97: Http Port Number
Enter key to show the default address setting in the RAID con- troller. Then You can reassign the default “HTTP Port Number” of the controller. I/O Port Addr : 28000000h, F2(Tab): Select Controller, F10: Reboot System Areca Technology Corporation RAID Controller Main Menu Quick Volume/Raid Setup Raid Set Function... -
Page 98: Smtp Port Number
RAID controller. You can then reassign the default “SMTP Port Number” of the controller. I/O Port Addr : 28000000h, F2(Tab): Select Controller, F10: Reboot System Areca Technology Corporation RAID Controller Main Menu Quick Volume/Raid Setup... -
Page 99: Alert By Mail Config
Move the cursor bar to the “Alert By Mail Config” item, then select the desired function. I/O Port Addr : 28000000h, F2(Tab): Select Controller, F10: Reboot System Areca Technology Corporation RAID Controller Main Menu Quick Volume/Raid Setup Raid Set Function... -
Page 100: Clear Events Buffer
BIOS CONFIGURATION I/O Port Addr : 28000000h, F2(Tab): Select Controller, F10: Reboot System Areca Technology Corporation RAID Controller Main Menu Quick Volume/Raid Setup Raid Set Function Time Device Event Type ElapseTime Errors Volume Set Function Physical Drives 2010-4-8 12:00:00 ARC-1883-VO#001 Raid Powered On... -
Page 101: System Information
BIOS CONFIGURATION I/O Port Addr : 28000000h, F2(Tab): Select Controller, F10: Reboot System Areca Technology Corporation RAID Controller Main Menu Controller H/W Monitor Quick Volume/Raid Setup CPU Temperature Raid Set Function Controller Temp. Volume Set Function CPU Fan 5625 Physical Drives 11.734... -
Page 102: Driver Installation
If you do not have the software CD disc with the package, contact your local dealers or you can also download the latest version drivers for Windows 10/8/Server 2012/7/2008/Vista/2003/XP, Linux, FreeBSD, Solaris and Mac OS X from the Areca web site at http://www.areca.com.tw... - Page 103 DRIVER INSTALLATION These driver diskettes are intended for use with new operating system installations. For Windows 10/8/Server 2012/7/2008/Vista, you can copy the Windows driver file to USB device and installed from it. Determine the correct kernel version and identify which diskette images contain drivers for that kernel.
-
Page 104: Driver Installation For Windows
DRIVER INSTALLATION 4.2 Driver Installation for Windows The SAS RAID controller can be used with Microsoft Windows 10/8/ Server 2012/7/2008/Vista/XP/2003 with StorPort Drivers. 4.2.1 Installing Windows on a RAID Volume For completed details on installing Windows, see the Windows User’s Manual. The following procedures detail installing the SAS RAID controller driver while installing Windows 10/8/Server 2012/ 7/2008/Vista/XP/2003. -
Page 105: Installing Controller On An Existing Windows
DRIVER INSTALLATION 8. Click on “Next” again to accept the default partition configura- tion, or refer to your Windows documentation to configure partitions manually. 9. From this point on, simply follow the Microsoft Windows instal- lation procedure. Follow the on-screen instructions, responding as needed, to complete the installation. - Page 106 DRIVER INSTALLATION Chapter, to install the controller and connect the disk drives or enclosure. 2. Start the system and then press Tab or F6 to enter the con- troller McBIOS RAID manager. Use the configuration utility to create the RAID set and volume set. For details, see Chap- ter 3, McBIOS RAID Manager.
-
Page 107: Uninstall Controller From Windows
DRIVER INSTALLATION (c). Scroll down to the bottom of the middle pane. Windows will display a list of new drives attached to your your system with a label such as “Disk 1” or “Disk 2”, etc. (d). Right-click on the drive you want to partition and then again to format it (e). -
Page 108: Driver Installation For Freebsd
Chapter 3, McBIOS RAID Manager. If you are using a Linux distribution for which there is not a com- piled driver available from Areca, you can copy the source from the SAS software CD or download the source from the Areca website and compile a new driver. -
Page 109: Driver Installation For Solaris
4.6.1 Installation Procedures This section describes detailed instructions for installing the Areca Mac driver & utility for the ARC-1883 series on your Intel_based Mac Pro. You must have administrative level permissions to install Mac driver & utility. You can use the MRAID installer to install Mac driver &... - Page 110 DRIVER INSTALLATION 1. Insert the Areca Software CD that came with your Areca SAS RAID controller. 2. Double-click on the “install_mraid.zip” file that resides at <CD- ROM>\packages\MacOS to add the installer on the Finder. 3. Launch the installer by double-clicking the install_mraid on the Finder.
- Page 111 DRIVER INSTALLATION CLI manual from Areca website or software CD <CDROM>\ DOCS directory. 5. A reboot is required to complete the installation (This will start the ArcHTTP so RAID Console can be used). 6. Normally ArcHTTP64 and CLI are installed at the same time on SAS RAID controller.
-
Page 112: Making Volume Sets Available To Mac Os X
DRIVER INSTALLATION Locate “ARC-1883 Web Management” and launch the selected McRAID storage manager. Enter RAID storage default User Name “admin” and the Password “0000” when the login page prompted for it. After logging in, the McRAID storage manager process starts. If there is any RAID adapter missed on the system start-up, you can use the “Rescan Device”... - Page 113 DRIVER INSTALLATION 3. Specify your Partition Information, Option setting and click on the “Apply” button. If you’re not sure which format to use, choose Mac OS X Extended (Journaled). 4. When a message asks you to confirm you want to partition the disk, click on the “Partition”...
-
Page 114: Archttp Proxy Server Installation
ARCHTTP PROXY SERVER INSTALLATION 5. ArcHTTP Proxy Server Installation Overview After hardware installation, the SAS/SATA disk drives connected to the SAS RAID controller must be configured and the volume set units initialized before they are ready to use. The user interface for these tasks can be accessed through the built- in configuration that resides in the controller’s firmware. -
Page 115: For Windows
ARCHTTP PROXY SERVER INSTALLATION 5.1 For Windows You must have administrative level permissions to install SAS RAID software. This procedure assumes that the SAS RAID hardware and Windows are installed and operational in your system. Screen captures in this section are taken from a Windows XP instal- lation. -
Page 116: For Linux
ARCHTTP PROXY SERVER INSTALLATION There “Areca RAID Controller” icon bar window start appearing in the taskbar, double-click to launch the ArcHTTP Configuration screen. Or click on the “Start” button in the Windows task bar and then click on the “Program”, select the “McRAID” and run “... - Page 117 (a). Insert the SAS RAID controller CD in the CD-ROM drive. (b). Copy <CD-ROM>\PACKAGES\Linux\http directory to local (Ex:/usr/local/sbin). or (c). Download from the www.areca.com.tw or from the email attachment. 2. You must have administrative level permissions to install SAS RAID controller ArcHTTP proxy server software. This procedure assumes that the SAS RAID hardware and driver are installed and operational in your system.
-
Page 118: For Freebsd
ARCHTTP PROXY SERVER INSTALLATION Press CTRL-C to exit program!! ############################## Controller [1] Http: New client [9] accepted Controller [1] Http: New Recv 243 bytes Controller [1] Http: Send [174] bytes back to the client (c). If you need the “Cfg Assistant”, please refer to section 5.6 ArcHTTP Configuration. -
Page 119: For Mac Os X
ARCHTTP PROXY SERVER INSTALLATION 1. Insert the SAS RAID controller software CD in the CD-ROM drive. 2. Login as root. Copy <CD-ROM>\PACKAGES\Solaris\http ArcHTTP file to a local directory. The next steps are same as Linux. Please see section 5.2 For Linux. 5.5 For Mac OS X The firmware embedded McRAID storage manager can configure and monitor the SAS RAID controller via ArcHTTP proxy server. - Page 120 Display HTTP Connection Information To Console: Select “Yes" to show Http send bytes and receive bytes information in the console. Scanning PCI Device: Select “Yes” for ARC-1883 series controller Scanning RS-232 Device: No Scanning Inband Device: No • Mail (alert by Mail) Configuration: Many users require that email notifications be sent to the appropriate administrators when an alert is detected.
- Page 121 Mail address: This is the mail address that the e-mail alerts will appear to be coming from, but don’t type IP to replace domain name. Ex: RaidController_1@areca.com.tw. Account: Enter the valid account if your SMTP mail server requires authentication. Password: Enter the valid password if your SMTP mail server requires authentication.
- Page 122 ARCHTTP PROXY SERVER INSTALLATION To set up SNMP traps sending function, click on the “SNMP Configuration” link. SNMP Traps Configurations are set up on this page. This setup screen is shown as below: The following article describes a best practice methodology for setting this up in the “SNMP Traps Configurations”.
- Page 123 ARCHTTP PROXY SERVER INSTALLATION Note: After you confirm and submit configurations, you can use "Generate Test Event" feature to make sure these settings are correct. • Rescan Device Configuration: The ArcHTTP scans the RAID controllers on the system and creates an individual RAID controller icon located on left column of the "ArcHTTP Configurations"...
-
Page 124: Web Browser-Based Configuration
WEB BROWSER-BASED CONFIGURATION 6. Web Browser-based Configuration Before using the firmware-based browser McRAID storage manager, do the initial setup and installation of this product. If you need to boot up the operating system from a RAID volume set, you must first create a RAID volume by using McBIOS RAID manager. -
Page 125: Start-Up From Windows/Mac Local Administration
WEB BROWSER-BASED CONFIGURATION • Locally manage a system containing a supported RAID storage that has Windows or Mac OS X, ArcHTTP and a supported browser. • Remote and managed systems must have a TCP/IP connection. Start-up from Windows/Mac Local Administration •... -
Page 126: Start-Up From Ethernet Port (Out-Of-Band)
WEB BROWSER-BASED CONFIGURATION 1. You can click on the individual adapter icon located on left column of the “ArcHTTP Configurations” screen or Launch your McRAID storage manager by entering http://[Computer IP Address]:[Port Number] in the web browser. 2. When connection is established, the "System Login" screen appears. -
Page 127: Mcraid Storage Manager
WEB BROWSER-BASED CONFIGURATION 6.2 McRAID Storage Manager The following login screen is displayed in the browser. This screen displays the initial start-up configuration. The RaidSet Hierarchy displays the “Raid Set List”, “Volume Set List”, and “Physical Disk List”. The RAID set information, volume set information, and drive information can also be viewed by clicking on the “RAID Set Hierarchy”... -
Page 128: Main Menu
WEB BROWSER-BASED CONFIGURATION 6.3 Main Menu The main menu shows all available functions, accessible by clicking on the appropriate link. Individual Category Description Quick Function Create a default configuration, which is based on the number of physical disks installed; it can modify the volume set Capacity, Raid Level, and Stripe Size. -
Page 129: Create Raid Set
WEB BROWSER-BASED CONFIGURATION Note: In “Quick Create”, your volume set is automatically configured based on the number of disks in your system. Use the “Raid Set Functions” and “Volume Set Functions” if you prefer to customize your volume set, or RAID 30/50/60 volume set. 6.5 Raid Set Functions Use the “Raid Set Function”... -
Page 130: Delete Raid Set
WEB BROWSER-BASED CONFIGURATION 128 volumes is the default mode for SAS RAID controller, the 16 volumes mode is used for support roaming this raidset to SATA RAID controllers. The SATA RAID controller is designed to support up to 16 volumes only. You have to use “Max 16 volumes” on the raidset mode if you plan to roam this raidset between SAS RAID controller and SATA RAID controller. -
Page 131: Offline Raid Set
WEB BROWSER-BASED CONFIGURATION Select the “Expand Raid Set” option. If there is an available disk, then the “Select SAS/SATA Drives For Raid Set Expansion” screen appears. Select the target RAID set by clicking on the appropriate check box. Select the target disk by clicking on the appropriate check box. -
Page 132: Rename Raid Set
WEB BROWSER-BASED CONFIGURATION 6.5.5 Rename Raid Set The default RAID set name will always appear as “Raid Set #” when it is first created by the controller. The "Rename Raid Set" function is for customer to rename the default RAID set name. To rename a RAID set from a group of RAID sets: 1. -
Page 133: Create Hot Spare
WEB BROWSER-BASED CONFIGURATION Click on the RAID set number to activate in the select column. Click on the “Submit” button on the screen to activate the RAID set that had a disk removed (or failed) in the power off state. The SAS RAID controller will continue to work in degraded mode. -
Page 134: Delete Hot Spare
WEB BROWSER-BASED CONFIGURATION 6.5.8 Delete Hot Spare Select the target hot spare disk to delete by clicking on the ap- propriate check box. Tick on the “Confirm The Operation” check box and click on the “Submit” button on the screen to delete the hot spares. -
Page 135: Volume Set Functions
WEB BROWSER-BASED CONFIGURATION 6.6 Volume Set Functions A volume set is seen by the host system as a single logical device. It is organized in a RAID level with one or more physical disks. RAID level refers to the level of data performance and protection of a volume set. - Page 136 WEB BROWSER-BASED CONFIGURATION • Volume Name The default volume name will always appear as “ARC-1883- VOL”. You can rename the volume set providing it does not exceed the 15 characters limit. • Volume Raid Level Set the Raid Level for the volume set. Highlight the desired RAID Level from the available RAID levels option.
- Page 137 WEB BROWSER-BASED CONFIGURATION volume set directly sets and exposes 4KB sector size to the operating system. This option works on different OS which supports 16 bytes CDB. - Use 4K Block This option uses 16 bytes CDB and changes the sector size from default 512 bytes to 4k bytes.
- Page 138 Data saved in the volume will be hidden by Algorithm developed by Areca Technology. With this scramble process, no one can see and access into the hidden volume data without access key.
- Page 139 WEB BROWSER-BASED CONFIGURATION bits), or password (a variable key size). Each encryption key size causes the algorithm to behave slightly differently, so the increasing key sizes not only offer a larger number of bits with which you can scramble the data, but also increase the com- plexity of the cipher algorithm.
-
Page 140: Create Raid30/50/60 (Volume Set 30/50/60)
WEB BROWSER-BASED CONFIGURATION • SCSI Channel/SCSI ID/SCSI Lun SCSI Channel: The SAS RAID controller function is simulated as a external SCSI RAID controller. The host bus is represent- ed as a SCSI channel. Choose the SCSI Channel. SCSI ID: Each SCSI device attached to the SCSI card, as well as the card itself, must be assigned a unique SCSI ID number. -
Page 141: Delete Volume Set
WEB BROWSER-BASED CONFIGURATION Note: RAID level 30 50 and 60 can support up to eight RAID set (four pairs), but it can not support expansion and migration. 6.6.3 Delete Volume Set To delete a volume from RAID set, move the cursor bar to the main menu and click on the “Delete Volume Set”... -
Page 142: Volume Growth
WEB BROWSER-BASED CONFIGURATION 6.6.4.1 Volume Growth Use “Expand RAID Set" function to add disk to a RAID set. The additional capacity can be used to enlarge the last volume set size or to create another volume set. The “Modify Volume Set” function can support the “Volume Modification”... -
Page 143: Volume Set Migration
WEB BROWSER-BASED CONFIGURATION 6.6.4.2 Volume Set Migration Migrating occurs when a volume set is migrating from one RAID level to another, when a volume set strip size changes, or when a disk is added to a RAID set. Migration state is displayed in the volume state area of the “RAID Set Hierarchy”... -
Page 144: Check Volume Set
WEB BROWSER-BASED CONFIGURATION 6.6.5 Check Volume Set To check a volume set from a RAID set: 1. Click on the “Check Volume Set” link. 2. Click on the volume set from the list that you wish to check. Tick on “Confirm The Operation” and click on the “Submit” button. Use this option to verify the correctness of the redundant data in a volume set. -
Page 145: Stop Volume Set Check
WEB BROWSER-BASED CONFIGURATION Note: Please make sure of the inconsistency source generated by parity error or bad block before you click on the recovery method. Otherwise, you will lose the recovery data. 6.6.7 Stop Volume Set Check Use this option to stop the “Check Volume Set” function. 6.6.8 Download Volume Key File Get the key file which was generated by CLI “vsf genkey”... -
Page 146: Physical Drive
WEB BROWSER-BASED CONFIGURATION 6.7 Physical Drive Choose this option to select a physical disk from the main menu and then perform the operations listed below. 6.7.1 Create Pass-Through Disk To create pass-through disk, move the mouse cursor to the main menu and click on the “Create Pass-Through”... -
Page 147: Delete Pass-Through Disk
WEB BROWSER-BASED CONFIGURATION fication” screen appears mark the check box for the pass-through disk from the pass-through drive pool and click on the “Submit” button to select drive. When the “Enter Pass-Through Disk Attri- bute” screen appears, modify the drive attribute values, as you want. -
Page 148: Clone And Replace
WEB BROWSER-BASED CONFIGURATION Clone Disk Procedure 1. Select one of the members as the “Clone Source” (status indi- cated as Raid Set #) by clicking on the appropriate check box. 2. Select a “Clone Target” (status indicated as Free or Hot Spare) by clicking on the appropriate check box. -
Page 149: Clone Only
WEB BROWSER-BASED CONFIGURATION 6.7.4.2 Clone Only The stand-by disk will clone the logical drives without substitut- ing it. The status of the stand-by drive will be marked as “Of- flined” after the cloning process. The source drive will remain a member of the logical drive. -
Page 150: Identify Enclosure
Basically, in the eyes of the controller, the disk suddenly disap- pears due to whatever reason. 6.7.8 Identify Enclosure To prevent removing the wrong enclosure, the selected Areca ex- pander enclosure all disks fault LED indicator will light for physi- cally locating the selected enclosure when the “Identify Enclo- sure”... -
Page 151: System Controls
WEB BROWSER-BASED CONFIGURATION 6.8 System Controls 6.8.1 System Config To set the RAID system function, move the cursor to the main menu and click on the “System Controls” link. The “Raid System Function” menu will show all items, and then select the desired function. -
Page 152: Sata Ncq Support
WEB BROWSER-BASED CONFIGURATION • SATA NCQ Support The controller supports both SAS and SATA disk drives. The SATA NCQ allows multiple commands to be outstanding within a drive at the same time. Drives that support NCQ have an internal queue where outstanding commands can be dynami- cally rescheduled or re-ordered, along with the necessary tracking mechanisms for outstanding and completed portions of the workload. -
Page 153: Cpu Fan Detection
WEB BROWSER-BASED CONFIGURATION • CPU Fan Detection The ARC-1883ix series incorporate one big passive heatsink attaching a active cooling fan that allows the hot devices such as a ROC and expander chip to keep cool. In addition, newer systems already have enough air flow blowing over the con- troller. -
Page 154: Write Same For Initialization
Gen3 slot. You must restart the computer twice for the PCIE Gen3 setting to take effect. • Disk Capacity Truncation Mode Areca RAID controllers use drive truncation so that drives from differing vendors are more likely to be able to be used... -
Page 155: Smart Option For Hdd
WEB BROWSER-BASED CONFIGURATION as spares for each other. Drive truncation slightly decreases the usable capacity of a drive that is used in redundant units. The controller provides three truncation modes in the system configuration: “Multiples Of 10G”, “Multiples Of 1G”, and “Disabled’. -
Page 156: Advanced Configuration
WEB BROWSER-BASED CONFIGURATION The default is “on demand”. User can schedule every certain period of time interval to pull the SMART status of each disk. When SMART pulling is executed, disk activity will be tempo- rally halted until the SMART parameter reading is finished. That is why you don’t want to set the Interval too frequent. - Page 157 WEB BROWSER-BASED CONFIGURATION • Timeout Setting Disk time-out is a registry setting that defines the time that RAID controller will wait for a hard disk to respond to a com- mand. You can modify the retry value by entering a new value in the edit box beside this button and then selecting the button.
- Page 158 WEB BROWSER-BASED CONFIGURATION without repetitive hard parsing activities. The Amount of Read Ahead parameter is used to allocate an amount of memory in the cache memory the frequently executed queries and return the result set back to the host without real disk read execution. Default value is Auto: Controller will base on the HDD number to set the amount of Read Ahead value.
- Page 159 It combines the “Legacy BIOS”, “UEFI BIOS” and “EFI BIOS” into a single BIOS, and provides BIOS option in the GUI. In the old days, Areca provided separate BIOS files for each, and need to manually flash it in. Now flashing BIOS for different BIOS type is no longer needed, just make the BIOS selection in System Controls: Advance Configuration: BIOS Option.
- Page 160 WEB BROWSER-BASED CONFIGURATION Enable: The RAID-on-Chip (ROC) PCIe link will be down and need to be re-initialized to get the link up. Disable: The RAID-on-Chip (ROC) PCIe link will ignore the “PCIE link Down Reset” command. • Active Cable Management An active cable requires power for circuitry that is integral to any of the TX/RX high speed serial channels supported by the cable.
-
Page 161: Hdd Power Management
WEB BROWSER-BASED CONFIGURATION 6.8.3 HDD Power Management Areca has automated the ability to manage HDD power based on usage patterns. The “HDD Power Management” allows you to choose a “Stagger Power On Control”, “Low Power Idle”, “Low RPM” and completely “Spins Down Idle HDD”. It is designed to reduce power consumption and heat generation on idle drives. -
Page 162: Time To Hdd Low Power Idle
WEB BROWSER-BASED CONFIGURATION 6.8.3.2 Time to Hdd Low Power Idle This option delivers lower power consumption by automatically unloading recording heads during the setting idle time. The val- ues can be selected “Disabled” or within the range 2 to 7 min- utes. -
Page 163: Ethernet Configuration
WEB BROWSER-BASED CONFIGURATION 6.8.4 Ethernet Configuration Use this feature to set the controller Ethernet port configuration. A customer doesn’t need to create a reserved space on the arrays before the Ethernet port and HTTP service are working. The firm- ware-embedded web browser-based RAID manager can access it from any standard internet browser or from any host computer either directly connected or via a LAN or WAN with no software or patches required. -
Page 164: Alert By Mail Configuration
WEB BROWSER-BASED CONFIGURATION Note: If you configure the HTTP Port Number to 0, the HTTP console will be closed. 6.8.5 Alert By Mail Configuration To configure the SAS RAID controller e-mail function, move the cursor bar to the main menu and click on the “System Controls” link. -
Page 165: Snmp Configuration
WEB BROWSER-BASED CONFIGURATION 6.8.6 SNMP Configuration Please refer to Appendix D of SNMP Operation & Installation. 6.8.7 NTP Configuration The Network Time Protocol (NTP) is used to synchronize the time of a computer client or server to another server or reference time source, such as a radio or satellite receiver or modem. -
Page 166: View Events/Mute Beeper
WEB BROWSER-BASED CONFIGURATION • NTP Sever Address The most important factor in providing accurate, reliable time is the selection of NTP servers to be used in the configuration file. Typical NTP configurations utilize multiple redundant serv- ers and diverse network paths in order to achieve high accu- racy and reliability. -
Page 167: Generate Test Event
WEB BROWSER-BASED CONFIGURATION Select this option to view the system events information: Time, Device, Event Type, Elapse Time and Errors. The RAID control- ler does not have a built-in real time clock. The time information is the relative time from the system time setting. The maximum event no. -
Page 168: Update Firmware
WEB BROWSER-BASED CONFIGURATION The manufacture default password is set to 0000. The password option allows user to set or clear the SAS RAID controller’s password protection feature. Once the password has been set, the user can only monitor and configure the SAS RAID controller by providing the correct password. -
Page 169: Information
WEB BROWSER-BASED CONFIGURATION 6.9 Information 6.9.1 Raid Set Hierarchy Use this feature to view the SAS RAID controller current RAID set, current volume set and physical disk information. The volume state and capacity are also shown in this screen. 6.9.1.1 Hdd Xfer Speed “Hdd Xfer Speed”... -
Page 170: Sas Chip Information
WEB BROWSER-BASED CONFIGURATION If there’s a certain location in the hard drive that is getting poor performance, hard drive read benchmarks can help confirm this. Above is a screenshot of a palimpsest benchmark on a hard drive. The length time of firmware takes to complete the drive test depends on its size. -
Page 171: System Information
WEB BROWSER-BASED CONFIGURATION 6.9.3 System Information To view the SAS RAID controller’s system information, move the mouse cursor to the main menu and click on the “System Infor- mation” link. The SAS RAID controller “RAID Subsystem Infor- mation” screen appears. Use this feature to view the SAS RAID controller’s system information. -
Page 172: Upgrading Flash Rom Update Process
McRAID storage manager or nflash DOS utility. New releases of the firmware are available in the form of a DOS file on the shipped CD or Areca website. The files available at the FTP site for each model contain the following files in each version: ARC1883NNNN.BIN Software Binary Code ( “NNNN”... - Page 173 APPENDIX A-2 Upgrading Firmware Through McRAID Storage Manager Get the new version firmware for your SAS RAID controller. For example, download the bin file from your OEM’s web site onto the C: drive. 1. To upgrade the 12Gb/s SAS RAID controller firmware, move the mouse cursor to “Upgrade Firmware”...
- Page 174 "Raid system Console" on the "System Controls" option. A-3 Upgrading Firmware Through nflash DOS Utility Areca now offers an alternative means communication for the SAS RAID controller – Upgrade the all files (BIOS, BOOT, FIRM and MBR0) without necessary system starting up to running the ArcHTTP proxy server.
- Page 175 APPENDIX A:\nflash Raid Controller Flash Utility V1.52 2013-11-07 Command Usage: NFLASH FileName NFLASH FileName /cn --> n=0,1,2,3 write binary to controller#0 FileName May Be ARC1883FIRM.BIN or ARC1883* For ARC1883* Will Expand To ARC1883BOOT /FIRM/BIOS.BIN A:\>nflash arc188~1.bin Raid Controller Flash Utility V1.52 2013-11-07 MODEL : ARC-1883 MEM FE620000 FE7FF000...
-
Page 176: Flash-Based Backup Module (Arc-1883-Bat/Cap)
APPENDIX Appendix B Flash-based Backup Module (ARC-1883- BAT/CAP) B-1 Overview The ARC-1883-BAT/CAP kit includes the Flash-based module (FBM), and one cable. The FBM features NAND flash memory and super capacitor technology that provides cache offload capability to pro- tect cached data in case of system power loss. The ARC-1883-CAP (Flash+Supercap) module is mounted super-capacitor pack that provides power for the backup of your data. - Page 177 APPENDIX 1. FBM with SuperCap Figure B-1, ARC-1883-CAP Figure B-2, ARC-1883-CAP (top view) (upper view) 2. FBM with Battery Figure B-3, ARC-1883-BAT Figure B-4, ARC-1883-BAT (top view) (upper view) B-4 Status of FBM The following table provides the LED status of the FBM. D2 (Blue) Status D14 (Blue)
- Page 178 APPENDIX D13 (Red) Status D10 (Green) Status Normal Normal On (SuperCap) Fail Quick Flash 10Hz Back-up Quick Flash 10Hz Calibration Slow Flash 1Hz Restore Slow Flash 1Hz Need Replace Normal Off (Battery) Function LED1 (Green) LED2 (Green) NAND Flash R/W Flash Flash Note:...
- Page 179 APPENDIX Note: 1. Low profile bracket also provided. 2. The FBM will occupy one PCI slot on the host backplane. B-6 Flash-based Backup Capacity The FBM backup capacity is defined as the maximum duration of a power failure for which data in the cache memory can be written into the flash on ARC-1883-CAP/BAT.
- Page 180 APPENDIX B-8 FBM Functionality Test Procedure: 1. Writing amount of data into controller volume, about 5GB or bigger. 2. Waiting for few seconds, power failed system by remove the power cable. 3. Power on system, and press Tab/F6 to login controller. 4.
-
Page 181: Battery Backup Module (Arc-6120Ba-T121-12G)
APPENDIX Appendix C Battery Backup Module (ARC-6120BA- T121-12G) C-1 Overview The 12Gb/s SAS RAID controller operates using cache memory. The Battery Backup Module is an add-on module that provides power to the 12Gb/s SAS RAID controller cache memory in the event of a power failure. - Page 182 APPENDIX Note: The BBM status will be shown on the web browser of "Hard- ware Monitor Information" screen. C-4 Installation 1. Make sure all power to the system is disconnected. 2. The 12Gb/s SAS RAID controller’s battery connector is available for the optional battery backup module.
- Page 183 APPENDIX C-6 Operation 1. Battery conditioning is automatic. There are no manual proce- dures for battery conditioning or preconditioning to be perform- ed by the user. 2. In order to make sure of all the capacity is available for your battery cells, allow the battery cell to be fully charged when installed for the first time.
- Page 184 • Operating Temperature Temperature: -0 C to +40 • Humidity: 45-85%, non-condensing • Storage Temperature Temperature: -40 C to 60 • Humidity: 45-85%, non-condensing Electrical • Input Voltage +3.6VDC • On Board Battery Capacity 1880mAH (1 x 1880mAH) for ARC-1883 series boards...
-
Page 185: Snmp Operation & Installation
An example of a SNMP management application is Hewlett-Packard’s Open View, Net-SNMP or SNMPc. The SNMP extension agent can be used to augment the Areca RAID control- ler if you are already running an SNMP management application at your site. - Page 186 Service Layer and Protocols Physical Managed Object D-3 SNMP Installation Perform the following steps to install the Areca RAID controller SNMP function into the SNMP manager. The installation of the SNMP manager is accomplished in several phases: Step 1. Installing the SNMP manager software on the client Installing the SNMP manager software on the client.
- Page 187 3. Service Method-3: using in-band PCI + SNMP extension agent. Pay attention to these: • Download the snmp extension agent from Areca URL. • The agent is to be installed on the system which has the Areca card. • Check Mark the option: “SNMP Through PCI”.
- Page 188 APPENDIX D-3-1 Using ArcHTTP The HTTP management software (ArcHTTP) runs as a service or daemon, and have it automatically start the proxy for all con- trollers found. This way the controller can be managed remotely without having to sign in the server. The HTTP management soft- ware (ArcHTTP) also has integrated the ability of sending SNMP trap.
- Page 189 APPENDIX D-3-2 Using Onboard NIC Installation By using the built-in LAN port on the RAID controller- RAID con- troller using built-in LAN interface. You can use the browser-based manager or CLI SNMP configuration to setup the firmware-based SNMP configuration. The following screen is the firmware-embed- ded SNMP configuration setup screen using browser-based man- ager: To launch the above browser-based RAID controller SNMP func-...
- Page 190 D-3-3 Using In-band PCI + SNMP Extension Agent Installa- tion By using the IP address assigned to the operating- RAID control- ler using Areca SNMP extension agent through PCIe host bus interface. 1. Set only “Community” field and select the “SNMP Port” option on the firmware-embedded SNMP configuration function.
- Page 191 If you are running another version of Windows, your screens may look different, but the Areca SNMP extension agent installation is essentially the same. 1. Insert the Areca RAID controller software CD in the CD-ROM drive. 2. Double-click on the setup.exe file that resides at: <CD- ROM>\packages\windows\SNMP on the CD.
- Page 192 3.The screen shows Preparing to Install. 4. The InstallShield Wizard opens, preparing to install and click on the “Next” button to continue. Follow the on-screen prompts to continue the Areca SNMP extension agent installation. 5. When you reach the installation page, click on the “Install”...
- Page 193 • Starting SNMP Trap Notification Configurations To start "SNMP Trap Notification Configruations", There have two methods. 1. First, double-click on the "Areca RAID Controller". 2. Second, you may also use the "Taskbar Start/programs/ Areca Technology Corp/ArcSnmpConf" menus shown below. • SNMP Community Configurations...
- Page 194 1 is the highest level, and covers events the need immediate attention (and action) from the administrator. D-3-4-2 Linux You must have administrative level permission to install Areca RAID software. This procedure assumes that the Areca RAID hardware and Linux are installed and operational in your sys- tem.
- Page 195 APPENDIX D-3-4-3 FreeBSD You must have administrative level permission to install Areca RAID software. This procedure assumes that the Areca RAID hardware and FreeBSD are installed and operational in your system. The old version agent has to modify the open source project, integrate the changes from Areca manually, then take the modified binaries and manually deploy them.
-
Page 196: Event Notification Configurations
APPENDIX Appendix E Event Notification Configurations The controller classifies disk array events into four levels depending on their severity. These include level 1: Urgent, level 2: Serious, level 3: Warning and level 4: Information. The level 4 covers notification events such as initialization of the controller and initiation of the re- building process;... -
Page 197: Volume Event
APPENDIX B. Volume Event Event Level Meaning Action Start Initialize Warning Volume initialization has started Start Rebuilding Warning Volume rebuilding has started Start Migrating Warning Volume migration has started Start Checking Warning Volume parity checking has started Complete Init Warning Volume initialization completed Complete Rebuild Warning Volume rebuilding completed... -
Page 198: Hardware Monitor Event
APPENDIX D. Hardware Monitor Event Event Level Meaning Action DRAM 1-Bit ECC Urgent DRAM 1-Bit ECC error Check DRAM DRAM Fatal Error Urgent DRAM fatal error Check the DRAM module and encountered replace with new one if required. Controller Over Urgent Abnormally high Check air flow and cooling fan of... -
Page 199: Raid Concept
APPENDIX Appendix F RAID Concept RAID Set A RAID set is a group of disks connected to a RAID controller. A RAID set contains one or more volume sets. The RAID set itself does not define the RAID level (0, 1, 1E, 3, 5, 6, 10, 30, 50 60, etc);... -
Page 200: Ease Of Use Features
RAID set. Therefore, if a server fails, the RAID set disk drives can be moved to another server with an Areca RAID controllers and the disks can be inserted in any order. Online Capacity Expansion •... - Page 201 APPENDIX set. Then, data on the existing volume sets (residing on the newly expanded RAID set) is redistributed evenly across all the disks. A contiguous block of unused capacity is made available on the RAID set. The unused capacity can be used to create additional volume sets.
- Page 202 APPENDIX • Online RAID Level and Stripe Size Migration For those who wish to later upgrade to any RAID capabilities, a system with online RAID level/stripe size migration allows a simplified upgrade to any supported RAID level without having to reinstall the operating system. The RAID controllers can migrate both the RAID level and stripe size of an existing volume set, while the server is on line and the volume set is in use.
-
Page 203: Online Volume Expansion
APPENDIX of disk failure(s). In the case of disk failure, the volume set transitions from migrating state to (migrating+degraded) state. When the migration is completed, the volume set tran- sitions to degraded mode. If a global hot spare is present, then it further transitions to rebuilding state. -
Page 204: Hot-Swap Disk Drive Support
APPENDIX high degree of fault-tolerance. A hot spare is a spare physical drive that has been marked as a hot spare and therefore is not a member of any RAID set. If a disk drive used in a volume set fails, then the hot spare will automatically take its place and he data previously located on the failed drive is reconstructed on the hot spare. -
Page 205: Auto Rebuilding
APPENDIX In the normal status, the newly installed drive will be recon- figured an online free disk. But, the newly-installed drive is automatically assigned as a hot spare if any hot spare disk was used to rebuild and without new installed drive replaced it. -
Page 206: High Reliability
APPENDIX rebuild priority to balance volume access and rebuild tasks appropriately. The Background Task Priority is a relative indi- cation of how much time the controller devotes to a back ground operation, such as rebuilding or migrating. RAID controller allows user to choose the task priority (Ultra Low (5%), Low (20%), Medium (50%), High (80%)) to bal- ance volume set access and background tasks appropriately. -
Page 207: Consistency Check
APPENDIX The RAID controller drives perform automatic defect reassign- ment for both read and write errors. Writes are always com- pleted - if a location to be written is found to be defective, the drive will automatically relocate that write command to a new location and map out the defective location. -
Page 208: Data Protection
APPENDIX Data Protection • Battery Backup The RAID controllers are armed with a Battery Backup Mod- ule (BBM). While a Uninterruptible Power Supply (UPS) pro- tects most servers from power fluctuations or failures, a BBM provides an additional level of protection. In the event of a power failure, a BBM supplies power to retain data in the RAID controller’s cache, thereby permitting any potentially dirty data in the cache to be flushed out to secondary storage when... -
Page 209: Understanding Raid
APPENDIX Appendix G Understanding RAID RAID is an acronym for Redundant Array of Independent Disks. It is an array of multiple independent hard disk drives that provides high performance and fault tolerance. The RAID controller imple- ments several levels of the Berkeley RAID technology. An appro- priate RAID level is selected when the volume sets are defined or created. -
Page 210: Raid 1
APPENDIX RAID 1 RAID 1 is also known as “disk mirroring”; data written on one disk drive is simultaneously written to another disk drive. Read performance will be enhanced if the array controller can, in parallel, access both members of a mirrored pair. During writes, there will be a minor performance penalty when compared to writing to a single disk. -
Page 211: Raid 10(1E)
RAID 10(1E) array comprised of five disks; A, B, C, D and E. In this configuration, each strip is mirrored on an adjacent disk with wrap-around. Areca RAID 10 offers a little more flexibility in choosing the number of disks that can be used to constitute an array. -
Page 212: Raid 5
APPENDIX RAID 5 RAID 5 is sometimes called striping with parity at byte level. In RAID 5, the parity information is written to all of the drives in the controllers rather than being concentrated on a dedicated parity disk. If one drive in the system fails, the parity information can be used to reconstruct the data from that drive. - Page 213 APPENDIX RAID 6 RAID 6 provides the highest reliability. It is similar to RAID 5, but it performs two different parity computations or the same compu- tation on overlapping subsets of the data. RAID 6 can offer fault tolerance greater than RAID 1 or RAID 5 but only consumes the capacity of 2 disk drives for distributed parity data.
- Page 214 APPENDIX Important: RAID level 00, 100, 30, 50 and 60 can support up to eight RAID set. If volume is RAID level 00, 100, 30, 50, or 60, you can’t change the volume to another RAID level. If volume is RAID level 0, 1, 10(1E), 3, 5, or 6, you can’t change the volume to RAID level 00, 100, 30, 50, or 60.
-
Page 215: Summary Of Raid Levels
APPENDIX Summary of RAID Levels 12Gb/s SAS RAID controller supports RAID Level 0, 1, 10(1E), 3, 5, 6, 30, 50 and 60. The following table provides a summary of RAID levels. RAID Level Comparsion RAID Description Disks Data Availability Level Requirement (Minimum) Also known as striping. - Page 216 APPENDIX RAID 60 is a combination multiple RAID Up to two disk 6 volume sets with RAID 0 (striping) failure in each sub-volume...
Need help?
Do you have a question about the ARC-1883 Series and is the answer not in the manual?
Questions and answers