Table of Contents
Advertisement
Advertisement
Table of Contents

Related Manuals for AmpliVox 240


Summary of Contents for AmpliVox 240
- Page 1 Model 240 Operation Manual OM024-6 Model 240 Operating Manual Page 1...
-
Page 2: About This Manual
ABOUT THIS MANUAL READ THIS OPERATING MANUAL BEFORE ATTEMPTING TO USE THE INSTRUMENT. This manual is valid for the Model 240 (applies from firmware version 4v47 onwards – please refer to section 1.3). This product is manufactured by: Amplivox Ltd. - Page 3 For supply in US only Caution: Federal Law restricts this device to sale by or on the order of a licenced medical professional.
-
Page 4: Table Of Contents
Contents 1 Introduction 1.1 Intended applications 1.2 Unpacking 1.3 Firmware version 1.4 Standard contents 1.5 Optional accessories 2 Important Safety Instructions 2.1 Precautions 2.2 Electromagnetic compatibility (EMC) considerations 2.3 Power supply options 2.4 Audiometer connections 2.5 Data transfer to a printer 2.6 Data transfer to a computer 3 Using the Audiometer 3.1 Switching the audiometer on and off... -
Page 5: Introduction
1 Introduction Thank you for purchasing an Amplivox audiometer. The Amplivox Model 240 is a diagnostic audiometer that will give many years of reliable service if treated with care. 1.1 Intended applications The Model 240 diagnostic audiometer is designed for use by audiologists, general practitioners, hearing aid dispensers and child health professionals. -
Page 6: Optional Accessories
Printer cable(s) USB Cable Audiocups (noise reducing earphone enclosures) 2 Important Safety Instructions The Model 240 instrument must be used only by practitioners qualified to perform audiometric tests. It is intended for use as a screening and diagnostic tool. 2.1 Precautions... -
Page 7: Electromagnetic Compatibility (Emc) Considerations
Once the voltage of the batteries is too low to operate the instrument the message “Replace Battery” will appear. Note that local regulations are likely to cover disposal of the batteries. OM024-6 Model 240 Operating Manual Page 3... -
Page 8: Audiometer Connections
Patient Response Switch * The relevant part numbers are indicated in Section 12 Note regarding the 6-pin mini DIN connector: This is a restricted socket for Amplivox use only. No user access is permitted. Page 4 OM024-6 Model 240 Operating Manual... -
Page 9: Data Transfer To A Printer
The audiometer is supplied with software to allow connection to a computer for the transfer of test results (see Section 3.9). You must use the designated USB cable which is available from Amplivox (see Section 12). OM024-6 Model 240 Operating Manual... -
Page 10: Using The Audiometer
This indicates that when the PRESENT key is pressed, a tone will be presented at 30dBHL at a frequency of 1kHz (1000Hz) to the designated ear. On start up the audiometer defaults to the left ear. Page 6 OM024-6 Model 240 Operating Manual... -
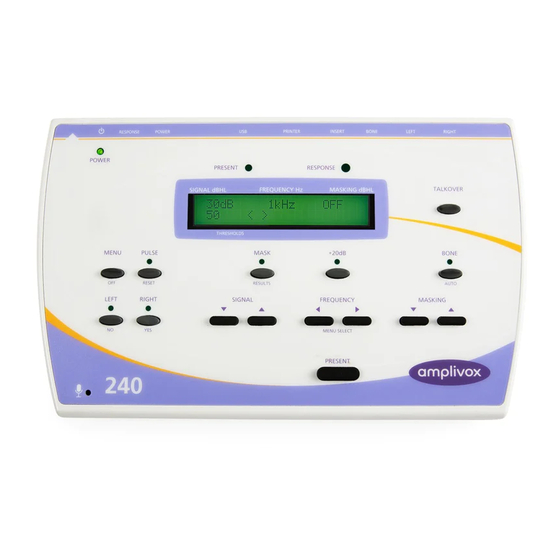
Page 11: Audiometer Controls
YES key to load the audiogram; then release MENU Contrast Adjust contrast using the SIGNAL keys Shows either “Not in use” or the battery Battery voltage, e.g. “5.3v”. OM024-6 Model 240 Operating Manual Page 7... - Page 12 Press this key when an automatic test has been completed to displays the results; use the LEFT and RIGHT keys to display the results for the required ear and the FREQUENCY keys to view the entire frequency range. Page 8 OM024-6 Model 240 Operating Manual...
- Page 13 5dB steps; to scroll through the range keep the key pressed PRESENT Press to present the displayed test signal to the patient. The “PRESENT” indicator above the display will illuminate green during presentation OM024-6 Model 240 Operating Manual Page 9...
-
Page 14: Threshold Retention Function
Left ear 20dBHL Right ear 10dBHL To clear the Threshold Retention memory, use the Clear Test menu option described in Section 3.4.2. To record and review bone conduction thresholds use the BONE key. Page 10 OM024-6 Model 240 Operating Manual... -
Page 15: Saving Audiograms In Internal Memory
3.8 Printing audiograms Three designated thermal printers (the Able AP1300 or the Sanibel MPT- II) are available as options for use with the Model 240 audiometer. The correct printer must be selected (use the MENU options described in Section 3.4.2 to make this selection). -
Page 16: Data Transfer To Noah Or Audiview
3.9 Data transfer to NOAH or AudiView To transfer test results stored within the audiometer to a NOAH database the Amplivox NOAH Audilink software must be installed on to a computer. Alternatively, Amplivox AudiView allows data to be transferred to a computer and subsequently viewed, annotated &... - Page 17 30dB, increase the attenuation level in 10dB steps until the patient responds (2) When the patient responds, wait for 1 to 2 seconds and present the tone again at the same level; however, if the patient does respond at OM024-6 Model 240 Operating Manual Page 13...
- Page 18 Print the results (Section 3.8), or Transfer the results to a computer (Section 3.9) Refer to Section 3.4.2 to clear the thresholds at the end of a test and, if required, switch off the audiometer. Page 14 OM024-6 Model 240 Operating Manual...
- Page 19 (3) To initiate a test press and hold the MENU key, then press the AUTO key and release both OM024-6 Model 240 Operating Manual Page 15...
- Page 20 The thresholds are retained by the audiometer and may be viewed, stored, printed or transferred to a computer (see Section 4.4.4). Refer to Section 3.4.2 to clear the thresholds at the end of a test and, if required, switch off the audiometer. Page 16 OM024-6 Model 240 Operating Manual...
- Page 21 (e.g. if no response was made and the retry option was not chosen). The operator then has the option to use manual audiometry to obtain any missing thresholds. Press RESULTS to continue. OM024-6 Model 240 Operating Manual Page 17...
-
Page 22: Specification
USB interface: Transfer of test results to a computer 5.2 Maximum hearing levels provided at each frequency Frequency, Air conduction, dBHL Bone conduction, dBHL (DD45) (B-71) 1000 1500 2000 3000 4000 6000 8000 Page 18 OM024-6 Model 240 Operating Manual... - Page 23 Continuous operation Equipment mobility Portable The Model 240 Audiometer is classified as a Class IIa device under Annex IX of the EU Medical Devices Directive. It is intended for use as a diagnostic audiometer instrument. OM024-6 Model 240 Operating Manual...
-
Page 24: Symbols
6 to 8 hours use from alkaline batteries. Frequency Modulation Carrier frequencies: 125Hz to 8kHz as per pure tones Modulation waveform: Sinusoidal Rising and falling symmetry: Symmetrical on linear frequency scale Modulating frequency: 15.625Hz Frequency deviation: +/-10% Page 20 OM024-6 Model 240 Operating Manual... -
Page 25: Routine Maintenance
8 Routine Maintenance 8.1 Audiometer maintenance The Model 240 audiometer is a precision instrument. Handle it carefully in order to ensure its continued accuracy and service. When cleaning the instrument, first disconnect it from the mains supply. Use a soft cloth and... - Page 26 Before use check the transducer cables and connectors for signs of wear and/or damage. If you find any, please replace the item immediately by contacting Amplivox or your Amplivox distributor, requesting the relevant part number (see Section 12). Handle the audiometric headset, bone vibrator headset and other accessories with care.
- Page 27 8.3 Mains adapter maintenance Before use check the mains AC adapter for signs of wear and/or damage. If you find any replace the adapter immediately by contacting Amplivox or your Amplivox distributor. Refer to Section 12 for approved part numbers.
-
Page 28: Instrument Storage And Transportation
Batteries (if fitted) should be removed if the instrument is not to be used over an extended period of time. 10 Calibration and Repair of the Instrument Amplivox recommends that this audiometer should be calibrated on an annual basis. Please contact Amplivox or the designated distributor for details of calibration services. -
Page 29: Guarantee
12 Ordering Consumables and Accessories To order consumables, additional accessories and to replace detachable parts that have been damaged, please contact Amplivox for current prices and delivery charges. The items available are listed below: Stock No. -
Page 30: Disposal Information
For any waste electrical units purchased from Amplivox that either: bear the crossed out wheeled bin symbol with black bar underneath or, have been replaced with new Amplivox products on a like-for-like basis Page 26 OM024-6 Model 240 Operating Manual... - Page 31 B2B Compliance will be able to provide further information on how to recycle your waste electrical units and answer any queries you may have. B2B Compliance Tel: +44 (0) 1691 676 124 (Option 2) Email: operations@b2bcompliance.org.uk OM024-6 Model 240 Operating Manual Page 27...
-
Page 32: Appendix 1 - Emc Guidance & Manufacturer's Declaration
Appendix 1 - EMC Guidance & Manufacturer’s Declaration Guidance and manufacturer’s declaration – electromagnetic emissions The Model 240 Audiometer is intended for use in the electromagnetic environment specified below. The customer or user of Model 240 Audiometer should assure that it is used in such an environment. - Page 33 Guidance and manufacturer’s declaration – electromagnetic immunity (1) The Model 240 Audiometer is intended for use in the electromagnetic environment specified below. The customer or user of the Model 240 Audiometer should assure that it is used in such an environment.
- Page 34 IEC 61000-4-8 typical location in a typical commercial or hospital environment. NOTE U is the a.c. mains voltage prior to the application of the test level Page 30 OM024-6 Model 240 Operating Manual...
- Page 35 Guidance and manufacturer’s declaration – electromagnetic immunity (2) The Model 240 Audiometer is intended for use in the electromagnetic environment specified below. The customer or user of the Model 240 Audiometer should assure that it is used in such an environment.
- Page 36 RF transmitters, an electromagnetic site survey should be considered. If the measured field strength in the location in which the Model 240 Audiometer is used exceeds the applicable RF compliance level above, the Model 240 Audiometer should be observed to verify normal operation.
- Page 37 Recommended separation distances between portable and mobile RF communications equipment and the Model 240 Audiometer The Model 240 Audiometer is intended for use in an electromagnetic environment in which radiated RF disturbances are controlled. The customer or the user of the Model 240 Audiometer can help prevent electromagnetic...
-
Page 38: Appendix 2 - Use With Non-Medical Electrical Equipment
16 of IEC 60601-1:2005 are met. The following signal inputs and outputs on the Model 240 audiometer are electrically isolated to the requirements of IEC 60601-1 in order to reduce any potential hazard associated with the use of mains-powered equipment... - Page 39 Diagram 1: Model 240 used with the medically-approved mains adapter Mains Outlet Medical Mains Adapter Model 240 Audiometer OM024-6 Model 240 Operating Manual Page 35...
- Page 40 Diagram 2: Model 240 used with the medically-approved mains adapter and printer Mains Outlet Medical Mains Adapter Model 240 Audiometer Mains Outlet Printer via Printer PRINTER socket Power Supply Page 36 OM024-6 Model 240 Operating Manual...
- Page 41 Diagram 3: Model 240 used with the medically-approved mains adapter and PC Mains Outlet Medical Mains Adapter Model 240 Audiometer Mains Outlet Power Supply via USB socket OM024-6 Model 240 Operating Manual Page 37...
Need help?
Do you have a question about the 240 and is the answer not in the manual?
Questions and answers