Avocent CPS1610 Installer/User Manual
Avocent hub/switch installer/user guide cps810, cps1610
Hide thumbs
Also See for CPS1610:
- Installer/user manual (98 pages) ,
- Specifications (1 page) ,
- Installer/user manual (82 pages)
Table of Contents
Advertisement
Advertisement
Table of Contents

Subscribe to Our Youtube Channel
Related Manuals for Avocent CPS1610


Summary of Contents for Avocent CPS1610
- Page 1 Installer/User Guide CPS810 CPS1610...
- Page 2 POWER ON This symbol indicates the principal on/off switch is in the on position. POWER OFF This symbol indicates the principal on/off switch is in the off position.
- Page 3 CPS810/1610 Installer/User Guide Avocent, the Avocent logo, The Power of Being There and DSView are registered trademarks of Avocent Corporation. All other marks are the property of their respective owners. © 2004 Avocent Corporation. All rights reserved.
-
Page 4: Canadian Notification
USA Notification Warning: Changes or modifications to this unit not expressly approved by the party responsible for compliance could void the user’s authority to operate the equipment. Note: This equipment has been tested and found to comply with the limits for a Class A digital device, pursuant to Part 15 of the FCC rules. -
Page 5: Table Of Contents
T A B L E O F C ON T E N T S Table of Contents List of Figures ... vii List of Tables ... ix Chapter 1: Product Overview... 1 Features and Benefits ... 1 Safety Precautions ... 2 Using DSView Software... - Page 6 CPS Installer/User Guide Authentication of serial CLI port sessions ... 26 Authentication summary ... 26 Using security lock-out ... 27 Managing the Port History Buffer ... 28 Using port history mode commands ... 28 Managing the CPS Appliance Using SNMP... 30 Chapter 4: Using CPS Appliance Commands ...
- Page 7 Server PPP command ... 54 Server RADIUS command ... 55 Server Reboot command ... 56 Server Security command ... 57 Server Set command ... 57 Server SNMP command... 58 Server SNMP Community command ... 58 Server SNMP Manager command ... 59 Server SNMP Trap command ...
- Page 8 CPS Installer/User Guide Appendix E: Technical Support ... 86 Index... 87...
-
Page 9: List Of Figures
LIST OF FIGU RES List of Figures Figure 2.1: 16-port CPS Appliance Front Panel ... 5 Figure 2.2: 16-port CPS Appliance Back Panel... 6 Figure B.1: CAT 5 Cable Adaptor Pin Assignments ... 78 Figure B.2: Reversing Cable Adaptor Pin Assignments... 80 Figure B.3: 8-wire RJ-45 Reversing Cable ... - Page 10 viii CPS Installer/User Guide...
-
Page 11: List Of Tables
LIST OF TABLES List of Tables Table 2.1: LEDs and Buttons... 5 Table 3.1: Default Port Settings ... 11 Table 3.2: SSH Authentication Methods... 17 Table 3.3: Access Rights ... 23 Table 3.4: Port History Mode Commands... 28 Table 4.1: Line Editing Operations for VT100 Compatible Devices ... 35 Table 4.2: Line Editing Operations for ASCII TTY Devices ... - Page 12 CPS Installer/User Guide Table 5.18: Server SNMP Command Parameter... 58 Table 5.19: Server SNMP Community Command Parameters... 59 Table 5.20: Server SNMP Manager Command Parameters ... 59 Table 5.21: Server SNMP Trap Command Parameter... 60 Table 5.22: Server SNMP Trap Destination Command Parameters... 61 Table 5.23: Server SSH Command Parameters...
- Page 13 List of Tables Table C.1: CPS Appliance Enterprise Traps... 82 Table D.1: Ports Used by CPS Appliance ... 85...
- Page 14 CPS Installer/User Guide...
-
Page 15: Chapter 1: Product Overview
You may connect up to 8 serial devices to a CPS810 appliance, and 16 serial devices to a CPS1610 appliance. A single 10/100 Ethernet port provides network connectivity. Two CPS appliances may be mounted in 1U of vertical space in a standard 19 inch rack. -
Page 16: Safety Precautions
Safety Precautions To avoid potential device problems when using Avocent products, if the building has 3-phase AC power, ensure that a computer and its monitor (if used) are on the same phase. For best results, they should be on the same circuit. -
Page 17: Using Dsview Software
Chapter 1: Product Overview Using DSView Software The DSView management software may be used to manage CPS appliances and access attached devices. Using DSView software, you may perform most of the operations that are described in this manual. This manual describes how to manage a CPS appliance by entering commands using the CLI. - Page 18 CPS Installer/User Guide...
-
Page 19: Chapter 2: Installation And Configuration
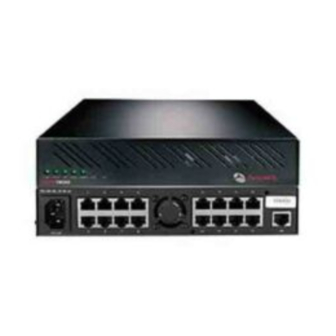
CHAPTER Installation and Configuration Hardware Overview Figure 2.1 shows the front panel of a 16-port CPS network appliance. Figure 2.1: 16-port CPS Appliance Front Panel The lower left area of the front panel contains five LEDs and two buttons, which are described in Table 2.1. -
Page 20: Installing The Cps Network Appliance
Check that the POWER LED is illuminated. If not, check the power cable to ensure that it is inserted snugly into the back of the unit. The ONLINE LED will illuminate within one minute to indicate that the self-test is complete. If the ONLINE LED blinks, contact Avocent Technical Support for assistance. -
Page 21: Configuring The Cps Appliance
WARNING: The CPS appliance and all attached devices should be powered down before servicing the unit. Always disconnect the power cord from the wall outlet. Configuring the CPS Appliance To configure the CPS network appliance, you must specify a unique IP address, plus other network address information. - Page 22 CPS Installer/User Guide Reply from 192.168.0.5: bytes=32 time<10ms TTL=128 Reply from 192.168.0.5: bytes=32 time<10ms TTL=128 Reply from 192.168.0.5: bytes=32 time<10ms TTL=128 Reply from 192.168.0.5: bytes=32 time<10ms TTL=128 If the CPS appliance did not successfully obtain its IP address with the BootP protocol, you will see a display similar to the following.
-
Page 23: Initial Cps Appliance Login
CPS network appliance, you are prompted for a username. To log in to the CPS appliance for the first time: At the Username prompt, type user. At the Password prompt, press Avocent CPS16xx S/W Version x.x (ASCII) Username: Admin Password: Authentication Complete CPS configuration is required. -
Page 24: Reinitializing The Cps Network Appliance
CPS Installer/User Guide Enter CPS New Admin Password > ***** Confirm New Admin Password > ***** After you have provided the required configuration information, a confirmation message appears while the CPS appliance stores the values in its configuration database. You have now completed the initial login, and you may enter additional commands at the CLI prompt (>). -
Page 25: Chapter 3: Operations
CHAPTER Operations Overview The CPS serial over IP network appliance and its ports are easily configured and managed to meet your requirements for device connection, user authentication, access control, power status monitoring, port history information display and Simple Network Management Protocol (SNMP) compliance for use with third party network management products. - Page 26 CPS Installer/User Guide Table 3.1: Default Port Settings (Continued) Parameter Power Most of these settings are standard serial port operating characteristics. The CLI access character parameter specifies how you access the CLI. For more information, see Telnet CLI mode on page 20. The Power parameter instructs the CCM appliance to monitor the state of a specified control signal.
-
Page 27: Connecting To Serial Devices
You may connect using either SSH or plain text. DSView management software The Avocent DSView management software offers an interface to access devices attached to Avocent digital Keyboard, Video and Mouse (KVM) appliances and CPS network appliances. The Telnet client built into the DSView software uses Windows server-based authentication and authentication servers to control access. -
Page 28: Connecting To Devices From The Serial Cli Port
CPS Installer/User Guide Authentication Complete Connected to Port: ... If the authentication method is configured as None, you may Telnet and connect to a serial device without entering credentials; however, credentials are always required when connecting to the CPS CLI. Data entered at the Telnet client is written to the attached serial device. -
Page 29: Configuring And Using Dial-In Connections
Issue a Connect command to the desired port. CONNECT <port> To end a device session that was initiated with a Connect command, issue a Disconnect command. DISCONNECT For more information, see Server CLI command on page 51, Connect Command on page 43 and Disconnect Command on page 43. -
Page 30: Connecting To Devices Using Ssh
CPS Installer/User Guide The PPP dial-in may be used to access a remote CPS appliance that does not warrant a WAN (Wide Area Network) link to the Ethernet interface. In this case, the PPP connection allows a remote PC with Telnet capability to dial the CPS appliance and then establish a Telnet connection to a port. The PPP dial-in may also be used to access a subnet containing remote CPS devices in the event of a WAN link failure. - Page 31 Telnet access on port 3007, then port 3107 will be a direct SSH connection for port 7. When SSH is enabled, Telnet port 23 connections will be accepted from other clients if the Server Security command includes the Encrypt=SSH,None parameter, which indicates that both SSH and plain text connections will be allowed.
- Page 32 CPS Installer/User Guide Table 3.2: SSH Authentication Methods (Continued) Method PW|KEY or KEY|PW PW&KEY or KEY&PW A user’s access rights are determined from the authentication method used. SSH key authentication always uses the access rights from the local user database. Depending on the server authentication method specified with the Server Security command, SSH password authentication will use either the access rights from the local user database, the DSView software server or the values returned by the RADIUS server.
-
Page 33: Enabling Plain Text Telnet And Ssh Connections
and the FTP connection will be closed. The CPS appliance then stores the SSH key with the username in the CPS user database. • When using the KEY keyword to specify the SSH key, the KEY parameter specifies the actual uuencoded SSH key. -
Page 34: Telnet Cli Mode
CPS Installer/User Guide If you enable SSH connections using the Server Security command with the Encrypt=SSH parameter, plain text Telnet connections will be disabled. However, if you enable SSH connections with the Server SSH command, both plain text and SSH connections will be allowed. To enable both Telnet and SSH connections: Issue a Server Security command, indicating Encrypt=SSH,None. -
Page 35: Session Time-Out
If you initiated the device session with a Connect command, enter CLI mode and issue a Disconnect command. DISCONNECT - or - Allow the port to time-out due to inactivity. In this case, a notification message is issued and the serial CLI session returns to CLI mode. -
Page 36: Managing User Accounts
CPS Installer/User Guide A server-level preemption level may also be configured with the Server CLI command. This value is used when authentication is disabled on the serial CLI port and a user on that port attempts to connect to another port that is already in use. For example, assume authentication has been disabled on the serial CLI port. -
Page 37: Access Rights And Levels
For more information, see Connecting to devices using SSH on page 16, Access rights and levels on page 23 and User Set command on page 72. To delete a user: Issue a User Delete command. USER DELETE <username> If the specified user is currently logged in, a message is sent to the user indicating that access is no longer permitted, and the user’s Telnet session is terminated. -
Page 38: Using Authentication Methods
CPS Installer/User Guide Table 3.3: Access Rights (Continued) Access Right Description The Port access right gives a user access to one or more serial ports and the attached serial devices. You may grant Port access rights to specific ports (Pn), a range of ports (Px-y) or all ports (PALL). -
Page 39: Radius Authentication
• Secure indicates authentication will be locked to one DSView software server after a successful initial access, and DSView software server and appliance credentials will be stored on the CPS appliance. • Trustall indicates that any DSView software server may be used for authentication, and DSView software server credentials will not be stored or validated on the CPS appliance. -
Page 40: Authentication Of Serial Cli Port Sessions
CPS Installer/User Guide Authentication of serial CLI port sessions Using the Server CLI command, you may enable or disable user authentication at the serial CLI port. You may also configure a preemption level that will be used by a serial CLI port user when user authentication is disabled on that port. -
Page 41: Using Security Lock-Out
You must specify the server’s IP address, the UDP port to be used and a “secret” to be used. You must also specify a user-rights attribute value that matches a value in the RADIUS server’s dictionary. You may also use this command to delete a RADIUS server definition. SERVER RADIUS PRIMARY|SECONDARY DELETE For more information, see Server RADIUS command on page 55. -
Page 42: Managing The Port History Buffer
CPS Installer/User Guide configure a lock-out period of from 1-99 hours. Specifying a lock-out period of 0 disables the feature; that is, users will not be locked-out. A locked-out user will remain locked-out until the specified time elapses, the CPS appliance is power-cycled or the user is unlocked by an administrator with the User Unlock command. - Page 43 Table 3.4: Port History Mode Commands (Continued) Command Description P decrements the current history display line by the number of lines per page and outputs a Prev new history display page. Quit Q returns to the normal CLI. R leaves port history mode and CLI mode and resumes the session with the attached serial Resume device.
-
Page 44: Managing The Cps Appliance Using Snmp
CPS Installer/User Guide • If Auto is specified, the number of bytes in the history buffer is displayed and the entire con- tent of the buffer is output to the Telnet session. In this mode, the history buffer’s content may be reviewed in the Telnet client’s scrolling window. - Page 45 For more information, see Server SNMP command on page 58. To specify SNMP community names: Issue a Server SNMP Community command, using the Readcomm, Writecomm and Trapcomm parameters to specify community names. NOTE: The default community names are “public”; if you enable SNMP, you are encouraged to change the community values to prevent access to the MIB.
- Page 46 CPS Installer/User Guide To disable SNMP traps, issue a Server SNMP Trap command with the Disable parameter. SERVER SNMP TRAP DISABLE The CPS appliance will display a numbered list of traps that are currently enabled with a prompt requesting you to select trap(s) to disable. Indicate the traps to be disabled by entering a trap’s list number, several numbers separated by commas, a range of numbers separated by a dash or a combination of numbers with commas and dashes.
- Page 47 PORT <to_port> ALERT COPY <from_port> At the confirmation prompt, press occurs, all previously defined strings on the port being copied to will be replaced. For more information, see Port Alert Add command on page 45, Port Alert Copy command on page 45 and Port Alert Delete command on page 46.
- Page 48 CPS Installer/User Guide...
-
Page 49: Chapter 4: Using Cps Appliance Commands
CHAPTER Using CPS Appliance Commands Accessing the CLI You may access the CLI in three ways: using the Telnet CLI, using the serial CLI or entering the CLI access character during a session to a serial device. When the CLI is accessed, its prompt appears (>), indicating you may type a command. -
Page 50: When Commands Take Effect
CPS Installer/User Guide Table 4.2 lists the line editing operations for ASCII TTY devices. There is no command line buffer available on an ASCII TTY device. Table 4.2: Line Editing Operations for ASCII TTY Devices Operation Backspace When commands take effect Each command is completely processed before the next command may be entered. - Page 51 Table 4.3: Command Syntax Types in Example Command (Continued) Value Syntax XONXOF Keyword value. Not every command will contain all syntax types. For example, the following command reboots the CPS appliance. >SERVER REBOOT In this case, both SERVER and REBOOT are positional commands. In most cases, one or more spaces separate positional commands, positional parameters and keyword parameters.
-
Page 52: Syntax Conventions
CPS Installer/User Guide > POR 2 SET BAUD=576 FLOW=XON ERR 27 - SET keyword value invalid In the following example, there are spaces between BAUD, the equal sign and the value 57600. Spaces are not permitted between keyword parameters and their values. >... - Page 53 Table 4.4: CPS Appliance Command Summary (Continued) Command Description, Access Right and Access Level Copies a port’s alert strings to another port. Port Alert Copy Access right: SCON or PCON Access level: ADMIN or APPLIANCEADMIN Deletes one or more port alert strings. Port Alert Delete Access right: SCON or PCON Access level: ADMIN or APPLIANCEADMIN...
- Page 54 CPS Installer/User Guide Table 4.4: CPS Appliance Command Summary (Continued) Command Server RADIUS Server Reboot Server Security Server Set Server SNMP Server SNMP Community Server SNMP Manager Server SNMP Trap Server SNMP Trap Destination Server SSH Show Port Show Port Alert Description, Access Right and Access Level Specifies RADIUS server parameters.
- Page 55 Table 4.4: CPS Appliance Command Summary (Continued) Command Description, Access Right and Access Level Displays CPS appliance configuration, statistics and session information. Show Server Access right: SMON Access level: ADMIN or APPLIANCEADMIN Displays information specified with the Server CLI command. Show Server CLI Access right: SMON Access level: ADMIN or APPLIANCEADMIN...
- Page 56 CPS Installer/User Guide Table 4.4: CPS Appliance Command Summary (Continued) Command User Unlock Description, Access Right and Access Level Unlocks a locked-out user. Access right: USER Access level: ADMIN or APPLIANCEADMIN (An ADMIN level user may issue this command for users with any level other than APPLIANCEADMIN.)
-
Page 57: Chapter 5: Cps Appliance Commands
Connect command. This command frees the attached serial device and allows other users to access it. Access right: port-specific Access level: ADMIN, APPLIANCEADMIN or others with access to port Syntax DISCONNECT Description Port number in the range 1-8 for a CPS810 appliance or 1-16 for a CPS1610 appliance. -
Page 58: Help Command
CPS Installer/User Guide Help Command The Help command displays information about CPS appliance commands. Access right: none needed Access level: none needed Syntax HELP [<command_name>] Table 5.2: Help Command Parameter Parameter <command_name> Examples The following command displays information about the Show Server CLI command. help sho ser cli The following command displays a list of all commands. -
Page 59: Port Alert Add Command
7. port 7 alert copy 1 Description Port number in the range 1-8 for a CPS810 appliance or 1-16 for a CPS1610 appliance. 3-32 character string. If the string contains embedded spaces, it must be enclosed in quotes. -
Page 60: Port Alert Delete Command
For more information, see Managing the Port History Buffer on page 28. to specify all strings. Pressing Description Port number in the range 1-8 for a CPS810 appliance or 1-16 for a CPS1610 appliance. cancels the command. Enter... -
Page 61: Port Logout Command
Access right: SCON or PCON Access level: ADMIN or APPLIANCEADMIN Syntax PORT [<port>|ALL] SET [TD=<device>] [NAME=<name>] [BAUD=<baud>] [SIZE=<size>] [PARITY=<parity>] Description Port number in the range 1-8 for a CPS810 appliance or 1-16 for a CPS1610 appliance. Chapter 5: CPS Appliance Commands... - Page 62 TIMEOUT=<time-out> Description A port number in range 1-8 for a CPS810 appliance or 1-16 for a CPS1610 appliance, a range of ports separated by a hyphen or multiple port numbers separated by commas, or All which indicates that the settings that follow should be applied to all ports.
-
Page 63: Port Set In/Out Command
Table 5.8: Port Set Command Parameters (Continued) Parameter SOCKET=<socket> CHAR=^<cli_char> TOGGLE=NONE|DTR POWER=<signal> Example The following command sets a baud rate of 57600 and enables XON/XOFF flow control on port 2. > port 2 set baud=57600 flow=xonxof Port Set In/Out command The Port Set In/Out command specifies how carriage returns (CR) and linefeeds (LF) are treated in incoming or outgoing serial data on one or all ports. -
Page 64: Quit Command
Access right: none needed Access level: all Description Either a port number in range 1-8 for a CPS810 appliance or 1-16 for a CPS1610 appliance, or All which indicates that the settings that follow should be applied to all ports. -
Page 65: Server Commands
Syntax RESUME Server Commands The Server command has several forms, as listed in Table 5.10. Table 5.10: Server Command Summary Command Server CLI Server FLASH Server Ping Server PPP Server RADIUS Server Reboot Server Security Server Set Server SNMP Server SNMP Community Server SNMP Manager Server SNMP Trap Server SNMP Trap Destination Defines/deletes destinations for enabled SNMP traps. - Page 66 CLEAR|KEEP Description CLI port number in the range 1-8 for a CPS810 appliance or 1-16 for a CPS1610 appliance. Default = 1 Terminal type to be used on the CLI port. The entire name of the type must be specified; abbreviations are not permitted. Valid types are: ASCII, VT52, VT100, VT102, VT220, VT320 and OFF.
-
Page 67: Server Flash Command
(cps10bt.img) contains the CPS startup and self-test logic. The application image (cps10app.img) contains the program that provides CPS functionality. You will need a TFTP server. Download the latest FLASH image from Avocent. Save the image file to the appropriate directory on the TFTP server. -
Page 68: Server Ping Command
CPS Installer/User Guide Table 5.12: Server FLASH Command Parameters (Continued) Parameter IMAGE=<host_file> Example The following command updates the boot image program using the image file name c:\winnt\system32\drivers\cps10bt.img, which is located on the TFTP server host located at 192.168.1.16. > ser fla app hostip=192.168.1.16 c:\winnt\system32\drivers\ima=cps10bt.img Server Ping command The Server Ping command enables or disables response to ping requests. -
Page 69: Server Radius Command
Syntax SERVER PPP DISABLE|ENABLE LOCALIP=<local_ip>] [REMOTEIP=<rem_ip>] [MASK=<subnet>] Table 5.14: Server PPP Command Parameters Parameter DISABLE|ENABLE LOCALIP=<local_ip> REMOTEIP=<rem_ip> MASK=<subnet> Examples The following command enables the PPP server with a local IP address of 192.168.0.1, a remote IP address of 192.168.0.2 and a subnet mask of 255.255.255.0. >... -
Page 70: Server Reboot Command
CPS Installer/User Guide Table 5.15: Server RADIUS Command Parameters Parameter PRIMARY| SECONDARY IP=<radius_ip> SECRET=<secret> USER-RIGHTS=<attr> AUTHPORT=<udp> TIMEOUT=<time-out> RETRIES = <retry> DELETE Examples The following command specifies primary RADIUS server information; default values will be used for the UDP port, time-out and retries values. >... -
Page 71: Server Security Command
Server Security command The Server Security command specifies the authentication method, enables/disables access methods and enables/disables security lock-out. For more information, see Using Authentication Methods on page 24, Enabling plain text Telnet and SSH connections on page 19 and Using security lock-out on page 27. -
Page 72: Server Snmp Command
CPS Installer/User Guide Access right: SCON Access level: APPLIANCEADMIN Syntax SERVER SET [IP=<ip_address>] Table 5.17: Server Set Command Parameters Parameter IP=<ip_address> MASK=<subnet> GATEWAY=<gtwy> Server SNMP command The Server SNMP command enables or disables SNMP UDP port 161 SNMP processing. When you disable SNMP processing, you may still enable and disable traps with the Server SNMP Trap command. -
Page 73: Server Snmp Manager Command
Syntax SERVER SNMP COMMUNITY [READCOMM=<name>] [WRITECOMM=<name>] [TRAPCOMM=<name>] Table 5.19: Server SNMP Community Command Parameters Parameter READCOMM= name < > WRITECOMM name =< > TRAPCOMM= name < > Server SNMP Manager command The Server SNMP Manager command defines or deletes SNMP management entities. You may define up to four management entities. -
Page 74: Server Snmp Trap Destination Command
CPS Installer/User Guide You may indicate the traps to be enabled/disabled by entering a single number, several numbers separated by commas, a range of numbers separated by a dash or a combinations of numbers separated by commas and dashes. You may also type , which cancels the operation. -
Page 75: Server Ssh Command
Syntax SERVER SNMP TRAP DESTINATION ADD|DELETE <ip_address> Table 5.22: Server SNMP Trap Destination Command Parameters Parameter ADD|DELETE <ip_address> Server SSH command The Server SSH command enables or disables SSH session access to the CPS appliance and specifies the SSH authentication method. When you enable SSH, all CPS sessions will be terminated if a CPS SSH server key must be generated. -
Page 76: Show Commands
Displays user configuration and session information. Description Either a port number in the range 1-8 for a CPS810 appliance or 1-16 for a CPS1610 appliance, ALL to display information about all ports or NAMES to display only port names. Default = your port... - Page 77 Table 5.26 and Table 5.27 list the display fields for a Show Port command that specifies one or all ports. Table 5.26: Show Port Command Display Fields for Console Ports Field Content Port Port number. Comma-separated string of port values: baud rate, number of bits, parity, stop bits, flow control, socket number, time-out value and CLI access character (from Port Set Serial Port Settings command).
-
Page 78: Show Port Alert Command
Wakeup state for socket (from SPC command). Minimum On time (from SPC command). Minimum Off time (from SPC command). Description Port number in the range 1-8 for a CPS810 appliance or 1-16 for a CPS1610 appliance. Content IP address (from initial configuration or Server Set command). -
Page 79: Show Server Cli Command
Table 5.29: Show Server Command Display Fields (Continued) Field Mask Gateway Up Time Port Username Duration Socket From Socket IP Input and Output BOOT Show Server CLI command The Show Server CLI command displays the serial CLI settings. Access right: SMON Access level: ADMIN or APPLIANCEADMIN Syntax SHOW SERVER CLI... -
Page 80: Show Server Ppp Command
CPS Installer/User Guide Table 5.30: Show Server CLI Command Display Fields (Continued) Field Connect Modeminit string Server CLI Timeout Local authentication Local preemption level Show Server PPP command The Show Server PPP command displays the current PPP settings that were configured with the Server PPP command. -
Page 81: Show Server Snmp Command
Table 5.31: Show Server Security Command Display Fields Field Authentication Encryption Lockout DS Server IP #0 DS Server IP #1 DS Server IP #2 DS Server IP #3 Preauth Certs Fingerprint (Hex) Fingerprint (BB) Ping Reply Show Server SNMP command The Show Server SNMP command displays SNMP configuration information. - Page 82 CPS Installer/User Guide Table 5.32: Show User Command Parameter Parameter <username>|ALL The Show User command display for one user includes the information in the following table. Table 5.33: Show User Command Display Fields Field User Level Access Locked Last Login Port Username Duration...
-
Page 83: Spc Command
Otherwise, USER level is assigned. User’s access rights and preemption level. Description Port number in range 1-8 for a CPS810 appliance or 1-16 for a CPS1610 appliance. Indicates that the settings that follow should be applied to all ports configured as SPC. -
Page 84: User Commands
CPS Installer/User Guide Table 5.35: SPC Command Parameters (Continued) Parameter ONMIN=<time> OFFMIN=<time> User Commands The User command has several forms, as listed in Table 5.36. Table 5.36: User Command Summary Command User Add User Delete User Logout User Set User Unlock User Add command The User Add command adds a new user to the CPS user database. - Page 85 Table 5.37: User Add Command Parameter Description <username> 3-16 alphanumeric character username. Usernames are case sensitive. PASSWORD=<pwd> 3-16 alphanumeric character password. Passwords are case sensitive. Name of uuencoded public key file on an FTP server. The maximum file size that SSHKEY=<keyfile>...
-
Page 86: User Delete Command
CPS Installer/User Guide User Delete command The User Delete command removes a username entry from the CPS user database. The username may no longer be used to authenticate a session with the CPS appliance. If the specified user is currently logged in, a message is output to the user, indicating that access is no longer permitted, and the Telnet session is terminated. - Page 87 Syntax USER SET <username> [PASSWORD=<pwd>] [SSHKEY=<keyfile>] [FTPIP=<ftpadd>] [KEY=<sshkey>] [ACCESS=<access>] [PREEMPT=1|2|3|4] Table 5.40: User Set Command Parameters Parameter Description <username> Username. New 3-16 alphanumeric character password. Passwords are case sensitive. This parameter is required when changing another user’s password. The password is PASSWORD=<pwd>...
-
Page 88: User Unlock Command
CPS Installer/User Guide Examples The following command sets the access rights for JohnDoe, enabling access to all ports with configuration and monitoring access rights and specifying a preemption level of three. >user set JohnDoe access=pall,scon,smon pre=3 The following command removes the server configuration access right for JohnDoe, and leaves other access rights intact. -
Page 89: Appendices
RJ-45 4.45 x 22.23 x 20.32 cm 1U form factor (1.75 x 8.75 x 8.00 in) 5 lbs (2.3 kg) without cables 75 BTU/hr (CPS810 appliance); 102 BTU/hr (CPS1610 appliance) 2.5 cfm 22 W (CPS810 appliance); 30 W (CPS1610 appliance) - Page 90 CPS Installer/User Guide Table A.1: CPS 810/1610 Appliance Technical Specifications (Continued) Item Temperature Humidity Safety and EMC Standards Value to 40 Celsius (32 to 104 Fahrenheit) operating to +65 Celsius (-4 to +149 Fahrenheit) nonoperating 10% to 90% noncondensing FCC P 15 Class A, EN55022, EN61000-3-2, EN61000-3-3, EN60950, EN55024, ETL (UL 1950), CSA 22.2 No.
-
Page 91: Appendix B: Device Cabling
Table B.1: Port Pin Assignments Pin Number NOTE: RI (Ring Indicate) is not supported Modular adaptors are available from Avocent to convert RJ-45 modular jacks to standard pinout configurations. Adaptors are available for use with: • CAT 5 cable. - Page 92 CPS Installer/User Guide Table B.2: Adaptors for Use with CAT 5 Cable (Continued) Part Number 210127 750238 Figure B.1 shows the pin assignments for the adaptors listed in Table B.2. RJ-45 8 pin 210120 RJ-45 8 pin 210122 Figure B.1: CAT 5 Cable Adaptor Pin Assignments Description RJ-45 to RJ-45 Male Adaptor for Cisco and Sun Netra console port CAT 5 Serial Starter Kit - includes all the above adaptors...
-
Page 93: Reversing Adaptors And Cables
Reversing Adaptors and Cables Table B.3 lists the reversing adaptors and reversing cables available from Avocent. Table B.3: Reversing Adaptors and Cables Part Number 210094 210095 210090 210092 210091 210093 210105 690226 690227 690228 750122 Figure B.2 shows the pin assignments for the adaptors listed in Table B.3. - Page 94 210094 RJ-45 8 pin 210095 Figure B.2: Reversing Cable Adaptor Pin Assignments If you choose to use a non-Avocent reversing cable, make sure the cable is reversing, as shown in Figure B.3. Reversing Cable Adaptors RJ-45 8 pin DB-9 DTE...
- Page 95 8-WIRE CPS Port Figure B.3: 8-wire RJ-45 Reversing Cable Modular Adaptor Appendices...
-
Page 96: Appendix C: Supported Traps
The CPS appliance supports the following MIB2 traps: • authenticationFailure • linkUp • linkDown • coldStart Table C.1 lists the supported enterprise traps. The Avocent web site, www.avocent.com, contains the complete trap MIB. Table C.1: CPS Appliance Enterprise Traps Trap rebootStarted userLogin userLogout serialSessionStarted serialSessionStopped... - Page 97 Table C.1: CPS Appliance Enterprise Traps (Continued) Trap Description and Variable(s) userAuthentication A user failed to authenticate with the CPS appliance. Failure Variable: username. The CPS appliance has received a command to set itself to factory default values. factoryDefaultsSet (The appliance sends this trap after receiving the command, but before actually reverting to factory default values.) The CPS appliance detected a port alert string on a serial port.
- Page 98 CPS Installer/User Guide Table C.1: CPS Appliance Enterprise Traps (Continued) Trap SPCSocketReboot Command SPCSocketOnSense Failure SPCSocketOffSense Failure SPCTotalLoadHigh SPCTotalLoadLow SPCSocketStatusOn SPCSocketStatusOff userLocked userUnlocked aggregatedServer StatusChg Description and Variable(s) The Reboot command was issued to an SPC socket. Variables: command issued by username, server name, SPC location name, CPS appliance port number and SPC socket number.
-
Page 99: Appendix D: Ports Used
Appendix D: Ports Used Table D.1 lists the UDP and TCP port numbers used by the CPS appliance. The values assume a default configuration; some values are configurable. Table D.1: Ports Used by CPS Appliance Port Type and Number TCP 22 TCP 23 UDP 161 TCP 3211... -
Page 100: Appendix E: Technical Support
Appendix E: Technical Support Our Technical Support staff is ready to assist you with any installation or operating problems you encounter with your Avocent product. If an issue should develop, follow the steps below for the fastest possible service: Check the pertinent section of the manual to see if the issue can be resolved by following the procedures outlined. - Page 101 INDE X Access rights and levels about 23 changing 24 configuring 24 displaying 24 Adaptors 77 Authentication configuring 26, 57 displaying configuration information 27, 66 summary 26 types 24 using DSView software 24, 57 See also RADIUS BootP 7 Buttons 5 Cabling 77 accessing 35 changing the access character 20, 47, 51...
- Page 102 CPS Installer/User Guide Show Server 64 Show Server CLI 65 Show Server PPP 66 Show Server RADIUS 66 Show Server Security 66 Show Server SNMP 67 Show User 67 SPC 69 summary 38 syntax 36 User Add 70 User command summary 70 User Delete 72 User Logout 72 User Set 72...
- Page 103 displaying configuration information 65 Initial login 9 Installation configuring addresses 7 hardware 6 IP address changing 57 configuring 7 displaying 64 LEDs 5 Line editing operations ASCII TTY devices 36 VT100 compatible devices 35 Lock-out. See Security lock-out Login 9 Logout 47, 72 Modem.
- Page 104 CPS Installer/User Guide Server Reboot command 56 Server Security command 57 Server Set command 57 Server SNMP command 58 Server SNMP Community command 58 Server SNMP Manager command 59 Server SNMP Trap command 59 Server SNMP Trap Destination command 60 Server SSH command 61 Session ending 20, 47, 50, 72...
- Page 105 access rights and levels 23 adding 22, 70 changing 22, 72 deleting 23, 72 displaying 23, 67 User Add command 70 User command summary 70 User Delete command 72 User Logout command 72 User Set command 72 User Unlock command 74 Index...
- Page 106 CPS Installer/User Guide...
- Page 107 Avocent Corporation warrants to the original retail purchaser that this product is and will be free from defects in materials and workmanship for a period of 24 months from the date of purchase. Additionally, all Avocent products carry an unconditional thirty-day satisfaction guarantee. If, for any reason, you are dissatisfied with the performance of this product, you may return it to the point of purchase for a refund of the purchase price (excluding shipping charges).
- Page 108 L4B 1E4 Canada Tel: +1 877 992 9239 Fax: +1 877 524 2985 590-187-001H Avocent International Ltd. Avocent House, Shannon Free Zone Shannon, County Clare, Ireland Tel: +353 61 715 292 Fax: +353 61 471 871 Avocent Germany Gottlieb-Daimler-Straße 2-4...
Need help?
Do you have a question about the CPS1610 and is the answer not in the manual?
Questions and answers