Table of Contents
Advertisement
Quick Links
Advertisement
Table of Contents

Related Manuals for Progear Fitness 3001


Summary of Contents for Progear Fitness 3001
- Page 1 Manu ual Tr readm mill IMPORT TANT: Rea ad all instr ructions c carefully b before usin ng this pro oduct. Retain t this owner r’s manua al for futur re referenc The spec cifications o of this prod duct may v vary from t this photo a and, subjec...
- Page 2 3001.5‐102715 ...
-
Page 3: Table Of Contents
TABLE OF CONTENTS SERVICE ------------------------------------------------------------------------ 2 LABEL PLACEMENT --------------------------------------------------------- 3 PRODUCT SAFETY ---------------------------------------------------------- 4 OVERVIEW DRAWING ------------------------------------------------------ 6 HARDWARE LIST & TOOL ------------------------------------------------- 7 PARTS LIST --------------------------------------------------------------------- 8 ASSEMBLY --------------------------------------------------------------------- 9 COMPUTER -------------------------------------------------------------------- 12 STORAGE ----------------------------------------------------------------------- 14 ADJUSTMENT ------------------------------------------------------------------15 LUBRICATION------------------------------------------------------------------- 18 TROUBLESHOOTING -------------------------------------------------------- 19 WARM UP ----------------------------------------------------------------------- 20 WARRANTY -------------------------------------------------------------------- 21 FAX FORM ---------------------------------------------------------------------- 22... -
Page 4: Service
SERVICE IMPORTANT: FOR NORTH AMERICA ONLY To request product service and order replacement parts, please call our customer service department at: 1-844-641-7920 Daily, 8:00 AM-5:00 PM Pacific Standard Time, service@paradigmhw.com or email us at: Please visit our website at www.paradigmhw.com. Please have the following information ready when requesting for service: Your name Phone number... -
Page 5: Label Placement
LABEL PLACEMENT... -
Page 6: Product Safety
PRODUCT SAFETY Basic precautions should always be followed, including the following safety instructions when using this treadmill. Read all instructions before using this treadmill. DANGER: To reduce the risk of electric shock, please read the following: Always unplug the treadmill from the electrical outlet immediately after using and before cleaning, assembling, or servicing. - Page 7 PRODUCT SAFETY Keep the treadmill on a solid, level surface with the minimum safety area clearance of 6ft x 3ft around the treadmill. Be sure the area around the treadmill remains clear during use and has adequate clearance. This treadmill is for household use only. ...
-
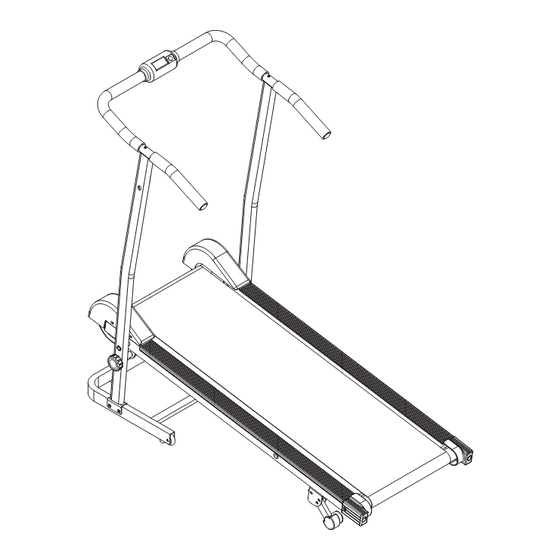
Page 8: Overview Drawing
OVERVIEW DRAWING... -
Page 9: Hardware List & Tool
HARDWARE LIST & TOOLS (#35) Flat washer (#30) Carriage bolt (#38) Nylon nut M8 Φ8.5*Φ20*1.5 M8*35 4 PCS 4 PCS 4 PCS (#37) Curve washer (#25) Allen bolt (#34) Flat washer Φ6.5*Φ15*1.5 M10*60 Φ10.5*Φ22*1.5 2 PCS 2 PCS 2 PCS (#28) Allen bolt S5 Allen Wrench M6*15 1 PCS... -
Page 10: Parts List
PARTS LIST Description Qty No. Description 001 Main frame 1 026 Allen bolt M8*30 002 Left upright handle bar 1 027 Allen bolt M8*35 003 Right upright handle bar 1 028 Allen bolt M6*15 004 Base tube 1 029 Allen bolt M6*60 005 Computer frame 1 030 Carriage bolt M8*35 006 Rear base tube... -
Page 11: Assembly
ASSEMBLY Tool: Multi Hex Tool with Phillips Screwdriver Step 1 Inserting the left handlebar frame (02) to the left side of the base bracket (04) , Through the holes with two M8 carriage bolt (30)and two M8 Washers (35) , then secure the bolts with 8mm nylon nut (38) with 8 mm open end wrench . - Page 12 ASSEMBLY Tool: Multi Hex Tool with Phillips Screwdriver S5 Allen Wrench Step 2 Lift the main frame (01) and insert & secure with bolt (25) and flat washer (34) through the holes of the left/right handlebar frame (02, 03). Note: After attach the main frame (01) to the handlebar frame (02, 03), fully tighten the bolt (25), wait until complete Step 3, then tighten all bolts completely to make sure the main frame is secure attach to handlebar frame.
- Page 13 ASSEMBLY Tool: S5 Allen Wrench Step 3 Connect Sensor wire (49) and (50), insert the computer frame (05) onto the left/right handlebar frame (02, 03) and secure with bolt (28) and curve washer (37). Put the Locking knob (16) through the left handlebar frame to secure the main frame (01).
- Page 14 OMPUT Pleas se load 2p pcs of 1.5V V “AAA” bat tteries befo ore operati ing the con nsole. Squ eezing the top & & bottom si ide of the f front cover r of the con nsole on th he marked area until the back...
-
Page 15: Computer
COMPUTER SCAN : Display changes according to the next diagram every 4 seconds. Automatically display of the following functions in the order shown: TIME---SPEED---DISTANCE---CALORIE---ODOMETER---SCAN NOTE: 1. Without any signal coming in 4-5 minutes, the LCD display will be shut off automatically. -
Page 16: Storage
STORAGE FOLDING UP THE TREADMILL To fold up the treadmill, place one hand on the back end of the treadmill and the other hand to turn the locking knob (16) out of the left handlebar frame . Carefully lift the end of the treadmill up into the upright position. Insert the locking knob (16) through the handlebar hole into the side of the bed &... -
Page 17: Adjustment
USTME nning Bed d Incline Adjustme 1. P Place one h hand on th e rear end d of the Ma ain Frame, and then l ift the rear r end of th he Main Fr rame up an nd use the other han d to remov ve the Lock... - Page 18 USTME justing t the Run ning Be Tool: S5 Alle en Wrenc 1. T The running g belt is ini tially set a nd adjuste ed at the fa ctory. Ho owever it m come e loose du ring transp portation an nd/or durin ng use.
- Page 19 ADJUSTMENTS Then try running on the center of the running belt again. If the running belt is still shifting away from center, turn the same Allen Bolt (29) another 1/4 turn in the clockwise direction. You should see the belt start to correct itself by moving back toward the center.
-
Page 20: Lubrication
BRICATI e treadmill has alread dy been sp pread with "Silicone O Oil" in adva ance before leav ving the ma anufacturin ng plant. Silicone o oil is withou ut volatility and has grad dually perm meated thr rough the r running be ere will be n no need to... -
Page 21: Troubleshooting
TROUBLE SHOOTING TROUBLE SHOOTING PROBLEM: Treadmill running belt slips or is not centered on rear roller. SOLUTION: Refer to “Adjusting the Running Belt” section on page 18. PROBLEM: Computer not working correctly SOLUTION: Check to make sure the computer wires are connected securely. -
Page 22: Warm Up
WARM U adriceps S Stretch With h one hand d against a a wall for b balance, re ach behind u and pull y your right fo oot up. B Bring your h heel as clo to y your buttoc cks as poss sible. -
Page 23: Warranty
WARRANTY MANUFACTURER’S LIMITED WARRANTY Paradigm Health & Wellness warrants to the original purchaser that this product is free from defects in material and workmanship when used for the purpose intended, under the conditions that it has been installed and operated in accordance with Paradigm’s Owner’s Manual. -
Page 24: Fax Form
FAX FORM Paradigm Health & Wellness, Inc. PARTS REQUEST FAX FORM Please fax this form to (1-626-810-2166) OR YOU CAN EMAIL CUSTOMER SERVICE REQUESTS TO service@paradigmhw.com NAME: _______________________________________________________ ADDRESS: ____________________________________________________ CITY ______________ STATE ______________ ZIP ___________________ TELEPHONE: (Day) _____________________________________________ (Night) ____________________________________________ (Email Address) ____________________________________ SERIAL#: __________________________________________ MODEL#: __________________________________________...
Need help?
Do you have a question about the 3001 and is the answer not in the manual?
Questions and answers