Advertisement
Table of Contents
- 1 Checking SD Card for Secure Location
- 2 Installation
- 3 Data Cable Installation
- 4 Operation
- 5 Day & Time
- 6 Initial System Setting
- 7 Timed Programmes
- 8 PIN Protection of Program
- 9 Status Screen
- 10 Menu Screen
- 11 Dimensions
- 12 Compatibility with Ecosmart Fans
- 13 Safe Cleaning Mode
- Download this manual
Checking SD Card for secure location
Due to the possibility of movement during transit, we
recommend a check is undertaken to ensure that the SD
Card is located securely in its housing on the PCB before
Installation commences.
Step 1: Remove the bezel and detach PCB unit from back box.
Remove plastic cover on the back of the PCB unit casing to gain
access to PCB board and SD Card.
Bezel
Remove the plastic
cover on the back
of PCB/SD unit.
Step 3: Press SD Card using finger to secure SD Card
into housing to ensure that the hardware & software
is connected.
LINUX
TERMINAL
SD CARD
R121
C148
Nuaire: A Trading Division of Polypipe Limited Western Industrial Estate Caerphilly United Kingdom CF83 1NA
T: 029 2088 5911 F: 029 2088 7033 E: info@nuaire.co.uk W: www.nuaire.co.uk
ES-LCD User Control
SD Card Location
Addendum to Leaflet Number 671415
Back box.
Unit containing the PCB/SD card.
J5
This is necessary as the SD card on the PCB contains the
software for the controller and if movement of the SD card
has taken place in transit the controller will not function.
Follow the pictures below to locate the easily accessible SD
card.
Step 2: Locate the SD Card on PCB. Press SD Card using finger to
release from SD Card housing (as shown). Note: components are
fragile, do not use tools when adjusting SD Card.
LINUX
TERMINAL
SD CARD
R121
C148
Step 4: Refit the back plastic cover of the PCB unit and follow the
Installation and Maintenance instructions for full installation of the
control. In the event of a blue screen, please repeat Step 2 and 3.
1
The EMC Directive
2014/30/EU
The Low Voltage
directive
2014/35/EU
J5
Housing
containing
the SD card.
SD card.
11. 05. 17. Leaflet Number 671415
Advertisement
Table of Contents

Related Manuals for NuAire ES-LCD


Summary of Contents for NuAire ES-LCD
- Page 1 In the event of a blue screen, please repeat Step 2 and 3. LINUX TERMINAL SD CARD R121 C148 Nuaire: A Trading Division of Polypipe Limited Western Industrial Estate Caerphilly United Kingdom CF83 1NA T: 029 2088 5911 F: 029 2088 7033 E: info@nuaire.co.uk W: www.nuaire.co.uk 11. 05. 17. Leaflet Number 671415...
- Page 2 Front of unit Always physically check the suitability of the back box before fitting. Nuaire Limited Western Industrial Estate Caerphilly United Kingdom CF83 1NA T: 029 2088 5911 F: 029 2088 7033 E: info@nuaire.co.uk W: www.nuaire.co.uk 11. 05. 17. Leaflet Number 671415...
- Page 3 20 secs while the system loads the software. The ES-LCD operates via a set of menus. It can control the function of the fan by manual setting or using a set of timed programmes. The control will guide you through the initial set up routine via menus when the unit is initially switched on.
- Page 4 Installation and Operating Instructions ES-LCD User Control 3.3 Timed Programmes Here the temperature measurement of the ES-TEMP is used by the LCD to decide whether to bring on the ventilation, There are two custom programmes available (custom heating or cooling depending on the temperature measured at program A &...
- Page 5 Installation and Operating Instructions ES-LCD User Control The example below shows the fan will run at speed 8 The example below shows the fan will run at speed 5 between between 7:30am and 6pm every Monday to Friday inclusive. midnight and 6am every day if the temperature at the...
- Page 6 Installation and Operating Instructions ES-LCD User Control changes to the program. Just type in any four characters that you can easily remember and press ‘Enter’ to protect the programs. When PIN protected; the correct PIN must be entered before any changes can be made to the programs. If this facility is not needed then do not enter any characters;...
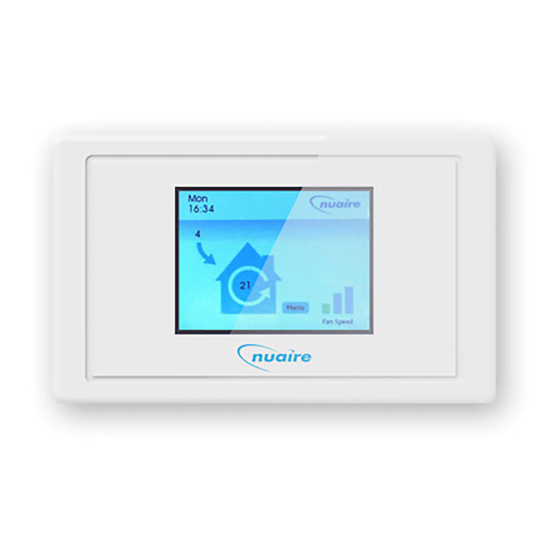
- Page 7 Installation and Operating Instructions ES-LCD User Control 3.5 Status Screen Function: this shows the current selected function of the fan system either selected manually or via the program. This is the default screen showing on the display during The options are: normal operation.
- Page 8 D = Recessed To check if the fan is suitable for upgrade, please contact mounting depth Nuaire with detail of the fan code and the serial number printed on the rating label. Unit Dimensions 145 85 Note: This unit contains a...
Need help?
Do you have a question about the ES-LCD and is the answer not in the manual?
Questions and answers