Table of Contents
Advertisement
Quick Links
Advertisement
Table of Contents

Related Manuals for ASROCK DeskMini GTX1060


Summary of Contents for ASROCK DeskMini GTX1060
- Page 2 Version 1.0 Published November 2017 This device complies with Part 15 of the FCC Rules. Operation is subject to the following two conditions: (1) this device may not cause harmful interference, and (2) this device must accept any interference received, including interference that may cause undesired operation.
- Page 3 AUSTRALIA ONLY Our goods come with guarantees that cannot be excluded under the Australian Consumer Law. You are entitled to a replacement or refund for a major failure and compensation for any other reasonably foreseeable loss or damage caused by our goods. You are also entitled to have the goods repaired or replaced if the goods fail to be of acceptable quality and the failure does not amount to a major failure.
-
Page 4: Table Of Contents
Contents Chapter 1 Introduction Package Contents Specifications Chapter 2 Product Overview Front View Rear View Motherboard Layout Chapter 3 Hardware Installation Begin Installation Installing the CPU Installing the CPU Fan and Heatsink Installing Memory Modules (SO-DIMM) Installing Mobile PCI Express Module (MXM) Installing the WiFi Module Installing the WiFi Antennas Installing the M.2 SSD... - Page 5 4.3.1 UEFI Menu Bar 4.3.2 Navigation Keys Main Screen OC Tweaker Screen Advanced Screen 4.6.1 CPU Configuration 4.6.2 Chipset Configuration 4.6.3 Storage Configuration 4.6.4 ACPI Configuration 4.6.5 USB Configuration Tools Hardware Health Event Monitoring Screen Security Screen 4.10 Boot Screen 4.11 Exit Screen...
-
Page 6: Chapter 1 Introduction
DeskMini GTX/RX (Z370) Series Chapter 1 Introduction Thank you for purchasing DeskMini GTX/RX (Z370) Series, a reliable gaming barebone system. Because the hardware specifications might be updated, the content of this documentation will be subject to change without notice. 1.1 Package Contents • DeskMini GTX/RX (Z370) Series Barebone System with: DeskMini GTX/RX (Z370) Series Chassis Motherboard (pre-installed) -
Page 7: Specifications
1.2 Specifications System Model • DeskMini GTX1060 • DeskMini GTX1070 • DeskMini GTX1080 Chassis • 1.92L (155 x 155 x 80mm) • Supports 8 Generation Intel® Core Processors (Socket 1151) • 3+1 Power Phase design • Supports Intel® Turbo Boost 2.0 Technology • Supports Intel®... - Page 8 • 2 x 4 Pin Fan Connectors • 1 x GPU Fan connector • 1 x RGB LED header • 1 x DC Power DIN Jack (4 Pin) Power • 270W/19V (for DeskMini GTX1080) Adapter 220W/19V (for DeskMini GTX1070 /DeskMini GTX1060) Operation • 0~35°C Temp.
- Page 9 Please realize that there is a certain risk involved with overclocking, including adjusting the setting in the BIOS, applying Untied Overclocking Technology, or using third-party overclocking tools. Overclocking may affect your system’s stability, or even cause damage to the components and devices of your system. It should be done at your own risk and expense. We are not responsible for possible damage caused by overclocking.
-
Page 10: Chapter 2 Product Overview
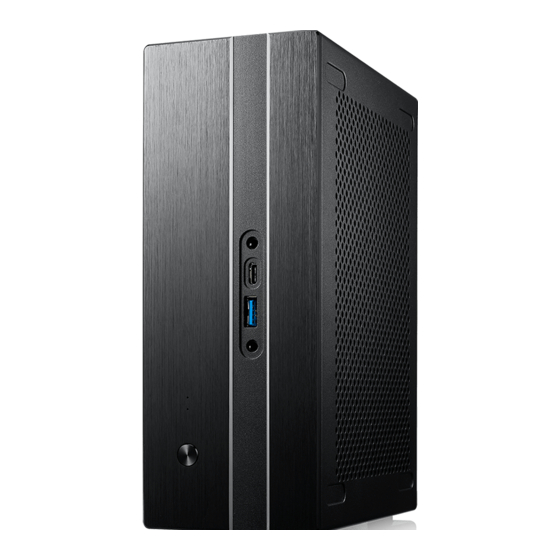
DeskMini GTX/RX (Z370) Series Chapter 2 Product Overview This chapter provides diagrams showing the location of important components of the Beebox series. 2.1 Front View Description HDD LED Power LED Power Button MIC-In USB 3.0 Type-A Port USB 3.0 Type-C Port Headphone/Headset... -
Page 11: Rear View
2.2 Rear View Description DC Power Din Jack LAN RJ-45 Port* HDMI Port USB 3.1 Gen1 Ports USB 3.1 Gen1 Ports HDMI Port Mini DisplayPort Kensington Lock Key Lock DisplayPort * There are two LEDs on the LAN port. Please refer to the table below for the LAN port LED indications. ACT/LINK LED SPEED LED LAN Port... -
Page 12: Motherboard Layout
DeskMini GTX/RX (Z370) Series 2.3 Motherboard Layout Top View CPU_FAN2 CPU_FAN1 DC Jack Mic In USB 3.0 USB_10 USB 3.0 T: USB6 B: USB7 USB 3.0 USB_1 CLRCMOS1 USB 3.0 T: USB8 B: USB9 Headphone / Headset BIOS USB_2_3 USB_4_5 Audio CODEC RoHS... -
Page 13: Bottom View
Bottom View Intel Chipset CLRCMOS2 CMOS Battery... - Page 14 DeskMini GTX/RX (Z370) Series No. Description CPU Fan Connector (CPU_FAN1) 2 x 260-pin DDR4 SO-DIMM Slots (DDR4_A1, DDR4_B1) CPU Fan Connector (CPU_FAN2) USB 2.0 Header (USB_2_3) USB 2.0 Header (USB_4_5) System Panel Header (PANEL1) 3W Audio AMP Output Wafer Header (SPEAKER1) RGB LED Header (RGB_LED1) Clear CMOS Pad (CLRCMOS1) 5-Pin GPU Fan Connector (GPU_FAN1)
-
Page 15: Onboard Headers And Connectors
Onboard Headers and Connectors Onboard headers and connectors are NOT jumpers. Do NOT place jumper caps over these headers and connectors. Placing jumper caps over the headers and connectors will cause permanent damage to the motherboard. System Panel Header Connect the power (9-pin PANEL1) button, reset button and RESET#... - Page 16 DeskMini GTX/RX (Z370) Series Serial ATA3 Connectors These two SATA3 (see p.8, No. 11 and 12) connectors support SATA data cables for internal storage devices with up to 6.0 Gb/s data transfer rate. *The SATA3 connectors support 2.5-inch hard drive (+5V) and do not Signal Name Signal Name support 3.5-inch hard...
- Page 17 GPU Fan Connector This motherboard FAN_SPEED_CONTROL (5-pin GPU_FAN1) provides a 5-Pin GPU fan FAN_SPEED FAN_VOLTAGE (see p.7, No. 10) connector for connecting your GPU fan. RGB LED Header The RGB header is used to (4-pin RGB_LED1) connect RGB LED extension 12V G R (see p.7, No.
-
Page 18: Chapter 3 Hardware Installation
DeskMini GTX/RX (Z370) Series Chapter 3 Hardware Installation 3.1 Begin Installation 1. Unscrew the four screws of the back panel. 2. Slide the the top cover outward and then lift it off the chassis. - Page 19 3. Unscrew the two screws in the chassis. 4. Pull out the motherboard tray.
- Page 20 DeskMini GTX/RX (Z370) Series How to install the Key Lock 1. Secure the Key Lock to the back panel. Key Lock 2. Complete.
-
Page 21: Installing The Cpu
3.2 Installing the CPU 1. Before you insert the 1151-Pin CPU into the socket, please check if the PnP cap is on the socket, if the CPU surface is unclean, or if there are any bent pins in the socket. Do not force to insert the CPU into the socket if above situation is found. - Page 22 DeskMini GTX/RX (Z370) Series Please save and replace the cover if the processor is removed. The cover must be placed if you wish to return the motherboard for after service.
-
Page 23: Installing The Cpu Fan And Heatsink
3.3 Installing the CPU Fan and Heatsink DeskMini GTX/RX (Z370) series supports both Intel CPU Box Fan (65W) and third- party CPU fan cooler. Please note that the DeskMini GTX/RX (Z370) series chassis has 52mm height limitation for the CPU fan cooler. -
Page 24: Installing Memory Modules (So-Dimm)
DeskMini GTX/RX (Z370) Series 3.4 Installing Memory Modules (SO-DIMM) This motherboard provides two 260-pin DDR4 (Double Data Rate 4) SO-DIMM slots. 1. DeskMini GTX/RX (Z370) series requires DDR4 SO-DIMM. 2. For dual channel configuration, you always need to install identical (the same brand, speed, size and chip-type) DDR4 SO-DIMM pairs. -
Page 25: Installing Mobile Pci Express Module (Mxm)
3.5 Installing Mobile PCI Express Module (MXM) This motherboard provides a Mobile PCI Express Module (MXM) Slot. Installing a Type A MXM Card (70mm) - Page 26 DeskMini GTX/RX (Z370) Series...
- Page 28 DeskMini GTX/RX (Z370) Series Installing a Type B MXM Card (105mm)
- Page 30 DeskMini GTX/RX (Z370) Series...
- Page 31 Installing a Type B+ MXM Card (105mm-113mm) 7.6mm 7.6mm *Before installing a Type B+ MXM card, please replace the 5mm standoffs with the 7.6mm standoffs.
- Page 32 DeskMini GTX/RX (Z370) Series...
- Page 34 DeskMini GTX/RX (Z370) Series...
-
Page 35: Installing The Wifi Module
3.6 Installing the WiFi Module 1. Prepare a type 2230 WiFi/BT module and the screw. 2. Align and gently insert the WiFi/BT module into the M.2 Socket (Key E) (M2_4). *Please be aware that the module only ts in one orientation. 3. -
Page 36: Installing The Wifi Antennas
DeskMini GTX/RX (Z370) Series 3.7 Installing the WiFi Antennas 1. Insert the Wi-Fi Antenna Connectors to the antenna ports on the rear panel of the DeskMini GTX/RX (Z370) Series. *Please make sure to align the at surface of Wi-Fi Antenna Connectors with the at side of holes when inserting the connectors. - Page 37 3. Insert the SMA Wi-Fi Antenna Cables to the designated hole on the drive mounting tray. Route the cables rightward as shown in the illustration below. 4. Make sure that the cable routing is organized as shown in the illustration below.
- Page 38 DeskMini GTX/RX (Z370) Series 5. Attach the SMA Wi-Fi Antenna Cables to the WiFi Module. 6. Connect the two WiFi 2.4/5 GHz Antennas to the antenna connectors. 7. Turn the antenna clockwise until it is securely connected. Set the WiFi 2.4/5 GHz Antenna at 90-degree angle.
-
Page 39: Installing The M.2 Ssd
3.8 Installing the M.2 SSD The following is an example of installing M.2_SSD (NGFF) module into the M2_2. 1. Prepare a M.2_SSD (NGFF) module and the screw. 2. Depending on the PCB type and length of your M.2_SSD (NGFF) module, and the corresponding nut location to be used. - Page 40 DeskMini GTX/RX (Z370) Series 4. Peel o the yellow protective lm on the nut to be used. Hand tighten the standoffs into the desired nut location on the motherboard. 5. Align and gently insert the M.2 (NGFF) SSD module into the M.2 slot. Please be aware that the M.2 (NGFF) SSD module only ts in one orientation.
-
Page 41: Installing The 2.5-Inch Hdd/Ssd
3.9 Installing the 2.5-inch HDD/SSD 1. Locate the drive mounting trays. 2. Engage the HDDs/SSDs with the latches in the drive mounting trays. 3. Place the HDDs/SSDs on the trays. Align the drive screw holes with those in the drive mounting trays. - Page 42 DeskMini GTX/RX (Z370) Series 4. Connect the SATA Data and Power Cable to the HDDs/SSDs. 5. Connect the other end of the SAT Cables to the SATA Connectors on the motherboard.
-
Page 43: Complete
3.10 Complete 1. Connect the power button cable to the System Panel Header on the motherboard. 2. Connect the USB cable to the USB Header on the motherboard. 3. Install the motherboard tray. - Page 44 DeskMini GTX/RX (Z370) Series Note: Before re-installing the motherboard tray, be sure to place the tray below the side chassis’s metal tab. Metal Tab Metal Tab...
- Page 45 4. Refasten the two screws in the chassis. 5. Replace the top cover. 6. Refasten the four screws of the back panel.
-
Page 46: Chapter 4 Uefi Setup Utility
DeskMini GTX/RX (Z370) Series Chapter 4 UEFI SETUP UTILITY 4.1 Introduction This section explains how to use the UEFI SETUP UTILITY to configure your system. You may run the UEFI SETUP UTILITY by pressing <F2> or <Del> right after you power on the computer, otherwise, the Power-On-Self-Test (POST) will continue with its test routines. -
Page 47: Ez Mode
4.2 EZ Mode The EZ Mode screen appears when you enter the BIOS setup program by default. EZ mode is a dashboard which contains multiple readings of the system’s current status. You can check the most crucial information of your system, such as CPU speed, DRAM frequency, SATA information, fan speed, etc. -
Page 48: Advanced Mode
DeskMini GTX/RX (Z370) Series 4.3 Advanced Mode The Advanced Mode provides more options to configure the BIOS settings. Refer to the following sections for the detailed configurations. To access the EZ Mode, press <F6> or click the "EZ Mode" button at the upper right corner of the screen. -
Page 49: Navigation Keys
4.3.2 Navigation Keys Use < > key or < > key to choose among the selections on the menu bar, and use < > key or < > key to move the cursor up or down to select items, then press <Enter>... -
Page 50: Main Screen
DeskMini GTX/RX (Z370) Series 4.4 Main Screen When you enter the UEFI SETUP UTILITY, the Main screen will appear and display the system overview. Favorite Display your collection of BIOS items. Press F5 to add/remove your favorite items. -
Page 51: Oc Tweaker Screen
4.5 OC Tweaker Screen In the OC Tweaker screen, you can set up overclocking features. Because the UEFI software is constantly being updated, the following UEFI setup screens and descriptions are for reference purpose only, and they may not exactly match what you see on your screen. -
Page 52: Dram Timing Configuration
DeskMini GTX/RX (Z370) Series Intel Turbo Boost Technology Intel Turbo Boost Technology enables the processor to run above its base operating frequency when the operating system requests the highest performance state. Intel Speed Shift Technology Enable/Disable Intel Speed Shift Technology support. Enabling will expose the CPPC v2 interface to allow for hardware controlled P-sates. -
Page 53: Dram Frequency
DRAM Frequency If [Auto] is selected, the motherboard will detect the memory module(s) inserted and assign the appropriate frequency automatically. Primary Timing CAS# Latency (tCL) The time between sending a column address to the memory and the beginning of the data in response. - Page 54 DeskMini GTX/RX (Z370) Series Write to Read Delay (tWTR_L) The number of clocks between the last valid write operation and the next read command to the same internal bank. Write to Read Delay (tWTR_S) The number of clocks between the last valid write operation and the next read command to the same internal bank.
- Page 55 tRDWR_dg Configure between module read to write delay. tRDWR_dr Configure between module read to write delay. tRDWR_dd Configure between module read to write delay. tWRRD_sg Configure between module write to read delay. tWRRD_dg Configure between module write to read delay. tWRRD_dr Configure between module write to read delay.
-
Page 56: Advanced Setting
DeskMini GTX/RX (Z370) Series RTL (CH A) Configure round trip latency for channel A. RTL (CH B) Configure round trip latency for channel B. IO-L (CH A) Configure IO latency for channel A. IO-L (CH B) Configure IO latency for channel B. IO-L Offset (CH A) Configure IO latency offset for channel A. - Page 57 ODT NOM (CH B) Use this to change ODT (CH B) Auto/Manual settings. The default is [Auto]. Dll Bandwidth 0 Configure the Dll Bandwidth 0. Dll Bandwidth 1 Configure the Dll Bandwidth 1. Dll Bandwidth 2 Configure the Dll Bandwidth 2. Dll Bandwidth 3 Configure the Dll Bandwidth 3.
-
Page 58: Advanced Screen
DeskMini GTX/RX (Z370) Series 4.6 Advanced Screen In this section, you may set the configurations for the following items: CPU Configuration, Chipset Configuration, Storage Configuration, ACPI Configuration and USB Configuration. Setting wrong values in this section may cause the system to malfunction. UEFI Configuration UEFI Setup Style Select the default mode when entering the UEFI setup utility. -
Page 59: Cpu Configuration
4.6.1 CPU Configuration Intel Hyper Threading Technology Intel Hyper Threading Technology allows multiple threads to run on each core, so that the overall performance on threaded software is improved. Active Processor Cores Select the number of cores to enable in each processor package. CPU C States Support Enable CPU C States Support for power saving. - Page 60 DeskMini GTX/RX (Z370) Series Hardware Prefetcher Automatically prefetch data and code for the processor. Enable for better performance. Adjacent Cache Line Prefetch Automatically prefetch the subsequent cache line while retrieving the currently requested cache line. Enable for better performance. Software Guard Extensions (SGX) Use this item to enable or disable Software Controlled Software Guard Extensions (SGX).
-
Page 61: Chipset Configuration
4.6.2 Chipset Configuration Primary Graphics Adapter Select a primary VGA. Top of Lower Usable Dram Set the maximum value of TOLUD. Set this item to Dynamic to allow TOLUD to adjust automatically based on the largest MMIO length of the installed graphic controller. - Page 62 DeskMini GTX/RX (Z370) Series PCIE ASPM Support This option enables/disables the ASPM support for all CPU downstream devices. PCH PCIE ASPM Support This option enables/disables the ASPM support for all PCH PCIE devices. DMI ASPM Support This option enables/disables the control of ASPM on CPU side of the DMI Link. PCH DMI ASPM Support This option enables/disables the ASPM support for all PCH DMI devices.
- Page 63 BT Control Enable/disable the BT module's connectivity. Deep Sleep Configure deep sleep mode for power saving when the computer is shut down. Restore on AC/Power Loss Select the power state after a power failure. If [Power Off] is selected, the power will remain off when the power recovers.
-
Page 64: Storage Configuration
DeskMini GTX/RX (Z370) Series 4.6.3 Storage Configuration SATA Controller(s) Enable/disable the SATA controllers. SATA Controller Speed Indicates the maximum speed the SATA controller can support. SATA Mode Selection [AHCI] Supports new features that improve performance. [Intel RST Premium (RAID)] Combine multiple disk drives into a logical unit. SATA Aggressive Link Power Management SATA Aggressive Link Power Management allows SATA devices to enter a low power state during periods of inactivity to save power. -
Page 65: Acpi Configuration
4.6.4 ACPI Configuration Suspend to RAM Select disable for ACPI suspend type S1. It is recommended to select auto for ACPI S3 power saving. ACPI HEPT Table Enable the High Precision Event Timer for better performance. PCIE Devices Power On Allow the system to be waked up by a PCIE device and enable wake on LAN. -
Page 66: Usb Configuration
DeskMini GTX/RX (Z370) Series 4.6.5 USB Configuration XHCI Hand-off This is a workaround for OSes without XHCI hand-off support. The XHCI ownership change should be claimed by XHCI driver. -
Page 67: Tools
4.7 Tools RGB LED RGB LED and header allows users to connect LED strip and create their unique PC style easily. UEFI Tech Service Contact Tech Service if you are having trouble with your PC. Please setup network configuration before using UEFI Tech Service. Easy RAID Installer Easy RAID Installer helps you to copy the RAID driver from the support CD to your USB storage device. - Page 68 DeskMini GTX/RX (Z370) Series Boot Manager Boot Manager is specifically designed for the dual OS platform/multi-OS platform users to easily customize and manage the boot menu. *Please connect more than one boot devices to use this tool. Boot Manager Enable/disable the Boot Manager. Boot Manager Timeout Enable/disable the Boot Manager Timeout.
-
Page 69: Network Configuration
Network Configuration Use this to configure internet connection settings for Internet Flash. Internet Setting Enable or disable sound effects in the setup utility. UEFI Download Server Select a server to download the UEFI firmware. -
Page 70: Hardware Health Event Monitoring Screen
DeskMini GTX/RX (Z370) Series 4.8 Hardware Health Event Monitoring Screen This section allows you to monitor the status of the hardware on your system, including the parameters of the CPU temperature, motherboard temperature, fan speed and voltage. Fan-Tastic Tuning Select a fan mode for CPU Fans 1&2, or choose Customize to set 5 CPU temperatures and assign a respective fan speed for each temperature. -
Page 71: Security Screen
4.9 Security Screen In this section you may set or change the supervisor/user password for the system. You may also clear the user password. Supervisor Password Set or change the password for the administrator account. Only the administrator has authority to change the settings in the UEFI Setup Utility. Leave it blank and press enter to remove the password. -
Page 72: Boot Screen
DeskMini GTX/RX (Z370) Series 4.10 Boot Screen This section displays the available devices on your system for you to configure the boot settings and the boot priority. Fast Boot Fast Boot minimizes your computer's boot time. In fast mode you may not boot from an USB storage device. - Page 73 CSM (Compatibility Support Module) Enable to launch the Compatibility Support Module. Please do not disable unless you’re running a WHCK test.
-
Page 74: Exit Screen
DeskMini GTX/RX (Z370) Series 4.11 Exit Screen Save Changes and Exit When you select this option the following message, “Save configuration changes and exit setup?” will pop out. Select [OK] to save changes and exit the UEFI SETUP UTILITY. Discard Changes and Exit When you select this option the following message, “Discard changes and exit setup?”...
Need help?
Do you have a question about the DeskMini GTX1060 and is the answer not in the manual?
Questions and answers