Table of Contents
Advertisement
Quick Links
OWNER'S MANUAL
Model AC215
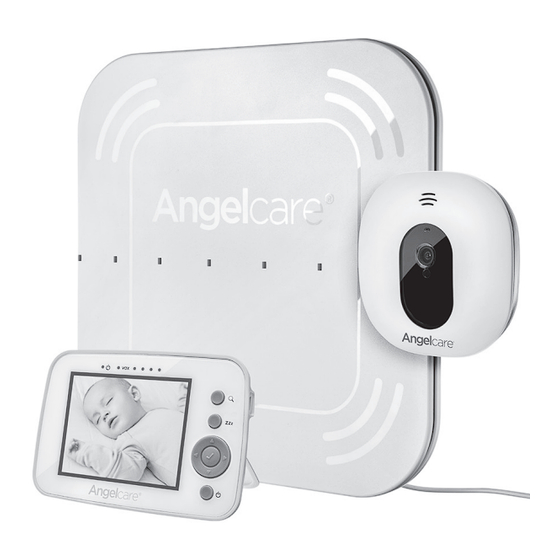
Video, Movement & Sound Monitor
Cord Safety
Ensure the Camera is at least 1 metre away from your baby's
cot. The Sensor Pad cord must always be kept out of reach of
baby and secured using the cord cover kit provided.
For assistance, FAQs or guidance with your monitor
please visit our Customer Support page at angelcare.co.uk
TABLE OF CONTENTS
WARNINGS ............................................................................................................................................................................... 2
SETUP REQUIREMENTS .................................................................................................................................................................4
STEP 1 - Charging the Parent Unit (9 hours) ........................................................................................................................... 5
STEP 2 - Installing the Sensor Pad .............................................................................................................................................6
STEP 3 - Setting up the Camera ..................................................................................................................................................9
STEP 4 - Turning on your monitor ............................................................................................................................................ 10
STEP 5 - Testing and getting to know your monitor ........................................................................................................... 11
STEP 6 - Activating and deactivating additional functions ............................................................................................. 15
Troubleshooting ............................................................................................................................................................................. 20
Limited warranty .............................................................................................................................................................................22
Technical specifications ................................................................................................................................................................22
Advertisement
Table of Contents

Related Manuals for Anglecare AC215


Summary of Contents for Anglecare AC215
-
Page 1: Table Of Contents
OWNER’S MANUAL Model AC215 Video, Movement & Sound Monitor Cord Safety Ensure the Camera is at least 1 metre away from your baby’s cot. The Sensor Pad cord must always be kept out of reach of baby and secured using the cord cover kit provided. -
Page 2: Warnings
OWNER’S MANUAL WARNING KEEP YOUR OWNER’S MANUAL FOR FUTURE Adult assembly required. REFERENCE. Keep small parts away from children when assembling. PLEASE READ THE WARNINGS AND INSTRUCTIONS CAREFULLY BEFORE ASSEMBLING & USING THE PRODUCT. We, at Angelcare , stand behind all of our ®... - Page 3 15.16 Antenna - The antenna used for this transmitter must be installed to provide a separation distance of at least 20 cm from all persons and must not be collocated or operating in conjunction with any other antenna or transmitter. 15.17 Power Lines - An outside antenna system should NOT be located in the vicinity of overhead power lines or other electric light or power circuit, or where it can fall into such power lines or circuits as contact...
-
Page 4: Setup Requirements
Model AC215 SETUP REQUIREMENTS Video, Movement & Sound Monitor INCLUDED: Parent Unit Camera Tabletop stand with removable wall mount metal ball (for Camera) AC adapter Lithium ion battery pack AC adapter (for Parent Unit) (for Parent Unit) (for Camera) (Screwdriver required... -
Page 5: Step 1 - Charging The Parent Unit (9 Hours)
STEP 1 - CHARGING THE PARENT UNIT (9 HOURS) 1) Unlock the battery compartment on the backside Battery compartment lock and remove the cover. Insert the provided rechargeable battery into the compartment. Contacts of the battery and the contacts in the compartment must be aligned. -
Page 6: Step 2 - Installing The Sensor Pad
WARNING STRANGULATION HAZARD. Children have STRANGLED in cords: • Keep adapter cords out of the reach of children (more than 1 meter away). • Because of the serious strangulation risk to infants and toddlers, parents and caregivers should never place the Camera within 1 meter of a cot. - Page 7 2.2 - SELECT THE COT LEG TO SECURE THE CORD COVERS RECOMMENDED Figure 1 Figure 2 Use the cot leg by the wall closest to the Camera (Figure 1). In cases where the Camera is across the room, use the leg closest to the Camera to position the covered wire (Figure 2). It is always preferable that the covered cord run along a wall.
- Page 8 8 cm 6) Place the 6th cord cover approximately 8 cm from the edge of the mattress support. CLIC! 7) Snap together the remaining cord covers that will run along the floor. 8) Remove any cord slack to make sure no parts of the cord are loose.
-
Page 9: Step 3 - Setting Up The Camera
STEP 3 - SETTING UP THE CAMERA Camera can be installed on the wall (see included parts) or using the tabletop stand. Depending on the position you choose, you’ll need to remove the metal ball from the stand to wall mount camera. MUST BE MORE THAN 1 METRE AWAY 1) Install the Camera on... -
Page 10: Step 4 - Turning On Your Monitor
CAMERA Speaker Microphone Camera Power ON/OFF indicator Micro USB charging port Front Side POWER ON/OFF Pause Sensor Pad/ Pairing button Magnet for tabletop stand Back Side STEP 4 - TURNING ON YOUR MONITOR Your Camera and Parent Unit come pre-paired, so you should see video within 3 - 4 seconds of turning ON the units. -
Page 11: Step 5 - Testing And Getting To Know Your Monitor
When Parent Unit is turned ON and Camera is OFF, Parent Unit will display Out-of-Range icon. If there is a lost connection between the 2 units after 15 seconds, the Out-of-Range alarm will sound on the Parent Unit (refer to Troubleshooting section): •... - Page 12 5.1 - SENSOR PAD IMPORTANT • Test your monitor before first use. • Test your monitor regularly to ensure it is functioning correctly. • Test your monitor every time you move the Sensor Pad to a different place. TO ACTIVATE THE SENSOR PAD: 1) Press Menu/Select button to access main menu.
- Page 13 TO ADJUST THE SENSOR PAD SENSITIVITY LEVEL: 1) Press Menu/Select button to access main menu. 2) Select the Settings icon to access sub-menu. 3) Select the Movement Sensitivity icon. 4) Use the up and down arrows to choose the desired sensitivity level (1 = LOW to 5 = High).
- Page 14 5.2 - SOUND TO ACTIVATE/DEACTIVATE SOUND 1) Press Menu/Select button to access main menu. 2) Select the Sound icon. 3) Use the up and down arrows to TO TEST THE SOUND: activate or deactivate the sound. Ask someone to speak into 4) Press Menu/Select button to confirm.
-
Page 15: Step 6 - Activating And Deactivating Additional Functions
YOU ARE NOW READY TO USE YOUR MONITOR The Angelcare monitor can be used with the pre-program factory settings ® or you can also customise your settings to your preference. DEFAULT SETTINGS Sound Mode: ON Speaker Volume: Level 3 (of 6) Movement Mode: ON Sensor Pad Sensitivity: Level 3 (of 5) TIC: OFF... - Page 16 TO DEACTIVATE OR ACTIVATE VOX MODE: 1) Press Menu/Select button to access the main menu. 2) Select the VOX icon to activate or deactivate the VOX function. 3) Press Menu/Select button to confirm. NOTE: By deactivating VOX, Continuous Sound setting will turn ON. TO ADJUST THE SOUND SENSITIVITY (VOX): Allows you to determine the sound level needed to trigger sound transmission to the Parent Unit.
- Page 17 6.3 - THERMOMETER TO CHANGE THE MEASUREMENT UNIT: 1) Press Menu/Select button to access main menu. 2) Select the Temperature icon to access sub-menu. 3) Select the ˚C ˚F icon. 4) Use the up and down arrows to change from Celsius to Fahrenheit. ºC ºF ºC...
- Page 18 TEMPERATURE ALARM • Alarm activates when temperature reaches maximum or minimum set temperature. • Parent Unit will emit 4 consecutive beeps, every 5 seconds. • Temperature Alarm icon will show on LCD screen. 6.4 - SCREEN SAVER Allows you to set the screen saver starting point. 1) Press Menu/Select button to access main menu.
- Page 19 6.6 - ZOOM MODE Allows you to zoom in to twice the normal view. 1) Press and release the Zoom button on the Parent Unit. 2) The Zoom icon will appear at the bottom left corner of the screen. 3) Use the arrow keys to zoom in on what you want to see more closely.
-
Page 20: Troubleshooting
TROUBLESHOOTING TAKING CARE OF YOUR RECHARGEABLE BATTERY • Ensure that you fully charge your battery for 9 hours before first use. • To maintain maximum battery life it is recommended that you fully discharge your battery periodically. If your Parent Unit is not in use, please turn it OFF. LOSS OF CONNECTIVITY In the case of loss of connectivity, the first step is to bring the Parent Unit and Camera closer together and make sure that both units are ON to restore the connection. - Page 21 NO SOUND IS BEING TRANSMITTED • Bring the Parent Unit closer to the Camera. • Recharge the Parent Unit. • Check connections or change to another electrical outlet. • Ensure both units are ON. • Ensure mains supply units are activated. •...
-
Page 22: Limited Warranty
LIMITED WARRANTY This warranty does not cover products and Angelcare warrants to the original owner of this ® accessories which are not Angelcare-branded, or product that Angelcare monitor is free from any ® any problems that result from usage that is not material and workmanship defects for the term of in accordance with product instructions, failure the warranty period (see warranty table below to... - Page 24 For assistance, FAQs or guidance with your monitor please visit our Customer Support page at Angelcare.co.uk www.angelcarebaby.com...
Need help?
Do you have a question about the AC215 and is the answer not in the manual?
Questions and answers