NETGEAR STM150 Reference Manual
Prosecure web/email threat manager
Hide thumbs
Also See for STM150:
- Installation manual (2 pages) ,
- Reference manual (261 pages) ,
- Appliance reference manual (248 pages)
Table of Contents
Advertisement
Quick Links
Download this manual
See also:
Reference Manual
Advertisement
Table of Contents

Subscribe to Our Youtube Channel
Related Manuals for NETGEAR STM150


Summary of Contents for NETGEAR STM150
- Page 1 ProSecure Web/Email Threat Manager STM150 Reference Manual NETGEAR, Inc. 350 East Plumeria Drive San Jose, CA 95134 USA January 2009 202-10414-01 v1.0...
- Page 2 In the interest of improving internal design, operational function, and/or reliability, NETGEAR reserves the right to make changes to the products described in this document without notice. NETGEAR does not assume any liability that may occur due to the use or application of the product(s) or circuit layout(s) described herein.
- Page 3 Federal Office for Telecommunications Approvals has been notified of the placing of this equipment on the market and has been granted the right to test the series for compliance with the regulations. Voluntary Control Council for Interference (VCCI) Statement This equipment is in the second category (information equipment to be used in a residential area or an adjacent area thereto) and conforms to the standards set by the Voluntary Control Council for Interference by Data Processing Equipment and Electronic Office Machines aimed at preventing radio interference in such residential areas.
- Page 4 Open SSL Copyright (c) 1998-2000 The OpenSSL Project. All rights reserved. Redistribution and use in source and binary forms, with or without modification, are permitted provided that the following conditions * are met: 1. Redistributions of source code must retain the above copyright notice, this list of conditions and the following disclaimer.
- Page 5 (gzip format) Product and Publication Details Model Number: STM150 Publication Date: January 2009 Product Family: Threat Manager Product Name: ProSecure Web/Email Threat Manager STM150 Home or Business Product: Business Language: English Publication Part Number: 202-10414-01 Publication Version Number 1.0, January 2009...
- Page 6 1.0, January 2009...
-
Page 7: Table Of Contents
Conventions, Formats, and Scope ................... xi Revision History ........................xii Chapter 1 Introduction What is the ProSecure Web/Email Threat Manager STM150? ........1-1 About Stream Scanning ...................1-2 Key Features and Capabilities ..................1-2 What Can You Do with an STM150? ................1-3 Service Registration Card with License Key(s) ..............1-4 Front Panel Features ......................1-4... - Page 8 ProSecure Web/Email Threat Manager STM150 Reference Manual Testing HTTP Scanning ..................2-10 What to Do Next ......................2-10 Chapter 3 Performing System Management Tasks Modifying System Settings .....................3-1 Configuring Network Settings ...................3-1 Enabling Session Limits and Timeouts ..............3-3 Scanning Exclusions ....................3-4 Setting the System Time ..................3-5 Specifying the Notification Server ................3-6...
- Page 9 Using the Network Diagnostic Tools .................5-6 Using the Realtime Traffic Diagnostic Tools .............5-7 Gathering Important Log Information ...............5-7 To collect information about your the STM150 ............5-7 Generate Network Statistics Report .................5-8 Using Reports to Optimize Protection and Performance ..........5-8 Working with Logs ....................5-8 Working with Reports .....................
- Page 10 ProSecure Web/Email Threat Manager STM150 Reference Manual v1.0, January 2009...
-
Page 11: About This Manual
About This Manual The NETGEAR ® ProSecure™ Web/Email Threat Manager STM150 Reference Manual describes how to configure and troubleshoot a ProSecure Web/Email Threat Manager STM150. The information in this manual is intended for readers with intermediate computer and networking skills. -
Page 12: Revision History
January 2009 For more information about network, Internet, firewall, and VPN technologies, see the links to the NETGEAR website in Appendix B, “Related Documents.”. Note: Product updates are available on the NETGEAR, Inc. website at http://kbserver.netgear.com/products/STM150.asp. Revision History Manual Manual Part... -
Page 13: Introduction
Chapter 1 Introduction This chapter provides an overview of the features and capabilities of the ProSecure Web/Email Threat Manager STM150. It also identifies the physical features of the appliance and the contents of its package. Topics discussed in this chapter include: •... -
Page 14: About Stream Scanning
Stream scanning is based on the simple observation that network traffic travels in streams. The STM150 scan engine starts receiving and analyzing traffic as the stream enters the network. As soon as a number of bytes are available, scanning commences. The scan engine continues to scan more bytes as they become available, while at the same time another thread starts outputting the bytes that have been scanned. -
Page 15: What Can You Do With An Stm150
Receive Real-time Alerts and Generate Comprehensive Reports – You can configure the STM150 to send out alerts whenever a malware or an outbreak is detected on the network. Real-time alerts can be sent out via email, allowing you to monitor malware events wherever you are. -
Page 16: Service Registration Card With License Key(S)
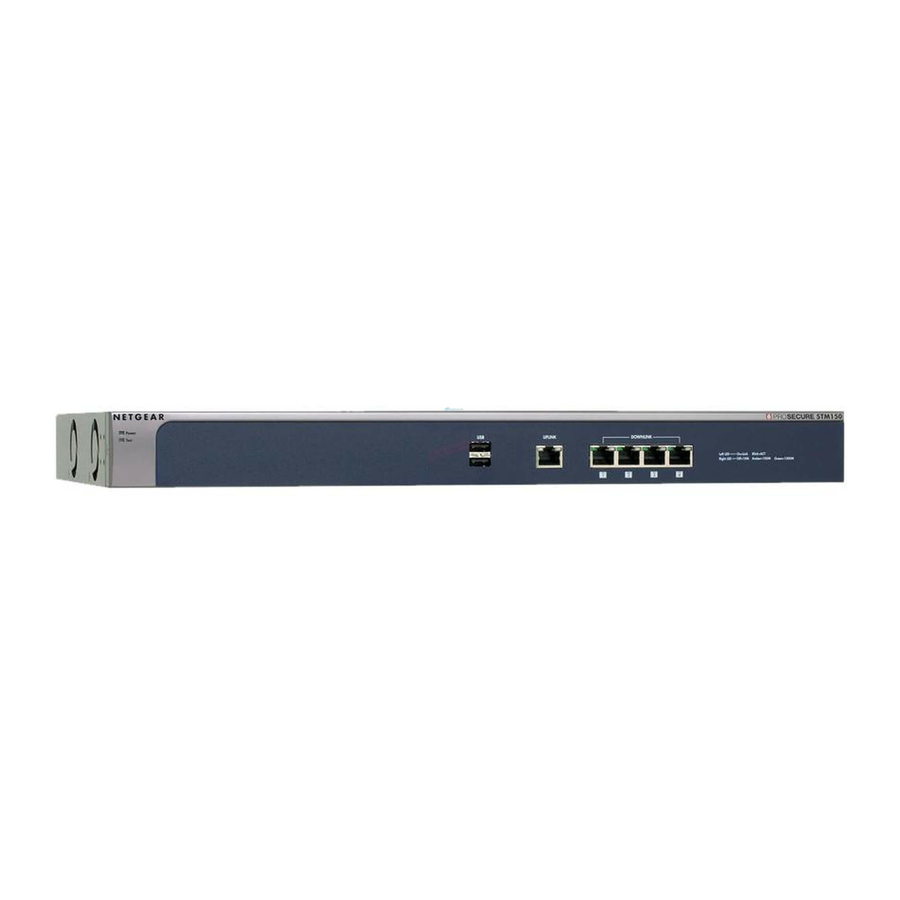
Figure 1-1 Front Panel Features The ProSecure Web/Email Threat Manager STM150 front panel shown below includes two groups of RJ-45 connectors and status indicator light-emitting diodes (LEDs), including Power and Test lights: Figure 1-2 1. -
Page 17: Rear Panel Features
Four switched N-way automatic speed negotiating auto MDI/MDIX Ethernet ports. Rear Panel Features The STM150 rear panel functions are described below: Figure 1-3 1. Console port: To connect to a COM port on a Microsoft Windows or Linux computer; may be used to perform the initial configuration. -
Page 18: Default Ip Address, Login Name, And Password Location
ProSecure Web/Email Threat Manager STM150 Reference Manual Default IP Address, Login Name, and Password Location Check the label on the bottom of the STM150’s enclosure if you need a reminder of the following factory default information: ProSecure Web/Email Threat Manager STM150 This device complies with part 15 of the FCC Rules and Canada ICES-003. -
Page 19: Using The Rack Mounting Kit
ProSecure Web/Email Threat Manager STM150 Reference Manual Using the Rack Mounting Kit Use the provided mounting kit for the STM150 to install the appliance to a rack. The mounting brackets supplied with the STM150 are usually installed before the unit is shipped out. If the brackets are not yet installed, attach them using the supplied hardware. - Page 20 ProSecure Web/Email Threat Manager STM150 Reference Manual Introduction v1.0, January 2009...
-
Page 21: Provisioning Threat Management Services
“What to Do Next” on page 2-10 Choosing a Deployment Scenario The STM150 is an inline transparent bridge appliance that can easily be deployed to any point on the network without requiring network reconfiguration or additional hardware. The following are the most common deployment scenarios for the STM150. Depending on your network environment and the areas that you want to protect, you can choose one or a combination of these deployment scenarios. -
Page 22: Gateway Deployment
Gateway Deployment Figure 2-1 In a typical gateway deployment scenario, a single the STM150 appliance is installed at the gateway – between the firewall and the LAN core switch – to protect the network against all malware threats entering and leaving the gateway. Installing the STM150 behind the firewall to protects it from DoS attacks. -
Page 23: Server Group
Server Group Figure 2-2 In an server group deployment, one STM150 appliance is installed at the gateway and another in front of the server group. This type of deployment helps split the network load and provides the mail server with dedicated protection against malware, including email-borne viruses and spam. -
Page 24: Segmented Lan Deployment
Segmented LAN Deployment Figure 2-3 In a segmented LAN deployment, one the STM150 appliance is installed in front of each network segment. This type of deployment helps split the network load and protects network segments from malware coming in through the gateway or originating from other segments. -
Page 25: Logging In To The Stm150
ProSecure Web/Email Threat Manager STM150 Reference Manual Logging In to the STM150 Follow these steps to log in to the STM150. Use a browser to connect to https://192.168.1.201 https://192.168.1.201 Figure 2-4 Note: The STM150 factory default IP address is 192.168.1.201. If you changed it, you must use the IP address you assigned it. - Page 26 Note: During the initial setup, the setup wizard displays when your first log in; afterward the login takes you to the system status page. The Support tab on the main menu contains links to the online NETGEAR STM150 product documentation and support knowledgebase.
-
Page 27: Registering The Stm150
“Service Registration Card with License Key(s)” on page 1-4) is provided in the product package. If your the STM150 appliance has an active connection to the Internet, you can register the STM150 online. 1. Select Support > Registration. The registration page displays 2. -
Page 28: Use The Setup Wizard To Complete The Configuration
Note: Setting the maximum file size to a high value may affect the STM150's performance. The default value is recommended, which is sufficient to detect the vast majority of threats. -
Page 29: Verifying The Stm150 Installation
Internet access is allowed via port 443. If the proxy server requires authentication, enter a user name and password. Web Categories The STM150 lets you choose from a list of Web content categories you can block from being accessed from your network. Check those you wish to block. Apply the Changes To confirm and apply the STM150 settings that you have configured, click Apply. -
Page 30: Testing Connectivity
If you need to change the settings or to view reports or logs, connect to the STM150 Web interface (using the IP address you assigned to the STM150 during the preconfiguration process), and then log on. -
Page 31: Modifying System Settings
Configuring Network Settings A valid IP address is required for the STM150 to retrieve online updates. It is also needed for access to the STM150 management web GUI. Go to Global Settings > Network Setting to enter the system name and other network settings. - Page 32 ProSecure Web/Email Threat Manager STM150 Reference Manual Figure 3-1 For other devices connected to the STM150 (such as a firewall or a switch), you now have an option to manually change the duplex settings. This feature will allow STM150 to integrate with other devices seamlessly.
-
Page 33: Enabling Session Limits And Timeouts
The Number of Sessions option specifies the maximum number of sessions that should be allowed via the STM150 from a single source machine. Please note that some protocols like ftp, rstp create 2 sessions per connection which should be considered when configuring session limiting. -
Page 34: Scanning Exclusions
Scanning Exclusions To enhance system performance, you may add trusted hosts or connections to this list. The STM150 will no longer scan these connections based on the specified hosts or ports. To enter a scanning exclusion rule 1. On the menu, click Global Settings > Scanning Exclusions. -
Page 35: Setting The System Time
Setting the System Time Setting the correct system time and time zone ensures that the date and time recorded in the STM150 logs are accurate. Changing the time zone requires the STM150 to reboot to apply the updated settings. To set the system time 1. -
Page 36: Specifying The Notification Server
Note that same SMTP server will also send you logs and reports. If you do not specify an SMTP server, the STM150 will still generate reports and logs, but it will be unable to send them to you or other members of your organization via email. - Page 37 After you set an SMTP server to use for notification, you need to specify the types of alerts that you want the STM150 to send out. The STM150 provides four types of alerts – update failed alert, license expiration alert, malware alert, and outbreak alert.
- Page 38 ProSecure Web/Email Threat Manager STM150 Reference Manual To enable system administrator email alerts 1. On the menu, go to Monitoring > Logs & Reports > Alerts. Figure 3-6 2. Configure the Enable Update Failed Alerts, Enable License Expiration Alerts, Enable Malware Alerts, or Enable Outbreak Alerts check boxes as you prefer.
-
Page 39: Configuring Snmp Settings
SNMP enables administrators to monitor network performance, identify bottlenecks and plan for network expansion. The STM150 provides support for report aggregation via SNMP version 1. You can configure the STM150 to send SNMP traps to management stations on the network. -
Page 40: Supported Mib Browsers
SNMP Browser for KDE The STM150 MIB structure is automatically downloaded by management stations. You should start receiving notifications after you enable SNMP on the STM150 and add the its IP address into your MIB browsers. Defining Trusted SNMP Hosts In Trusted SNMP hosts, type the IP addresses of the computers to which you want to grant GET and SET privileges on the STM150. -
Page 41: Backing Up And Restoring Configuration
• Anti-spam settings – Whitelist, blacklist, content filtering settings, etc. Tip: You can use a backup file to export all settings to another the STM150 appliance that has the same language and management software versions. Remember to change the IP address of the second the STM150 appliance before deploying it to eliminate IP address conflicts on the network. -
Page 42: To Back Up The Stm150 Settings
1. On the menu, click Administration > Settings Backup & Restore. The Backup and Restore page appears. Figure 3-8 2. Under Backup the STM150 Configuration, click Back. A dialog box appears, showing the file name of the backup file ( backup.gpg 3. -
Page 43: Resetting To Factory Defaults
Restarting the STM150 Restarting the STM150 will temporarily terminate all network connections that pass through the STM150. Network connection is restored as soon as the restart and startup processes are completed, usually within a minute or two. Restart button Figure 3-10 New Photo On the rear panel, press the Restart button: this restarts the unit;... -
Page 44: Enabling Remote Management
ProSecure Web/Email Threat Manager STM150 Reference Manual Enabling Remote Management The STM150 provides remote management. Figure 3-11 To enable remote management, go to Administration > Remote Management. Enter the port number you wish to use. You may enter port 443 or a port ranging from 1024 to 65535. -
Page 45: Administering Software Updates
ProSecure Web/Email Threat Manager STM150 Reference Manual Administering Software Updates The STM150 has four main components – pattern file, scan engine, OS, and software. To ensure up-to-date protection against malware, perform updates regularly. Figure 3-12 The STM150 provides two methods of updating its components: •... -
Page 46: To Configure Scheduled Updates
Connect to another update server, and then entering the IP address or host name of the alternative update source. 3. If you want the STM150 to check for and update the pattern file only, select the Update signature patterns to check box. If you want the STM150 to update all components (including the pattern file), leave the box unchecked. -
Page 47: Applying A Software Update That Requires A Reboot
ProSecure Web/Email Threat Manager STM150 Reference Manual Applying a Software Update that Requires a Reboot If a downloaded update requires a reboot, you will be prompted to perform the update upon login to the system. Figure 3-13 The update notice will provide information about the update, allow you to install it now or install it later, and warn you if the update will reboot the system. -
Page 48: Administering Admin Login Timeouts And Passwords
ProSecure Web/Email Threat Manager STM150 Reference Manual Administering Admin Login Timeouts and Passwords The STM150 specifies one Administrator account (Admin) and one guest account. You can use this section to change the user name or password for either account, and adjust the admin login time setting. - Page 49 4. To confirm, enter the new password again under the Retype New Password field. 5. Click Apply. You can configure STM150 to automatically log off any of its Web interface sessions if no activity is detected within a specified period of time. To configure Web interface timeout, from the main menu, click Administration >...
- Page 50 ProSecure Web/Email Threat Manager STM150 Reference Manual 3-20 Performing System Management Tasks v1.0, January 2009...
-
Page 51: Optimizing Scans
ProSecure Web/Email Threat Manager STM150 Reference Manual Chapter 4 Optimizing Scans This chapter provides information on how to optimize the ProSecure Web/Email Threat Manager STM150 scan settings. Topics discussed include: • “Default Scan Settings” on page 4-1 • “Customizing Email Scanning Settings” on page 4-2 •... -
Page 52: Customizing Email Scanning Settings
(protocols), set the scan actions, and configure the maximum file size to scan. Figure 4-1 In the Email Security > Anti-Virus > Action page, set an action that you want the STM150 to perform when it detects a threat. The STM150 can block and delete infected emails or attachments. -
Page 53: End User Email Notification Settings
ProSecure Web/Email Threat Manager STM150 Reference Manual End User Email Notification Settings To configure the notification options for email scan, go to Email Security > Anti-Virus > Notification Settings on the menu. Figure 4-2 The following options are available on the Notification Settings page. - Page 54 Send Warning Email When Malware Is Found In addition to inserting an alert to the message, the STM150 may send out an email either to the sender, recipient, or both as notification. The subject and message body are customizable. Make sure to keep the tag so that the malware information will be inserted automatically.
-
Page 55: Email Content Filtering
ProSecure Web/Email Threat Manager STM150 Reference Manual Email Content Filtering The STM150 provides several options for filtering unwanted content in the email. You can filter mails based on keywords in the subject, file type, and file name. You can also set an action to perform on emails with password-protected attachments. - Page 56 For IMAP and POP3, select either Block email & log or Log. File Extension Enter the file extensions that you want the STM150 to filter. Use commas to separate multiple entries. For SMTP, select an action to take on the listed file extensions. Available options include: •...
-
Page 57: Protecting Against Email Spam
This order of implementation ensures the optimum balance between spam prevention and system performance. For example, if a mail is originating from a whitelisted source, the STM150 will deliver the mail immediately to its destination inbox without implementing the other spam prevention technologies, thereby speeding up mail delivery and conserving the STM150 system resources. - Page 58 ProSecure Web/Email Threat Manager STM150 Reference Manual To define the sender whitelist. On the menu, go to Email Security > Anti-Spam > Whitelist and Blacklist. Figure 4-4 1. Under the Whitelist column, enter the IP address (or IP address range), domain name, or email address that you want set as a trusted source.
- Page 59 (RBLs). By accessing these RBLs, the STM150 can block spam originating from known spam sources. By default, the STM150 comes with three pre-defined RBLs, Dsbl, Spamhaus, and Spamcop.
-
Page 60: Configuring Heuristic Email Anti-Spam Scanning
1. In the Add Real-time Blacklist section, type the name of the provider under the Provider column. 2. Under RBL Domain Suffix, type the domain name from which the STM150 will retrieve the real-time blacklist. 3. Click Add. The message appears. - Page 61 STM150 will append a spam tag (customizable) in the mail subject. Figure 4-6 Note: For the heuristic spam detection to function correctly, the STM150 must be connected to the Internet. To configure heuristic scanning. 1. On the main menu, go to Email Security > Anti-Spam > Heuristic Scanning.
-
Page 62: Customizing Web Scanning Settings
Ports to Scan. For example, if the HTTP service on your network uses both port 80 and port 8080, enter both port numbers. This will ensure that STM150 will scan traffic that is sent and received through a non-standard HTTP port. -
Page 63: Configuring Web Malware Scans
Define the action (Delete file, Log only) and check the Streaming box for each protocol you wish to enable streaming. In Scan Exception, set the maximum file size that STM150 will scan. STM150 can scan files up to 25,600KB (25MB) in size. -
Page 64: Configuring Web Content Filtering
ProSecure Web/Email Threat Manager STM150 Reference Manual To replace the original page with warning text. check the Replace Page with Warning Text: checkbox. Customize the warning text. If you wish to present the warning page in HTML format instead of plain text check the HTML Format checkbox. If you wish to preview the warning page in HTML format click Preview. - Page 65 Blocked Web Components: Select the corresponding check box to automatically block the type of web component you wish to block. Note that if any check box is selected, STM150 will block any of that type of web component that it detects, whether malicious or legitimate.
- Page 66 Preview. The maximum size for the warning text message is 3 Kilobytes. Figure 4-10 When the STM150 blocks access to a link of a certain blocked web category, it will display an HTML warning message. When the user clicks the Submit URL Categorization button, the STM150 will present a web form that enables the user to submit their categorization request.
-
Page 67: Configuring Web Url Filtering
White List Select the Enable check box if you want STM150 to bypass the scanning of sites listed here. If an URL is in both the white list and black list, then the white list will take precedence and files from the URL will not be scanned. - Page 68 Blacklist Select the Enable check box if you want STM150 to block access to the sites listed here. You can enter a maximum of 200 entries to the black list. To add a URL to the blacklist, enter the URLs that you want to block into the Add URL field, and then click add.
-
Page 69: Https Scan Settings
ProSecure Web/Email Threat Manager STM150 Reference Manual HTTPS Scan Settings To configure the HTTPS scan settings, go to Web Security > HTTPS Scan > Settings. Figure 4-12 To configure the HTTPS scan settings, click Web Security > HTTP and HTTPS > HTTPS Settings, and set the following options. -
Page 70: The Stm150 Ca Certificate
If HTTPS scan is enabled, an alert message appears when a user connected to the STM150 visits an HTTPS site. Note that this is not a bug in the STM150 – it is a result of HTTPS scanning and 4-20 Optimizing Scans v1.0, January 2009... - Page 71 SSL. SSL has two parts – client and server authentication. Server authentication occurs with every HTTPS request, but client authentication is NOT mandatory, and rarely occurs. As a result, whether the request is from the STM150 or the real client is of less importance.
-
Page 72: Certificate Management
CA to the trusted list. Before enabling HTTPS scanning, you may specify which certificate to be used by the STM150 to handle HTTPS requests. By default, a certificate issued by NETGEAR is used. This certificate can be downloaded here for browser import. -
Page 73: Trusted Hosts
Exceptions section under the Certificates Management page of the STM150 Web interface. After it is added to the Exception list, you will have the option to add it to the STM150's trusted list, delete it from the exception list, or view the details of the certificate. - Page 74 ProSecure Web/Email Threat Manager STM150 Reference Manual Note that certain sites contain elements from different HTTPS hosts. For example, contains HTTPS elements from: https://example.com • secureserver1.example.com • secureserver2.example.com • imageserver.example.com You must add the above-mentioned sites to the hostlist to completely bypass the scanning of .
-
Page 75: Configuring Ftp Scan
Under Action you can specify what type of action to take against detected malware. You can select Delete file or Log only. In Scan Exception, set the maximum file size that STM150 will scan. STM150 can scan files up to 25,600KB (25MB) in size. - Page 76 ProSecure Web/Email Threat Manager STM150 Reference Manual In the box below the Enable check box, enter the file extensions (without the period) that you want to block. Use commas to separate multiple file extensions. The list may contain a maximum of 40 different file types.
-
Page 77: Monitoring System Performance
Chapter 5 Monitoring System Performance The STM150 provides on using the online support services along with real-time alerts and comprehensive monitoring, reporting and logging capabilities to ensure that you are able to effectively respond to the latest threats found on the network. -
Page 78: Viewing The System Status
• When a license expires, a led on the STM150 front panel will blink continuously. To stop this, click on the Stop Led Blink button. After this has been clicked, the button will be greyed out until the next time a license expires. -
Page 79: Using Statistics And Web Usage Data
Figure 5-2 The at-a-glance table on the Statistics tab page lets you review the distribution of traffic going through this STM150. Information available on this page includes: Usage - Shows CPU, memory, and disk space usage Active Connections - Shows the number active connections for each supported protocol... - Page 80 ProSecure Web/Email Threat Manager STM150 Reference Manual To view Web usage statistics, click Monitoring > Statistics >Web Usage. Figure 5-3 Select the time frame for the Web Usage report then click View The at-a-glance table on this page allows you to quickly see which categories of Web sites are getting the most access from your network.
-
Page 81: Monitoring Security
ProSecure Web/Email Threat Manager STM150 Reference Manual Monitoring Security To view a summary of malware incidents on the network, click Monitoring > Security. Figure 5-4 Spam and malware detected on the SMTP, IMAP, POP3, HTTP, HTTPS and FTP protocols are listed on this page, in addition to the actions taken on the malicious code. -
Page 82: Running Diagnostics
ProSecure Web/Email Threat Manager STM150 Reference Manual Running Diagnostics The STM150 provides diagnostic tools that help you analyze traffic conditions and the status of the network. Two sets of tools are available – network diagnostic tools and traffic diagnostic tools. -
Page 83: Using The Realtime Traffic Diagnostic Tools
ProSecure Web/Email Threat Manager STM150 Reference Manual Use PING to check the connection between The STM150 and a specific IP address. Enter the IP address or host name, and then click PING. The PING results appear at the bottom of the page. -
Page 84: Generate Network Statistics Report
Generate Network Statistics Report The Network Statistic Report provides the user a detailed overview of the network utilization in the STM150 managed network environment. Users will be able to see what consumes the most resources on the network. On the Monitoring > Diagnostics page, click Generate Network Statistics to send the report to the administrator. - Page 85 Download. Sending Logs The STM150 can send logs via email and to a syslog server on the network. You can configure both log sending methods by clicking Log & Reports > Email & Syslog. To configure the STM150 to forward logs to a syslog server.
- Page 86 ProSecure Web/Email Threat Manager STM150 Reference Manual 5. In Select logs to send, select the check boxes for the log types that you want the STM150 to send via email. 6. In Format, click either Plain Text or CSV. If you want the STM150 to compress the log file before sending, select the Zip the logs to save space check box.
-
Page 87: Working With Reports
ProSecure Web/Email Threat Manager STM150 Reference Manual This automated log purging takes the burden of managing the size of the STM150 logs off your shoulders and ensures that the latest malware incidents and traffic activities are always recorded. To manually purge selected logs, go to Logs & Reports > Log Management and select the check boxes under Clear the following log information for the logs you wish to purge, then click the Clear Log Information button. -
Page 88: Using Online Support
Copy and paste the support key given to you by Netgear into the Support Key field, and then click the Connect button. If the status shows the tunnel status is on, Netgear’s support staff will be able to access your STM150 and perform advanced diagnostics. -
Page 89: Working With Hot Fixes
If NETGEAR support cannot access your the STM150 remotely, you may be asked to save a log file to your computer and then email it to NETGEAR for analysis. If asked to do so, log into the STM150 Web interface, go to Monitoring > Diagnostics > Gather Important Log Information and click Download Now. -
Page 90: Sending Suspicious Files To Netgear For Analysis
7. Click Apply to install the hot fix. Sending Suspicious Files to NETGEAR for Analysis You can report any undetected malware file or malicious email to Netgear for online for analysis. The file will be compressed and password protected before sending. -
Page 91: Default Settings And Technical Specifications
ProSecure Web/Email Threat Manager STM150 Reference Manual Appendix A Default Settings and Technical Specifications You can use the reset button located on the rear panel to reset all settings to their factory defaults. • To perform a hard reset, press and hold the reset button for approximately 10 seconds (until the TEST LED blinks rapidly). - Page 92 ProSecure Web/Email Threat Manager STM150 Reference Manual Default Settings and Technical Specifications v1.0, January 2009...
-
Page 93: Appendix B Related Documents
ProSecure Web/Email Threat Manager STM150 Reference Manual Appendix B Related Documents This appendix provides links to reference documents you can use to gain a more complete understanding of the technologies used in your NETGEAR product. Document Link Internet Networking and TCP/IP ttp://documentation.netgear.com/reference/enu/tcpip/index.htm... - Page 94 ProSecure Web/Email Threat Manager STM150 Reference Manual Related Documents v1.0, January 2009...
-
Page 95: Index
ProSecure Web/Email Threat Manager STM150 Reference Manual Index notification settings 4-3 package contents 1-4 preconfiguration 2-4, 2-8 default settings 4-1 deployment location 1-6 rack mounting 1-7 real-time scanning 1-2 testing connectivity 2-10 testing HTTP scanning 2-10 verifying 2-9 deployment scenarios...
Need help?
Do you have a question about the STM150 and is the answer not in the manual?
Questions and answers