Advertisement
Quick Links
K2
K1
ALARM
MON-TO-FRI
MON-TO-SAT
YEAR 12/24
AL.ON
AL.OFF
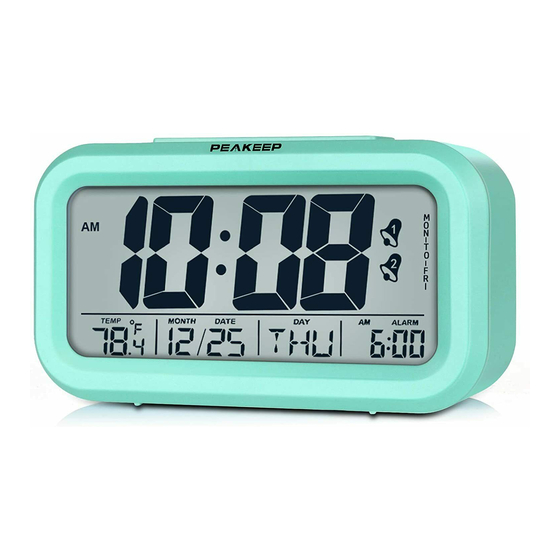
Product Specifications
Dimensions: 5.4*1.8*3 inch / 13.8*4.7*7.8CM
G Weight: 0.4lb./0.18KG
Clock Inaccuracy: ±3 seconds/month (in normal temperature)
Power supply: 3 PCS 1.5V AAA alkaline batteries (Not included)
Tips: for better performance, replace batteries every 6 months.
Getting Started
1. Remove the battery compartment cover from the back of the unit, place the cord on the bottom of the battery
to gain easy access to remove batteries when replacing. Show as "FIG 1"
2. Properly align and insert 3 AAA alkaline batteries, replace cover.
Setting Clock Time
1. Toggle setting mode switch to TIME SET position.
2. The factory default time of AM 12:00 starts to blink. Refer to the circled portion of "FIG 2".
Instructions
MHP 3112
K3
K4
K5
MIN
HOUR
LOCK
DATE/ C/ F
MONTH
AL.SET
DATESET
ON
OFF
TIMESET
SENSOR
K6
K7
ALARM
MON-TO-FRI
MON-TO-SAT
YEAR 12/24
AL.ON
AL.OFF
K1-Alarm switch(4 modes)
K2-Year setting
-Military Time/ Regular Time converting
K3-Minute setting
-Date setting
-Celsius/Fahrenheit converting
K4-Hour setting
-Month setting
K5-Setting mode switch
K6-Sensor switch
K7-Battery compartment
MIN
HOUR
LOCK
DATE/ C/ F
MONTH
AL.SET
DATESET
ON
OFF
TIMESET
SENSOR
AAA
FIG 1
1/5
Advertisement

Related Manuals for Peakeep MHP-3112


Summary of Contents for Peakeep MHP-3112
- Page 1 Instructions MHP 3112 K1-Alarm switch(4 modes) K2-Year setting -Military Time/ Regular Time converting ALARM HOUR K3-Minute setting -Date setting MON-TO-FRI -Celsius/Fahrenheit converting LOCK MON-TO-SAT YEAR 12/24 DATE/ C/ F MONTH AL.SET AL.ON DATESET AL.OFF TIMESET K4-Hour setting SENSOR -Month setting K5-Setting mode switch K6-Sensor switch K7-Battery compartment...
-
Page 2: Setting Alarm
DATE TEMP MONTH ALARM FIG 2 3. Set current time with HOUR and MIN buttons. 4. When the current time is displayed, toggle setting model switch to LOCK position. The current time display will stop blinking. Tips: When you set the minute with MIN button, the seconds' timer re-sets to zero. Setting Clock Date 1. - Page 3 DATE ALARM TEMP MONTH FIG 4 3. Set alarm 1 with HOUR and MIN buttons. 4. When your desired alarm 1 time is displayed, press ALARM button to turn on alarm 1 while “ON” starts to blink. Refer to the circled portion of “FIG 5”. DATE TEMP MONTH...
- Page 4 7. Repeat steps 3-5 to set alarm 2 time and independently control alarm 2 on or off. Refer to the circled portion of “FIG 8”. DATE TEMP MONTH DATE TEMP MONTH FIG 8 8. After controlling alarm 2 on or off as per you require, toggle setting switch back to LOCK position. Selecting Alarm Mode 1.
-
Page 5: Light Function
4. Toggle alarm switch to AL.OFF, the alarm will no longer work. The alarm symbols will not display. Turning Alarm off When alarm goes off, gradually accelerated beep sounds for 1 minute. 1. Press the top SNOOZE button to temporarily suspend the alarm for 8 minutes. 2.
Need help?
Do you have a question about the MHP-3112 and is the answer not in the manual?
Questions and answers