Table of Contents
Advertisement
Advertisement
Table of Contents

Related Manuals for Avital 3300L


Summary of Contents for Avital 3300L
- Page 1 Model 3300L ➤ Owner’s Guide...
-
Page 2: Limited Lifetime Consumer Warranty
limited lifetime consumer warranty For a period of one calendar year from the date of purchase of this auto-security device, Directed Electronics promises to the ORIGINAL PURCHASER to repair or replace (with a comparable reconditioned model), free of cost, any electronic control module which proves to be defective in workmanship or material under normal use, SO LONG AS THE SYSTEM WAS SOLD, INSTALLED, AND SERVICED BY A PROFES- SIONAL AUTO INSTALLER, AND REMAINS IN THE CAR IN WHICH THE SYS-... - Page 3 TO THE MAXIMUM EXTENT ALLOWED BY LAW, ANY AND ALL WAR- RANTIES ARE EXCLUDED BY THE MANUFACTURER AND EACH ENTITY PARTICIPATING IN THE STREAM OF COMMERCE THEREWITH. THIS EXCLUSION INCLUDES BUT IS NOT LIMITED TO THE EXCLUSION OF ANY AND ALL WARRANTY OF MERCHANTABILITY AND/OR ANY AND ALL WAR- RANTY OF FITNESS FOR A PARTICULAR PURPOSE AND/OR ANY AND ALL WARRANTY OF NON-INFRINGEMENT OF PATENTS, IN THE UNITED STATES OF AMERICA AND/OR ABROAD.
- Page 4 This vehicle theft protection is effective for one (1) year from the date of purchase and is limited to one claim. This vehicle theft protection guarantee is valid only for the theft of the entire vehicle and specifically excludes any other considerations, including, but not limited to, damage caused to the vehicle, theft of parts, contents or any other consequen- tial damages.
- Page 5 © 2008 directed electronics—all rights reser ved...
-
Page 6: Table Of Contents
table of contents l l i i m m i i t t e e d d l l i i f f e e t t i i m m e e c c o o n n s s u u m m e e r r w w a a r r r r a a n n t t y y ................i i r r e e m m o o t t e e c c o o n n f f i i g g u u r r a a t t i i o o n n s s . - Page 7 © 2008 directed electronics—all rights reser ved...
-
Page 8: Remote Configurations
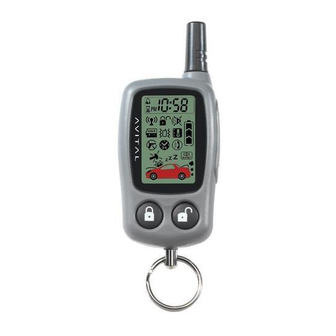
remote configurations ➜ LCD 2-way configuration © 2008 directed electronics—all rights reser ved... - Page 9 Vehicle Interior Temperature Indicator Numeric Display AM/PM Indicator Alarm Clock Mode Indicator Timer Function Indicator Transmit Range Indicator Transmission Indication Vibrate/Beep Mode Indicator Power Saver Mode Indicator Remote Start Timer Mode Indicator No Function Vehicle Page Mode Indicator Full Trigger Shock Sensor Indicator Hood/Trunk Open or Trigger Indicator Parking Light Indicator Door Open or Trigger Indicator...
-
Page 10: Standard 4-Button Configuration (Both Remotes)
➜ standard 4-button configuration (both remotes) controls the Arm and Panic On/Off function. The arming is controlled by pressing this button. The panic alarm is triggered by pressing and holding this button. Press again to cancel the panic alarm controls the D D i i s s a a r r m m and P P a a n n i i c c Off function. Press this button to disarm the system or to cancel the panic alarm. -
Page 11: Lcd 2-Way Remote Additional Controls
and optional auxiliary convenience or expansion function that you have added to your system.. The auxiliary output controls __________________________. ➜ LCD 2-way remote additional controls note: The controls listed below are applicable only to the LCD 2-way remote. The LCD backlighting will turn on when pressed for less than one second;... -
Page 12: What Is Included
Buttons When pressed simultaneously these buttons toggle between beep notification and vibrate notification. Buttons When pressed simultaneously these buttons activate battery saver mode, which will drop power consumption on the transceiver battery to zero when the alarm is inactive or disarmed. what is included ➤... -
Page 13: System Maintenance
important information Congratulations on the purchase of your state-of-the-art vehicle security system. This system has been designed to provide years of trouble-free operation. By carefully reading this guide prior to using your system, you will maximize the use of this product and its features. -
Page 14: Your Warranty
To replace the battery, gently pull the battery cover release tab, then slide the door down to expose the battery and remove the expired battery. Place the new battery into the transceiver observing the correct polarity. When power is returned the transceiver will light all icons in the LCD and generate a musical tone. - Page 15 Changes or modifications not expressly approved by the party responsible for compliance could void the user's authority to operate this device. © 2008 directed electronics—all rights reser ved...
-
Page 16: Standard Lcd 2-Way Icon Configuration
➜ Standard LCD 2-way icon configuration Icon The vehicle interior temperature icon has no functions Icon The numeric display icon will show the hours and minutes. Icon The AM/PM icon indicates the time before or after noon. Icon The alarm clock mode icon indicates that the alarm clock mode is active. - Page 17 Icon The power saver mode can be turned on or off with the trans- ceiver. This icon displays the status. Icon The remote start timer mode icon has no function. Icon No function. Icon The vehicle page mode icon displays when the alarm module is paging the transceiver.
- Page 18 Icon The remote start icon has no function. Icon The Valet mode icon appears when the system is in Valet mode. Icon The remote start safety shut down icon has no function. Icon The battery level icon indicates the level of power remaining in the battery.
- Page 19 Standard LCD 2-way button functions F F u u n n c c t t i i o o n n Lamp On (10 sec) Power-Saver Mode* Beep/Vibrate Mode Time Adjust Mode (hour)** Time Adjust Mode (min)** Alarm Clock Set Mode (hour)** Alarm Clock Set Mode (min)** Alarm Clock Music...
- Page 20 Remote Start On Melody Selection 2 (where applicable) 10 Min Parking Count Down Mode 20 Min Parking Count Down Mode 30 Min Parking Count Down Mode 60 Min Parking Count Down Mode 90 Min Parking Count Down Mode 120 Min Parking Count Down Mode Parking Count Down Off Mode...
-
Page 21: Lcd 2-Way Remote Operation
LCD 2-way remote operation The remote start system operates at 434 MHz and incorporates Directed’s proprietary A.S.K. out-board two-way transceiver. The high frequency combined with Binary Data communication achieves superior range with two-way communication. ➜ system signal paging features A page is the signal the control module sends to the transceiver as confirmation of receipt of a command or alarm system status. -
Page 22: Using Your System
using your system important: Due to the complexity of this system, instal- lation of this product must only be performed by an authorized Directed dealer. ➜ active arming You can arm the system by pressing second. When the system arms, you will hear a short siren sound, or chirp, and see the parking lights flash once. -
Page 23: Warn Away Response Description
note: If any protected entry point (such as a door or a switch-protected trunk or hood) is open, the system will not passively arm. Additionally, each time a protected entry is opened (triggered) during the arming count- down, the 30-second countdown starts over. When armed your vehicle is protected as follows: ➤... -
Page 24: Triggered Response Description
➤ R R e e m m o o t t e e C C o o n n t t r r o o l l L L C C D D - The full trigger alert icon (28) will dimly illuminate for two seconds ➤... -
Page 25: Disarming
➤ I I g g n n i i t t i i o o n n T T r r i i g g g g e e r r - If the ignition is turned on the siren will chirp for three seconds, then the siren will sound and the lights will flash for the programmed duration and the remote will flash. -
Page 26: High Security Disarm
➜ high security disarm This security system offers High Security Disarm. High Security Disarm is a feature that makes it possible to silence and reset the system while it is triggering, without disarming the system. If the system is triggered and the siren has been sounding for longer than six seconds, pressing and return the unit to the armed state. -
Page 27: Silent Mode
To disarm the security system, turn the ignition to the ON posi- tion. Press the Valet button within 15 seconds. After five seconds, the system will disarm. If the system does not disarm, you may have waited too long; turn the ignition off and on and try again. -
Page 28: Panic Mode
➜ panic mode If you are threatened in or near your vehicle, you can attract attention by triggering the system with your remote. Just press for 1.5 seconds, and you will enter Panic Mode. The siren will sound and the parking lights will flash for the programmed siren duration. -
Page 29: Setting The Clock
To enter or exit Valet Mode using the remote: Steps 2 through 3 must be quickly and smoothly completed. 1. Open any vehicle door. 2. Press 3. Press 4. Press again. The status LED will light solidly if you are entering Valet Mode, and it will go out if you are exiting Valet Mode. - Page 30 Example If the alarm triggers three times within a 60-minute period and each time the same sensor or switch triggers the alarm, NPC interpret those triggers as false alarms. After the third trigger, ignores, or bypasses, that sensor or switch (along with any ®...
-
Page 31: Arming Diagnostics
diagnostics The microprocessor at the heart of your system is constantly monitoring all of the switches and sensors connected to it. It is designed to detect any faulty switches and sensors and prevents them from disabling the entire system. The microprocessor will also record and report any triggers that occurred during your absence. -
Page 32: Directed Electronics—All Rights Reser Ved
➜ disarming diagnostics Extra chirps that are heard when disarming the system are the Tamper Alert. If four chirps are heard when disarming the system, then the security system was triggered in your absence. If five chirps are heard when disarming the system, a zone was trig- gered so many times that the Nuisance Protection bypassed that zone. -
Page 33: Code Hopping
➜ table of zones A zone is represented by the number of LED flashes used by the system to identify a particular type of input. Standard input assignments are listed in the following table, along with spaces to write in any optional sensors or switches that have been installed. ZONE (Number of LED Flashes) -
Page 34: Rapid Resume Logic
the vehicle. The alarm will automatically re-sync and respond to the remote normally. high frequency Your system transmits and receives at 434 MHz. This provides a cleaner spectrum with less interference and a more stable signal. Enjoy a phenomenal increase in range, even in areas with high radio interference. -
Page 35: Programming Options
programming options Programming options control your system's normal, operational set-up. Most options do not require additional parts, but some may require installation labor. The following is a list of the programmable options, with the factory settings in Bold. ➤ A A c c t t i i v v e e arming (from remote only) or passive arming (auto- matic arming 30 seconds after the last door has been closed). -
Page 36: Security & Convenience Expansions
security & convenience expansions Listed below are some of the many expansion options available. Please consult your dealer for a complete explanation of all the options available to you. Metal on glass, glass cracking, and breaking Audio Sensor: glass produce distinctive acoustic signatures. The 506T audio sensor uses a microphone to pick up sounds, then analyzes them with proprietary acoustic software to determine if the glass has been struck. -
Page 37: Installation Options
Power Window Control: vided with the 529T and 530T systems. These can operate power windows, and can roll them up automatically when the system is armed, roll them down, or both up and down. installation options Installation options may require additional parts or labor. Please consult your dealer. -
Page 38: Glossary Of Terms
glossary of terms The “brain” of your system. Usually hidden under- Control Unit: neath the dash area of the vehicle. The control unit houses the microprocessor which monitors your vehicle and controls all system functions. Fault-Proof Starter Interrupt: your system that prevents the vehicle’s starter from cranking whenever the system is armed. - Page 39 This is what happens when the Trigger or Triggered Sequence: alarm “goes off ” or “trips.” The triggered sequence of your system consists of the siren sounding and parking lights flashing for the programmed duration. A small push-button switch mounted at a discre- Valet Button: tionary location inside the vehicle.
-
Page 40: Quick Reference Guide
Arming ■ To arm, press the parking lights will flash once. Disarming ■ To disarm, press flash twice. High security disarm ■ For high security disarm, press sounding. To completely disarm the security system, press again and the system will chirp 4 or 5 times (reporting the trigger). Disarming without a remote ■... - Page 41 The company behind this system is Directed Electronics. Since its inception, Directed Electronics has had one purpose, to provide consumers with the finest vehicle security and car stereo products and accessories available. The recipient of nearly 100 patents and Innovations Awards in the field of advanced electronic technology, Directed is ISO 9001 registered.
Need help?
Do you have a question about the 3300L and is the answer not in the manual?
Questions and answers