Table of Contents
Advertisement
MODEL VX141MSPROR™ RENTAL
MASONRY/BRICK SAW
OWNER'S/OPERATOR'S MANUAL
RENT L
Caution!
Read Safety and General Instructions carefully before using saw for the first time.
REV. 2
serial
number -
You should record the Serial Number of your Tile Saw on this
Owner's/Operator's Manual and on the Warranty Card. The Warranty
Card must be sent back with all the required pertinent information
for the warranty to take effect.
R
Advertisement
Table of Contents

Related Manuals for Pearl Abrasive VX141MSPROR


Summary of Contents for Pearl Abrasive VX141MSPROR
- Page 1 MODEL VX141MSPROR™ RENTAL MASONRY/BRICK SAW OWNER’S/OPERATOR’S MANUAL RENT L serial number - You should record the Serial Number of your Tile Saw on this Owner’s/Operator’s Manual and on the Warranty Card. The Warranty Card must be sent back with all the required pertinent information for the warranty to take effect.
- Page 2 TABLE OF CONTENTS PAGE GENERAL SAFETY RULES FOR ALL POWER TOOLS....... . 3 SYMBOLS .
-
Page 3: I. General Safety Rules For All Power Tools
i. GENERAL SAFETY RULES FOR ALL POWER TOOLS W RNING! Read all instructions. As with all machinery there are certain hazards involved with operation and use of the machine. The following basic safety precautions should be followed at all times to reduce the risk of fire, electric shock and serious personal injury to you or others. -
Page 4: Ii. Symbols
21. Extension cords. Make sure your extension cord is in good condition. When using an extension cord, be sure to use one heavy enough to carry the current your product will draw. An undersized cord will cause a drop in line voltage resulting in loss of power and overheating. Extension cord tables (refer to page 21) show the correct size to use depending on cord length and nameplate ampere rating. -
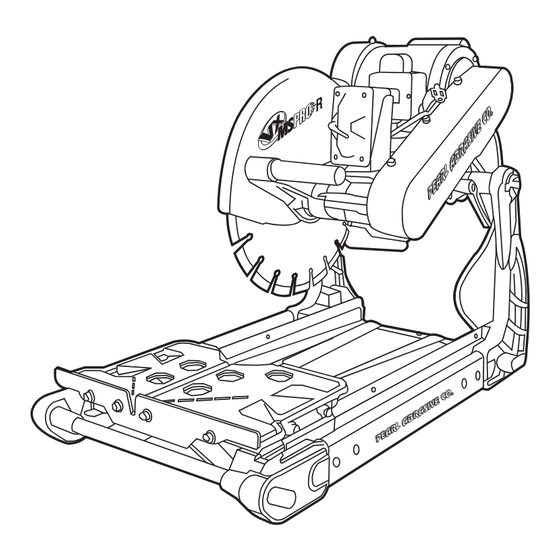
Page 5: Iii. Features
OPTIONAL OUTER TRAY for wet application RAISED PLATFORM FRAME TABLE LOCKING MECHANISM Design making edges easy to facilitates the saw’s chopping lift from operation iv. SPECIFICATIONS VX141MSPROR M SONRY/BRICK S W MAX. BLADE CUTTING CUTTING SIZE MOTOR WEIGHT CAPACITY LENGTH... -
Page 6: V. Unpacking
v. UNPACKING Open the container. Carefully lift the saw out evenly by the frame. Be certain you have the following items before you discard the container: • Saw • Size 19 Open Wrench • 14" saw blade • 45º/90º rip guide •... - Page 7 3. Simply line up the material being cut with the OPER TION appropriate pre-marked lines on the cutting To operate the VX141MSPROR as a chop or plunge table. saw: pull up on the Angle Lock Pin, rotate 90 degrees, 4. Now you are ready to make your cut.
-
Page 8: Vii. Proper Blade Use
vii. PROPER BLADE USE DO’S DON’TS • Inspect blades daily for cracks or uneven wear. • Do not operate the saw without safety guards in position. • Always use appropriate blade for material being cut. • Do not operate the saw with blades larger than 14". •... -
Page 9: Ix. Changing Motor Voltage
CHANGING MOTOR VOLTAGE WARNING: Turning on the The VX141MSPROR motor has the ability to accept power from a 115V saw, while the motor is set at and 230V power source. By default the motor is set to accept power 115V, to a 230V electrical power from a traditional 115V power source. -
Page 10: Xi. Replacement Parts List
REPLACEMENT PARTS LIST VX141MSPROR MAIN ASSEMBLY PART NAME PART NUMBER PART NAME PART NUMBER Frame assembly (no rails) PA150328 M5 X 0.8 X 16L Cross screw (4) V3925058 Depth guide weldment PA141094 Dia 17mm arbor inner flange V390029 Collar Set Cutting Head... - Page 11 VX141MSPROR FRAME ASSEMBLY PART NAME PART NUMBER PART NAME PART NUMBER Left Arm V390007 M8 X 1.25 X 30L Socket hex bolt (2) PA2704081 Metal pan frame V390017 M6 x 1.0 x 10L Socket head hex screw (4)PA150333 Dust Collection Pan V390014 M6 x 1.0 Nut (2)
- Page 12 VX141MSPROR CUTTING HEAD ASSEMBLY PART NAME PART NUMBER PART NAME PART NUMBER 2 HP 115V/230V Dual voltage motor VX141122 M5 Spring lock washer (2) V3925053 Motor Fan Cover PA141079 5/16" - 18 UNC Nut (4) PA01191 Motor Fan PA150231 30D X 120 Handle...
- Page 13 VX141MSPROR SWITCH ASSEMBLY PART NAME PART NUMBER PART NAME PART NUMBER Switch box PSV00002R 25Amp Circuit breaker PA150350 (no cover or electrical components) Aluminum cover PA100006 Reset button boot S1000-03.1 Aluminum rotary switch (external) PA100019 20Amp Toggle switch V390027 Metal relay fork (internal) PA141117 M4 x 0.7 x 13L Countersunk cross screw (4)
- Page 14 VX141MSPROR BLADE GUARD ASSEMBLY PART NAME PART NUMBER D12.7 Circular end cap PA250731 Arbor Cover V390003 D14.5 Circular end cap (2) PA25073 M6 Narrow washer (3) PA00082 M6 X 1.0 Nylon Nut CX38088 M6 X 1.0 X 16L Hex bolt PA00083 M6 x 1.0 x 10L Hex bolt...
-
Page 15: Xii. Troubleshooting
xii. TROUBLESHOOTING For your safety and the safety of others, turn the power switch off and always remove the W RNING! plug from power source before troubleshooting. Repairs performed by unauthorized personnel could cause serious hazard. We recommend that service to this tool be performed by a qualified service technician with original equipment replacement parts. - Page 16 Problem Possible Cause Solution Irregular run of the saw blade. Poor tension in the blade Return the saw blade to the material. manufacturer. Excessive wear. Wrong type of saw blade. Use harder saw blades. Shaft of motor causes wobbling. Have bearings of the motor of the motor replaced.
- Page 17 Problem Possible Cause Solution Saw blades shows blooming Lateral friction when cutting. The material feed is too high; proceed colors. more slowly. Grinding marks on the saw Material is not being fed parallel Ensure that the direction of feed is blade.
-
Page 18: Xiv. The Right Blades Does The Right Job
Pearl reserves the right to discontinue products at any time without notice. All illustrations displayed in this manual are the property of Pearl Abrasive Co. and shall not be duplicated or reproduced without the express written consent of Pearl Abrasive Co. -
Page 19: Xvi. Water Hose Kit Installation
xvi. WATER HOSE KIT INSTALLATION 1. Orient the w ater pipes as shown in Fig. A. Insert the shortest pipe from the "Y" adapter into the adjacent sleeve at the rear of the blade guard. First, you will need to remove the black cap covering the hole insert (#1). - Page 20 CORPORATE OFFICE: SO. CALIFORNIA • USA 4900 ZAMBRANO ST., COMMERCE, CA 90040-0031 562-927-5561 • FAX 562-928-3857 Toll Free: 800-969-5561 www.pearlabrasive.com GEORGIA • USA ONTARIO • CANADA 3950 STEVE REYNOLDS BLVD. 375-2 PIDO ROAD NORCROSS, GEORGIA 30093 PETERBOROUGH, ONTARIO K9J-6X7 Part No. VX141MSPRORMAN • 07/17...
Need help?
Do you have a question about the VX141MSPROR and is the answer not in the manual?
Questions and answers
Good afternoon, i need the METAL BEARING ROLLERS (COMPLETE) #5