Advertisement
Quick Links
Owner's Manual
CAUTION:
Weight on this product should not exceed 113 kgs / 250 lbs.
T6610N
WARNING
Exercise can present a health risk.
Consult a physician before beginning
any exercise program with this
equipment. If you feel faint or dizzy,
immediately discontinue use of this
equipment. Serious bodily injury can
occur if this equipment is not assembled
and used correctly. Serious bodily injury
can also occur if all instructions are not
followed. Keep others and pets away
from equipment when in use. Always
make sure all bolts and nuts are
tightened prior to each use. Follow all
safety instructions in this manual.
Product May Vary Slightly
From Pictured
v.V
Advertisement

Related Manuals for Orbit Fitness T6610N


Summary of Contents for Orbit Fitness T6610N
- Page 1 T6610N Owner’s Manual WARNING Exercise can present a health risk. Consult a physician before beginning any exercise program with this equipment. If you feel faint or dizzy, immediately discontinue use of this equipment. Serious bodily injury can occur if this equipment is not assembled and used correctly.
- Page 2 TABLE OF CONTENTS Page Page Safety Instructions Maintenance Hardware Identification Chart Storage Assembly Instructions Product Parts Drawing Using The Electronic Meter Parts List Operational Instructions SAFETY INSTRUCTIONS WARNING: To reduce the risk of serious injury, read the following Safety Instructions before using the 2 in 1 Rower / Recumbent Bike.
- Page 3 HAREWARE INDETIFICATION CHART This chart is provided to help identify the hardware used in the assembly process. Place the washers, the end of the bolts, or screws on the circles to check for the correct diameter. Use the small scale to check the length of the bolts and screws.
- Page 4 Part No. and Description 97 Bolt, Hex Head M8x1.25x16mm 101 Bolt, Hex Head M10x1.5x85mm 102 Bolt, Hex Head M10x1.5x95mm 103 Bolt, Hex Head M10x1.5x125mm 104 Nylock Nut M8x1.25mm 105 Nylock Nut M10x1.5mm 109 Large Washer M8x23mm 114 Bolt, Button Head M8x12mm 115 Bolt, Round Head M5x0.8x12mm...
-
Page 5: Assembly Instructions
ASSEMBLY INSTRUCTIONS Place all parts form the box in a cleared area and position them on the floor in front of you. Remove all packing materials from your area and place them back into the box. Do not dispose of the packing materials until assembly is completed. - Page 6 ASSEMBLY INSTRUCTIONS STEP 4: Attach the SUPPORT BRACKET(60) onto the RAIL(52) with HEX BOLTS(M8x16mm)(97). Press the NUT CAPS(79) onto NYLOCK NUT(M10)(105) and HEX BOLTM10x75mm (100). STEP 5: Attach the RAIL(52) onto the MAIN FRAME(1) by sliding the RAIL PIVOT(49) into the bracket on the MAIN FRAME(1) and securing with HEX BOLT (M10125mm)(103) and NYLOCK NUT(M10)(105).
- Page 7 ASSEMBLY INSTRUCTIONS NOTE: Be careful not to damage the PULSE SENSOR WIRES(73,74) while doing assembly STEP 8 to STEP 10. STEP 8: Attach the HANDRAIL(70) onto the SEAT CARRIAGE(64) with BUTTON HEAD BOLTS (M8x12mm)(114). STEP 9: Attach the SEAT(68) onto the SEAT CARRIAGE(64) with ROUND HEAD BOLTS(M6x15mm)(95). Attach the BACK CUSHION(69) onto the SEAT CARRIAGE(64) with ROUND HEAD BOLTS (M6x30mm)(96).
- Page 8 ASSEMBLY INSTRUCTIONS NOTE: The RIGHT PEDAL(41) has R stamped on the end of the pedal shaft. The RIGHT PEDAL(41) has right hand threads and is tightened by turning clockwise. The LEFT PEDAL(39) has L stamped on the end of the pedal shaft. The LEFT PEDAL(39) has left hand threads and is tightened by turning counter clockwise.
- Page 9 ASSEMBLY INSTRUCTIONS FIG 1 Adjustment Pad STEP 13: Insert the SENSOR WIRE(29) and PULSE CONNECTION WIRE(75) into the bottom end of METER POST(31) and pull them out of the top of the METER POST(31). Pull the HANDLEBAR(25), twist the STRAP(21) and slide the strap thru the gap into the hole in the bottom of the METER POST(31).
- Page 10 “CONSOLE INSTRUCTIONS” Take a few minutes to review the console layout. Below is an overview of the console’s features and functions We recommend that you use the console to help vary your workout routine and keep you focused on your process toward your fitness goals.
- Page 11 “C ONSOLE NSTRUCTIONS – ONSOLE UTTONS ” onsole uttons START/PAUSE a. Press to begin your exercise START/PAUSE b. Press again to stop and pause all functions during your exercise program. All the date on the display will then freeze. START/PAUSE c.
- Page 12 “C ONSOLE NSTRUCTIONS – ONSOLE UTTONS ” START/PAUSE MODE During workout (after pressing ), the user could press to select SPEED, DISTANCE and CALORIES, or RPM, ODO (Odometer) and WATT. RPM, ODO, WATT will show at the same time SPEED, DISTANCE, CAL. will show at the same time DISTANCE and ODO (ODOMETER) information: ...
- Page 13 “C ONSOLE NSTRUCTIONS”– ONSOLE UNCTIONS” onsole unctions PROGRAM: The console comes with 16 preset programs Displays programs for selection during setup, from P1 ~ P16 Displays the selected program during exercise LEVEL: Displays torque/resistance level of the current program, from 1 to 16 torque/resistance level;...
- Page 14 “C ONSOLE NSTRUCTIONS”– ONSOLE UNCTIONS” CALORIES: Count Up: If target calories were not selected, this measures total calories your body burned during exercise Count Down: If you have set the preference value of calories, the console will count down from that selected target calories down to 0 BMR: ...
- Page 15 “C ONSOLE NSTRUCTIONS – ANUAL ROGRAM (P1)” “1” Prior information: Press any button on the console or begin pedaling to turn on the console a. Make sure that the power cord is properly plugged into the socket. b. The console would automatically shut off after 60 seconds of inactivity c.
- Page 16 “C ONSOLE NSTRUCTIONS – ANUAL ROGRAM (P1)” “B. SET THE DESIRED TIME or DESIRED DISTANCE To avoid the user to select TIME and DISTANCE in the same program to confuse the user couldn’t distinguish which one (TIME or DISTANCE) as the first priority. User could only select TIME or DISTANCE in the same program, one at the time If you would like to select TIME value, not If you would like to select DISTANCE value, not...
- Page 17 “C ONSOLE NSTRUCTIONS – ANUAL ROGRAM (P1)” “C. SET THE DESIRED CALORIES and YOUR AGE” 1. ENTER UP or DOWN button and then button: ENTER a. Press button to confirm TIME or DISTANCE value and enter the mode to set the CALORIES UP or DOWN b.
- Page 18 “C ONSOLE NSTRUCTIONS – ANUAL ROGRAM (P1)” “F. DURING WORKOUT, THE TORQUE/TENSION LEVEL IS EASILY CHANGED AT ANY TIME” UP or DOWN button: You can change the torque/tension level (from 1 to 16 levels) at any UP or DOWN time during workout by pressing button G.
- Page 19 “C ONSOLE NSTRUCTIONS – ROGRAM (P2 ~ P7)” “1” Prior information: Press any button on the console or begin pedaling to turn on the console Make sure that the power cord is properly plugged into the socket The console would automatically shut off after 60 seconds of inactivity Press any button on the console or begin pedaling to turn on the console.
- Page 20 “C ONSOLE NSTRUCTIONS – ROGRAM (P2 ~ P7)” “3” Normal way to operate PROGRAM (P2~P7) “A.“ENTER MANUAL PROGRAM (P2~P7)” a. START/PAUSE button: START/PAUSE If you have selected other program (P1 or P8 ~ P16), pressing button to pause the current program b.
- Page 21 “C ONSOLE NSTRUCTIONS – ROGRAM (P2 ~ P7)” “C. SET THE DESIRED CALORIES and YOUR AGE” 1. ENTER UP or DOWN button and then button: ENTER a. Press button to confirm the TIME or DISTANCE value and enter the mode to set the CALORIES UP or DOWN b.
- Page 22 “C ONSOLE NSTRUCTIONS – ROGRAM (P2 ~ P7)” “F. DURING WORKOUT, THE TORQUE/TENSION LEVEL IS EASILY CHANGED AT ANY TIME” UP or DOWN button: You can change the torque/tension level (from 1 to 16 levels) at any UP or DOWN time during workout by pressing button G.
- Page 23 “C ONSOLE NSTRUCTIONS – ROGRAM (P8)” “1” Prior information: Press any button on the console or begin pedaling to turn on the console Make sure that the power cord is properly plugged into the socket. The console would automatically shut off after 60 seconds of inactivity Press any button on the console or begin pedaling to turn on the console.
- Page 24 “C ONSOLE NSTRUCTIONS – ROGRAM (P8)” “B. SET THE PERSONAL INFO. ( GENDER, HEIGHT and AGE )” 1. UP or DOWN button: ENTER After pressing the button, the GENDER function mode will appear with the display UP or DOWN flashing “ ”.
- Page 25 “C ONSOLE NSTRUCTIONS – ROGRAM (P8)” “D. THE BODY FAT RESULT INFORMATION” The illustration on the left is just an example to show you what the result should look like, each person has different body fat condition depends on the user’s current health condition from time to time 1.
- Page 26 “C ONSOLE NSTRUCTIONS – ROGRAM (P8)” “D. THE BODY FAT RESULT INFORMATION” 4. BODY TYPE: Refer to the following list to determine what your body type is: Type 1 5% ~ 9% (fat %) Underweight Type 2 10% ~ 14% Slim Class 1 (fat %) Type 3...
- Page 27 “C ONSOLE NSTRUCTIONS – ROGRAM (P9 ~ P12)” T.H.R. 60% H.R.C. 85% H.R.C. 75% H.R.C. “1” Prior information: Press any button on the console or begin pedaling to turn on the console Make sure that the power cord is properly plugged into the socket The console would automatically shut off after 60 seconds of inactivity Press any button on the console or begin pedaling to turn on the console.
- Page 28 “C ONSOLE NSTRUCTIONS – ROGRAM (P9 ~ P12)” “B. SET THE DESIRED TIME or DESIRED DISTANCE To avoid the user to select TIME and DISTANCE in the same program to confuse the user couldn’t distinguish which one (TIME or DISTANCE) as the first priority. User could only select TIME or DISTANCE in the same program, one at the time If you would like to select TIME value, not If you would like to select DISTANCE value, not...
- Page 29 “C ONSOLE NSTRUCTIONS – ROGRAM (P9 ~ P12)” “D. SET THE TARGET HEART RATE or YOUR AGE” If you have selected PROGRAM 9, select TARGET If you have selected PROGRAM 10~12, select HEART RATE: your AGE: ENTER UP or DOWN ENTER UP or DOWN button and then...
- Page 30 “C ONSOLE NSTRUCTIONS – ROGRAM (P9 ~ P12)” “F. START EXERCISE” START/ PAUSE START/ PAUSE button: Press to begin exercise. “START” would then appear on the screen “ G. DURING WORKOUT, ALWAYS MONITOR YOUR CURRENT HEART RATE STATUS” NOTE for HEART RATE: ...
- Page 31 “C ONSOLE NSTRUCTIONS – ETTING ROGRAM (P13 ~ P16)” “1” Prior information: Press any button on the console or begin pedaling to turn on the console a. Make sure that the power cord is properly plugged into the socket b. The console would automatically shut off after 60 seconds of inactivity c.
- Page 32 “C ONSOLE NSTRUCTIONS – ETTING ROGRAM (P13 ~ P16)” “B. SET THE DESIRED TIME or DESIRED DISTANCE To avoid the user to select TIME and DISTANCE in the same program to confuse the user couldn’t distinguish which one (TIME or DISTANCE) as the first priority. User could only select TIME or DISTANCE in the same program, one at the time.
- Page 33 “C ONSOLE NSTRUCTIONS – ETTING ROGRAM (P13 ~ P16)” “D. SET THE DESIRED CALORIES and YOUR AGE” ENTER UP or DOWN button and then button: ENTER a. Press button to confirm the CALORIES value and enter the mode to set the AGE UP or DOWN b.
- Page 34 “C ONSOLE NSTRUCTIONS – ETTING ROGRAM (P13 ~ P16)” “H. DURING WORKOUT, THE TORQUE/TENSION LEVEL IS EASILY CHANGED AT ANY TIME” UP or DOWN button: You can change the torque/tension level (from 1 to 16 levels) at any UP or DOWN time during workout by pressing button I.
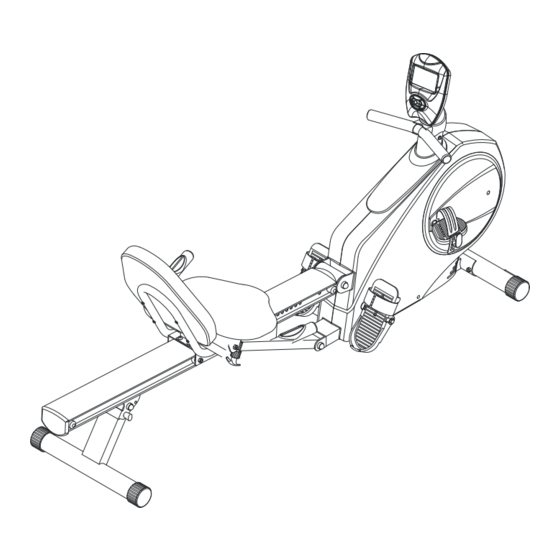
- Page 35 OPERATIONAL INSTRUCTIONS RECUMBENT BIKE MODE AND ROWER MODE Your 2 in 1 Rower / Recumbent Bike can be used in the Recumbent Bike mode or the Rower mode. When the SPRING PIN(67) locks the SEAT ASSEMBLY to the RAIL(52), the 2 in 1 Rower/ Recumbent Bike is in the Recumbent Bike mode.
- Page 36 OPERATIONAL INSTRUCTIONS MAINTENANCE The safety and integrity designed into the 2 in 1 Rower / Recumbent Bike can only be maintained when the 2 in 1 Rower / Recumbent Bike is regularly examined for damage and wear. Special attention should be given to the following: 1.
- Page 37 STORAGE 1. To store the 2 in 1 Rower / Recumbent Bike simply keep it in a clean dry place. 2. To avoid damage to the electronics meter, remove the batteries before storing the 2 in 1 Rower / Recumbent Bike for one year or more. 3.
-
Page 39: Parts List
PARTS LIST PART NAME PART NAME Main Frame Flange Bolt M8x1.25x25mm Front Stabilizer Left Pedal Axle Left Pedal Strap Pulley Right Pedal Strap Wheel Right Pedal Strap Connection Wheel Stand One Way Bearing Pedal Shaft Bearing (6004Z) Spacer C Ring M20 Foot Pedal Bearing Housing Pedal Strap... - Page 40 PART NAME PART NAME Pulse Connection Wire Allen Wrench 6mm Moving Wheel Manual Round Endcap 60mm Bolt, Button Head M8x12mm Round Plug 25mm Bolt, Button Head M5x0.8x12mm Nut Cap M10 Carriage Bolt M8x1.25x60mm Carriage Bolt M8x18mm Screw, Round Head M4x20mm Screw, Round Head M4x25mm Screw, Round Head M5x18mm Screw, Round Head M5x0.8x15mm...
Need help?
Do you have a question about the T6610N and is the answer not in the manual?
Questions and answers