
Subscribe to Our Youtube Channel
Related Manuals for Advanced Illumination Pulsar 320


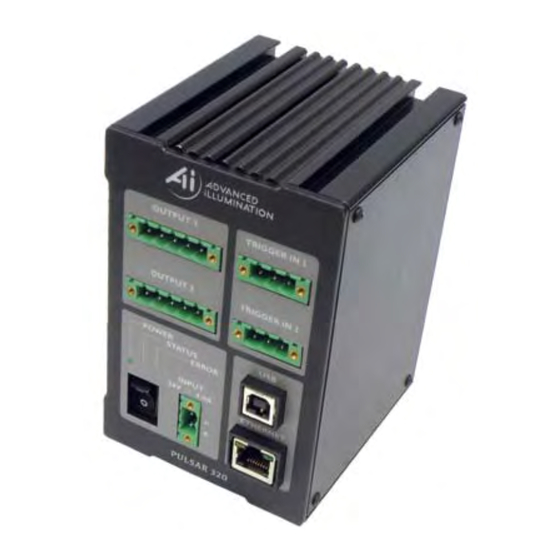
Summary of Contents for Advanced Illumination Pulsar 320
- Page 1 Pulsar 320 Strobe Controller Operator’s Manual & Installation Guide P u l s a r 3 2 0 M a n u a l...
- Page 2 050051 REV-03 Manual, Operation, Pulsar 320 The shipping container should contain the following items: Packing List Description Ai Part # Pulsar 320 Controller 1805314 3 Pin, Trigger input connectors 1777989 2 Pin, Power input connector 172-1024 USB Cable (x2) A d v a n c e d i l l u m i n a t i o n , I n c.
- Page 3 ........3.1 Pulsar 320 Controller Cable Connections 3.1.1...
- Page 4 Software Installation 4.4.2 Running Under Host Computer Control 4.4.2.1 Configure Pulsar 320 4.4.2.2 Launch Pulsar 320 Controller User Interface 4.4.2.3 Pulsar 320 Utility Dialog Box Status Indicators 4.4.2.3.1 Light Head 4.4.2.3.2 USB Connection 4.4.2.3.3 Status Panels 4.4.2.4 Pulsar 320 User Interface Output Controls 4.4.2.4.1...
- Page 5 ........Figure 3: Pulsar 320 Light head output connection ......
-
Page 6: Introduction
Pulsar 320. In certain modes of operation, the output voltages and currents provided by the Pulsar 320 could result in a potentially injurious or fatal electrical shock. For this reason, light heads should be connected BEFORE the power switch is turned on. -
Page 7: Return Policy
original date of purchase. Should a defect develop during this period, return the complete product, freight prepaid, to one of Ai’s distributors or to the Ai factory. Ai will inspect the unit, and if a defect is found will, at our option, repair or replace the product without charge. -
Page 8: Features
2.0 Features The following is a brief overview of the features provided by the Pulsar 320. These features will be covered in greater detail within the Operation and Specification sections of the manual. 2.1 Light Head Outputs Two outputs capable of high power are provided. Each will provide up to 50A of pulse current drive. - Page 9 3.1.2 Light Head: Figure 3 shows how the output connectors on the front panel of the Pulsar 320 mates with the light head connectors. Plug the P u l s a r 3 2 0 M a n u a l...
-
Page 10: Figure 3: Pulsar 320 Light Head Output Connection
Figure 3: Pulsar 320 Light Head Output Connection 3.2.1 Green: This light indicates that the Pulsar 320 has power either from the USB connection to the host computer or the main 24VDC power connection. 3.2.2 Amber: The amber light indicates the operational status of the Pulsar 320. -
Page 11: Figure 5: Usb Dialog Open
3. Launch Pulsar 320 Utility 4. Choose USB 5. Select a USB port. Use port 0 by default. Press Connect Figure 5: USB Dialog Open 6. Upon Connecting to a USB port, the strobe settings window will open (Fig 6) - Grayed-out outputs mean no light is connected. -
Page 12: Figure 7: Ready To Program Test Mode
The Pulsar 320 can communicate via ETHERNET. For instructions on this, please refer to the TCP/IP setup guide in Appendix D. 4.0 Operation The following section details the procedures for operation of the Pulsar 320 Controller and defines its various operating modes. 4.1 Definition of Terms The following terms are used within this manual and, more generally, in relation to machine vision illumination. - Page 13 4.1.3.4 Light head Characteristics: Also contained within the data provided by Signatech II to the Pulsar 320 are the number and type of LEDs in each string and the number of parallel strings connected to each channel.
-
Page 14: Trigger Delay
Several modes of trigger operation are provided for in the Pulsar 320. The trigger may start on either a rising or falling edge. For test purposes, the Pulsar 320 also has an internal trigger source. - Page 15 4.2.2 Trigger: The trigger input connectors are located at the upper right of the Pulsar 320’s front panel. The differential trigger levels are CMOS/TTL compatible but will accept input pulses as great as 30 V. Two input trigger connectors are provided, one for each output. One trigger may be mapped to both outputs.
-
Page 16: Figure 8: Usb Connection
4.3.2 Amber: The amber light indicates the operational status of the Pulsar 320. A blink rate of once per second indicates normal operation. A blink rate of 5 times per second indicates an error condition. 4.3.3 Red: The red light blinks an error code in the case of an error condition. The condition is indicated by three sets of sequential flashes. For... -
Page 17: Figure 9: Light Head Connection Diagram
Figure 9: Light Head Connection Diagram Table 1: Pin Function Chart P u l s a r 3 2 0 M a n u a l P u l s a r 3 2 0 M a n u a l... -
Page 18: Figure 10A: Software Installation Window
4.4.1 Software Installation: Pulsar 320 Controller user interface software is required to set the operational parameters of the Pulsar 320. This utility program is included online at our website, and is installed as follows: Note: Administrator Access to the system is usually required to install the software. Note: Supported operating systems are Windows XP through Windows Figure 10A: Software Installation Window 1. The software can be found on our website under: Resources ->... -
Page 19: Figure 11A: Gui Dialog Window
3. Close all open applications if prompted and press OK. 4. Select a Program Group or use the default (Advanced Illumination) and click Next. (See figure 10B.) Note: If for some reason the automatic installation program cannot be used, the software can be manually installed as follows: Place the four support files from the downloads in the same folder on the PC. -
Page 20: Figure 11B: Tcp/Ip Dialog Window
Settings IPDialog Slew Rate Address Channel 1 High High High Channel 2 Subnet High Differential Trigger Trigger 1 Gateway Trigger 2 High Advanced Settings Cancel Limit Output to 48V Figure 11B: TCP/IP Dialog Window Close Figure 11C: Settings Window D. TCP/IP: Opens TCP/IP connection dialog E. Settings: Opens Pulsar 320 configuration settings dialog 1. - Page 21 Pulsar 320 allowing the settings to take effect. The program button will be highlighted to indicate that there are new settings that have not yet been transferred to the Pulsar 320. 4.4.2.4.3 Mode: One of four modes can be selected here.
- Page 22 Each slider control has a scale adjustment. All settings are internally checked by the Pulsar 320 for compatibility with the attached light head. Settings that will overdrive the light head will not be allowed.
- Page 23 In the single-ended trigger configuration, the input will accept TTL/CMOS compatible signals and is internally clamped so that trigger inputs of up to 30 V may be applied. If the differential trigger connection is chosen, the Pulsar 320 will recognize input logic levels that are compliant with RS232/485 protocol. For all triggered modes, the trigger signal should have a minimum width of 2 microseconds and a rise and fall time of less than 200 nanoseconds.
-
Page 24: Figure 12: Trigger Connector
6.0 Troubleshooting 6.1 Pulsar 320 Status Indicator Lights There are three LED indicators on the front panel of the Pulsar 320. During normal operation, the green LED will be illuminated indicating that power is “on.” Just to the right of the green LED, an amber LED will pulse at about 1 pulse per second. - Page 25 If a code is encountered which is not listed here, the operator should contact Technical Support at Advanced illumination for further assistance. If the corrective action suggested for the listed error code does not resolve the problem, the operator should contact Advanced illumination.
- Page 26 7.0 Specifications Requirements Notes Packaging Dimensions and 453.6 g (1.0 lb) Weight weight are measured Dimensions 96.52mm x 86.36mm x 129.54mm excluding LCD display (3.8” L x 3.4” W x 5.10” H) and din rail plate Optional bolt-on din rail Din Rail Mounting Feature mounting plate Hardware Config.
- Page 27 (Specifications cont.) Uses VB application for user control PC Application Abstracts Pulsar firmware protocol Available by request PC DLL from VB app. USB compatible TCP/IP via 10/100Base-T Performed by Advanced Firmware Updates via USB Loader software illumination, Inc. High Level Source - ‘C’ Available by request Standard User Interface Power switch (Rocker on/off) Provides Pulses @ 50...
- Page 28 (Specifications cont.) Ethernet Not fully supported by (Electrical) Ethernet current software interface 8 position - 8 conductor RJ45 w/ Link and Rx/Tx LEDs for (Mechanical) metal shield Ethernet TCP/IP , UDP , TFTP via 10/100Base-T (Protocol) Other protocols TBD Trigger 1 Trigger may be 2 Independent Trigger Inputs (Electrical)
-
Page 29: Table 3: Specifications
This information is provided as a reference and may be used when developing custom integration solutions. It is advised that users contact Advanced illumination when special requirements exist. Dip switch S1 and momentary switches SW2 & SW3 are located on the main pc board. Removal of the back plate is required to gain access (see Figure 14). -
Page 30: Table 4: Internal Switch Functions
Dip Switches: S1 Normal Number Description Operation State Used to force firmware to stay in boot loader H8 Emulator enable Firmware write enable. Allows the H8 flash to be written Internal programming mode. Used to enable the embedded flash programming algorithm. Need to be OFF for initial loading of firmware over USB. -
Page 31: Figure 14: S1, Sw2 & Sw3 Locations
Figure 14: S1, SW2 & SW3 Locations Note: SW2 & SW3 are not installed in some early production units. P u l s a r 3 2 0 M a n u a l P u l s a r 3 2 0 M a n u a l... - Page 32 9.0 Appendixes Appendix A: Trigger connection diagram Appendix B: Pulsar 320 Loader utility Appendix C: Installation Drawing Appendix D: TCP/IP Setup Instructions a d v a n c e d i l l u m i n a t i o n . c o m...
-
Page 33: Figure 15: Trigger Connection Diagram
Appendix A Appendix A: Figure 15 Trigger Connection Diagram P u l s a r 3 2 0 M a n u a l P u l s a r 3 2 0 M a n u a l... - Page 34 a d v a n c e d i l l u m i n a t i o n . c o m...
- Page 35 P u l s a r 3 2 0 M a n u a l P u l s a r 3 2 0 M a n u a l...
- Page 36 Appendix B Appendix B - Figure 19: Pulsar 320 Loader Utility a d v a n c e d i l l u m i n a t i o n . c o m...
- Page 37 Initial LED Temp*: Factory Set *This parameter contains information that could be harmful to the attached light head if altered. Advanced Illumination assumes NO responsibility for damaged products if this parameter is changed from factory settings without prior approval* Supply Overhead:...
- Page 38 LIGHTHEAD DATA*: *This section contains information that could be harmful to the attached light head if altered. Advanced illumination assumes NO responsibility for damaged products if any information in this section is changed from factory settings without prior ap- proval*...
-
Page 39: Figure 20: Installation Drawings
Appendix C: Appendix C - Figure 20: Installation Drawings P u l s a r 3 2 0 M a n u a l P u l s a r 3 2 0 M a n u a l... -
Page 40: Figure 21: Windows Ip Configuration
- Direct connect with a single PC connection 2.0 Connection to the Pulsar 320 - Pulsar 320 TCP/IP setup TCP/IP Connection through network to Pulsar 320: PC Setup Find your current IP address and determine whether it is static or dynamic: 1. -
Page 41: Figure 22: Local Area Properties
If the current IP address is: Static, then this IP will need to be changed to Dynamic by enabling DCHP. Dynamic, then take note of: IP Address, Subnet Mask, Default Gateway, then continue to Pulsar Setup. Enable DHCP (Windows XP) 1. -
Page 42: Figure 24: Windows Ip Configuration
Direct TCP/IP connection from single PC to Pulsar320 PC Setup You will need to assign a static IP to the host PC Find your current IP address and whether it is static or dynamic: 1. Open Windows Start menu 2. Select Run 3. - Page 43 If the current IP address is: - Static, then make note of the IP address, subnet mask, and default gateway. You will need to assign the Pulsar 320 network settings so they work in the same range. - Dynamic, then assign a static IP address instead (covered in the following pages).
- Page 44 3. Classic view: Open Network Connections Category view: Select Network and Internet Connections, and then Network Connections 4. Double-click on your active LAN or Internet Connection 5. Click Properties This opens the Local Area Connections Properties window 6. In the General tab, highlight the Internet Protocol (TCP/IP) item, and click Properties.
-
Page 45: Figure 25: Usb Port Configuration
Appendix D - Figure 25: USB Port Configuration Connect to the Pulsar 320 The Pulsar must first be configured via USB. 1. Connect the target Pulsar 320 unit via USB cable to host PC 2. Connect 24VDC power source and toggle the controller ON 3. Launch “PulsarV00_02.exe” 4. In the parent window, select the USB icon to establish a USB connection This will open the USB port select dialog. -
Page 46: Figure 26: Pulsar Tcp/Ip Connection And Ip Dialog Window
10. Subnet Mask is a division of networks into separate pieces. Essentially you will want both host PC and Pulsar 320 to be on the same subnet so they can find each other. Enter the value found from your PC settings. Example: PC Subnet: 255.255.255.0 Pulsar 320 Subnet: 255.255.255.0... - Page 47 17. Press ADD to add a new device to the list. 18. Name the device for easy recognition and enter all the proper IP settings that were loaded onto the controller. Once finished, press OK 19. Select the newly added device and press Connect to establish the TCP/IP connection to that device. P u l s a r 3 2 0 M a n u a l P u l s a r 3 2 0 M a n u a l...
- Page 48 a d v a n c e d i l l u m i n a t i o n . c o m...
Need help?
Do you have a question about the Pulsar 320 and is the answer not in the manual?
Questions and answers