Advertisement
Table of Contents
Remote Monitoring
Color Weather Station
Welcome!
--------------
Congratulations on your new Professional Weather Station and welcome to
the La Crosse Technology family! This product was designed with you in mind
by our hometown team of weather enthusiasts based in La Crosse, Wisconsin.
Instructional Manual
Model: C84343
DC: 082717
www.lacrossetechnology.com/C84343
Remote Monitoring Color Weather Station
Page | 1
Advertisement
Table of Contents

Related Manuals for La Crosse Technology C84343


Summary of Contents for La Crosse Technology C84343
- Page 1 Welcome! -------------- Congratulations on your new Professional Weather Station and welcome to the La Crosse Technology family! This product was designed with you in mind by our hometown team of weather enthusiasts based in La Crosse, Wisconsin. Instructional Manual Model: C84343 DC: 082717 www.lacrossetechnology.com/C84343...
- Page 2 Table of Contents Temperature | Humidity Trend Arrows Step 1: Power Up Daily HI | LO Temperatures Step 2: Station Options Seasonal Changes in Foliage Step 3: Mounting Basics Backlight Brightness Option 1: Connect with La Crosse View Low Battery Icons Wi-Fi Network Requirements Sensor ID | Sensor Search La Crosse View...
-
Page 3: Step 3: Mounting Basics
STEP 1. Power Up Insert the included batteries: • 2-AA batteries into thermo-hygro sensor • 5 volt power cord (required) into your weather station *3-AA batteries for optional backup of your time and date *Battery operation only, station will not update sensor or Wi-Fi data. Power cord is required. ST EP 2 : St at ion Op t ions O PT IO N 1 CON N ECT WI T H L A C R OS S E VI EW ™... -
Page 4: Wi-Fi Network Requirements
Option 1: Connect with La Crosse View™ DOWNLOAD • Visit the App Store or Google Play Store to download the free La Crosse View™ app on your mobile device. CHE CK YOU R N ETWO R K • Confirm that your mobile device is connected to a 2.4GHz (802.11 b/g/n) Wi-Fi band before trying to connect your station to the La Crosse View app. -
Page 5: New Data Stream Technology
Note: If switching to a new Wi-Fi network, your station may take up to 3 minutes to reacquire all sensor information. Note: In the event of a power outage, or your station being unplugged temporarily, your station should automatically reconnect to your existing Wi-Fi network, once power is reestablished. Note: Weather station power cord use is required. - Page 6 La Crosse View™ Enhancements NWS (National Weather Service) Daily HI | LO temperature Note: When not using the app, the daily HI | LO will come from your outdoor TH sensor. NWS Chance of Precipitation The letters NWS will show in the forecast area NWS Additional Forecast Icons Standard Icons: Sunny •...
-
Page 7: Simple Status Messages
New Data Stream Technology Use the Data Stream Menu in the La Crosse View™ app to select up to 3 items to stream on your station. 1. Open the La Crosse View™ app and select your station. 2. Scroll down to the Data Stream section and press the blue icon. 3. - Page 8 “LOST Wi-Fi” • Check your power cord connection. (power cord required to connect) • When trying to reestablish your station’s Wi-Fi connection, be sure your mobile device is on the same 2.4GHz network you want your station to use. • Check your network connection. •...
-
Page 9: Connect Additional Sensors To Your
Compatible ™ additional sensors start with the letters “LTV-”. Always check your product page for available sensors: www.lacrossetechnology.com/C84343 For support and guidance of your La Crosse View™ app, please visit: www.lacrossetechnology.com/lacrosseviewsupport Remote Monitoring Color Weather Station... - Page 10 Option 2: Standalone Station When operating as a standalone station, you can manually adjust your stations settings app, time and date will be set automatically. Note: When using the La Crosse View ™ Settings Menu 1. Hold the SET button for 3 seconds to enter settings menu. 2.
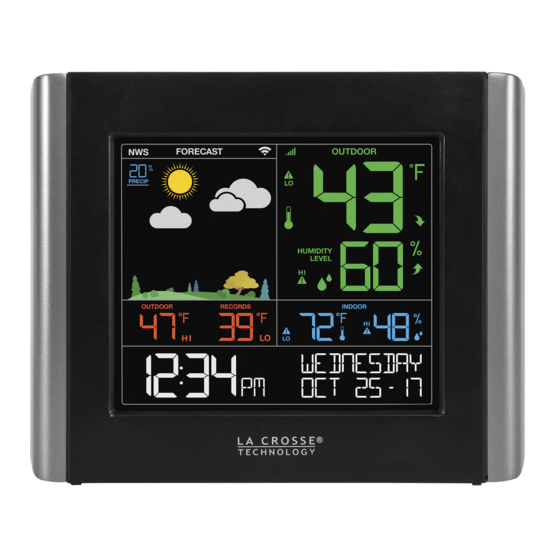
- Page 11 Your Station’s Features - Standalone or Connected NWS Forecast Information: Trend Arrows Precipitation, HI | LO, etc. Weather Forecast Icons Fahrenheit or Celsius - Temperature Percentage - Relative Humidity Wi-Fi Connection Icon Relative Humidity Icon Low Battery Icons Sensor Reception Icon Temperature Icon Standalone stations can only display Connected stations offer the ability to...
-
Page 12: Reset Hi | Lo Temperature/Humidity Records
HI | LO Temperature/Humidity Records Press and release the TEMP button to view your HI and LO records with time and date of occurrence. A new HI or LO record will replace the existing record. Viewing order: • Outdoor HI Temp with Time/Date •... - Page 13 Alerts: Temperature | Humidity Programmable Temperature and Humidity alerts keep you on top of changing conditions. To set alerts: 1. Hold the ALERTS button to enter alert set mode 2. Outdoor LOW temperature alert OFF will show. 3. If you wish to set this alert value, press the + or – buttons to arm this alert (ON). 4.
- Page 14 Active Alerts • When armed alert value is reached, station will beep 5 times each minute, until out of alert range. • The flashing alert icon will indicate the type of alert HI or LO. • Press any button to stop the alert from sounding. •...
- Page 15 Seasonal Changes in Foliage The tree foliage will change seasonally on your weather station. The dates are programmed into your weather station for an automatic foliage change. Spring Summer June 21st – Sept. 20th March 20th – June 20th Autumn Winter Sept.
- Page 16 Sensor ID | Sensor Search Each of your sensors has an individual ID number, located on its bar code. This sensor ID is visible on your station by pressing the SENSOR button. View ID numbers: • Press and release the SENSOR button to view individual station and sensor ID numbers. All other information will disappear temporarily.
- Page 17 Factory Reset A factory restart of your station will remove your sensor ID numbers and Wi-Fi settings and return your station to its default settings and “out of the box” condition. This may resolve connection issues with your sensors or Wi-Fi.
- Page 18 If you have ideas for features or support solutions you’d like to see us make, please let us know! We truly want to make owning a La Crosse Technology product not only a practical experience, but also a fun one. So email us at: store@lacrossetechnology.com...
-
Page 19: Specifications
Up to 400 feet (121 meters) in open air, RF 915 MHz Wi-Fi Transmission: RF 2.4 GHz Power C84343 Station: 5.0 Volt 600mA power cord included (Required) AC6 HX06-0500600-AU-001 Input: 100-240V 0.3A 50/60Hz 3-AA batteries included, backup for time and date Optional Battery Backup:... -
Page 20: Care And Maintenance
• Promptly remove expired batteries. Warranty and Support La Crosse Technology, Ltd. provides a 1-year limited time warranty (from date of purchase) on this product relating to manufacturing defects in materials & workmanship. Before returning a product, please contact our friendly customer support with questions or visit our online help:... -
Page 21: Fcc Statement
FCC Statement This equipment has been tested and found to comply with the limits for a Class B digital device, pursuant to part 15 of the FCC Rules. These limits are designed to provide reasonable protection against harmful interference in a residential installation. This equipment generates, uses and can radiate radio frequency energy and, if not installed and used in accordance with the instructions, may cause harmful interference to radio communications.
Need help?
Do you have a question about the C84343 and is the answer not in the manual?
Questions and answers
I don't seem to be able to connect to the remote sensor after replacing batteries in both the sensor and the Station display. The inside Temperature seems to work fine but the outside temperature doesn't show. Until I replaced the batteries a couple of weeks ago, everything was working fine. I have been using the station as a stand alone station. It is model C84343 and I believe it is about 5 years old, received as a gift. I can see the outside temperature and humidity on the sensor but it does not transmit to the station. Also, the buttons on the top of the station seem to be very loose, and fall off easily. My wifi is not on 2.4 GHz and I don't believe it can change. It is on the other, I believe something like 5 GHz.
To troubleshoot the remote sensor connection issue for the La Crosse Technology model C84343 after replacing the batteries, follow these steps:
1. Remove Batteries from the Old Sensor – Take out the batteries from your previous sensor.
2. View Sensor ID – Press and release the SENSOR button on the station to display the sensor ID number.
3. Delete Old Sensor ID – While viewing the sensor ID, hold the MINUS button for 5 seconds until dashes appear, indicating the ID is deleted.
4. Search for New Sensor – Your station will begin searching for a new sensor.
5. Install Batteries in the New Sensor – Insert the batteries into your new sensor and wait up to three minutes for the station to detect and display the new sensor readings and ID.
6. Manually Send Signal (Optional) – If the station does not detect the sensor, press the TX button under the battery cover of the sensor to send a signal immediately.
If the issue persists, consider performing a factory reset on the station by holding the ALERTS and LIGHT buttons together for 5 seconds.
This answer is automatically generated
I lost my wfi connection and have tried to reconnect following the steps in the manual, including a factory reset. I've confirmed that the phone is on a 2.4ghz signal but it is still not able to connect to wifi. What can I do now to reconnect to wifi?