Crow Runner Series User Manual
Wireless and wired control panel runner (new look) led keypad
Hide thumbs
Also See for Runner Series:
- Installation and configuration manual (192 pages) ,
- User manual (44 pages) ,
- Quick programming manual (2 pages)

Related Manuals for Crow Runner Series


Summary of Contents for Crow Runner Series
- Page 1 ELECTRONIC ENGINEERING LTD Runner Series IRELESS AND IRED ONTROL ANEL User’s Guide Covers: Runner (New Look) LED Keypad & Runner (New Look) LCD Keypad (Coming Soon) Rev: C G.T. (Updated) April 2008...
- Page 2 Crow’s obligation is limited to repairing or replacing this product, at its option, free of charge for materials or labor, if it is proved to be defective in materials or workmanship under normal use and service. Crow shall have no obligation under this Limited Warranty or otherwise if the product is altered or improperly repaired or serviced by anyone other then Crow.
- Page 3 Contents INTRODUCTION ...........................1 ....................... 1 LARM ONTROL YSTEM ....................1 YPICAL LARM YSTEM ONFIGURATION KEYPAD DESCRIPTION ........................2 ..........................2 UNCTION .......................... 2 LPHANUMERIC ..........................2 UDIBLE IGNALS ............................. 3 NDICATORS ........................3 UMMARY OF UNCTIONS OPERATING THE KEYPAD ........................4 ....................4 OW TO RM THE YSTEM BEFORE...
- Page 4 Contents ....................15 SING THE EMOTE OMMAND ONTROL ......................16 SING OCAL OMMAND ONTROL LCD KEYPAD............................17 ..................17 DJUSTING ACKLIGHTING AND UZZER LCD K ....................... 18 EYPAD IN OCAL Accessing Local Edit Mode......................18 Local Edit Mode Direct Program Addresses..................18 LCD KEYPAD LOCAL EDIT MODE MENU PROGRAMMING ..............19 Changing the Area Single Character Identifier .................21 Changing the Zone Names......................21 Changing the Keypad Area Name ....................22...
-
Page 5: Introduction
We are really pleased that you chose to protect your premises and possibly even your lives with our RUNNER SERIES from Crow Electronic Engineering Ltd. The RUNNER SERIES is a highly advanced, multifunction alarm control system, designed to flawlessly manage your security system at home or at business, protects you against burglary and supports the operation of multiple electronic devices. -
Page 6: Keypad Description
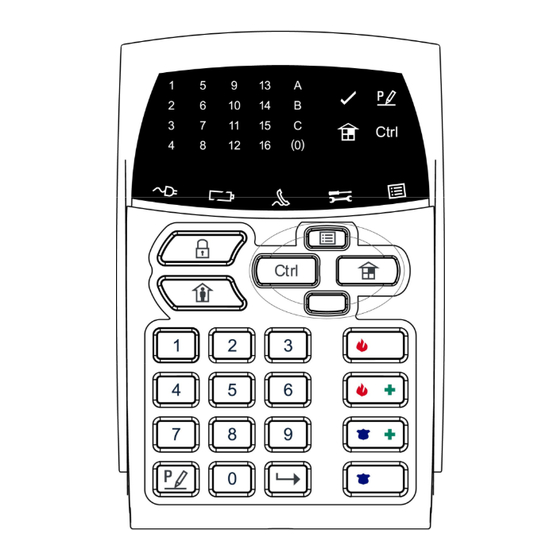
Keypad Description The LED Keypad shows all the information required to operate the system. The User communicates with the alarm system via the keypad. The Keypad displays continuous information about the status of the alarm system, and enables the User to operate the system in different modes, change settings and program Users' access codes. -
Page 7: I Ndicators
Keypad Description Indicators There are 30 LED indicators to show the status of the system. Zone and Status indicators LEDs 1- 16, =zones sealed (ready) Partitions indicators LEDs A or B or C (Spare) Memory indicator= , Bypass indicator= Program indicator= , Mains indicator= Trouble indicator= , Battery indicator=... -
Page 8: Operating The Keypad
Operating the Keypad How to Arm the System before Exit Preparing the System for Arming Verify that all zone indicators are off, when all zones are closed (all doors, exits and windows are closed and motion in the protected area is restricted or bypassed), the system is ready to be armed. -
Page 9: Disarming The System
Operating the Keypad Arming the System While Staying Home Arming the System in Stay Mode This type of arming is used when people are present within the protected area. At nighttime, when the family is about to retire, perimeter zones are protected, but not the interior zones. Consequently, interior movements are ignored by the system. -
Page 10: How To Initiate Panic
Operating the Keypad While in the Bypass mode it is possible to bypass more than one zone, press < >, the Bypass indicator lights to indicate that the system is in bypass mode. Add the zone number (example, 03) one or more zones, the zone LED indicators lights to indicate that the zone is bypassed, then press <... -
Page 11: Ndications
Operating the Keypad How to Read LED Indications LIGHT\INDICATION ON STEADY FLASHING ä â Zone Unsealed All Zones Sealed Normal Memory Display Mode New Memory Event Bypass Off Zone Bypass Mode Active Zone/s Bypassed Run Mode Client Program Mode Installer Program Mode Chime Mode ON Chime Mode OFF Mains (AC) OK... -
Page 12: M Essages
Operating the Keypad How to Read System Messages When viewing the memory events at the keypad by pressing the < >, the first thing that is always displayed is the system messages. If the system led turns ON but no other Zone LED’s are ON at the same time, this means that there are no current system alarms. - Page 13 CABINET TAMPER Cabinet or Satellite Siren Flashing WRONG CODE Code Tamper at Flashing ALARM Keypad # LED’s 1-8 On Steady CROW KEYPAD Keypad Tamper Alarm at On Steady TAMPER SWITCH Keypad # ACTIVATED LED’s 1-8 On Steady LOW BATTERY Controller Battery...
- Page 14 Operating the Keypad HISTORICAL EVENT DISPLAY CHART-Continued EVENT DEVICE INDICATOR STATUS MAINS FAILURE Controller Mains Supply Flashing Controller on-board Flashing Thermal fuses activated FUSE FAILURE LED 1 On Steady (F1 or F2) Wires to Output 1 or 2 LED’s 1 or 2 On Steady OUTPUT 1 or 2 have been cut...
- Page 15 Operating the Keypad HISTORICAL EVENT DISPLAY CHART-Continued EVENT DEVICE INDICATOR STATUS KEYPAD PANIC Panic Alarm at Keypad Flashing On Steady LED’s 1-8 PENDANT PANIC Radio Panic Alarm Flashing On Steady LED’s 9-16 KEYPAD FIRE Fire Alarm at Keypad Flashing Flashing On Steady LED’s 1-8 KEYPAD MEDICAL...
-
Page 16: O Utputs And D Evices
Operating the Keypad How to Control Outputs and Devices The keypad enables you to control external devices, such as an air-conditioner or heater. To activate or halt a device: 1. Press < >. The control LEDs are constantly lit. 2. Press the number of the device. Up to eight different devices can be controlled via the keypad. -
Page 17: How To Change The Master Code
Operating the Keypad How to Change the Master Code NOTE: When changing the Master Code, please Ensure that you remember the new Master Code that you enter. Otherwise, your systems installer will need to come back to reset the code. This may incur a Service (Call Out) Fee. While in CLIENT mode (see “Entering the user Program/Client Mode”... -
Page 18: Date
Operating the Keypad How to set Time and Date The alarm system has an internal clock that may be used to automatically Arm or Disarm the alarm or turn Outputs On or off. It is also used to identify when events occurred in memory via the LCD keypad. -
Page 19: U Sing The R Emote C Ommand C Ontrol
Operating the Keypad Using the Remote Command Control Another powerful feature available from your alarm is Command Control. This feature is a remote control facility which allows valid users to access the panel via a standard touch tone telephone and check or changes the Arm/Disarm status of each of the areas, operate each of the eight outputs or turn on an optional Microphone. -
Page 20: Using Local Command Control
Operating the Keypad Using Local Command Control If a command control code for outputs is programmed and the output/s are allowed to be locally controlled from the keypad, then entering the 4 digit code at a keypad blanks the display and the zone LED’s now indicate the output status. -
Page 21: Lcd Keypad
LCD KEYPAD Most of the main actions like ARM, DISARM, ARM STAY, and others are the same at the crow LCD keypad. But in the LCD keypad the user can change texts like zone name and area names, adjust the backlight and buzzer tone. -
Page 22: Lcd Keypad In Local Edit Mode
“Output Names” (the Output name is displayed when viewing Output On/Off events in memory mode). Accessing Local Edit Mode To enter Local Edit Program Mode on a CROW LCD Keypad Press “CONTROL” followed by “ARM” and hold for 2 seconds. NOTE: You must press the “Control”... -
Page 23: Lcd Keypad Local Edit Mode Menu Programming
LCD KEYPAD LCD KEYPAD LOCAL EDIT MODE MENU PROGRAMMING The LCD Keypad Main menu headings for “Local Edit” program mode are listed on this page. On entering Local Edit Mode the display looks like the example below. To move to the next menu heading simply press the Çarrow. To move back to the previous heading simply press the ÈArrow. - Page 24 LCD KEYPAD When you are at the desired main menu heading, press <ENTER> to access the data program location. See example below...
-
Page 25: Changing The Area Single Character Identifier
The Cursor is underneath the first letter to be edited (in this case the “Z”). The letters <A...Z> indicate that the letters selected by the numeric buttons (0-9) are in capitals. Pressing the “MEM (CROW)” button once displays <a..z>, indicating that lower case letters are selected by the numeric buttons (0-9). ד... -
Page 26: Changing The Keypad Area Name
(Remember that there are a maximum of 16 characters per program address). If you make a mistake use the “STAY (CROW)” button to move the cursor towards the left and make any corrections necessary. When you are happy with the text, press <ENTER> to save the changes. You can program the text for all zones in the same way. -
Page 27: Resetting Individual Text To Default Or Last Saved Setting
LCD KEYPAD Resetting Individual Text to Default or Last Saved Setting While in “Local Edit Mode” there are two special functions that can be performed at any of the “Local Edit” Program locations. They are “Return to Default Text” or “Return to Previously Saved Text”. -
Page 28: Customization Chart
Customization Chart Use this form to record your changes and customizations. User Name User Name Zone Zone Name Device...
Need help?
Do you have a question about the Runner Series and is the answer not in the manual?
Questions and answers