Advertisement
4PIL SERIES PILASTER DRAWER BOX SYSTEM INSTRUCTIONS
TOOLS REQUIRED:
#2
3
32
#2
ESTIMATED ASSEMBLY TIME:
45 MIN
CARE AND MAINTENANCE:
Clean with a damp cloth and
wipe parts dry.
VIDEO INSTRUCTIONS: WWW.REV-A-SHELF.COM/VIDEOS
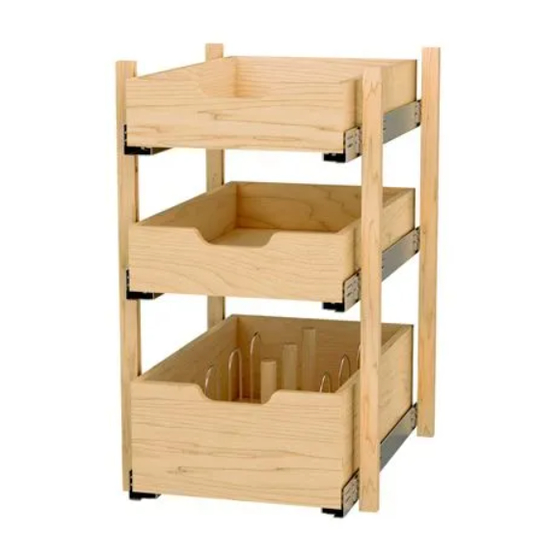
Parts List
No.
Description
1
Pilaster Uprights (front of cabinet)
2
Pilaster Uprights (back of cabinet)
3
#8 x 3/4" Deep Thread Screws
(Screw Pack #059)
4
#6 x 1/2" Wood Screws
(Screw Pack #084)
5
Upright Safety Cap
6
Slide button/screw set
7
BLUM
Slides
®
8
Wood Box (Short)
9
Wood Box (Tall)
10
BLUM
®
Triggers
11
Wood Pegs (Tall Box Only)
12
Wire Dividers
7
8
INSTALLATION INSTRUCTIONS: PILASTER DRAWER BOX SYSTEM
12400 Earl Jones Way
Louisville, KY 40299
rev-a-shelf.com
Customer Service: 800-626-1126
1
Qty
2
2
8
8
4
2/Set
1
1 or 2
1
2/Set
3
4
5
5
9
10
2
5
6
11
12
I-4PIL-TRI-0216
Advertisement
Table of Contents

Related Manuals for Rev-A-Shelf 4PIL-TRI-0216


Summary of Contents for Rev-A-Shelf 4PIL-TRI-0216
-
Page 1: Parts List
12400 Earl Jones Way Louisville, KY 40299 rev-a-shelf.com Customer Service: 800-626-1126 VIDEO INSTRUCTIONS: WWW.REV-A-SHELF.COM/VIDEOS 4PIL SERIES PILASTER DRAWER BOX SYSTEM INSTRUCTIONS TOOLS REQUIRED: Parts List Description Pilaster Uprights (front of cabinet) Pilaster Uprights (back of cabinet) ESTIMATED ASSEMBLY TIME: #8 x 3/4” Deep Thread Screws... - Page 2 4 screws and buttons SLIDE BUTTON POSITIONS included, attach the buttons through the indicated holes shown. (See Fig 2) NOTE: The slides used in the Rev-A-Shelf Pilaster System are BLUM 563H53301B SECURE BUTTONS WITH PROVIDED SCREWS Customer Service: 800-626-1126 | rev-a-shelf.com...
- Page 3 HANGING SLIDES FIGURE 3 ON UPRIGHTS STEP 3 ROTATE FRONT OF THE SLIDE SO IT FITS INTO THE Locate the desired hole FRONT PILASTER UPRIGHT. locations for the pilaster SLIDE INTO PLACE buttons to be inserted. Insert the button attached to the rear of the slide into the back Pilaster Upright slot.
- Page 4 (See Fig 8.1). Place the end caps on the top REMOVE EXTENSION BRAKCET of the uprights (See Fig 8.2). REMOVE SCREWS 12400 Earl Jones Way Louisville, KY 40299 rev-a-shelf.com Customer Service: 800-626-1126 Customer Service: 800-626-1126 | rev-a-shelf.com...
Need help?
Do you have a question about the 4PIL-TRI-0216 and is the answer not in the manual?
Questions and answers