
Related Manuals for VOLTCRAFT FM-400


Summary of Contents for VOLTCRAFT FM-400
- Page 1 MATERIAL MOISTURE METER OPERATING INSTRUCTIONS PAGE 22-41 Best.-Nr. / Item no. / N° de commande / Bestelnr.: 40 92 36 VERSION 11/13...
- Page 2 TABLE OF CONTENTS Page 1. Introduction ........................23 2. Intended Use ........................24 3. Scope of Delivery ......................25 4. Explanation of Symbols .....................25 5. Safety Information ......................26 a) General Information ....................26 b) Battery Notes ......................28 6. Control Elements .......................29 7. Inserting/Replacing the Batteries ..................30 8.
-
Page 3: Introduction
1. INTRODUCTION Dear customer, Thank you for making the excellent decision of purchasing this Voltcraft® product. Voltcraft This name stands for above-average quality products in the areas of measuring, ® charging and grid technology, characterised by technical competence, extraordinary perform- ance and permanent innovation. -
Page 4: Intended Use
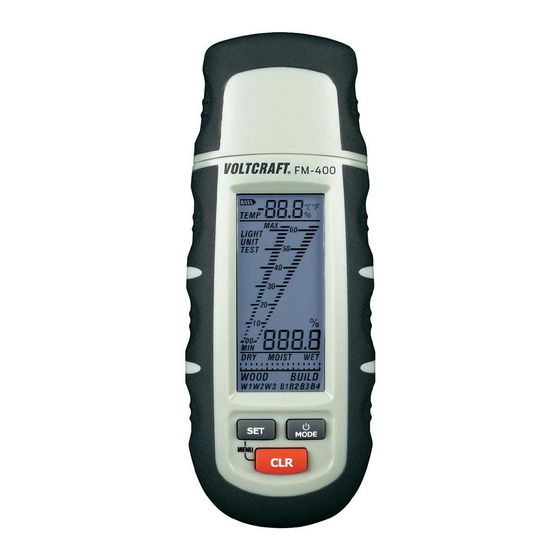
2. INTENDED USE The battery-operated material-moisture meter measures the moisture in materials such as wood and building materials, plaster, screed, etc. For a high measuring accuracy, several ma- terial characteristic curves are available. A bar scale, indicator scale and direct value display facilitate reading on the LC display. -
Page 5: Scope Of Delivery
3. SCOPE OF DELIVERY • Material moisture meter • 3 x battery CR2032 • Replacement measuring prods • Protective cap with test adapter • Sensor adapter with round plug • Operating instructions 4. EXPLANATION OF SYMBOLS An exclamation mark in a triangle indicates important notes in these operating instructions that must be strictly observed. -
Page 6: Safety Information
5. SAFETY INFORMATION a) General Information The guarantee/warranty will expire if damage is incurred resulting from non- compliance with the operating instructions! We do not assume any liability for consequential damage! We do not assume any liability for property damage and personal injury caused by improper use or non-compliance with the safety instructions! In such cases the warranty/guarantee will expire. - Page 7 • Do not leave packaging material unattended. It may become a dangerous toy for children. • Always keep the meter with its accessories so that it cannot be reached by children. The measuring prods pose a danger of injury. • Never touch the measuring prods during measurement. This may cause measur- ing tolerances.
-
Page 8: B) Battery Notes
b) Battery Notes • Keep batteries out of reach of children. • Do not leave any batteries lying around openly. There is a risk of batteries being swallowed by children or pets. If swallowed, consult a doctor immediately. • Leaking or damaged batteries may cause alkali burns if they come in contact with the skin. -
Page 9: Control Elements
6. CONTROL ELEMENTS 1. Protective cap 2. Measuring prod 3. LC display 4. “SET” button 5. “CLR” button 6. On/off “MODE” button 7. Self-test adapter 8. Temperature and humidity sensor 9. Round plug 1. Battery display 2. Menu display 3. Test mode 4. -
Page 10: Inserting/Replacing The Batteries
7. INSERTING/REPLACING THE BATTERIES 1. The current battery capacity is displayed via the battery status display 2. Switch off the meter before starting battery replacement. 3. Loosen the cross-head screw at the rear of the product with a small screwdriver. 4. -
Page 11: Settings
9. SETTINGS To get to the setting mode, push the buttons “SET” and “CLR” at the same time with the device activated. Push the button “MODE” to choose between the following fi ve options. Please observe the following chapters. - Temperature compensation (“TEMP”) - “Dry”... - Page 12 Conversion table for indicator values Anhydrite screed Quick-drying B25 cement B35 cement cement screed Elastizel screed Plaster screed Wood cement Lime mortar screed DIN magnesium Polystyrene Wood soft-fi bre Cement-bound oxychloride cover plate, bitumen chipboard Cement screed with Cement screed with Cement mortar bitumen addition plastic addition...
- Page 14 Indicator value All values in % material humidity 16.5 15.5 24.0 14.9 23.6 14.4 23.3 14.2 22.8 14.0 22.4 13.8 22.0 13.5 21.5 13.4 21.0 13.3 20.5 13.2 20.0 13.0 19.5 12.9 18.8 12.7 18.0 12.7 30.1 17.5 12.6 29.1 17.0 12.5 28.0...
-
Page 15: C) Lighting
11.8 18.5 19.0 12.0 11.7 17.3 17.0 11.0 11.6 16.0 15.4 10.2 11.5 13.2 13.1 11.4 12.0 10.7 11.3 11.1 c) Lighting Use the button “MODE” to choose the mode “LIGHT”. Push the button “SET” to choose between the following functions: “AUTO”: Lighting goes out after 5 seconds of inactivity and activates automatically by pushing of a button. -
Page 16: Self-Test
10. SELF-TEST • Push the button “MODE” twice after activation. The meter is in test mode. • Touch the meter‘s measuring prods “2” to the self-test adapter “7”, contacts “ – T – ”, fi rst • Then perform another test with the contacts “ – B – ”. If a value appears in the LC display after each test as described in the following fi... -
Page 17: Measuring Process
11. MEASURING PROCESS To measure humidity in materials, push the two measuring prods “2” into the material carefully. During measurement, the symbol “%” fl ashes. If the symbol remains lit permanently, the precise measuring value is available in the digital display for humidity “8”. The bar scale “9”... - Page 18 Wood characteristic curve Obeche Ilomba English oak Afrormosia Abura Aspen Rubber tree Agda Iroko Fibre boards Imbuia Maple Izombe Hard fi bre board Kokrodua Andiroba Jarrah Wood fi bre Cork insulation board Balsa Karri Kauramin Melamine chipboard Birch Lime tree, small Pine Phenol resin chipboard...
-
Page 19: C) Building Moisture Measurement "Build
American ash tree Japanese ash tree Walnut Aspen White birch Spruce White beech Yellow beech White maple Yellow pine Cedar c) Building Moisture Measurement “BUILD” After activation, push the button “MODE” briefl y once to switch to building material moisture mode “BUILD”. -
Page 20: D) "Wet/Moist/Dry" Indicator
d) “Wet/Moist/Dry” Indicator The LC display additionally shows an indicator scale “5”. This permits quick measurement if no precise % values are required. The indicator values can be changed via the setting mode. For the values, see chapter 9, b. We recommend a value of 70 for “DRY”... -
Page 21: Disposal
13. DISPOSAL a) General Information Dispose of the product according to the applicable statutory provisions at the end of its service life. Remove any batteries inserted in the meter and dispose of it separately from the product. b) Batteries You as the end user are required by law (Battery Ordinance) to return all used batteries. Disposing of them in the household waste is prohibited.
Need help?
Do you have a question about the FM-400 and is the answer not in the manual?
Questions and answers