Table of Contents
Advertisement
Quick Links
Advertisement
Table of Contents

Related Manuals for BMW R 1200 GS 2003


Summary of Contents for BMW R 1200 GS 2003
- Page 1 Rider’s Manual R 1200 GS BMW Motorrad...
-
Page 3: Welcome To Bmw
We congratulate you on your information on the correct choice of a motorcycle from equipment for machine and BMW and welcome you to the rider, again geared toward max- community of BMW riders. imising reliability and safety. Familiarise yourself with your... -
Page 4: General Information
When the time comes to sell Note: your BMW, please remember to Special information on operat- hand over this Rider’s Manual; it ing and inspecting your motor- is, by law, an important part of cycle as well as maintenance the vehicle. - Page 5 Optional accessory operation You can obtain optional accessories through your – This symbol draws your atten- authorised BMW motorcy- tion to the outcome of the cle dealer or trade outlet; instructions on how to per- optional accessories have form a particular operation...
- Page 6 General information If your BMW was supplied with equipment not described in this Rider’s Manual (such as a radio or anti-theft alarm, for example), Custom equipment you will find these features When you ordered your BMW described in separate manuals.
-
Page 7: Safety Information
BMW accepts product liability We hope you will appreciate for these products. Conversely, that no legal claims can be BMW is unable to accept any entertained on the basis of the liability whatsoever for parts data, illustrations or descrip- and accessories which it has tions in this manual. - Page 8 It's foolhardy to ride without the be used on or with a BMW vehi- right clothing. This applies even cle without constituting a safety to short journeys, and to every hazard.
- Page 9 Important: and will gladly advise and assist BMW refuses to accept liability you. for damage or consequential damage due to repairs or serv- Best wishes, ice work carried out by other...
-
Page 10: Table Of Contents
Warning indicators ..21-23 Brake system - ABS warning lights ..24-25 general......80-81 Brake system - with Operation ......27 BMW Integral ABS ..82-89 Ignition switch and steering lock.... 28-29 Accessories......91 Electronic immobiliser General instructions .....92 (EWS) ......30-31 Power sockets, 12 V .. - Page 11 Contents Maintenance ....107 Technical Data....163 Safety information....108 Engine........164 Troubleshooting Power train......165 chart......109-110 Frame and Toolkit ....... 111 suspension....166-170 Engine oil ....112-113 Fuel and lubricants ..171-172 Brake system - Electrical system ....173 general ....... 114-115 Dimensions and weights ..174 Brake system .....
- Page 12 Contents...
-
Page 13: Overview
1 1 1 General view, left side General view, right side Left handlebar fitting Right handlebar fitting Cockpit... -
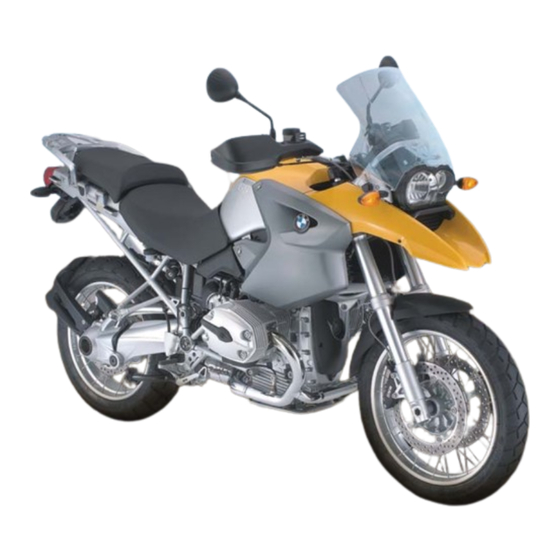
Page 14: General View, Left Side
General view, left side 10 Seat lock ( 46-48) 1 Spring-strut adjuster, front 11 On-board socket, 12 V, for connecting electrical 2 Power socket 12 V accessories ( 3 Windscreen ( 12 Rear suspension strut, 4 Headlight adjuster ( shock-absorber adjuster 5 Reservoir for clutch 51-52) hydraulic fluid (... -
Page 15: General View, Right Side
General view, right side 1 1 1 17 Compartment for toolkit 22 Helmet holder 18 Fuel filler cap 23 Secondary spark plug 78-79) 143) 19 Brake-fluid reservoir for 24 Primary spark plug ( 141) front brake ( 116) 25 Spring-strut adjuster, rear 20 Vehicle identification number 26 Brake-fluid reservoir for rear... -
Page 16: Left Handlebar Fitting
Left handlebar fitting 1 Button for Tripmaster ( 2 Hazard warning flasher Warning: switch ( To prevent air from entering 3 ABS button the hydraulic circuit: 4 Horn switch • Do not turn the fitting on the 5 Left flashing turn indicator handlebar. -
Page 17: Right Handlebar Fitting
Right handlebar fitting 1 1 1 7 Emergency off (kill) switch Warning: for ignition ( To prevent air from entering 8 Starter button ( the brake circuit: 9 Switch for heated handlebar • Do not turn the fitting on the grips handlebar. -
Page 18: Cockpit
Cockpit 1 Speedometer 2 Rev. counter ( 3 Telltale and warning lights Note: 4 Multifunction display ( The cockpit lights have auto- 5 Telltale light for anti-theft matic brightness control for alarm / bright/dark sensor daytime/night-time riding. The for lights sensor that controls the bright- 6 Ignition switch and steering ness of the cockpit lights is be-... -
Page 19: Status Indicators
Telltale and warning lights Multifunction display Function indicators Warning indicators warning lights... -
Page 20: Telltale And Warning Lights
Telltale and warning lights 1 Telltale light, left turn indicator 5 Warning light, ABS 2 Telltale light, high-beam headlight 6 Telltale light, right turn 3 Warning light, general indicator 4 Telltale light, neutral depending on national-market specification... -
Page 21: Multifunction Display
Multifunction display 11 10 Possible warnings 12 Oil pressure 13 Battery charge light 7 Fuel level 14 Bulb failure 20, 79) 15 Electronic immobiliser 8 Gear indicator ( active ( 9 Oil temperature 16 Fault in electronic engine 10 Display panel for Tripmaster management system 34, 35) 11 Display panel with clock... -
Page 22: Function Indicators
Function indicators Telltale light Multifunction Meaning display 11 : 28 Clock Shows the time in 12-hour mode Gear indicator Telltale light lights up when the gear- box is in neutral. The display shows a number corre- sponding to the gear you have engaged yellow Fuel level flashing... -
Page 23: Warning Indicators
Operate the kill switch Bring the motorcycle safely to a halt Check the engine oil level Attention: If the warning indicator lights up but the oil level is correct, always consult a spe- cialist workshop without delay, preferably an authorised BMW motorcycle dealer. - Page 24 Battery charge current The battery is no longer charging, gener- ator fault. Immediately consult a specialist work- shop, preferably an authorised BMW motorcycle dealer. yellow Bulb failure Rear light or brake light defective replace bulbs ( 134) Bulb failure...
- Page 25 Warning indicators Warning Multifunction Meaning/measure light display Electronic immobiliser yellow Key not recognised ( 30, 31). Communication with engine electronics disrupted Note: Various warnings may be is- sued simultaneously. Some warnings combine yellow red, in which case the two are displayed alternately.
-
Page 26: Abs Warning Lights
warning lights Warning light, Warning light, Malfunctions general ABS function deactivated by the rider, integral braking system available ( Flashes at ABS not available, because pull-away 1 Hz test not completed ( Flashes at Only RESIDUAL BRAKING FUNCTION 4 Hz available in both circuits, ( 85) because self-diagnosis not completed (... - Page 27 Otherwise the brake system is defective: do not attempt to ride the motorcycle. Red, alternate Alternate Fluid level in the BMW Integral ABS is too flashing at flashing at low, perform the checks listed above. 4 Hz...
-
Page 29: Operation
Ignition switch and steering lock Electronic immobiliser (EWS) Hazard warning flashers On-board computer Kill switch Heated handlebar grips Setting the clock Adjusting the windscreen Handlebar levers Lights Seat Mirrors Spring preload... -
Page 30: Ignition Switch And Steering Lock
Ignition switch and steering lock Warning: If the motorcycle is fitted with BMW Integral ABS , only the RESIDUAL BRAKING FUNC- TION is available when the ig- nition is switched off ( Note: Ignition switch and steering lock, tank filler cap lock and... - Page 31 Ignition switch and steering lock Key positions Warning: Never turn the key to posi- tion while riding the * Ignition and lights off, motorcycle. steering locked. Operating position; ignition, parking light and Attention: all circuits switched on, Turn the handlebars all the way predrive check is to the left before engaging the performed (...
-
Page 32: Electronic Immobiliser (Ews)
Electronic immobiliser (EWS) In-key security The electronic immobiliser helps protect your BMW motor- cycle from theft, and this Function enhanced security is at your An electronic component is disposal without any need for integrated into each of your you to set parameters or acti- keys. - Page 33 You can obtain spare/extra A spare key attached to the keys only through an authorised same ring as the ignition key BMW motorcycle dealer. The used to start the engine could keys are part of an integrated “irritate” the electronics, in...
-
Page 34: Hazard Warning Flashers
Hazard warning flashers Switching on the hazard warning flashers • Switch on the ignition, ignition Hazard warning flashers key in the position – Hazard warning flasher Note: switch 1 lights up You cannot activate the hazard • Operate hazard warning warning flashers if the ignition is flasher switch 1 switched off. - Page 35 Hazard warning flashers • Switch off the ignition, and with the ignition key in the position, the hazard warning flashers continue to flash – Repeaters 2 for the left and right flashing turn indicators in the telltale lights panel go out Switching off the hazard •...
-
Page 36: Tripmaster
Tripmaster Note: Residual range You can activate the Tripmaster This reading appears only when only when the ignition is the fuel level drops to reserve. switched on, in other words Residual range is estimated on when the ignition key is in the the basis of style of riding and U position. - Page 37 Tripmaster Resetting the tripmeter – Only when the motorcycle is at a standstill and the ignition switched on, in other words when the ignition key is in the U position • Repeatedly press button 1 (Trip) for less than 2 seconds until –...
-
Page 38: Kill Switch
If you move the kill switch to electronic engine manage- position B while the ignition is ment system, instrument on (switch in the U position), the panel, fuel pump and starter BMW Integral ABS motor are de-energised remains operational ( 82-89). -
Page 39: Heated Handlebar Grips
Heated handlebar grips Actuating handlebar-grip heating Note: Grip heating can be activated • Operate switch for heated only when the engine is run- handlebar grips 1 ning. The increase in power consumption can drain the bat- A Heating function OFF tery if you are riding at low en- B 50% (centre position) gine speeds. -
Page 40: Clock
Clock Setting the clock Warning: Do not attempt to set the clock unless the motorcycle • Press button 1 again for is at a standstill longer than 2 seconds – Risk of accident – Minutes reading 3 starts flashing: briefly press button 1 •... -
Page 41: Windscreen
Windscreen Adjusting the windscreen Attention: Always be sure to adjust clamp- Note: ing screws 1 on left and right You can set the windscreen to symmetrically and hand-tighten any of six different positions. the screws. • Move the windscreen in the •... -
Page 42: Handlebar Levers
• Turn adjusting screw 1 to set liability of the hydraulic clutch the most comfortable span: operating system consult a – Turn clockwise: to increase specialist workshop, preferably span an authorised BMW motorcycle – Turn counter-clockwise: dealer. to reduce span... - Page 43 Handlebar levers Adjusting the handbrake lever Warning: Do not attempt to turn adjust- ing screw 1 while riding the motorcycle. – Turn clockwise: to increase span • Turn adjusting screw 1 to set – Turn counter-clockwise: to the most comfortable span: reduce span...
-
Page 44: Lights
Lights Switching on the parking light Note: You can switch on the parking light only immediately after switching off the ignition, when the ignition key is in the position. • Switch off the ignition • Press the left turn indicator switch –... - Page 45 Lights Checking lights Attention: Always check that all lights are in full working order before rid- ing off. 1 Low-beam headlight Note: 2 High-beam headlight If turn indicator repeater flashes 3 Parking light at twice the usual speed: Defective flasher bulb. For instructions on changing Similarly, general warning bulbs for parking light, high-...
- Page 46 Note: Consult a specialist workshop, Headlight beam throw is kept preferably an authorised BMW constant when spring preload is motorcycle dealer, to have the adjusted to suit load. headlight adjusted to suit...
- Page 47 Lights Headlight setting with motorcycle heavily loaded Only if the load carried on the motorcycle is very high, the Pivot lever 1: headlight beam can also be lowered by moving pivot lever 1. A = neutral position This shortens the beam throw. B = high load...
-
Page 48: Seat
Seat Removing the seat • Turn the key in the seat lock to position B Note: • Remove the rear seat You must remove the rear • Turn the key in the seat lock seat before the front seat can to position A be removed. - Page 49 Seat Adjusting seat • Remove the rear seat Attention: • Remove the front seat and Front and rear retainers 1 and 2 turn it upside down for height adjustment must al- The front seat can be set to ways both be set to the same either of two positions by height.
- Page 50 Seat Installing seat Warning: Note: When installing, make sure Make sure that the tools are that front and rear seats are packed in such a way that the firmly located. toolkit is as flat as possible. • Set the front seat to the •...
-
Page 51: Mirrors
Mirrors Adjusting mirrors Simply turn the mirrors to adjust them: • Grip the mirror by the edge of the glass and • turn it to the desired position • Use a w/f 17 open-ended spanner to remove Adjusting mirror arms In order to improve ergonomics union nut 2 or if a mirror arm has worked... -
Page 52: Spring Preload
Spring preload • Use the hooked wrench to adjust preload of spring to a stage between 1 and 9: 3rd stage – metalled road 5th stage – loose gravel or similar 9th stage – off-road Warning: Before starting off, adjust Fine-tune the setting in accord- spring preload to suit the ance with your personal... - Page 53 Spring preload Adjusting spring preload, rear wheel LOW setting (one-up): • Turn knob 1 as far as it will go Warning: counter-clockwise in LOW Before starting off, adjust direction (L) as indicated by spring preload to suit the arrow. gross weight of the motorcy- •...
-
Page 54: Shock-Absorber Adjustment
Shock-absorber adjustment Basic setting (one-up): • Turn adjusting screw 1 as far as it will go clockwise in the direc- Warning: tion indicated by the H arrow Before starting the journey, • Turn adjusting screw 1 one adjust the shock absorber to and a half turns counter- match total weight. -
Page 55: Wheels
Wheels Tyre pressures for road tyres and massive-bar tyres: front rear One-up 2.2 bar 2.5 bar (31.9 psi) (36.3 psi) Two-up or Checking luggage 2.5 bar 2.7 bar tyre pressures (36.3 psi) (39.2 psi) Two-up and luggage 2.5 bar 2.9 bar Warning: (36.3 psi) (42 psi) Incorrect tyre pressures have... -
Page 56: Loading
Loading Correct loading Warning: Overloading can impair the handling of your motorcycle. • Maximum load in tank-top rucksack and topcase 5 kg (approx. 11 lbs) each • Make sure that the weight is • Check that fastenings are uniformly distributed between correctly positioned and tight right and left •... - Page 57 Loading Attention: Do not exceed the gross weight limit of 425 kg (937 lbs). Do not exceed the wheel load limits of 170 kg (375 lbs) at the front and 280 kg (617 lbs) at the rear. Adjust shock absorbers front and rear, rear-wheel spring and tyre pressures to suit total weight (...
-
Page 58: Shift Lever
Shift lever If you would like settings changed to suit your personal Warning: preferences, please contact a For safety reasons, do not at- specialist workshop, preferably tempt to change the position your authorised BMW of the shift lever. motorcycle dealer. -
Page 59: Riding
Safety instructions Checklist First time out Before you start Starting Running in Shifting gear Off-road riding Parking Refuelling Brake system - general... -
Page 60: Safety Instructions
Warning: Risk of fatal accident When the ignition is switched Your motorcycle is equipped off or if the BMW Integral ABS with a digital electronic engine fails, only a RESIDUAL BRAK- management system and a ING FUNCTION remains high-power ignition system. - Page 61 BMW motorcycle dealer. with the hot exhaust system. If misfiring or malfunction of the Do not allow the engine to fuel-air mixture preparation sys-...
-
Page 62: Checklist
Your vehicle must be in perfect specialist workshop, preferably technical order: this is a basic your authorised BMW motorcy- prerequisite for your safety and cle dealer. the safety of other road users. - Page 63 If you encounter any problems tyres, tread depth and tyre or difficulties, it is always best to pressures contact your authorised BMW – Load, gross weight motorcycle dealer. He will pro- – Check that the luggage sys- vide the necessary advice and tem is secure assistance.
-
Page 64: First Time Out
First time out Handling your motorcycle safely Attention: Each motorcycle has a charac- BMW Integral ABS incorpo- ter all its own. It is time now for rates a brake booster, so brak- you to familiarise yourself with ing efficiency is significantly... - Page 65 First time out Warning: Safe motorcycling doesn’t Do not ride the motorcycle af- depend on the motorcycle ter drinking alcoholic bever- alone. ages. Even small amounts of Your own skill and common- alcohol or drugs, particularly sense are needed too. if taken in conjunction with The key to genuine safety on medicines, will adversely af-...
-
Page 66: Before You Start
– Phase 1, A, with General completes. warning light – Phase 2, B, with General ABS self-diagnosis warning light yellow and If the motorcycle is fitted with – Phase 3, C, without General BMW Integral ABS , the ABS warning light performs self-diagnosis ( 86). - Page 67 Before you start Switch on the ignition • See the notes on the elec- tronic immobiliser (EWS) – Move the kill switch 1 to the run position A • Ignition switch in the position – Predrive check is performed – ABS self-diagnosis is Note: performed Starting on gradients:...
- Page 68 Before you start Fully retract the side stand Note: Engine does not start: – Move the gear lever to the Note: position or If the side stand is extended – Do not pull the clutch lever and a gear engaged, you can- until after you switch on the not start the motorcycle.
-
Page 69: Starting
Starting Starting Attention: Do not allow the engine to idle unnecessarily or for prolonged periods of time – risk of overheating or fire. Ride away immediately after starting the engine. To avoid overheating the air- cooled engine and possible Note: damage as a result, avoid even Do not turn the throttle twistgrip short warming-up periods at a... -
Page 70: Running In
Attention: 1,000 km (600 miles). Make Exceeding the specified engine an appointment with your speeds while running in will lead authorised BMW motorcycle to increased engine wear. dealer in good time, so that the work can be performed punctually. Note:... - Page 71 Attention: until the tyres are run in. Comply with the notes on This running in procedure is BMW Integral ABS essential if the tyres are to 82-89). achieve maximum grip.
-
Page 72: Gear Shifts
Gear shifts Engine speed Do not use the high end of the engine-revolutions range in any gear unless the engine is at operating temperature Load changes When the revolution counter needle enters the red zone on the dial, the fuel supply is inter- Warning: rupted in order to protect the Try not to open or close the... - Page 73 Gear shifts Gear shifts Note: Attention: Digital gear indicator 1 in the Always disengage the clutch in multifunction display tells you order to shift gear. which gear is engaged.
-
Page 74: Off-Road Riding
Off-road riding Attention: This motorcycle is a touring En- Wheels and tyres duro machine, which means it can also be used for light off- Warning: roading on unsurfaced tracks. If you lowered the pressure in If you are contemplating heavy the tyres for more traction off-road usage or long trips that when riding off-road, remem-... - Page 75 Remember to reset spring BMW Integral ABS preload and the shock absorb- If you are riding off-road or on a ers to the correct setting when loose surface, you might prefer you return to metalled roads to deactivate the ABS function.
-
Page 76: Parking
Parking Placing motorcycle on side stand Warning: • Switch off the ignition For safety reasons, never sit • Pull the handbrake lever on the motorcycle with the • Hold the motorcycle upright side stand extended. and balanced • Use your left foot to extend the side stand fully (arrow) Attention: •... - Page 77 Warning: • Ignition key in the If the motorcycle is equipped position with BMW Integral ABS only a – Handlebars unlocked RESIDUAL BRAKING FUNC- • Both feet on the ground, no TION is available when the igni-...
- Page 78 Parking • Switch off the ignition Place the motorcycle on • Hold the left handlebar grip its main stand. with your left hand • Grip luggage rack A or rear frame B with your right hand. Warning: • Place your right foot on the For safety reasons, never sit pin of the main stand, and on the motorcycle with the...
- Page 79 Parking Removing motorcycle from main stand • Hold the left handlebar grip Attention: with your left hand Make sure the main stand is ful- • Grip luggage rack A or rear ly retracted before you ride off. frame B with your right hand. •...
-
Page 80: Refuelling
Refuelling Attention: Leaded fuel will destroy the cat- alytic converter. Do not run the fuel tank dry or you may damage the engine or Refuelling catalytic converter. Fuel can damage plastic parts, Warning: so make sure they are not brought into contact with fuel. Fuel is flammable and explo- sive. - Page 81 Refuelling Capacity Note: The fuel gauge in the multifunc- Fuel grade tion display works only when the The engine is designed to run ignition is switched on, in other words when the ignition key is in – unleaded premium fuel position.
-
Page 82: Brake System - General
Brake system - general Wet brakes After the motorcycle has been washed, ridden through water or ridden in the rain, the brake discs and pads may be wet (or iced-over in winter), and may not take effect immediately. Warning: The brakes have to dry be- fore they start to bite. - Page 83 The brakes have to clean draulic fault. The brake system is themselves before they start defective. to bite. Immediately consult a specialist Dirt on the brakes increases workshop, preferably an author- the rate of pad wear. ised BMW motorcycle dealer.
-
Page 84: Brake System - With Bmw Integral Abs
Brake system - with BMW Integral ABS Warning: If ABS telltale light 1 or 2 BMW Integral ABS is the latest- lights up, consult the generation BMW Motorrad ABS ABS troubleshooting table development: by preventing 24-25). both wheels from locking and... - Page 85 Brake system - with BMW Integral ABS Safety margin But remember: the potentially shorter braking distances which BMW Integral ABS per- mits must not be used as an excuse for careless riding. ABS is primarily a means of ensuring a safety margin in genuine emergencies.
- Page 86 Brake system - with BMW Integral ABS Partially integral brakes The integral brake function interlinks the front and rear brakes, so both wheels are braked when you operate the Brake booster brake lever. The hydraulic pump in the BMW The electronic controller in the...
- Page 87 Brake system - with BMW Integral ABS RESIDUAL BRAKING FUNCTION If the BMW Integral ABS develops a fault, a RESIDUAL BRAKING FUNCTION only is available in the brake circuits in question. The RESIDUAL BRAKING FUNC- TION is the braking efficiency without the hydraulic servo assist- ance of the BMW Integral ABS.
- Page 88 Brake system - with BMW Integral ABS Self-diagnosis with • Release the brake levers, if pull-away test necessary The BMW Integral ABS per- • Switch on the ignition forms self-diagnosis and a Initially: pull-away test to ensure its – ABS warning light 2: operability.
- Page 89 Brake system - with BMW Integral ABS • Start the engine. • Move off – ABS warning light 1: OFF (as of approx. 5 km/h Note: (3 mph) road speed) Starting on gradients: Pull-away test successfully Always switch on the ignition...
- Page 90 Brake system - with BMW Integral ABS Deactivating ABS Warning: Never switch the ignition off and on unless the motorcycle is at a standstill. Brake boost and the integral function remain operational, even if the ABS function is Off-road deactivation deactivated.
- Page 91 Brake system - with BMW Integral ABS – With the motorcycle at a standstill, switch off the Warning: ignition When the ABS function is • Press and hold down deactivated – as indicated by ABS button 2 the ABS warning light 1 – the •...
-
Page 93: Accessories
General instructions Power sockets, 12 V Luggage system... -
Page 94: General Instructions
General instructions Warning: BMW cannot examine or test each product of outside origin on the accessories and tyres market to ensure that it can be used on or in connection with BMW motorcycles with- out constituting a safety haz- ard. Even approval by an... -
Page 95: Power Sockets, 12 V
Power sockets, 12 V Operating electrical accessories Sockets On-board sockets 1 and 2 Note: and the plug for electrical You can start using electrical accessories have a combined accessories only when the igni- maximum rating of 5 A. tion is switched on, in other Socket 2 is intended solely words when the ignition key is... - Page 96 – do not impede the rider Note: – do not restrict or impede Have the wiring installed by a movement of the handle- specialist workshop, preferably bars and/or handling an authorised BMW motorcycle – cannot be trapped dealer.
-
Page 97: Luggage System
Luggage system Warning: After an accident or if the motorcycle has fallen over, check that the system cases • Release latch 1 by pressing in are secure. the direction indicated by the Max. load per system case: arrow 10 kg (approx. 22 lbs). •... - Page 98 Luggage system Closing system case Changing case volume Attention: Before closing the carrying han- dle, make sure that the case Note: lock is in position A. Pivot lever 1 enables you to Risk of breaking the locking change the volume of the case. tongue.
- Page 99 Luggage system Installing system case Warning: When attaching, make sure that the case is retained securely. An incorrectly secured case could be lost and endanger • Pull latching flap 1 fully open other road users. • Hold the case straight and lower it into the two top •...
- Page 100 Luggage system • Push red lever 7 ( 99) down, while pressing on latching flap 3 – Latching flap 3 99) engages • Engage locking lever 2 in the holder and close it • Check the security of the case Note: •...
- Page 101 Luggage system Removing system case • Unlatch carrying handle 5 and pull it up ( – Yellow rocker switch 6 and red lever 7 are accessible underneath the handle • Pull latching flap 3 fully open • Open locking lever 2 –...
- Page 102 Luggage system Note: By removing the luggage rack with the rear seat removed and system cases installed, you have a large flat luggage carrier Warning: to which you can secure bulky Do not exceed the total items of luggage in various weight limit of the cases.
- Page 103 Always have the tightening tor- procedure ques checked by a specialist • Tighten three securing workshop, preferably an au- screws 1 to the specified thorised BMW motorcycle tightening torque ( 176) dealer. • Install the system cases...
-
Page 105: Arrive Safely
Reliable operation Service worldwide Training means extra safety... -
Page 106: Reliable Operation
Certain signs of wear, moreo- ver, may otherwise not be noticed until it is too late to put them right at moderate cost. The staff in the authorised BMW motorcycle dealer’s workshop know every detail of your motorcycle and can take reme-... -
Page 107: Service Worldwide
Call us if you have any questions BMW motorcycle dealer, a taxi about the BMW dealership net- for you, and even a replace- work. The phone number is in the ment vehicle and hotel accom- “Service Kontakt / Service... -
Page 108: Training Means Extra Safety
Work up to the wheel lock limit – Take bends smoothly and gradually. rhythmically, avoiding harsh BMW has a worthwhile safety braking and acceleration contribution to make in this area – Approach bends slower than too – BMW Safety Training. -
Page 109: Maintenance
Safety information Troubleshooting chart Toolkit Engine oil Brake system - general Brake system - without BMW Integral ABS Brake system - with BMW Integral ABS Clutch Wheels Removing the front wheel Installing the front wheel Removing rear wheel Installing the rear wheel... -
Page 110: Safety Information
Your authorised BMW motorcy- Tampering with the control cle dealer will gladly advise you unit of the engine manage- on technical requirements, the ment system represents an manufacturer’s recommenda-... -
Page 111: Troubleshooting Chart
Troubleshooting chart Fault: Engine does not start or is very difficult to start Possible cause Remedy Page Kill switch operated Move the kill switch to the run position 64-66) Side stand extended Fully retract the side and gear engaged stand Gear engaged (clutch Select neutral (or lever not pulled in) -
Page 112: Chart
It is advisable to have other faults – and work not described Note: on pages 111...154 – attended You can obtain further technical to by a specialist workshop, information from the following preferably your authorised publications: BMW motorcycle dealer. – BMW Repair Manual... -
Page 113: Toolkit
Toolkit Repair kit for tubeless tyres For repair procedure, please refer to the accompanying instructions Contents 1 screwdriver, reversible blade Warning: 1 open-ended spanner Do not repair tyre damage w/f* 17 mm exceeding 4 mm (0.16 in) in 1 spark plug socket spanner diameter. -
Page 114: Engine Oil
Engine oil Checking the oil level after the engine has been run only briefly or when it is not properly warm will falsify the reading and could lead to the engine being oper- ated with the wrong quantity of oil, because cold oil is viscous and takes longer to drain back into the sump. -
Page 115: Engine Oil
2 sure warning light • Pour in the correct quantity of must disappear and the red engine oil thorough filler General warning light neck 1 must go out. • Reinstall oil filler plug 3 BMW recommends Castrol... -
Page 116: General
To ensure reliability have all the safety of the brake work on the brake systems system. carried out by a specialist Immediately seek the advice workshop, preferably an au- of a specialist workshop, thorised BMW motorcycle preferably an authorised dealer. BMW motorcycle dealer. - Page 117 To ensure reliable operation of ness: have the work per- the brakes: have brake pads formed by a specialist replaced before the minimum workshop, preferably an au- permitted thickness is reached. thorised BMW motorcycle Checking brake pads dealer. 131-132)
-
Page 118: Brake System
Note: the MIN mark, assume there If the motorcycle is not fitted is a defect in the brake with BMW Integral ABS, the system. brake fluid level in the brake flu- Have the brake system id reservoir drops as the brake checked immediately by a pads wear. -
Page 119: Brake System
Have the brake system Note: checked immediately by a If the motorcycle is not fitted specialist workshop, prefera- with BMW Integral ABS, the bly an authorised brake fluid level in the brake flu- BMW motorcycle dealer. id reservoir drops as the brake pads wear. -
Page 120: Clutch
Clutch Note: The fluid level in the reservoir rises as the clutch wears. Attention: Unsuitable hydraulic fluids Fluid level in clutch lever could cause damage to the fitting clutch system. The clutch system is filled with a Do not top up the level in the special hydraulic fluid that does system. -
Page 121: Wheels
Have damaged wheel rims checked and, if necessary, replaced by a specialist work- shop, preferably an author- ised BMW motorcycle dealer. Checking spokes • Make sure the ground is level and firm and lift the motorcy- cle onto its main stand Warning: •... - Page 122 BMW Motorrad has ap- wear to the minimum tyre proved for your motorcycle. tread depth permitted by law. For each size of tyre BMW tests certain makes, and ap- proves those that it certifies • Measure tread depth at the as roadworthy.
- Page 123 • Raise the front wheel with To prevent damage to the brake front wheel stand, caliper and possible difficulty BMW special tool when assembling: never pull No. 36 3 970, or a suitable the brake lever when the brake auxiliary stand calipers have been removed.
- Page 124 Wheels • Use a Torx T45 bit to remove securing screws 1 for the left and right brake calipers • Push the brake pads back a little by lightly rocking the brake calipers • Carefully take off the left and right brake calipers Warning: Make sure that the motorcy-...
- Page 125 Wheels • Use a Torx T45 bit to slacken axle clamping screw 2 • Remove quick-release axle 1 using a 22 mm socket wrench and a w/f 17 open-ended spanner – Use the spark-plug Attention: wrench for more leverage When setting down the front 111) wheel, do not damage the •...
- Page 126 • Insert spacing bushing 3 Motorcycle with into the wheel hub BMW Integral ABS • Roll the front wheel in Do not damage the ABS sensor between the fork stanchions cable, the ABS sensor ring and •...
- Page 127 Wheels Warning: Motorcycle not equipped with • Remove front-wheel stand BMW Integral ABS: once as- • Compress the front forks sembly work on the brake cal- firmly several times ipers has been completed, • Tighten axle 1 to the specified...
- Page 128 Wheels Installing the front wheel Without BMW Integral ABS • Firmly pull the handbrake Attention: lever several times Always have the tightening tor- With BMW Integral ABS ques checked by a specialist • Switch on the ignition workshop, preferably an au- •...
- Page 129 Warning: Motorcycle with Make sure that the motorcy- BMW Integral ABS cle is standing firmly and can- Do not damage the ABS sensor not topple to the rear or to cable, the ABS sensor ring and either side.
- Page 130 Wheels • Apply a weight to the front • Lift the rear wheel clear of its wheel centring spigot, tilt it, lower it • Select 1st gear to the ground and remove it • Use the T50 Torx wrench 111) to remove five wheel studs 1 Attention: –...
- Page 131 Motorcycle with aluminium wheels differ. Be BMW Integral ABS sure not to mix up the wheel Do not damage the ABS sensor studs or use a mixture of the cable, the ABS sensor ring and two lengths.
- Page 132 Attention: hole Always have the tightening tor- • Hand-tighten wheel studs 1 ques checked by a specialist and then tighten in diago- workshop, preferably an au- nally opposite sequence to thorised BMW motorcycle the specified tightening dealer. torque ( 176)
-
Page 133: Brake Pads
• Visually inspect both sets of longer clearly visible: brake pads and brake cali- have the brake pads replaced pers and make sure that they by a specialist workshop, all bear the same colour preferably an authorised mark 2 BMW motorcycle dealer. -
Page 134: Brake Pads
1 in the inboard thickness is reached. brake pad: have the brake pads replaced • Make sure the ground is level by a specialist workshop, and firm and lift the motorcy- preferably an authorised cle onto its main stand BMW motorcycle dealer. -
Page 135: Notes On Changing Bulbs
Notes on changing bulbs Warning: When the engine is running or the ignition is switched on, do not touch electrically live components, terminals or wiring. Risk of fatal accident. Work on the electrical system Warning: only when the circuit has A bulb failure can mean that been interrupted (ignition you will have problems in see-... -
Page 136: Bulbs
Bulbs Changing brake-light/ rear-light bulb • Use a screwdriver to remove securing screws 1 • Remove rear light glass 2 Attention: • Press bulb 3 into its socket Switch off the ignition before and disengage it by turning it changing a bulb. counter-clockwise Risk of short-circuit •... - Page 137 Bulbs Changing high-beam headlight bulb Warning: H7 bulbs are pressurised. Wear goggles and protective • Make sure the ground is level gloves, risk of injury. and firm and lift the motorcy- cle onto its main stand • Turn the handlebars all the Attention: way to the right Switch off the ignition before...
- Page 138 Bulbs • Disconnect plug 3 from Note: H7 bulb 2 Insert H7 bulb 2 with lug 4 in • Release spring clip 6 from guide 5. retainers 1 on left and right Make sure that wording TOP on and swing the clip open the cover ( 135) is toward the •...
- Page 139 Bulbs Changing low-beam headlight bulb Warning: H7 bulbs are pressurised. Wear goggles and protective • Make sure the ground is level gloves, risk of injury. and firm and lift the motorcy- cle onto its main stand • Turn the handlebars all the Attention: way to the left.
- Page 140 Bulbs • Disconnect plug 6 from H7 Note: bulb 1 Insert H7 bulb 1 with lug 5 in • Release spring clip 3 from guide 4. retainers 2 at top and bottom Make sure that wording TOP on and swing the clip open the cover ( 137) is toward the •...
- Page 141 Bulbs Changing parking light bulb • Turn the handlebars all the Attention: way to the right Switch off the ignition before • Pull bulb holder 2 out of the changing a bulb. headlight housing Risk of short-circuit • Pull bulb 1 out of its bulb socket •...
- Page 142 Bulbs Bulbs for flashing turn • Remove securing screw 1 indicators front/rear, with screwdriver changing • Remove flashing turn indica- tor glass 3 • Press bulb 2 into its socket Attention: and disengage it by turning it Switch off the ignition before counter-clockwise changing a bulb.
-
Page 143: Spark Plugs
Spark plugs Warning: When the engine is running or the ignition is switched on, do not touch electrically live Changing primary spark components, terminals or plug wiring. • Make sure the ground is level Risk of fatal accident and firm and lift the motorcy- Work on the electrical system cle onto its main stand only when the circuit has... - Page 144 Always have the tightening remove the spark plug torque checked by a specialist • Installation is the reverse of workshop, preferably an au- the removal procedure thorised BMW motorcycle • Tighten the spark plug to its dealer. specified torque ( 176)
-
Page 145: Spark Plugs
Always have the tightening • Remove spark plug cover 2 torque checked by a specialist • Remove direct ignition coil 3 workshop, preferably an • Use the spark plug wrench authorised BMW motorcycle and screwdriver ( 111) to dealer. remove the spark plug... -
Page 146: Air Filter
Air filter Replacing air filter element • Make sure the ground is level and firm and lift the motorcy- cle onto its main stand • Working from inside, turn • Remove the front and rear quick-release adapter 3 seats ( counter-clockwise to unlatch •... - Page 147 Air filter • Press two retainers 2 at the rear to release and remove • Remove intake 1 Attention: Make sure that the throttle- valve cable is not disengaged • Pull the old air-filter insert for- when you remove the air filter ward and down, as illustrated, element.
- Page 148 Air filter • As shown in the illustration, • From this point on, installation insert the new air filter ele- is the reverse of the removal ment from above into the air procedure filter housing A • and then push it down into the air filter housing B Attention: After installing, check that both...
-
Page 149: Jump Starting
Jump starting Jump starting Attention: Do not attempt to jump-start the motorcycle using the on- board socket. Risk of fire The wires leading to the power socket do not have a load-ca- Note: pacity rating adequate for jump- Do not use proprietary start- starting the engine. - Page 150 Jump starting Note: On your motorcycle, use the battery adapter point on the positive terminal and the spring-strut screw as the ground connection when con- necting the jump leads. Attention: • When jump-starting the Make sure that the battery of engine, do not disconnect the the other vehicle has a voltage battery from the on-board...
-
Page 151: Jump Starting
Jump starting • Remove the protective cap from the battery adapter point • Start the engine of the vehicle • Begin by connecting one end with the discharged battery in of the red jump lead to the the usual way; if the engine positive terminal of the dis- refuses to start wait a few charged battery and the other... -
Page 152: Battery Maintenance Instructions
Battery maintenance instructions Charging the battery when Your motorcycle is supplied installed and connected with a maintenance-free The battery has to be charged battery. at regular four-weekly intervals if the motorcycle is laid up for a lengthy period. Attention: Compliance with the points below is important in order to Attention: maximise battery life:... - Page 153 Battery maintenance instructions Note: Note: BMW Motorrad has developed The motorcycle's on-board a trickle-charger specially electronics know when the bat- designed for compatibility with tery is fully charged. In this the electronics of your motorcy- case, the on-board socket is cle.
-
Page 154: Instructions
In case of doubt ask a specialist • Charge the battery, using a workshop, preferably an suitable charger authorised BMW motorcycle • Once the battery is fully dealer, to prepare the vehicle charged, disconnect the for laying up and to undertake... -
Page 155: Installing Battery
Installing battery Removing the battery • Remove the front and rear Warning: seats ( Before disconnecting the bat- • Use the screwdriver to dis- tery, switch off the ignition. connect negative battery Turn the ignition switch to lead 1 position , and check that •... -
Page 156: Installing Battery
Installing battery Installing the battery Installation of the battery is the reverse of the removal procedure. Warning: Before connecting the bat- tery, make sure the ignition is switched off. • Tighten the battery-terminal Turn the ignition switch to clamps position , and check that •... -
Page 157: Care
Washing the motorcycle Removing road salt Cleaning the windscreen Cleaning/care Touching up minor damage Care of exhaust silencer Cleaning/care Laying up Restoring to use... -
Page 158: Cleaning/Care
Cleaning/care Attention: Do not use aggressive or pene- trating cleaning agents or sol- vents, as they would cause damage to rubber and plastic parts. Use only solvent-free cleaning Note: agents to clean the seat. Regular cleaning, using the cor- Do not use a steam jet or high- rect methods, is an important pressure cleaning equipment. - Page 159 Cleaning/care Washing the motorcycle • Thoroughly dry all wet surfaces • Do not use solvents or clean- Warning: ing agents to clean the instru- After cleaning and before ment panel, switches and starting a journey, always test windscreen – take care not to the brakes.
- Page 160 Cleaning/care Removing road salt • Wash the motorcycle down Cleaning the windscreen immediately with cold water at the end of the journey. Attention: Do not use cleaning agents. Note: Fuel or chemical solvents at- Do not use warm water tack the windscreen material. –...
-
Page 161: Cleaning/Care
• Minor damage caused by stones striking the painted surface can be touched up with a BMW touch-up pencil Care of exhaust silencer of the correct colour • Changes in the appearance of the silencers during operation... -
Page 162: Laying Up
• Support the motorcycle under a specialist workshop, prefera- the engine so that the wheels bly your authorised BMW mo- are not taking any weight torcycle dealer. -
Page 163: Restoring To Use
Restoring to use Restoring to use • If necessary, remove protec- tive wax coating • Clean the motorcycle ( 157) • Check the brakes • Install a charged battery 80-88), ( 114-117) and 153-154) 131-132) • Perform all safety checks •... -
Page 165: Technical Data
Engine Power train Frame and suspension Fuel and lubricants Electrical system Dimensions and weights Performance data Tightening torques... -
Page 166: Engine
Engine R 1200 GS Type Two-cylinder, four-stroke EVO opposed-twin engine Displacement 1,170 cc Max. output to DIN 70 020 74 kW - at engine speed 7,000 rpm Max. torque 115 Nm - at engine speed 5,500 rpm Permissible engine speeds Engine speed, maximum 7,800 rpm ±50... -
Page 167: Power Train
Power train R 1200 GS Clutch Single-plate dry clutch Clutch plate dia. 180 mm (7.1 in ) Gearbox 6-speed with claw shift and integral torsional vibration damper Gear ratios 1st gear = 4.15 2nd gear = 2.89 3rd gear = 2.30 4th gear = 1.88 5th gear = 1.65 6th gear = 1.47... -
Page 168: Frame And Suspension
Frame and suspension R 1200 GS Frame Three-part frame concept with load-bearing engine. Tubular steel front and rear frames. Location of type plate Behind left side cover Location of vehicle identifi- On front frame at right cation number (VIN) Front brake Two floating brake discs with 4-piston fixed calipers Sintered metal brake-pad linings... - Page 169 Frame and suspension R 1200 GS Wheel location Front BMW Telelever Rear BMW EVO Paralever swinging arm Steering lock angle 2 x 42°...
- Page 170 Frame and suspension R 1200 GS Front suspension system Central spring strut with twin-tube shock absorber, spring preload adjustable in nine stages Spring travel (bump) 122 mm (4.8 in) Spring travel (rebound) 68 mm (2.7 in) Total suspension travel 190 mm (7.5 in) Fixed tube diameter 41 mm (1.6 in ) Front wheel castor in...
- Page 171 R 1200 GS Wheels and tyres Note: You can obtain detailed information on approved tyre sizes and makes from your authorised BMW motor- cycle dealer or by visiting “www.bmw-motorrad.com/ maintenance” on the Internet Front wheel Angled rim shoulder and double...
- Page 172 Frame and suspension R 1200 GS Tyre pressures (with tyres cold) One-up Front 2.20 bar (31.9 psi) Rear 2.50 bar (36,3 psi) Two-up Front 2.50 bar (36.3 psi) Rear 2.70 bar (39.2 psi) Two-up and luggage Front 2.50 bar (36.3 psi) Rear 2.90 bar (42 psi) Recommended minimum tyre tread depth...
-
Page 173: Fuel And Lubricants
Temperatures above or below the limits quoted for the individ- ual SAE classifications are permitted for brief periods only. All engine oils supplied by BMW are subject to regular BMW quality assurance checks. BMW does not approve the use of any upper-cylinder lubricants or similar oil additives. - Page 174 20 l (4.4 gal) (usable) including approx. 4 l (0.9 gal) reserve Brake fluid DOT 4 We recommend BMW brake fluids Attention: Use only new brake fluid to DOT 4 specification. Note: Oil in the fork legs and the rear...
-
Page 175: Electrical System
Electrical system R 1200 GS Battery 12 V 14 Ah, maintenance-free Low temperature test current 100 A Spark plugs Approved types Primary spark plug BOSCH YR5LDE Secondary spark plug BOSCH YR5LDE Electrode gap 0.8 mm (0.031 in) Wear limit 1.0 mm (0.039 in) Fuses All circuits are electronically pro- tected, so plug-in fuses are no longer... -
Page 176: Dimensions And Weights
Dimensions and weights R 1200 GS Maximum length 2, 210 mm (87 in) Maximum width (without mirrors) 915 mm (36 in) Maximum height (without rider) 1,430 mm (56.3 in) Seat height 840/860 mm (33.1/33.9 in) Wheelbase - in normal-load position 1,520 mm (60 in) Ground clearance - in normal-load position... -
Page 177: Performance Data
Performance data R 1200 GS Top speed 208 km/h (129 mph) Ride-past noise level to EU specification 79 dB (A) Stationary noise level to EU specification 87 dB (A) at 3,500 rpm Acceleration 0-100 km/h (0-62 mph) 3.4 s... -
Page 178: Tightening Torques
Tightening torques R 1200 GS Front wheel Brake caliper screws 30 Nm Quick-release axle 50 Nm Axle clamping screw 19 Nm Rear wheel Wheel studs 60 Nm Spark plugs Primary spark plug Engine cold 22.5 Nm Secondary spark plug Engine cold 22.5 Nm Battery Battery-terminal... -
Page 179: Service
1 10 motorcycle. BMW running-in check The BMW running-in check has to be performed when the mo- torcycle has covered between 500 km (approx. 300 miles) and 1,200 km (approx. 750 miles). -
Page 180: Confirmation Of Maintenance Work
Carried out in accordance with Carried out in accordance with manufacturer’s instructions manufacturer’s instructions Odometer Odometer reading reading Brake fluid changed: Without BMW Integral ABS With BMW Integral ABS Wheel circuit Control circuit Clutch fluid changed: Date, stamp, signature Date, stamp, signature... -
Page 181: Confirmation Of
Odometer Odometer reading reading Brake fluid changed: Brake fluid changed: Without BMW Integral ABS Without BMW Integral ABS With BMW Integral ABS With BMW Integral ABS Wheel circuit Wheel circuit Control circuit Control circuit Clutch fluid changed:... -
Page 182: Confirmation Of
Odometer Odometer reading reading Brake fluid changed: Brake fluid changed: Without BMW Integral ABS Without BMW Integral ABS With BMW Integral ABS With BMW Integral ABS Wheel circuit Wheel circuit Control circuit Control circuit Clutch fluid changed:... -
Page 183: Confirmation Of
Odometer Odometer reading reading Brake fluid changed: Brake fluid changed: Without BMW Integral ABS Without BMW Integral ABS With BMW Integral ABS With BMW Integral ABS Wheel circuit Wheel circuit Control circuit Control circuit Clutch fluid changed:... - Page 184 Odometer Odometer reading reading Brake fluid changed: Brake fluid changed: Without BMW Integral ABS Without BMW Integral ABS With BMW Integral ABS With BMW Integral ABS Wheel circuit Wheel circuit Control circuit Control circuit Clutch fluid changed:...
-
Page 185: Confirmation Of
Odometer Odometer reading reading Brake fluid changed: Brake fluid changed: Without BMW Integral ABS Without BMW Integral ABS With BMW Integral ABS With BMW Integral ABS Wheel circuit Wheel circuit Control circuit Control circuit Clutch fluid changed:... - Page 186 Odometer Odometer reading reading Brake fluid changed: Brake fluid changed: Without BMW Integral ABS Without BMW Integral ABS With BMW Integral ABS With BMW Integral ABS Wheel circuit Wheel circuit Control circuit Control circuit Clutch fluid changed:...
-
Page 187: Confirmation Of Service
Confirmation of service Record of all work carried out in workshop Work performed km/miles Date 1 10 This list is intended as a record of maintenance, warranty and re- pair work, of the installation of optional accessories, and also to confirm that special campaign work has been carried out. - Page 188 Confirmation of service Record of all work carried out in workshop Work performed km/miles Date...
-
Page 189: Concluding Thoughts
1 10 Now it’s your turn • Regular care is important, with all functions checked before the journey starts. • Use only genuine BMW Note: accessories. These satisfy all Your local authorised BMW safety requirements and are motorcycle dealer can supply... -
Page 191: Index
Brake system - deactivating, 88 Achtung 2 general, 81, 114, 115 Attention, 2 Aktualität 5 Brake system - with BMW Integral Axle clamping screw, 123 Anfahrtest 85 ABS, 82, 83, 84, 85, 86, 87, 88 Anlaßdruckschalter 15 Brake system, checking, 114... - Page 192 B - E Bulbs Clutch, 165 changing fluid level, 118 flashing turn indicators, 140 Clutch lever, 40 parking light, 139 Clutch lever, adjusting, 40 information, 133 Cockpit, 16 technical data, 173 general view, 16 Bulbs, changing Compression ratio, 164 flashing turn indicators, 140 Concluding thoughts, 187 notes, 133 Confirmation of maintenance...
- Page 193 E - H Emergency off (kill) switch for Fuel, 78 ignition, 15 consumption, 164 Engine oil, 112, 113 grade, 172 capacity, 171 refuelling, 78 consumption, 164 Fuel and lubricants, 171, 172 oil filler neck, 12, 113 Fuel filler cap, 13, 78 technical data, 171 Fuel gauge, 79 viscosity, 171...
- Page 194 H - N Handling your motorcycle Key positions, 29 safely, 62 Keys, 28 Hazard warning flashers, 32 Kill switch, 36 Headlight beam throw Knob adjustment, 43, 44 for spring preload, 51 Headlight setting with motorcycle heavily loaded, 45 Laying up the motorcycle, 160 Headlight setting RHD/LHD Left handlebar fitting, 14 traffic, 44, 45...
- Page 195 O - R Off-road riding, 72, 73 Quantity of oil, 112 Oil and grease on brakes, 81 Quick-release axle, 123 Oil capacity engine, 171 Rear shock absorber, gearbox, 172 adjusting, 52 Oil filler neck, 12, 113 Rear wheel Oil level technical data, 169 check, 113 Rear wheel drive...
- Page 196 R - S Rev. counter, 16 Service, notes, 177 RHD traffic Setting the clock, 38 headlight adjustment, 44, 45 Shift lever, 56 Ride-past noise level, 175 Shifting gear, 79 Rider Information Display (RID) Shock-absorber adjustment, 52 position, 16 Side panel, 144 Riding, 79 Side stand, 74, 75 Rims, 119, 169...
- Page 197 T - W Tyre tread, 120 Technical data, as of page, 164 Tyres, 169 Technical modifications, 108 approved sizes, 169 Technical specifications, 4 repair kit, 111 Telelever, 167 running in, 69 Telltale and warning lights, 18 technical data, 169 ABS, 18 tread depth, 120, 170 Telltale lights tyre pressures, 53, 170...
- Page 198 W - Z Wheels, 119, 120, 121, 124 not approved, 120 Wheels, technical data, 169...
- Page 199 Vehicle/dealership data Vehicle data Model Vehicle identification number Colour code First registration Registration number Dealership data Person to contact in Service Ms./Mr. Phone number Dealership address/phone (company stamp)
- Page 200 BMW recommends Castrol You might need certain items of information when you stop to refuel, so it is a good idea to write down the important data in this chart. Fuel Designation Premium fuel RON:Minimum Engine oil Grade The difference between the min.
- Page 201 About BMW Motorrad Integral ABS How does ABS work? adapts the braking pressure to must assume extremely low The maximum braking force the maximum braking force coefficients of friction (gravel, it is possible to transfer to the it is possible to transfer so that...
- Page 202 BMW extreme speed, in combina- accessories connected to tion with declining on-board the power sockets...
- Page 203 The ABS has to • since this is an emergency- of the failure of the BMW intervene to ensure that the run function, you should visit Motorrad Integral ABS, front wheel does not lock up;...
- Page 204 Any technical system is only ever as good as its maintenance. The service intervals specified must be kept to without fail to ensure that the BMW Motorrad Integral ABS is in an optimum maintenance condition. What is the design specification for BMW...
- Page 205 Applies to: Motorcycles with hand protectors Possibility of malfunction – Impermissible ergonomic set- Checking freedom of due to incorrectly posi- tings (see Rider's Manual, movement of handlebar tioned hand protector "Adjusting clutch lever/ han- levers If the hand protector is twisted dlebar lever"...
- Page 206 • Have the settings and the threaded-fastener tightening torques checked by a special- ist workshop, preferably an authorised BMW Motorrad dealer. BMW Motorrad Order No: 01 41 7 714 311 04.2008...
Need help?
Do you have a question about the R 1200 GS 2003 and is the answer not in the manual?
Questions and answers