Table of Contents
Advertisement
Quick Links
Applicable Tire Size Capacity:
any 24-inch – 700 x 45c
(Max Tire Outer Diameter = 714mm)
Main Features
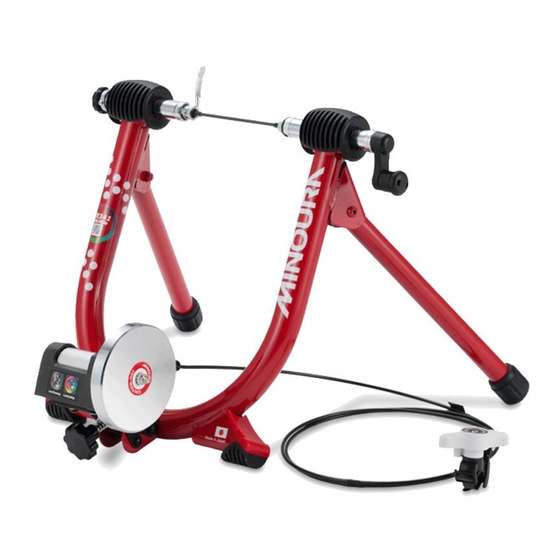
• The basic LiveRide series trainer combined with the simple & durable U-shaped design main frame and the powerful
Advanced-Magturbo resistance unit
• Uses a super-strong Neodymium magnet for providing extremely wide and controllable resistance range
• Easy-to-grip wing design remote shifter enables to choose your desired power from 7 resistance levels easily
Please Note
Contact
MINOURA North American Tech Center
(for U.S. residents ONLY)
Hayward, California, U.S.A.
Phone: 1-510-538-8599 (8 am - 5 pm, Mon - Fri, PST)
Fax:
1-510-538-5899
Email: support@minourausa.com
indoor bicycle trainer
(ETRTO 47-622)
This trainer must be used with a completely smooth (no knobs or raised tread) tire.
Failure to do so will ruin the mag unit, your tire, and void any possible warranty.
If you need help, please contact the shop first where you originally purchased this product
or call the distributors in your country. The distributors list can be found on our web site.
When you cannot get enough service, you can contact us;
MADE IN JAPAN
instructions manual
MINOURA Japan Headquraters
(for ALL customers)
1197-1 Godo, Anpachi, Gifu 503-2305 Japan
Phone: +81-584-27-3131
Fax:
+81-584-27-7505
Email: minoura@minoura.jp
Web: www.minoura.jp
LR341
(ver.1.1 2017/7)
Advertisement
Table of Contents

Related Manuals for MINOURA LiveRide LR341


Summary of Contents for MINOURA LiveRide LR341
- Page 1 Contact or call the distributors in your country. The distributors list can be found on our web site. When you cannot get enough service, you can contact us; MINOURA North American Tech Center MINOURA Japan Headquraters (for U.S. residents ONLY) (for ALL customers) Hayward, California, U.S.A.
- Page 2 The kit contains only M5 hex wrench. • Use the supplied rear quick release skewer for maximum stability. The hub clamping parts (couplings) fits the supplied quick release skewer only. Minoura is not responsible for any problem caused from using your own skewer.
- Page 3 About Quick Release Skewer Set the Q/R lever angle between A Quick Release Skewer is a device used to easily install or remove the wheels from the 12 and 4 o'clock position. Any other angle may cause the your bicycle frame. Most sport bicycles come with a Q/R.
- Page 4 (not supplied) Replace the quick release skewer on the one included with the LR341. The coupling is designed to fit the supplied Q/R only. Minoura is not responsible to any troubles caused by using your own skewer. If your bike is not a quick release skewer type, but a hub nut type, remove the Grommet (a black plastic skewer nut protecter) from the right side coupling.
- Page 5 (Wheel is hidden for easier explanation) Here is the step to mount the rear wheel onto LR341. Hub Clamp 1) Set the left side coupling tube to be almost Handle Adjust center by turning the Adjust Knob. Knob 2) Turn the Hub Clamp Handle counter-clockwise to Coupling retract (to make wide space between the couplings).
- Page 6 Turn the knob bolt clockwise to compress the drive roller to the tire. (see Fig. L) The ideal level is that the tire is compressed in the depth of 3 – 4mm. (see Fig. M) Precise contact between your tire and the drive roller is critical. If the contact is too loose, your tire will slip and training will suffer.
- Page 7 How To Install Remote Shifter Required Tool: 1 x M4 Hex Wrench LR341 comes with a convenient remote shifter device. Lever By installing it on your handlebar or stem, you can adjust the resistance in 7 different levels without getting off the bike. The remote shifter should be used in conjunction with the gears on your bike to achieve maximum efficiency in your workout.
- Page 8 Why My Remote Shifter Doesn't Work Properly? If you have a shifting issue where you can't set the remote at L or H, your cable may be stretched. To fix this problem, follow the adjust the cable tension. Set your remote shifter at "H" position and remove the shifter from your handlebar, then straighten the cable as much as possible.
Need help?
Do you have a question about the LiveRide LR341 and is the answer not in the manual?
Questions and answers