Silvercrest SEMM 1470 A1 Operating Instructions Manual
Hide thumbs
Also See for SEMM 1470 A1:
- Operating instructions manual (242 pages) ,
- Operating instructions manual (106 pages) ,
- Operating instructions manual (228 pages)

Subscribe to Our Youtube Channel
Related Manuals for Silvercrest SEMM 1470 A1


Summary of Contents for Silvercrest SEMM 1470 A1
- Page 1 ESPRESSO MACHINE SEMM 1470 A1 ESPRESSO MACHINE ESPRESSOMASCHINE Operating instructions Bedienungsanleitung IAN 277727...
- Page 2 Before reading, unfold the page containing the illustrations and familiarise yourself with all functions of the device. Klappen Sie vor dem Lesen die Seite mit den Abbildungen aus und machen Sie sich anschließend mit allen Funktionen des Gerätes vertraut. GB / IE / NI Operating instructions Page DE / AT / CH...
-
Page 4: Table Of Contents
Importer ............30 GB │ IE │ NI │ ■ SEMM 1470 A1 ... -
Page 5: Introduction
A warning at this hazard level indicates a potentially hazardous situation. Failure to avoid this hazardous situation could result in injury. ► Follow the instructions in this warning notice to prevent injury. ■ │ GB │ IE │ NI SEMM 1470 A1... -
Page 6: Proper Use
Observe the procedures described in these operating instructions. No claims of any kind will be accepted for damage arising as a result of incor- rect use. The risk shall be borne solely by the user. GB │ IE │ NI │ ■ SEMM 1470 A1 ... -
Page 7: Package Contents / Transport Inspection
If possible, keep the original packaging of the appliance for the entire duration of the warranty period so that the appliance can be packed properly for return shipment in the event of a warranty claim. ■ │ GB │ IE │ NI SEMM 1470 A1... -
Page 8: Safety Information
Customer Service department. Improper repairs can pose significant risks to the user. It will also invalidate any warranty claims. Never submerse the appliance in water or other liquids! Danger of electric shock! GB │ IE │ NI │ ■ SEMM 1470 A1 ... - Page 9 Protect the appliance from penetration by moisture and liquids. ■ Protect the appliance against knocks, dust, chemicals, extremes ■ of temperature, etc. and keep it away from sources of heat (ovens, radiators). ■ │ GB │ IE │ NI SEMM 1470 A1...
- Page 10 Repairs to the appliance during the warranty period may ► only be carried out by a customer service department authorised by the manufacturer. Otherwise, no warranty claims will be held for any subsequent damages. GB │ IE │ NI │ ■ SEMM 1470 A1 ...
-
Page 11: Appliance Elements
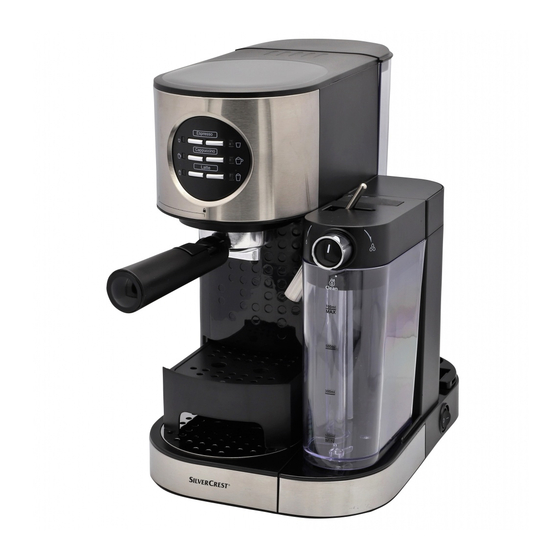
Water tank lid Water tank Holders On/off switch Lever for positioning the milk nozzle Figure C: Sieve holder Sieve block Large espresso sieve Small espresso sieve Measuring spoon with compactor ■ │ GB │ IE │ NI SEMM 1470 A1... -
Page 12: Before First Use
Empty the remaining water from the water tank and the milk tank NOTE ► You should also clean the appliance as described here after long periods out of use. The appliance is now ready for use. GB │ IE │ NI │ ■ SEMM 1470 A1 ... -
Page 13: Operation
This shows that you can only prepare espresso, as this does not require any milk. ■ │ GB │ IE │ NI SEMM 1470 A1... -
Page 14: Inserting The Espresso Sieves In The Sieve Holder
. You can now remove the espresso sieve GB │ IE │ NI │ ■ SEMM 1470 A1 ... -
Page 15: Adding Espresso Powder
” symbol. NOTE after preparing a drink, turn it slowly back ► To remove the sieve holder to the " " position to prevent any coffee from spraying out. ■ │ GB │ IE │ NI SEMM 1470 A1... -
Page 16: Setting The Milk Nozzle
There is, however, no need to remove the milk tank from the appliance if you want to adjust the length of the milk nozzle GB │ IE │ NI │ ■ SEMM 1470 A1 ... -
Page 17: Preparing Drinks
3) If there is not enough room, remove the drip tray from the appliance and place the glass directly on the base of the appliance. ■ │ GB │ IE │ NI SEMM 1470 A1... -
Page 18: Preparing Espresso
15 minutes if no other button is pushed. If you want to make another drink, simply press any button. The appliance heats back up. GB │ IE │ NI │ ■ SEMM 1470 A1 ... - Page 19 "Double" espresso button flashes 5 times. You can now release the button . The programme has been reset to 80 ml. ■ │ GB │ IE │ NI SEMM 1470 A1...
-
Page 20: Preparing Cappuccino
11) Wait until the espresso has stopped flowing out of the espresso outlet , the milk has stopped flowing out of the milk nozzle and all control lamps light up. You can now remove your cappuccino. GB │ IE │ NI │ ■ SEMM 1470 A1 ... - Page 21 Otherwise you will be in cleaning mode (see section "Cleaning and care"). You can customise the duration of the milk froth output for the “Small cappuc- cino” and “Large cappuccino” programmes: ■ │ GB │ IE │ NI SEMM 1470 A1...
-
Page 22: Preparing Latte Macchiato
4) Add the espresso powder to the espresso sieve and fit the sieve holder 5) Place a suitable cup on the drip grille 6) Set the milk nozzle so that it is pointing into the cup. GB │ IE │ NI │ ■ SEMM 1470 A1 ... - Page 23 Stop the milk output by pressing any button. The milk will stop coming out automatically after 70 seconds. ■ │ GB │ IE │ NI SEMM 1470 A1...
- Page 24 – The next time you prepare a latte macchiato using the “Small” latte but- the newly programmed duration will be used for milk output. GB │ IE │ NI │ ■ SEMM 1470 A1 ...
-
Page 25: Frothed Milk
15 minutes if no other button is pushed. If you want to make another drink, simply press any button. The appliance heats back up. ■ │ GB │ IE │ NI SEMM 1470 A1... -
Page 26: Cleaning And Care
2x in a row. The control lamps of the “Large” and “Small” cappuccino buttons , as well as the “Large” and “Small” latte buttons flash alternately and hot steam comes out of the milk nozzle GB │ IE │ NI │ ■ SEMM 1470 A1 ... - Page 27 3) Then press the positioning lever and the milk nozzle at the same time towards the recess on the milk tank lid so that they disconnect. ■ │ GB │ IE │ NI SEMM 1470 A1...
-
Page 28: Cleaning The Espresso Sieves, Sieve Holder And Espresso Outlet
. The water comes out of the espresso outlet and rinses out the pipes. As soon as the water stops coming out of the espresso outlet , the cleaning process is complete. GB │ IE │ NI │ ■ SEMM 1470 A1 ... -
Page 29: Cleaning The Water Tank
Clean the housing with a damp cloth. For stubborn soiling use a mild detergent on the cloth. Ensure that the appliance is completely dry before the next use. ■ │ GB │ IE │ NI SEMM 1470 A1... -
Page 30: Cleaning The Accessories
The pump is unusually • Fill the water tank • The water tank is empty. noisy. with water. GB │ IE │ NI │ ■ SEMM 1470 A1 ... -
Page 31: Technical Details
Dispose of the appliance via an approved disposal company or your municipal waste facility. Please comply with all applicable regulations. Please contact your waste disposal facility if you are in any doubt. ■ │ GB │ IE │ NI SEMM 1470 A1... -
Page 32: Kompernass Handels Gmbh Warranty
Service centres. GB │ IE │ NI │ ■ SEMM 1470 A1 ... -
Page 33: Service
Please note that the following address is not the service address. Please use the service address provided in the operating instructions. KOMPERNASS HANDELS GMBH BURGSTRASSE 21 44867 BOCHUM GERMANY www.kompernass.com ■ │ GB │ IE │ NI SEMM 1470 A1... - Page 34 Importeur ............60 DE │ AT │ CH │ 31 ■ SEMM 1470 A1...
-
Page 35: Einführung
Situation. Falls die gefährliche Situation nicht vermieden wird, kann dies zu Verletzungen führen. ► Die Anweisungen in diesem Warnhinweis befolgen, um Verletzungen von Personen zu vermeiden. ■ 32 │ DE │ AT │ CH SEMM 1470 A1... -
Page 36: Bestimmungsgemäße Verwendung
Das Gerät ausschließlich bestimmungsgemäß verwenden. ► Die in dieser Bedienungsanleitung beschriebenen Vorgehensweisen einhalten. Ansprüche jeglicher Art wegen Schäden aus nicht bestimmungsgemäßer Verwen- dung sind ausgeschlossen. Das Risiko trägt allein der Benutzer. DE │ AT │ CH │ 33 ■ SEMM 1470 A1... -
Page 37: Lieferumfang / Transportinspektion
örtlich geltenden Vorschriften. HINWEIS ► Heben Sie wenn möglich die Originalverpackung während der Garan- tiezeit des Gerätes auf, um das Gerät im Garantiefall ordnungsgemäß verpacken zu können. ■ 34 │ DE │ AT │ CH SEMM 1470 A1... -
Page 38: Sicherheitshinweise
Reparaturen können erhebliche Gefahren für den Benutzer entstehen. Zudem erlischt der Garantieanspruch. Tauchen Sie das Gerät nicht in Wasser oder andere Flüs- sigkeiten. Gefahr eines elektrischen Schlages! DE │ AT │ CH │ 35 ■ SEMM 1470 A1... - Page 39 Schützen Sie das Gerät vor Feuchtigkeit und dem Eindringen ■ von Flüssigkeiten. Schützen Sie das Gerät vor Stößen, Staub, Chemikalien, star- ■ ken Temperaturschwankungen und zu nahen Wärmequellen (Öfen, Heizkörper). ■ 36 │ DE │ AT │ CH SEMM 1470 A1...
- Page 40 Verwendung in Innenräumen vorgesehen. HINWEIS Eine Reparatur des Gerätes während der Garantiezeit darf ► nur von einem vom Hersteller autorisierten Kundendienst vorgenommen werden, sonst besteht bei nachfolgenden Schäden kein Garantieanspruch mehr. DE │ AT │ CH │ 37 ■ SEMM 1470 A1...
-
Page 41: Geräteelemente
Taste Espresso „klein“ (mit nebensteheder Kontrolleuchte) Abbildung B: Wassertankdeckel Wassertank Halterungen Ein-/Aus-Schalter Hebel zum Positionieren der Milchdüse Abbildung C: Siebträger Siebblockierer großes Espressosieb kleines Espressosieb Messlöffel mit Stopfer ■ 38 │ DE │ AT │ CH SEMM 1470 A1... -
Page 42: Vor Der Ersten Inbetriebnahme
Entleren Sie das verbliebene Wasser aus dem Wasser- und aus dem Milchtank HINWEIS ► Reinigen Sie das Gerät wie hier beschrieben auch nach längerer Standzeit. Das Gerät ist nun betriebsbereit. DE │ AT │ CH │ 39 ■ SEMM 1470 A1... -
Page 43: Inbetriebnahme
Espresso-Kontrollleuchten / . Dies zeigt an, dass Sie ausschließlich Espresso zubereiten können, denn dafür wird keine Milch benötigt. ■ 40 │ DE │ AT │ CH SEMM 1470 A1... -
Page 44: Espressosiebe In Siebträger Einsetzen
Siebträger herauszuneh- men, drehen Sie das eingesetzte Espressosieb so weit, bis sich die Einkerbung am Espressosieb über der Einkerbung am Siebträger befindet. Sie können das Espressosieb nun herausnehmen. DE │ AT │ CH │ 41 ■ SEMM 1470 A1... -
Page 45: Espressopulver Einfüllen
“ weist, drehen. HINWEIS ► Um den Siebträger nach der Getränkezubereitung abzunehmen, dre- hen Sie diesen langsam zurück zur Position „ “, um ein nachträgliches Herausspritzen zu vermeiden. ■ 42 │ DE │ AT │ CH SEMM 1470 A1... -
Page 46: Milchdüse Einstellen
Zur einfacheren Darstellung ist das Verstellen der Milchdüse hier mit abge- nommenen Milchtank gezeigt. Der Milchtank muss jedoch nicht unbedingt aus dem Gerät entnommen werden, wenn Sie die Länge der Milchdüse einstellen. DE │ AT │ CH │ 43 ■ SEMM 1470 A1... -
Page 47: Getränk Zubereiten
3) Sollte der Platz immer noch nicht ausreichend sein, nehmen Sie die Tropfen- auffangschale aus dem Gerät und plazieren Sie das Glas direkt auf dem Boden des Gerätes. ■ 44 │ DE │ AT │ CH SEMM 1470 A1... -
Page 48: Espresso Zubereiten
Taste drücken, schaltet sich das Gerät nach ca. 15 Minuten in den Energiesparmodus. Wenn Sie wieder ein Getränk zubereiten möchten, drücken Sie eine beliebige Taste. Das Gerät heizt wieder auf. DE │ AT │ CH │ 45 ■ SEMM 1470 A1... - Page 49 Sie die Taste Espresso „groß“ solange, bis die Kon- trollleuchte der Taste Espresso „groß“ 5 x aufleuchtet. Sie können die Taste nun lösen, die Programmierung wurde zurück auf 80 ml gesetzt. ■ 46 │ DE │ AT │ CH SEMM 1470 A1...
-
Page 50: Cappuccino Zubereiten
11) Warten Sie, bis kein Espresso mehr aus dem Espressoauslauf fließt, keine Milch aus der Milchdüse austritt und alle Kontrollleuchten dauerhaft leuchten. Sie können dann den Cappuccino entnehmen. DE │ AT │ CH │ 47 ■ SEMM 1470 A1... - Page 51 “. Ansonsten befinden Sie sich ich Reinigungs-Modus (siehe Kapitel „Reinigen und Pflegen“). Sie können für die Dauer der Milchschaumzugabe für die Programme „Cappuc- cino klein“ und „Cappuccino groß“ individuelle Zeiten speichern: ■ 48 │ DE │ AT │ CH SEMM 1470 A1...
-
Page 52: Latte Macchiato Zubereiten
Sie den Siebträger ein. 5) Stellen Sie eine passende Tasse auf das Abtropfgitter 6) Stellen Sie die Milchdüse so ein, dass diese in die Tasse weist. DE │ AT │ CH │ 49 ■ SEMM 1470 A1... - Page 53 Taste Cappuccino „groß“ leuchten und aus der Milchdüse tritt aufgeschäumte Milch. Stoppen Sie die Milchausgabe durch Drücken einer beliebigen Taste. Die Milchausgabe stoppt nach 70 Sekunden automatisch. ■ 50 │ DE │ AT │ CH SEMM 1470 A1...
- Page 54 , um den Latte Macchiato zuzubereiten. – Bei der nächsten LatteMacchiato - Zubereitung mit der Taste Latte „klein“ wird nun die neu programmierte Dauer der Milchausgabe angewendet. DE │ AT │ CH │ 51 ■ SEMM 1470 A1...
-
Page 55: Aufgeschäumte Milch
Taste drücken, schaltet sich das Gerät nach ca. 15 Minuten in den Energiesparmodus. Wenn Sie wieder ein Getränk zubereiten möchten, drücken Sie eine beliebige Taste. Das Gerät heizt wieder auf. ■ 52 │ DE │ AT │ CH SEMM 1470 A1... -
Page 56: Reinigen Und Pflegen
. Die Kontroll- leuchten der Tasten Cappuccino „groß“ und „klein“ , sowie der Tasten Latte „groß“ und „klein“ leuchten abwechselnd und heißer Wasserdampf tritt aus der Milchdüse aus. DE │ AT │ CH │ 53 ■ SEMM 1470 A1... - Page 57 3) Drücken Sie gleichzeitig den Hebel zum Positionieren und die Milchdüse in Richtung der Aussparung im Milchtankdeckel , so dass sich die Steckverbindung löst. ■ 54 │ DE │ AT │ CH SEMM 1470 A1...
-
Page 58: Espressosiebe, Siebträger Und Espressoauslauf Reinigen
6) Drücken Sie die Taste Espresso „klein“ . Das Wasser läuft aus dem Espressoauslauf und durchspült die Leitungen. Sobald kein Wasser mehr aus dem Espressoauslauf austritt, ist die Reinigung abgeschlossen. DE │ AT │ CH │ 55 ■ SEMM 1470 A1... -
Page 59: Wassertank Reinigen
Reinigen Sie das Gehäuse mit einem leicht angefeuchteten Tuch. Bei hartnäckige- ren Verschmutzungen geben Sie ein mildes Spülmittel auf das Tuch. Stellen Sie sicher, dass das Gerät vor einer erneuten Benutzung vollständig getrocknet ist. ■ 56 │ DE │ AT │ CH SEMM 1470 A1... -
Page 60: Zubehörteile Reinigen
• Rand des Siebträgers verreste auf dem Rand des von Espressopulverresten Siebträgers befreien. Geräuschvoller Betrieb • Wasser in den Wasser- • Der Wassertank ist leer. der Pumpe. tank füllen. DE │ AT │ CH │ 57 ■ SEMM 1470 A1... -
Page 61: Technische Daten
Entsorgen Sie das Gerät über einen zugelassenen Entsorgungsbetrieb oder über Ihre kommunale Entsorgungseinrichtung. Beachten Sie die aktuell geltenden Vorschriften. Setzen Sie sich im Zweifelsfall mit Ihrer Entsorgungseinrichtung in Verbindung. ■ 58 │ DE │ AT │ CH SEMM 1470 A1... -
Page 62: Garantie Der Kompernaß Handels Gmbh
Das Produkt ist nur für den privaten und nicht für den gewerblichen Gebrauch bestimmt. Bei missbräuchlicher und unsachgemäßer Behandlung, Gewaltanwendung und bei Eingriffen, die nicht von unserer autorisierten Service-Niederlassung vorgenommen wurden, erlischt die Garantie. DE │ AT │ CH │ 59 ■ SEMM 1470 A1... -
Page 63: Service
IAN 277727 Importeur Bitte beachten Sie, dass die folgende Anschrift keine Serviceanschrift ist. Kontaktieren Sie zunächst die benannte Servicestelle. KOMPERNASS HANDELS GMBH BURGSTRASSE 21 44867 BOCHUM GERMANY www.kompernass.com ■ 60 │ DE │ AT │ CH SEMM 1470 A1... - Page 64 KOMPERNASS HANDELS GMBH BURGSTRASSE 21 44867 BOCHUM DEUTSCHLAND / GERMANY www.kompernass.com Last Information Update · Stand der Informationen: 06 / 2016 · Ident.-No.: SEMM1470A1-042016-3 IAN 277727...
Need help?
Do you have a question about the SEMM 1470 A1 and is the answer not in the manual?
Questions and answers