Table of Contents
Advertisement
Quick Links
Personal Tracker
Quick Start Guide
GMTRA-IOS-EN-QS draft
Status Indicators
Status information is shown two ways:
• On the iPhone in the Personal Tracker app
• On the tracker using the LED indicators
On the iPhone
Status indicators are shown on the iPhone when the tracker is con-
nected by Bluetooth to the iPhone and you are using the Personal
Tracker app.
Bluetooth
Satellite
GPS
Connection
Coverage
For more detailed status information, touch Settings on the bottom
of the screen in the Personal Tracker app and select Status.
You can also enable Stealth Mode on the Status screen. This mode
will turn off any notification sounds (beeps, etc.) and LEDs so you
can use your device discreetly.
On the Tracker
Satellite Indicator
Color
Indication
Green—Blinking
Sending a message and satellite
coverage available.
Out of the Box
The following items are shipped in the box:
• Global Mobile Tracker (GMPT-401)
• USB charge cable (ACC GMPT-401 POGO to USB Cable)
• Power adapter with regional plug adapters
• Product documentation
Modes of Operation
The Personal Tracker has 2 modes of operation:
• Two devices—Tracker + iPhone
• Standalone—Tracker only (limited functionality)
User Documentation
To download the Personal Tracker User's Guide, go to
www.gt.honeywell.com, click Support, Login into Technical Sup-
port Portal.
Personal Tracker Application
For the latest Personal Tracker Application, go to
www.gt.honeywell.com, click Support, Login into Technical Sup-
port Portal.
09/16
Amber—Blinking
No satellite coverage.
Green—On for 3 seconds
Message sent successfully.
Amber—On for 3 seconds
Sending message failed.
System Indicator
Color
Indication
Green—Blinking
Power on, battery 60-100% charged.
Amber—Blinking
Power on, battery 20-60% charged.
Red—Blinking
Power on, battery 0-20% charged.
Blue—Blinking
Bluetooth connected.
Blue—Blinking Slow
In Bluetooth pairing mode (2 min).
Tracker
Battery
Red—Blinking fast
Alert mode is activated, sending SOS
message.
Red—On for 60
Emergency message successfully
seconds
sent.
Red—Blinking Slow
System fault.
Green—Blinking slow
Tracker is on, battery is fully charged.
(charging)
Amber—Blinking slow
Tracker is on, battery is charging.
(charging)
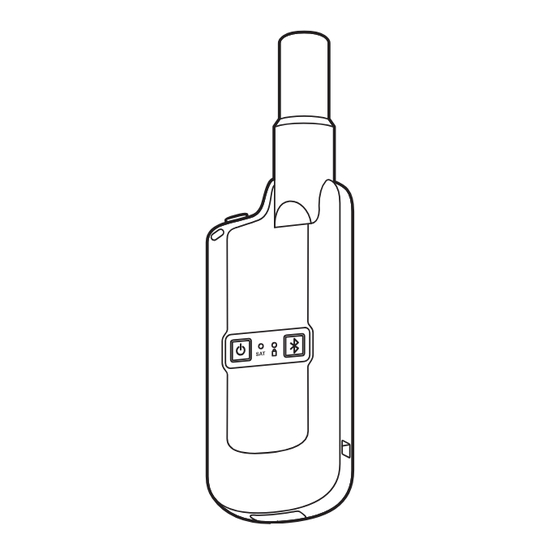
Getting to Know the Personal Tracker
Antenna
SOS Button
Lanyard
hole
System
Indicator
LED
Satellite
Indicator
LED
Bluetooth
Tracker Power
Pairing
Button
Button
Pogo connector
for charging
Register the Tracker in ViewPoint
Before registering the Personal Tracker in ViewPoint you must com-
plete the airtime activation form (contact your Account Manager).
To create a user account:
1. Go to viewpoint.gt.honeywell.com, click on the Register link and
follow the instructions. Wait for the confirmation email.
2. Click on the link in the confirmation email to complete
registration.
Note: If you do not click the link in the email, you will need to request
another activation email by clicking the Reset Password
button on the Login page..
3. Login using your Username (email address) and Password.
To add the tracker to ViewPoint Fleet:
1. Click Add Terminal.
2. Type the tracker IMEI, Serial Number, Fleet Name and other
optional information.
The IMEI and Serial Number are located on the product label
located on the back of the tracker or on the shipping box.
3. When prompted, select your terminal from the drop-down menu
and click Confirm.
Note: For more information on how to use ViewPoint with the
tracker, see the ViewPoint User Manual available in
ViewPoint from the Help menu.
Charging
The tracker can be charged using the USB cable connected to a wall
adapter, PC, portable USB charger, or car charger.
Powering the Tracker
To turn the tracker on, press and hold the power button for 2 sec-
onds. The System Indicator LED will flash to show battery status
(see the System Indicator table). To turn the tracker off, press the
power button for 2 seconds.
Tracker Power
Button
Bluetooth Connection
To establish a Bluetooth connection between the tracker and
your Apple device:
1. Turn the tracker on (see above).
2. Press the Bluetooth button on the tracker. The tracker is then
discoverable for 2 minutes.
Bluetooth Pairing
Button
3. Activate Bluetooth on your iPhone.
4. Open the Personal Tracker App. Touch Settings, Bluetooth.
Select the tracker on the list of available devices (see the label
on the tracker for the MAC address).
5. Enter PIN code 123456. The tracker pairs with the iPhone. When
connected the Bluetooth connection icon shows on the status bar
of the Personal Tracker app.
Advertisement
Table of Contents

Related Manuals for Honeywell GMPT-401


Summary of Contents for Honeywell GMPT-401
-
Page 1: Quick Start Guide
The tracker can be charged using the USB cable connected to a wall adapter, PC, portable USB charger, or car charger. • Global Mobile Tracker (GMPT-401) Antenna • USB charge cable (ACC GMPT-401 POGO to USB Cable) SOS Button Personal Tracker • Power adapter with regional plug adapters •... - Page 2 Disclaimer IP Rating IP67 Honeywell International Inc. (“HII”) reserves the right to make changes in specifications and other information contained in this document without prior Shock & Vibration MIL-STD-810G notice, and the reader should in all cases consult HII to determine whether any such changes have been made.
- Page 3 Only recharge the battery using the supplied charger. Caution: There is the risk of explosion if the battery pack is replaced by one that is not supplied by Honeywell Global Tracking, or if the battery pack is abused or disposed of incorrectly.
- Page 4 Ingress Protection: EN 60529: Classification IP66 and IP67 Iridium Type Approval (Iridium Certificate Number XXXXXX) FCC Statements FCC Part 15 Statement This device complies with part 15 of the FCC Rules. Operation is subject to the following two conditions: (1) This device may not cause harmful interference, and (2) This device must accept any interference received, including interference that can cause undesired operation.
- Page 5 Para recarregar a bateria use apenas o carregador fornecido. Cuidado: Existe risco de explosão se a bateria for substituída por outra que não tenha sido fornecida pela Honeywell Global Tracking, ou se a bateria for mal utilizada ou descartada de forma incorreta.
- Page 6 Производить зарядку батареи только с помощью поставляемого в комплекте зарядного устройства Внимание: Существует риск взрыва в случае, если аккумуляторная батарея будет заменена на батарею, которая не поставлена компанией Honeywell Global Tracking, либо аккумуляторная батарея будет неправильно эксплуатироваться или утилизироваться. Экологическая информация о продукции...
Need help?
Do you have a question about the GMPT-401 and is the answer not in the manual?
Questions and answers