Table of Contents
Advertisement
Quick Links
Advertisement
Table of Contents

Related Manuals for WENPOD GP1+


Summary of Contents for WENPOD GP1+
- Page 1 USER GUIDE...
- Page 2 C O N T E N T S Technical Background Introduction Getting Started Handling Methods Applications Support & Service...
-
Page 3: Technical Background
Technical Background Fussy A.I. Logic – Combining the application on artificial intelligent algorithm with gyroscope, it proactively stabilizes the shooting of video in horizontal-axis (shakinesss in horizontal levelling), in tilt-axis (shakiness in tilt angle), as well as directional-axis (shakiness in left and right motion). -
Page 4: What's In The Box
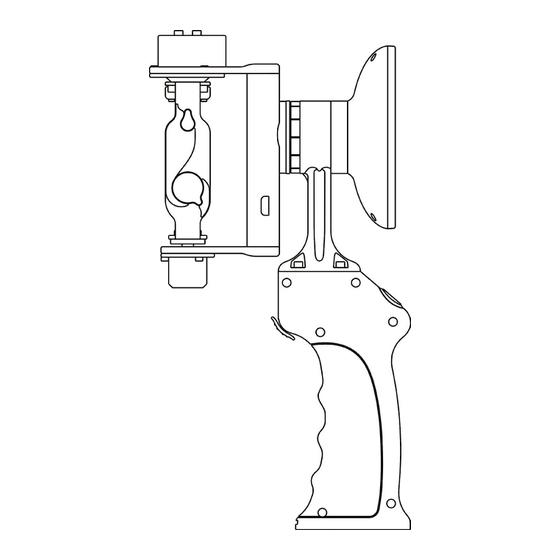
Introduction WENPOD GP1 is the state of the art digital gyroscopic stabilizer. It empowers stability and horizontal leveling when shooting video footage using GoPro action camera. With GP1 Plus, in combination with a few simple techniques, it empowers ordinary people to produce extraordinary video footages on the move. - Page 5 ① ② ④ ③ ⑤ ① GoPro REC button ⑥ ② GoPro mounting frame ⑧ ③ USB Port ④ Tilt axis motor ⑦ ⑤ Tilt angle controller joystick ⑥ Roll axis motor ⑦ Manufacturer USB port ⑧ 3.5-inch rotatable LCD screen ⑨...
- Page 6 Features Horizontal-axis remain stabilized while handle Horizontal-axis remain stabilized while handle can be freely rotated in 360 degrees. can be freely rotated in 360 degrees. 360° 360° Pan Lock Mode When handle is lifted up as in the following diagram (roll-axis motor is located above the GoPro camera), the motor that controls the horizontal leveling will seamlessly change to the pan-axis.
- Page 7 Rotatable LCD Screen GP1+ comes with a 3.5-inch LCD screen which allows the user to enjoy real-time shooting. Remarks * To be manually rotated 180 degrees maximum from left or right. It will be hyper-rotated if the rotation angle exceeds degrees thus considered as man-made damage.
-
Page 8: Getting Started
Getting Started This section introduces some basic yet important prepration steps as well as some basic operations. Installing battery As in the following diagrams, open the battery compartment door by sliding the switch to "open". Insert the battery in the direction of the triangle mark toward the battery compartment. - Page 9 Installing the GoPro Camera As shown in Fig 3-5, the GoPro lens is facing outward, a slight push to slide the camera towards the USB port (Fig 3-6 and Fig 3-7). Remarks * Before installation, ensure the GoPro camera functions normally and ensure there is adequate space in the memory card. REC button GoPro lens Push backward to...
-
Page 10: Handling Method
Handling Method Landscape Mode In this mode, your footage will be recorded in landscape position. It is best suited for making a VIDEO SELFIE. Your wrist must be locked and steady in order to record a stable footage Hold handle invertedly ① (For advance Hold handle invertedly ②... - Page 11 Hold handle horizontally This position is best suited for shots as you move, also applicable to moving your camera shots. In this ergonomic position, your wrist movment will be actively cancelled by both the horizontal-axis and tilt-axis motors. This will enhance the stability of shots when you move. Strongly Suggested (single hand, for advance users)...
- Page 12 Hold handle horizontally with both hands - Normal Mode① (for advance users) Flipping the handle as the following picture shown, at the same time hold the screen gently with the other hand. This position is best suitable for long shots, as well as shots in normal pacing speed. (for advance users)...
- Page 13 Applications Sporting Mini movie productions...
- Page 14 Romantic moments At the scene...
- Page 15 Baby vlog...
- Page 16 Initialization When there is change of camera, extreme changes in temperature, or instability during operation, you me need to reset your SP1 and carry out the initialization process. Initialization is NOT require during the day to day use except the above cases is encountered. Procedures for Initialization / Reset 1.Follow the step in page 7 to install and Pre-balance properly.
- Page 17 Attentions : ◆ GP1 Plus is delicate digital electronic equipment. Please stay away from strong magnetic field, fire, water or any high temperature, high humidity or high corrosive environment to avoid causing damage to this equipment. ◆ GP1+ is battery operated and controlled by our proprietary CPU and chipset . During the operation, please do not counteract the motors.
- Page 18 Incorrect Pitch-axis Incorrect Pitch-axis Use force pressing the LCD screen motor direction motor direction Fig 6-3 Fig 6-5 Common Errors ◆ During video shooting, why there are lost in frames? CMOS sensor in GoPro does not support high speed recording. Possible cause:...
-
Page 19: Legal Notices
Gazercam Limited Trademark declaration WENPOD is registered trademark of Gazercam Limited All trademarks, trade names and products mentioned herein belong to their respective owners. Limitation of Liability The contents of this manual are in accordance with the status quo, unless applicable the laws required, Gazercam Limited does not provide any kind of explicit or implied guarantee a particular purpose. - Page 20 Electronic equipment This equipment should not be used in any premises that electronic equipment is prohibited. It will interfere with other electronic equipment or cause other hazards. Children precautions This device and its accessories may contain small parts. Keep the device and its accessories out of the reach of children. Children could damage the device and its accessories inadvertently, or swallow small parts and may cause choking or other hazard.
- Page 21 www.gazercam.com...
Need help?
Do you have a question about the GP1+ and is the answer not in the manual?
Questions and answers