
Related Manuals for SOUNDMASTER RCD1770


Summary of Contents for SOUNDMASTER RCD1770
- Page 1 DEUTSCH ITALIANO ENGLISH NORSK FRANÇAIS SVENSKA NEDERLANDS ČEŠTINA Hersteller Wörlein GmbH Tel.: +49 9103/71670 Gewerbestrasse 12 Fax.: +49 9103/716712 D 90556 Cadolzburg Email. info@woerlein.com GERMANY Web: www.woerlein.com RCD1770...
- Page 2 Safety, Environmental and Setup Instructions No objects filled with liquids, such as vases, ENVIRONMENTAL PROTECTION shall be placed on the apparatus. Do not dispose of this product with the normal household waste at the end of its life cycle. Return it to a collection ...
-
Page 3: Location Of Controls
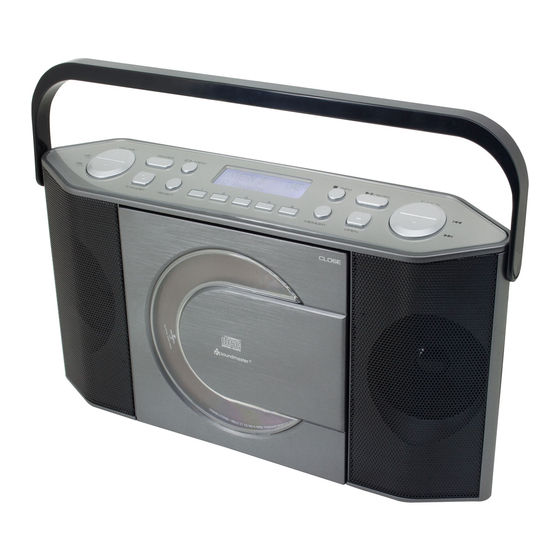
RCD1770 / English Instruction Manual LOCATION OF CONTROLS VOLUME UP PRESET 1-5 FAST KEYS SOURCE CD DOOR / MENU MEMORY / +10 DAB / FM ANTENNA CD DOOR OPEN LCD DISPLAY TUNE ▼ / / INFO AC SOCKET BATTERY COMPARTMENT... -
Page 4: Getting Started
RCD1770 / English Instruction Manual GETTING STARTED DAB/FM AERIAL Before using your radio for DAB or FM reception, pull out the telescopic antenna. You may need to adjust the position of the telescopic antenna for maxing signal strength. CONNECTING POWER Before connecting the power, check that the mains voltage on the rating plate which is same as the voltage in your area. - Page 5 RCD1770 / English Instruction Manual INTIAL SCAN When this unit is switched on for the first time at DAB mode, if not please press “SOURCE” button switching to DAB then press “SCAN”, the scanning display will be shown while the...
-
Page 6: Manual Tune
RCD1770 / English Instruction Manual RE-SCANNING FOR DAB STATIONS When first used, your radio scanned the DAB band for available stations. The station services found were then stored in your system's memory. You can re -scan the band at any time if you move to a different area or just to refresh the stored list of available stations. -
Page 7: Station Presets
RCD1770 / English Instruction Manual DL” (Dynamic Label Segment): This is a scrolling message giving real-time information-song titles, news headlines, etc. PROGRAMME TYPE: This describes the style of the program being broadcast. ENSEMBLE NAME: DAB Digital radio stations are broadcast in multiplexes. Each multiplex is a bundle of radio stations transmitted in a signal frequency. -
Page 8: Fm Mono/ Stereo
RCD1770 / English Instruction Manual FM RADIO This unit can also receive FM band radio stations and display RDS data (where broadcast). Press “SOURCE” button to select FM, Press “TUNE ▼/▲” button tune to FM station by 50 kHz steps, press and hold the “TUNE ▼/▲”... - Page 9 RCD1770 / English Instruction Manual CD OPERATION This player can playback CD, CD-R and CD-RW with CDDA, MP3 and wma audio format. Press “SOURCE” button to select CD Loading a disc: Press button to open the CD door.
-
Page 10: Program Play
RCD1770 / English Instruction Manual PROGRAM PLAY When playing a CD, you can store a random sequence of up to 60 tracks to play in your preferred order. To store a CD program: 1. In CD Stop mode, press the “MEMORY” button. -
Page 11: Care And Maintenance
RCD1770 / English Instruction Manual SYSTEM MENU This system menu only operate in standby. During standby mode, press “MENU” button to enter. to select as below then press “SELECT” to enter. Press the oder [Set Clock]: set the time clock by manual. -
Page 12: Troubleshooting
RCD1770 / English Instruction Manual TROUBLESHOOTING PROBLEM CAUSE / SOLUTION No sound / Volume not adjusted. Adjust the volume. power Mains cable not securely connected. Connect the mains cable properly. Batteries dead/incorrectly inserted. Insert (fresh) batteries correctly.
Need help?
Do you have a question about the RCD1770 and is the answer not in the manual?
Questions and answers